Are you ready for a burst of summer flavor? Raspberry Lemonade Bars are the perfect treat to cool you down and brighten your day. With buttery crust and tangy raspberry filling, they are easy to make and taste amazing. I’ll guide you through each step, plus share tips for fresh raspberries, baking secrets, and fun variations. Let’s jump in and make this sun-soaked delight together!
Ingredients
List of Ingredients
To make these raspberry lemonade bars, you need:
– 1 cup all-purpose flour
– 1/2 cup powdered sugar (plus extra for dusting)
– 1/4 teaspoon salt
– 1/2 cup cold unsalted butter, cubed
– 2 large eggs
– 1 cup granulated sugar
– 1/4 cup fresh lemon juice (about 2 lemons)
– Zest of 1 lemon
– 1 cup fresh raspberries (or thawed frozen raspberries)
– 1 tablespoon cornstarch
– 1/2 teaspoon baking powder
Substitutions for Common Ingredients
If you don’t have some ingredients, don’t worry! Here are some easy swaps:
– Instead of all-purpose flour, use gluten-free flour for a gluten-free version.
– If you run out of powdered sugar, blend granulated sugar until fine.
– Use coconut oil or margarine in place of cold unsalted butter.
– For a dairy-free option, replace eggs with a flax or chia seed mixture.
Tips for Choosing Fresh Raspberries
Fresh raspberries are key to these bars. Here’s how to pick the best ones:
– Look for firm berries that are bright in color.
– Avoid any raspberries that are mushy or have spots.
– Check for mold or moisture in the container.
– If you can, smell the raspberries. They should have a sweet, fruity scent.
– Buy your raspberries close to when you plan to use them for the best taste.
These tips help ensure your raspberry lemonade bars shine with flavor! For the full recipe, check out the entire guide.
Step-by-Step Instructions
Prepping the Oven and Baking Dish
Start by preheating your oven to 350°F (175°C). This helps create a nice, even bake. While that heats up, grab an 8×8-inch baking dish. You can grease it with butter or line it with parchment paper. Lining makes it easier to lift the bars out later.
Making the Crust
In a mixing bowl, combine 1 cup of all-purpose flour, 1/2 cup of powdered sugar, and 1/4 teaspoon of salt. Mix these dry ingredients well. Next, add in 1/2 cup of cold, cubed unsalted butter. Using a pastry cutter, or your fingers, mix until it looks like coarse crumbs. You want some pea-sized pieces of butter to stay.
Once mixed, take this crumbly mixture and press it into the bottom of your prepared dish. Make sure it’s even. Bake the crust for 15 minutes until it’s just lightly golden around the edges.
Preparing the Filling and Combining Layers
While the crust bakes, let’s make the filling. In a separate bowl, whisk together 2 large eggs, 1 cup of granulated sugar, 1/4 cup of fresh lemon juice, the zest of 1 lemon, and 1/2 teaspoon of baking powder. You want this mixture to be smooth.
Now, for the raspberries! Take 1 cup of fresh raspberries and toss them in another bowl with 1 tablespoon of cornstarch. This helps thicken the filling. Carefully fold these coated berries into your lemon mixture. Be gentle to keep the raspberries whole.
Once your crust is baked, pour this raspberry-lemon filling right over it. Spread it out evenly. Bake this in the oven for another 20-25 minutes. The filling should be set but still have a slight jiggle in the center.
After baking, let the bars cool completely in the pan. Then, move them to the fridge. Chill them for at least 2 hours. This helps the bars set up nicely. When you’re ready, dust them with extra powdered sugar and cut them into squares. Enjoy your flavorful summer delight!
For the full recipe, check out the complete guide.
Tips & Tricks
Perfecting the Lemonade Flavor
To enhance the lemonade flavor, use fresh lemon juice. It brings bright notes and tang. Zesting the lemon adds a lovely aroma and flavor. For a twist, add a splash of lemon extract. This small change elevates the taste. Balance the sweetness with the tartness of raspberries. You want a refreshing punch in every bite.
How to Avoid Overbaking
To prevent overbaking, watch the filling closely. When the edges are set, but the center jiggles, it’s ready. Remove it from the oven right away. Overbaking makes the bars dry and less enjoyable. Cooling the bars in the pan also helps them set. Chill them in the fridge for a firm texture.
Presentation Tips for Serving
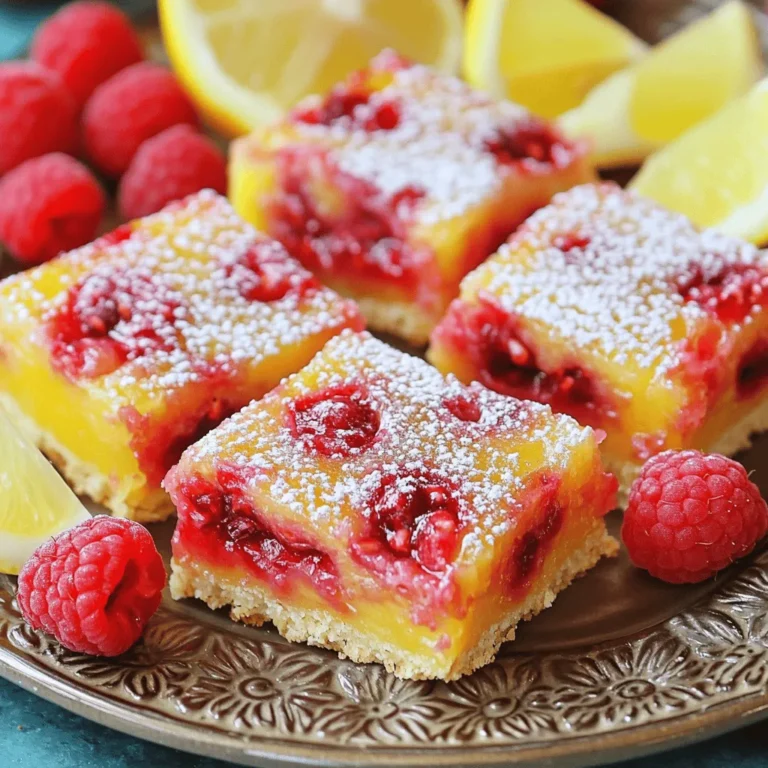
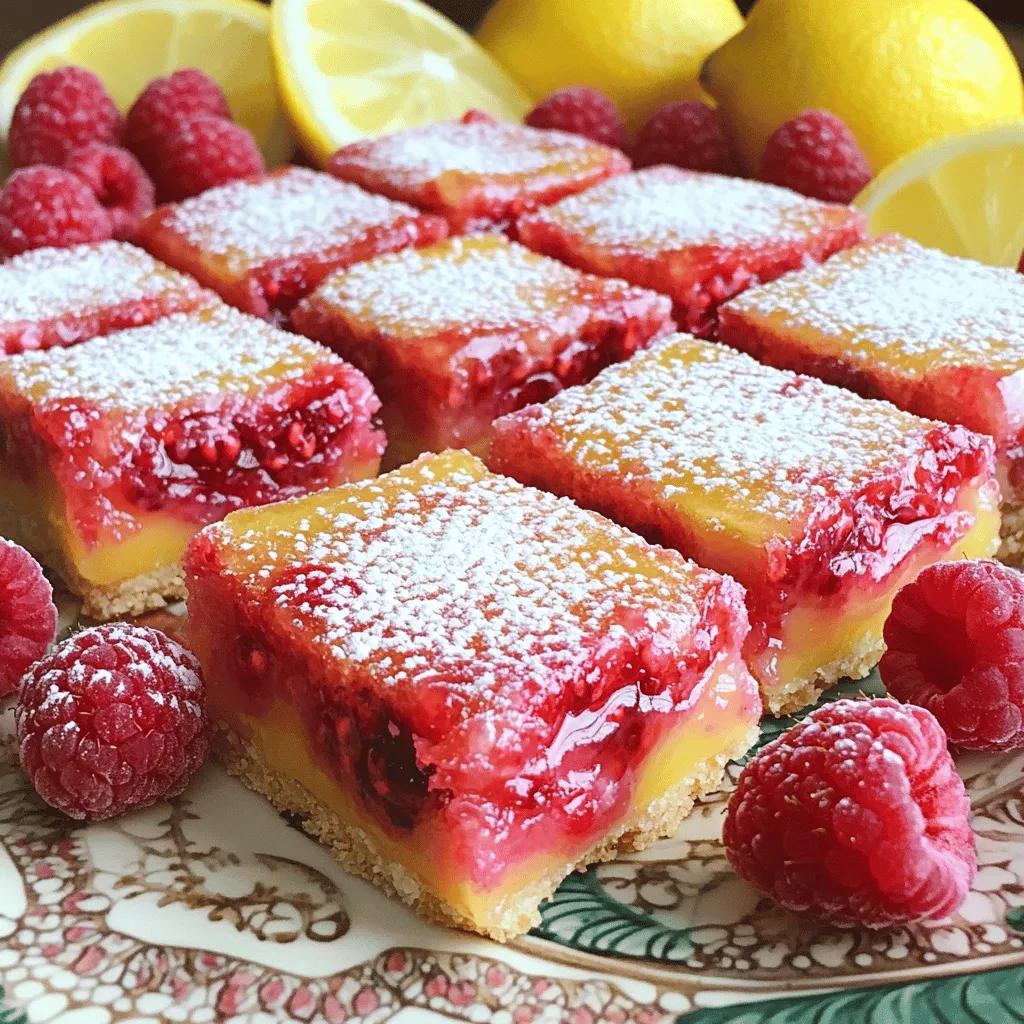
For a stunning presentation, slice the bars evenly into squares. Dust the top with powdered sugar for a touch of elegance. Arrange them on a colorful platter. Garnish with fresh raspberries and lemon wedges. This adds color and freshness to the dish. Your guests will be impressed by the beautiful display.
Variations
Alternative Fruit Combinations
You can mix up the flavors with different fruits. Try blueberries for a sweet twist. Strawberries add a fun touch, too. If you love tropical flavors, mango works great. Each fruit gives a fresh taste, making your bars unique. Just remember to adjust the sugar based on the fruit’s sweetness.
Gluten-Free Adaptation
No worries if you need gluten-free bars! Swap the all-purpose flour for a gluten-free blend. Make sure it includes xanthan gum for the right texture. The rest of the recipe stays the same. You still get that tasty flavor and soft texture.
Vegan Modifications
To make these bars vegan, replace the eggs with a flax egg. Mix one tablespoon of ground flaxseed with three tablespoons of water. Let it sit for five minutes to thicken. Use coconut oil instead of butter for the crust. You can enjoy these fruity treats without eggs or dairy!
For the full recipe, check out Raspberry Lemonade Bliss Bars .
Storage Info
How to Store Leftover Bars
To keep your Raspberry Lemonade Bars fresh, store them in an airtight container. Place parchment paper between layers to prevent sticking. You can keep them in the fridge for a cool treat.
Freezing Raspberry Lemonade Bars
You can freeze these bars for longer storage. First, cut them into squares. Then, wrap each square in plastic wrap. Place all wrapped bars in a freezer bag. They stay good for about three months.
How Long Do They Last?
When stored in the fridge, the bars last about one week. If frozen, they last around three months. Just thaw them in the fridge before serving. Enjoy the fresh taste of summer any time! For the full recipe, check out the Raspberry Lemonade Bliss Bars!
FAQs
Can I use frozen raspberries instead of fresh?
Yes, you can use frozen raspberries. Just thaw them first. Drain any extra juice. Lightly coat the thawed raspberries with cornstarch. This helps keep them from sinking in the filling. Using frozen raspberries can work well, especially when fresh ones are not in season.
How do I know when the bars are done baking?
To tell if the bars are done, look for a few signs. The filling should be set but still jiggle slightly in the center. The edges may turn a light golden color. If you insert a toothpick, it should come out clean or with a few moist crumbs. Keep an eye on the time, usually around 20-25 minutes after adding the filling.
What are some ideas for serving Raspberry Lemonade Bars?
There are many fun ways to serve these bars. You can dust them with powdered sugar for a nice touch. Pair them with whipped cream for a creamy contrast. Fresh mint leaves can add an extra pop of color. Serve them on a pretty platter with lemon slices and raspberries for a beautiful display. Consider serving them with iced tea or lemonade for a refreshing treat. For the full recipe, check out the Raspberry Lemonade Bliss Bars section above.
This blog post covered how to make delicious Raspberry Lemonade Bars. We explored the key ingredients and offered helpful substitutions. I shared tips for choosing fresh raspberries and explained step-by-step instructions for baking. You learned methods to enhance flavor and avoid overbaking. We also delved into variations, storage options, and answered frequent questions.
In the end, these bars are easy to make and perfect for any occasion. Enjoy every bite!