Craving a sweet treat but short on time? No-Bake Cheesecake Jars are the answer! These simple and delicious desserts come together quickly with just a few ingredients. Imagine creamy cheesecake layers, topped with fresh berries, all in a fun jar. Perfect for any occasion, they’re sure to impress. Let me guide you through this easy recipe and share tips to make them truly special!
Ingredients
Essential Ingredients for No-Bake Cheesecake Jars
To create delightful no-bake cheesecake jars, you need a few key ingredients. Here’s a simple list to get you started:
– 1 cup graham cracker crumbs
– 4 tablespoons unsalted butter, melted
– 1 cup cream cheese, softened at room temperature
– 1/2 cup powdered sugar
– 1 teaspoon pure vanilla extract
– 1 cup heavy whipping cream, chilled
– 1 cup mixed fresh berries (strawberries, blueberries, raspberries)
– Fresh mint leaves for garnish (optional)
Each ingredient plays an important role in making these jars a hit. The graham cracker crumbs form a delicious crust that adds crunch. The melted butter helps bind the crumbs, giving the base a rich flavor. Cream cheese gives the filling its creamy texture, while powdered sugar adds sweetness. Vanilla extract enhances the taste, making it even more inviting.
Chilled heavy whipping cream is crucial for a light and fluffy filling. The mixed fresh berries add a burst of flavor and color on top. Finally, a mint leaf garnish can elevate the presentation.
These ingredients make it easy to whip up an impressive dessert without baking. You can enjoy the sweet, creamy, and fruity layers in every spoonful. For the full recipe, check out the No-Bake Cheesecake Jars 🥄.
Step-by-Step Instructions
Preparing the Crust
To make the crust, you first need to mix graham cracker crumbs and melted butter. In a medium bowl, combine:
– 1 cup graham cracker crumbs
– 4 tablespoons unsalted butter, melted
Stir until the crumbs look sandy and are coated evenly. Next, grab small glass jars or dessert cups. Spoon about 2 tablespoons of the mixture into the bottom of each jar. Use the back of a spoon to press the crumbs down firmly. This creates a solid base for your cheesecake.
Making the Cheesecake Filling
Now, let’s move on to the filling. In a clean bowl, beat 1 cup of softened cream cheese with an electric mixer. Mix until it is smooth and creamy. Then, add:
– 1/2 cup powdered sugar
– 1 teaspoon pure vanilla extract
Continue mixing until it is lump-free. In another bowl, pour in 1 cup of chilled heavy whipping cream. Whip this with an electric mixer on high speed until you see stiff peaks form. This means your cream is fluffy and ready. Gently fold the whipped cream into the cream cheese mixture using a spatula. Be careful not to deflate the cream. This keeps your filling light and fluffy.
Assembling the Jars
Now it’s time to layer the jars! Use a spoon to fill each jar with the cheesecake mixture, leaving about a quarter of the jar empty. Level the top with a spatula for a nice finish. After this, generously top each jar with:
– 1 cup mixed fresh berries (like strawberries, blueberries, and raspberries)
If you want, mash the berries lightly with a fork to release some juice. This adds extra flavor! Cover the jars with lids or plastic wrap. Chill them in the fridge for at least 2 hours. For the best texture, let them sit overnight. Just before serving, you can add a few fresh mint leaves for a pop of color.
For the full recipe, refer to the provided details.
Tips & Tricks
Texture and Flavor Enhancements
To get a creamy cheesecake filling, start with soft cream cheese. It should sit at room temperature for at least 30 minutes. This step helps it mix smoothly. When mixing, use an electric mixer on medium speed. This keeps the texture light and fluffy.
For sweetness, taste your mixture before adding all the sugar. Some may prefer less sweetness. You can also add a squeeze of lemon juice. It brightens the flavor and balances the sweetness.
Presentation Tips
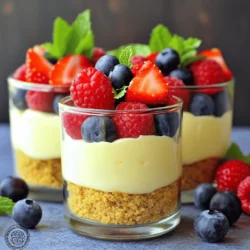
Garnishing your jars can make a big difference. Use fresh berries on top for color and taste. Strawberries, blueberries, and raspberries work well together. You can even mash them slightly for extra flavor.
When serving, use clear jars to show off the layers. A neat layer of cheesecake should be visible. Add a mint leaf on top for a fresh touch. This simple addition adds elegance and color.
Try these tips to elevate your no-bake cheesecake jars. For a complete recipe, check out the full recipe above.
{{image_4}}
Variations
Flavor Variations
You can have fun with flavors in your no-bake cheesecake jars. Try adding lemon or chocolate cheesecake fillings. Lemon adds a bright, zesty taste. Chocolate gives a rich, sweet twist. Both options are easy to make and very tasty!
For toppings, think about using seasonal fruits. Ripe strawberries in spring or peaches in summer can change the whole dish. You can even mix fruits to create a colorful layer. This way, your jars look as good as they taste!
Dietary Alternatives
If you need gluten-free options, there are easy swaps for the crust. Use crushed gluten-free cookies or nuts. These alternatives will keep the same great taste without any gluten.
For those who can’t have dairy, don’t worry! You can substitute cream cheese with a dairy-free option. Look for vegan cream cheese or use blended silken tofu. Both will still give you a creamy texture without the dairy. Enjoy making these jars fit your diet!
For the Full Recipe, check the earlier sections!
Storage Info
How to Store No-Bake Cheesecake Jars
To keep your no-bake cheesecake jars fresh, use airtight containers. Glass jars work best, as they seal tightly. If you use plastic wrap, ensure it covers the jars completely. This helps prevent any drying out or unwanted odors.
Store the jars in the fridge for up to five days. This chilling time lets the flavors meld and enhances the taste. For the best texture, wait at least two hours before serving. However, if you have time, letting them sit overnight is even better.
Freezing Options
Can you freeze no-bake cheesecake jars? Yes, you can freeze them! This is a great option if you want to make them ahead of time. To freeze, cover each jar with a lid or plastic wrap. Place them in the freezer for up to three months.
When you’re ready to eat them, move the jars to the fridge. Let them thaw overnight. Avoid using a microwave to speed up the process, as this can ruin the texture. Once thawed, serve them cold, and enjoy the creamy goodness.
FAQs
Common Questions About No-Bake Cheesecake Jars
How long do no-bake cheesecakes last?
No-bake cheesecakes keep well in the fridge for about 3 to 5 days. Make sure to cover them tightly. This helps keep them fresh and tasty.
Can I use different jar sizes for serving?
You can use any jar size you like! Just adjust the layers to fit. Smaller jars make cute treats for parties. Larger jars can serve as a dessert for a family meal.
Ingredient Substitution Queries
What can be used instead of cream cheese?
You can use ricotta cheese or Greek yogurt instead of cream cheese. These options can give a different taste and texture. They can also make your dessert lighter.
Is there an alternative to graham cracker for the crust?
Yes! You can use crushed cookies like Oreo or vanilla wafers. You can also try using almond flour for a gluten-free option. Just mix it with melted butter, like you would with graham crackers.
You learned how to make quick and tasty no-bake cheesecake jars. We covered essential ingredients, steps to prepare, and tips to improve flavor and look. I shared variations to suit different tastes and needs, along with storage tips.
These jars are simple, fun, and great for any occasion. You can mix flavors, adjust sweetness, and present beautifully. Enjoy crafting these treats with fresh ingredients and your personal touch!