Get ready to indulge in a dessert that’s both delightful and easy to make: Chocolate Kataifi Bars! In this post, I’ll share a simple recipe that showcases the unique texture of kataifi pastry, combined with rich chocolate and nuts. Whether you’re a baking novice or a seasoned pro, this treat is sure to impress your friends and family. Let’s jump right in and whip up a sweet masterpiece!
Ingredients
List of Required Ingredients
– 200g kataifi pastry
– 100g unsalted butter, melted
– 200g dark chocolate, finely chopped
– 150g sweetened condensed milk
– 50g chopped nuts (walnuts or pistachios)
– 1 teaspoon pure vanilla extract
– A pinch of sea salt
– 1 tablespoon granulated sugar (optional)
Ingredient Substitutions
You can change nuts easily. Use almonds or hazelnuts if you prefer. For a vegan version, swap the butter with coconut oil and use dairy-free chocolate. These changes keep the bars tasty and fun.
Importance of Ingredient Quality
Using high-quality chocolate is key. It makes the filling rich and smooth. Look for chocolate with at least 70% cocoa for the best flavor. The kataifi pastry also matters. Choose fresh kataifi for a great texture. It should be soft and easy to work with. This makes your Chocolate Kataifi Bars even more delightful.
Step-by-Step Instructions
Preparation Steps
1. Preheat the Oven: First, preheat your oven to 180°C (350°F). This ensures even cooking.
2. Prepare the Baking Pan: Line an 8×8 inch (20×20 cm) square baking pan with parchment paper. Leave some paper hanging over the sides. This makes it easy to lift out later.
3. Shred Kataifi Pastry: In a bowl, take the kataifi pastry. Carefully shred it into fine strands. This helps it bake evenly.
4. Mix with Butter: Drizzle the melted butter over the shredded kataifi. Toss it well to coat all the strands. This adds flavor and keeps them crispy.
Baking Process
1. Initial Baking: Spread half of the buttered kataifi mixture in the pan. Press it down firmly with a spatula or your hands. Bake in the preheated oven for about 15 minutes. It should turn a lovely golden brown.
2. Create the Chocolate Filling: While the kataifi bakes, prepare the chocolate filling. In a saucepan over low heat, combine finely chopped dark chocolate, sweetened condensed milk, vanilla extract, and a pinch of sea salt. Stir until smooth and glossy. Remove from heat and fold in the chopped nuts.
Layering and Final Baking
1. Pour the Chocolate Mixture: After the kataifi base bakes, carefully pour the chocolate filling over it. Spread it evenly with a spatula.
2. Top with Remaining Kataifi: Take the rest of the kataifi and spread it over the chocolate layer. Press this down gently to make it compact. If you want more sweetness, sprinkle some granulated sugar on top.
3. Final Baking Steps: Return the pan to the oven. Bake for another 20-25 minutes. The top should be golden and crispy.
4. Cooling Instructions: Once baked, let the bars cool in the pan for 30 minutes. Use the parchment overhang to lift the dessert out of the pan. Transfer it to a cutting board and cut into squares or rectangles.
For more details, check the Full Recipe.
Tips & Tricks
Perfecting Your Kataifi Bars
To achieve a crispy top layer, focus on the baking time. Bake until golden brown, about 20-25 minutes. Keep an eye on it. You want that crunchy texture.
For even baking, ensure your kataifi is spread evenly in the pan. Press it down well to form a solid base. This helps the heat circulate better, giving you the perfect bake.
Serving Suggestions
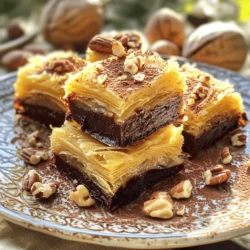
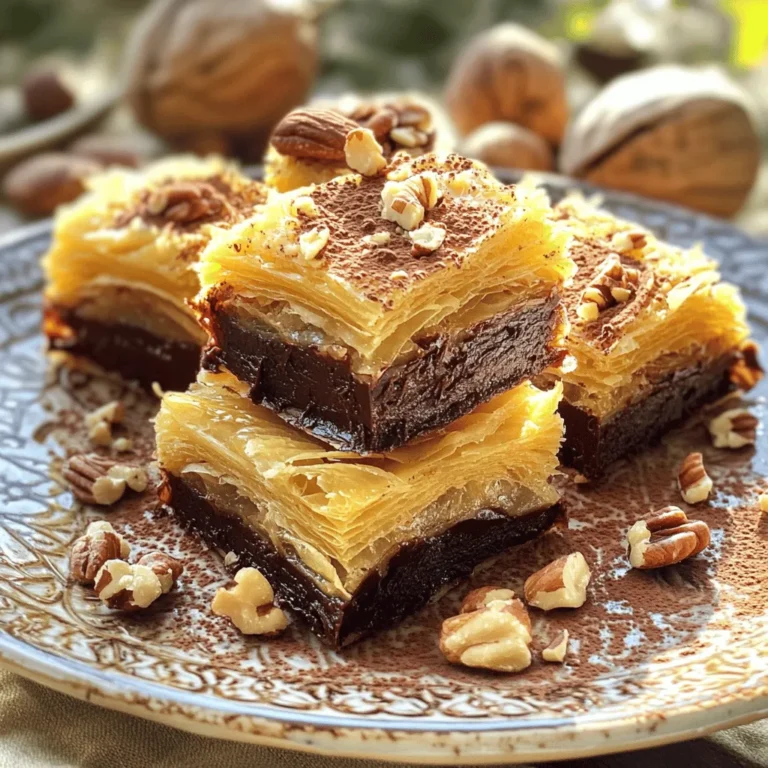
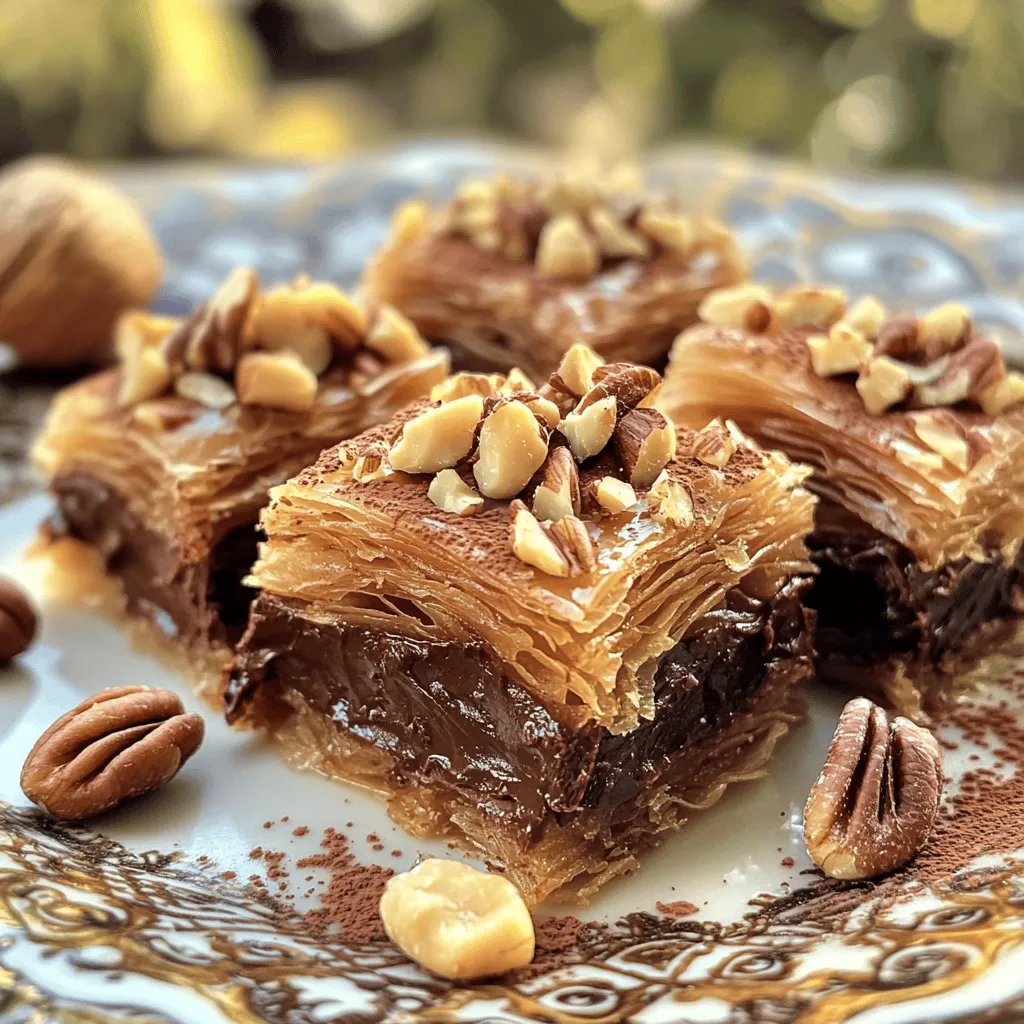
Presentation matters! Serve your kataifi bars on a nice plate. Dust them with cocoa powder or powdered sugar for that fancy touch. Adding whole nuts on top makes them look even better.
Pair these bars with a glass of milk or a cup of coffee. They also go well with a sweet dessert wine. Enjoy them with a side of fresh fruit for a fresh taste.
Troubleshooting Common Issues
If your kataifi layer is soggy, check your baking time. It should be golden brown before adding the chocolate. You can also try baking it a bit longer next time.
To ensure your chocolate mixture is smooth, melt the chocolate on low heat. Stir constantly until it is well combined. If it gets too thick, add a little more sweetened condensed milk to loosen it.
Variations
Flavor Variations
You can change the taste of your Chocolate Kataifi Bars easily. Adding spices like cinnamon or cardamom can bring warmth. A few drops of almond or orange extract will give a nice twist. You can also mix in fruit. Diced strawberries or bananas can add a fresh touch.
Dietary Variations
If you need a gluten-free version, look for gluten-free kataifi. Some brands offer this option, making it easy to enjoy. For a nut-free treat, just skip the nuts or use seeds. You can also make these bars dairy-free. Use coconut milk instead of sweetened condensed milk. This makes it creamy without dairy.
Size and Shape Adjustments
You can make larger or smaller batches based on your needs. If you want mini bars, use a smaller pan. Just adjust the baking time to ensure they cook evenly. For fun shapes, use cookie cutters after baking. This adds a playful twist to your dessert.
Storage Info
How to Store Chocolate Kataifi Bars
To keep your Chocolate Kataifi Bars fresh, store them properly. First, let the bars cool completely. Once cooled, cut them into squares. Place them in an airtight container. If you want to refrigerate them, use a glass or plastic container with a tight seal. This helps keep moisture out. You can also wrap the bars in plastic wrap before placing them in the container. For long-term storage, freeze the bars. Use freezer-safe bags or containers. Make sure to label them with the date for easy tracking.
Shelf Life
Chocolate Kataifi Bars can last for about a week at room temperature. Store them in a cool, dry place. If kept in the fridge, they can last up to two weeks. Signs that the bars have gone bad include a change in smell or texture. If they look dry or have an off smell, it’s best to toss them. Trust your senses to determine if they are still good.
Reheating Instructions
To enjoy leftover Chocolate Kataifi Bars, you can reheat them gently. The best method is to use a microwave. Place a bar on a microwave-safe plate. Heat it for about 10-15 seconds. Check to see if it’s warm enough. You can also use an oven for reheating. Set it to a low temperature, around 150°C (300°F). Place the bars on a baking sheet for about 5-10 minutes. Avoid high heat, as it can make them soggy. Enjoy them warm for a delightful treat!
FAQs
What is kataifi pastry?
Kataifi pastry is a thin, shredded dough. It looks like fine noodles. This pastry is crispy, light, and very flaky. It absorbs flavors well. You can find it in Middle Eastern or Mediterranean recipes. When baked, it turns golden and crunchy. It adds a fun texture to desserts and is perfect for our bars.
Can I make these bars in advance?
Yes, you can easily make these bars ahead of time. Prepare the bars and let them cool. You can store them in an airtight container. Keep them in the fridge for up to a week. If you want to save them longer, freeze them for up to three months. Just remember to wrap them well. This keeps them fresh and tasty.
How do I customize the sweetness level?
You can adjust the sweetness easily. If you want them sweeter, add more sugar. You can also use a sweeter chocolate. Dark chocolate is rich, but milk chocolate is sweeter. You can also mix them to get the flavor you like. Taste as you go, and find your perfect level of sweetness!
Can I replace dark chocolate with other types?
Yes, you can use different types of chocolate. Milk chocolate makes the bars sweeter. White chocolate is also an option, but it lacks the deep flavor of dark chocolate. You can mix chocolates too! This way, you can create a unique taste that suits your preference.
You’ve learned how to make delicious chocolate kataifi bars. We covered the key ingredients, like kataifi pastry and quality chocolate. You now know how to customize the recipe with different nuts or vegan options. I shared tips for perfecting your bars and how to store them properly. Remember, using fresh, high-quality ingredients makes a big difference. Enjoy being creative as you try different flavors and shapes. Make this recipe your own and impress your family and friends!