Skip to content
DisclaimerTerms Of UseGDPR PolicyCookie Policy

mealinmoments

  • Home
  • Drinks
  • Appetizers
  • Dinner
  • Dessert
  • About
  • Contact
  • Privacy Policy
DisclaimerTerms Of UseGDPR PolicyCookie Policy

Megan

To make this dish, you need a few key ingredients: - 1 cup Arborio rice - 4 large onions, thinly sliced - 4 cups vegetable broth - 2 tablespoons olive oil - 2 tablespoons unsalted butter - 1 teaspoon sugar - 1 teaspoon dried thyme - 1 bay leaf - 1 cup Gruyère cheese, grated - Salt and pepper to taste - Fresh parsley, chopped (for garnish) These ingredients come together to create a rich and comforting dish. The Arborio rice gives the recipe a creamy texture. The onions add a deep sweetness, which enhances the overall flavor. Feel free to get creative with add-ins! You can include: - Sautéed mushrooms for earthiness - Cooked chicken or beef for protein - A splash of white wine for depth - Spinach or kale for extra greens These options can elevate the dish and cater to your preferences. Seasoning is key to flavor. Besides salt and pepper, you can try: - A pinch of nutmeg for warmth - A dash of balsamic vinegar for sweetness - Fresh thyme leaves for added aroma For garnishing, consider: - Crispy fried onions for crunch - Chopped chives for a fresh kick - A drizzle of truffle oil for luxury These touches will make your French Onion Soup Rice even more appealing and delicious. To start, I heat olive oil and unsalted butter in a large pot. I set the heat to medium until the butter melts. Then, I add four large onions, thinly sliced, into the pot. The key is to cook them slowly. I lower the heat to medium-low. I stir the onions often. This helps them caramelize nicely. After about 25 to 30 minutes, they turn golden brown. At this point, I sprinkle one teaspoon of sugar over the onions. This adds extra sweetness. I stir well and cook for another five minutes. This step builds a rich, deep flavor. Next, I add one cup of Arborio rice to the pot. I make sure to stir well, coating each grain in that sweet onion mix. Now, I carefully pour in four cups of vegetable broth. I also add one teaspoon of dried thyme and one bay leaf for extra flavor. I season with salt and pepper to taste. Then, I stir everything together and bring it to a gentle simmer. I cover the pot and let it cook for 18 to 20 minutes. I stir occasionally, watching for the rice to become tender. It should absorb most of the broth during this time. After cooking, I turn off the heat and remove the bay leaf. I then stir in half of one cup of grated Gruyère cheese. This makes the rice creamy and cheesy. For serving, I dish out the rice into bowls. I top each serving with the rest of the cheese. If I want a crispy finish, I place the bowls under the broiler for one to two minutes. Finally, I sprinkle fresh parsley on top for color and flavor. Enjoy this dish warm for a comforting meal. For the complete recipe, check out the Full Recipe. Caramelized onions are the heart of this dish. Start by using large onions. Slice them thin to help them cook evenly. Heat olive oil and butter in a large pot. Add the onions when the fat is hot. Stir the onions every few minutes. This keeps them from burning. Cook them slowly on medium-low heat. Aim for a deep golden brown color. This might take about 25-30 minutes. If they start to stick, add a splash of broth. Adding sugar helps enhance their sweetness. Arborio rice is key for its creamy texture. First, add the rice to the pot with the onions. Stir it well to coat each grain. This helps the rice absorb flavor. Next, pour in the vegetable broth. Bring the mixture to a gentle simmer. Cover the pot with a lid while it cooks. Let it simmer for 18-20 minutes. Stir occasionally to prevent sticking. The rice should be tender and absorb most of the broth. Cheese brings comfort to this dish. For the best melt, use Gruyère cheese. Stir half of the cheese into the rice after cooking. This ensures it melts evenly. For a special touch, top the bowls with the rest of the cheese. You can place the bowls under a broiler for a few minutes. This gives a nice, crispy finish to the cheese. Watch closely to avoid burning. Serve with fresh parsley on top for color. Enjoy the warmth of this cozy dish. {{image_4}} To make a creamy version of this dish, add some cream or milk. After you cook the rice, stir in 1/2 cup of heavy cream. This step makes the rice rich and smooth. Adding cream also balances the strong onion flavor. You can adjust the amount based on your taste. Serve it warm for a comforting meal. For a vegan option, swap the butter and cheese. Use olive oil instead of butter. Replace Gruyère with a vegan cheese or omit it. The dish will still be tasty and comforting. You can also add a splash of coconut milk for creaminess. This keeps the dish rich while staying plant-based. You can change the cheese to mix flavors. Try sharp cheddar for a bolder taste. Mozzarella melts well and gives a stretchy texture. Parmesan adds a salty kick. Experiment with different cheeses to find your favorite blend. Each cheese brings a unique flavor, enhancing the dish in its own way. For the full recipe, refer to the [Full Recipe]. After you make French onion soup rice, let it cool to room temperature. Place it in an airtight container. You can store it in the fridge for up to three days. When you’re ready to eat, check for any off smells or changes in texture. If you want to keep it longer, freezing is a great option. Transfer the cooled rice to a freezer-safe container. Make sure to leave some space for expansion. You can freeze it for up to three months. Just label the container with the date, so you know when to use it. To reheat, you can use the microwave or the stove. If using the microwave, add a splash of water or broth to keep it moist. Heat in short bursts, stirring in between. If using the stove, warm it over low heat with a bit of broth. Stir often until hot. For a crispy top, you can place it in the oven for a few minutes. Enjoy the rich flavors just like when you first made it! Yes, you can use regular rice instead of Arborio. However, Arborio rice is special. It has a higher starch content. This gives the dish a creamier texture. Regular rice may not absorb flavors as well. If you choose regular rice, adjust the cooking time. It usually cooks faster than Arborio. To make French onion soup rice gluten-free, use gluten-free broth. Many store-bought vegetable broths are gluten-free. Always check the label to be sure. The rest of the ingredients are naturally gluten-free. This makes it easy to enjoy a warm bowl without gluten. This dish pairs well with simple sides. Consider a fresh green salad for crunch. A slice of crusty bread complements the soup's warmth. You can also serve it with roasted vegetables. They add a nice touch of color and flavor to your meal. For a cozy night, serve with a glass of red wine. It enhances the flavors beautifully. For the full recipe, check out the details above. In this post, I covered key ingredients and instructions for making French Onion Soup Rice. You learned how to prepare and cook, plus tips for perfect onions and rice. Don’t forget the variations for making it creamy or vegan. Proper storage and reheating methods keep it fresh. My final thought: this dish is easy and fun. Enjoy making it your own and sharing with others!

French Onion Soup Rice Savory and Comforting Dish

If you crave warmth on a chilly day, French Onion Soup Rice is for you! This dish blends rich flavors

- 1 cup Biscoff spread - 1 cup cream cheese, softened at room temperature - 1 cup whipped topping (such as Cool Whip) - 1/4 cup powdered sugar - 1 teaspoon pure vanilla extract - A pinch of salt - Optional: crushed Biscoff cookies for garnish To make Biscoff fluff dip, you need simple and tasty ingredients. First, grab a cup of Biscoff spread. This creamy base gives the dip its rich flavor. Next, use one cup of softened cream cheese. This helps create a smooth and creamy texture. Add one cup of whipped topping to the bowl. This will keep the dip light and fluffy. Then, mix in 1/4 cup of powdered sugar. This adds sweetness and balances the flavors. Don’t forget a teaspoon of vanilla extract. It enhances the overall taste. A pinch of salt brings out the best in all the flavors. For a fun touch, you can sprinkle crushed Biscoff cookies on top before serving. This adds crunch and makes the dip even more appealing. Now that you have all the ingredients, you are ready to create a delicious Biscoff fluff dip! You can find the Full Recipe for easy steps to follow. Start by mixing the cream cheese and Biscoff spread. Use a large bowl for this. I find a hand mixer works best. Blend them on medium speed. Keep mixing until it’s smooth and creamy. You want no lumps in your mix. This step is key for the base. Next, add the powdered sugar and a pinch of salt. The sugar adds sweetness, while the salt balances it. Gradually mix these into your creamy base. Keep mixing until everything is combined and smooth. This should take about one to two minutes. Now, it’s time to fold in the whipped topping. Use a spatula or a large spoon for this part. Be gentle to keep the light and airy texture. Mix just until everything is combined. Avoid over-mixing to keep it fluffy. Pour in the vanilla extract next. This adds a lovely depth to your dip. Stir gently to ensure it spreads evenly. You want the vanilla to blend well with the other flavors. Transfer your fluffy dip into a nice serving bowl. Use a spatula to smooth the top for a pretty look. This dip is also great for presentation. If you want, sprinkle crushed Biscoff cookies on top. This adds a nice crunch and looks beautiful. Now for the fun part—dipping! Serve your fluff dip with graham crackers, fresh fruit, or more Biscoff cookies. Each of these adds a tasty touch. You can get creative with your dippables. Enjoy sharing this delightful treat with friends! To make the best Biscoff fluff dip, mix the cream cheese and Biscoff spread well. Start with room temperature cream cheese. This helps it blend smoothly. Use a hand mixer on medium speed. Avoid lumps for a perfect texture. Be careful not to overmix the whipped topping. Gently fold it in to keep the dip light. A common mistake is mixing too fast or too long. This can make the dip dense instead of fluffy. You can add different flavors to your Biscoff fluff dip. Try mixing in a bit of chocolate syrup or peanut butter for a twist. You can also use flavored whipped topping for more fun. Consider adding mix-ins like mini chocolate chips or crushed nuts. These give extra crunch and flavor. Just make sure they blend well without overpowering the Biscoff taste. For an elegant look, serve the dip in a clear bowl. This shows off its creamy layers. Use decorative bowls for a festive touch. Garnish with crushed Biscoff cookies on top. This not only looks nice but adds texture. Serve with an extra spoon for easy dipping. Enjoy your delightful Biscoff fluff dip! {{image_4}} You can mix up Biscoff Fluff Dip in fun ways. One great idea is to make a Chocolate Biscoff Fluff Dip. Just add cocoa powder or melted chocolate to the base. This adds a rich, sweet twist that pairs well with the Biscoff flavor. You can also try nutty spreads like almond or peanut butter. These spreads add a new taste and texture, making the dip even more exciting. If you need gluten-free options, use gluten-free cookies for dipping. You can also check for gluten-free Biscoff cookies. For those who want dairy-free, swap cream cheese with a dairy-free alternative. Use coconut cream or a nut-based cream cheese. Both keep the taste yummy while meeting dietary needs. Seasonal flavors make this dip even more fun. In fall, add pumpkin spice to create a cozy vibe. Just mix in a teaspoon or two of pumpkin spice to the base. For the holidays, consider adding cinnamon or nutmeg. You can also use festive sprinkles on top to make it look special. These small changes keep your Biscoff Fluff Dip fresh and exciting all year long! For the full recipe, check out the complete guide to making this delicious treat! To keep your Biscoff Fluff Dip fresh, store it in an airtight container. This helps prevent air from getting in and drying out the dip. Make sure the lid is on tightly. If you do not have an airtight container, you can wrap the bowl tightly with plastic wrap. This will also do the trick. When stored in the fridge, Biscoff Fluff Dip lasts about 4 to 7 days. Always check for any off smells or changes in color. If it looks or smells funny, it's best to toss it out. Freshness is key for enjoying this sweet treat. Yes, you can freeze Biscoff Fluff Dip! To freeze, place it in an airtight container, leaving some space at the top for expansion. This dip can keep up to 2 months in the freezer. When you are ready to enjoy it, move it to the fridge to thaw overnight. After thawing, give it a good stir before serving. It might need a little fluffing up! Enjoy it again just like the first time. For the full recipe, check out the initial section. You can serve Biscoff Fluff Dip with many tasty treats. Here are some great dippables: - Graham crackers - Fresh fruit slices (like apples and bananas) - Pretzels for a salty crunch - Biscoff cookies for extra flavor - Marshmallows for a sweet touch These options pair well with the rich, sweet flavors of the dip. Try mixing and matching to find your favorite combination! Yes, you can make Biscoff Fluff Dip ahead of time. Just follow these tips: - Prepare the dip and store it in an airtight container. - Keep it in the fridge until you are ready to serve. - It stays fresh for about 3 days. This makes it great for parties or snacks on busy days. Making Biscoff Fluff Dip is quick and easy. Here’s the time breakdown: - Prep time: 15 minutes - Total time: 15 minutes You can whip this up in no time, making it a perfect treat for any occasion! Biscoff Fluff Dip can fit some special diets. Here are some options: - For gluten-free, check the Biscoff spread and cookies. - For vegan, use dairy-free cream cheese and whipped topping. These swaps help make the dip friendly for different diets while keeping it delicious! You can use homemade whipped cream instead of whipped topping. Here’s how: - Make sure your whipped cream is firm, not too soft. - Use the same amount as the whipped topping in the recipe. This change adds a fresh taste to the dip and can elevate your dip game! For a full recipe of Biscoff Fluff Dip, check out the ingredients and instructions above. Enjoy! Biscoff Fluff Dip is easy and fun to make. You mix simple ingredients for a delicious treat. The steps include blending, folding, and sampling. You can add your twists with flavors or garnishes. It’s perfect for any occasion and sure to impress. Store it right to enjoy later or share with friends. I hope you try this dip and customize it to your taste. Enjoy creating your unique version!

Biscoff Fluff Dip Delightful and Easy Recipe

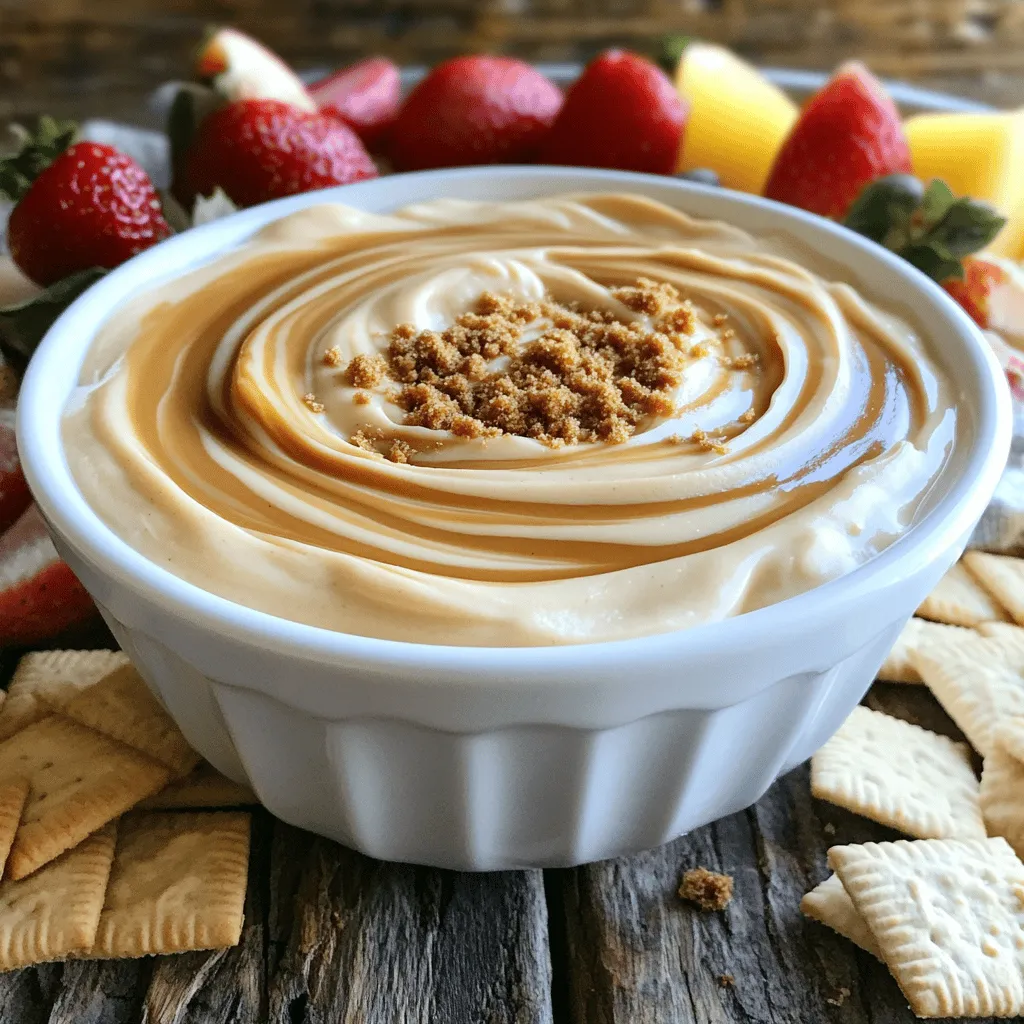
Are you ready to indulge in a sweet treat that’s both easy and delightful? This Biscoff Fluff Dip recipe mixes

To make this easy Pad Thai with shrimp, you will need: - 200g rice noodles - 200g shrimp, peeled and deveined - 2 tablespoons tamarind paste - 3 tablespoons soy sauce - 1 tablespoon fish sauce - 1 tablespoon sugar - 2 tablespoons vegetable oil - 2 cloves garlic, minced - 1 large egg - 1 cup bean sprouts - 2 green onions, thinly sliced - 1 tablespoon crushed peanuts - Fresh cilantro, for garnish - Lime wedges, for serving You can swap some ingredients if you want. If you don’t have tamarind paste, use lime juice or vinegar for a tangy taste. You can replace shrimp with chicken or tofu for a different protein. If you want a gluten-free option, use tamari instead of soy sauce. For a sweeter touch, try maple syrup instead of sugar. To make your dish even better, consider these garnishes: - Extra crushed peanuts for crunch - Fresh cilantro for a pop of green - Lime wedges for a zesty kick - Sliced red chili for heat These options will enhance your meal and make it look great. First, boil water in a large pot. Add 200g of rice noodles once the water is boiling. Cook them according to the package instructions until they are al dente. This usually takes about 5 to 7 minutes. After cooking, drain the noodles and rinse them under cold water. This stops the cooking process and keeps them from sticking. Set the noodles aside in a bowl for later. In a medium bowl, mix together the tamarind paste, soy sauce, fish sauce, and sugar. You will need 2 tablespoons of tamarind paste, 3 tablespoons of soy sauce, 1 tablespoon of fish sauce, and 1 tablespoon of sugar. Whisk these ingredients until smooth. Make sure the sugar dissolves completely. This sauce will give your Pad Thai its unique, savory flavor. Take a large skillet or wok and heat 2 tablespoons of vegetable oil over medium heat. Once the oil is hot, add 2 cloves of minced garlic. Sauté for about 30 seconds until fragrant. Then, add 200g of peeled and deveined shrimp. Cook the shrimp for 2 to 3 minutes, stirring often. They will change color and turn pink when done. Transfer the shrimp to a plate and set them aside. In the same skillet, push the shrimp to one side and crack 1 large egg into the empty space. Scramble it gently until just set, then mix it back in with the shrimp. Now it's time to bring everything together! Add the cooked rice noodles to the skillet. Pour your Pad Thai sauce over the noodles. Use tongs or a spatula to gently toss everything together. Make sure the noodles are well coated in sauce. Next, stir in 1 cup of bean sprouts and the thinly sliced green onions. Cook for an additional 1 to 2 minutes until everything is heated through. The bean sprouts should be slightly wilted. Now your Pad Thai is ready to serve! Plate it up and enjoy this shrimp-tastic dish. For the full recipe, check the details above! To ensure your shrimp are perfectly cooked, start with fresh shrimp. Look for shrimp that are pink and firm. Avoid shrimp that smell off or have a slimy texture. When cooking, heat your oil until it's hot, then add the shrimp. Cook them for 2-3 minutes until they turn pink and opaque. This shows they are done. Overcooking shrimp makes them tough, so watch closely. If you want to add flavor, marinate your shrimp in a mix of soy sauce and lime juice for 15 minutes before cooking. You can easily customize this dish for different diets. If you want a vegetarian option, swap shrimp for tofu or extra veggies. To make it gluten-free, use rice noodles and tamari instead of soy sauce. If you want a lower-carb dish, try zucchini noodles instead of rice noodles. You can play with flavors too. Add more lime juice for brightness or chili flakes for heat. If you have leftovers, store them in an airtight container. Keep them in the fridge for up to 2 days. To reheat, use a skillet over medium heat. Add a splash of water or oil to prevent sticking. Stir often until heated through. If you want to freeze your Pad Thai, do so before adding the bean sprouts and green onions. These fresh ingredients taste best when added just before serving. {{image_4}} You can easily make Pad Thai without shrimp. Use tofu or more veggies instead. Firm tofu works well. Just press it to remove extra water, then cube it. Sauté it until it’s golden brown. Add your favorite veggies like bell peppers, carrots, or snap peas. This makes a tasty vegetarian dish. If you want to switch up the protein, chicken or beef are great choices. You can also use scallops or even crab for a seafood twist. Just remember to adjust cooking times. For chicken or beef, slice it thin and cook it until it’s no longer pink. Seafood needs less time than shrimp, so watch it closely. Want to change the flavor? You can play with the sauce. Try adding a hint of lime juice or a splash of coconut milk for creaminess. If you like heat, toss in some chili flakes or sriracha. For a sweet twist, add pineapple chunks. These small changes create new taste profiles and keep meals exciting. For the full recipe, refer to the earlier section. To keep leftover Pad Thai fresh, place it in an airtight container. Store it in the fridge for up to three days. This helps keep the flavors intact. Avoid leaving it out at room temperature for too long. To reheat your Pad Thai, use a skillet over medium heat. Add a splash of water or oil to help it heat evenly. Stir frequently for about five minutes. You can also use a microwave. Heat it in short bursts, stirring in between. If you want to freeze Pad Thai, first let it cool completely. Divide it into portions and store them in freezer-safe bags. Squeeze out as much air as possible. It can last for up to two months in the freezer. To eat, thaw it overnight in the fridge before reheating. If you don't have tamarind paste, you can use lime juice. Mix it with brown sugar for sweetness. Another option is to use rice vinegar. It adds a nice tang, but it won't be as rich as tamarind. To reduce spice, use less chili sauce or omit it entirely. You can also add more sugar or lime juice. This will balance flavors without heat. Serve with extra lime wedges to let everyone adjust their spice level. Yes, you can make Pad Thai ahead of time. Cook and store the noodles and sauce separately. Keep shrimp and veggies in the fridge. When ready to eat, just reheat everything together in a pan. The best noodles for Pad Thai are rice noodles. They are soft and chewy, perfect for holding the sauce. Look for flat rice noodles, often labeled as "Pad Thai noodles." Make sure to soak them until they are tender. For a full recipe, check out the [Full Recipe]. You learned about Pad Thai’s key ingredients, cooking steps, and helpful tips. You saw how to customize the dish for your taste and needs. Remember to store leftovers properly to keep them fresh. Whether you enjoy shrimp or prefer a vegetarian option, Pad Thai is a fun dish to master. With these steps and ideas, you can create a tasty meal that suits everyone. Enjoy your cooking journey and have fun with it!

Easy Pad Thai with Shrimp Quick and Tasty Recipe

Craving something quick, tasty, and satisfying? My Easy Pad Thai with Shrimp is your answer! This dish combines fresh shrimp,

- 1 pound ground chicken - 1/2 cup breadcrumbs (preferably seasoned) - 1/4 cup finely grated Parmesan cheese - 2 cloves garlic, minced - 1/4 cup fresh parsley, finely chopped - 1 large egg, lightly beaten - 1 teaspoon dried Italian herbs - 1/2 teaspoon kosher salt - 1/4 teaspoon freshly ground black pepper - 1/4 cup marinara sauce (plus extra for serving) - 1 tablespoon extra virgin olive oil These ingredients come together to create a juicy and tasty dish. Ground chicken is lean and absorbs flavors well. The breadcrumbs help bind the meatloaf and keep it moist. Parmesan adds a rich, cheesy flavor. Fresh garlic gives a strong aroma and taste to the dish. Parsley brightens everything up with its fresh color and taste. You can swap ground chicken for ground turkey or beef if you prefer. Gluten-free breadcrumbs work well for those avoiding gluten. Fresh herbs can replace dried ones, giving a fresher taste. When buying chicken, look for fresh, pink meat with no smell. Choose high-quality Parmesan cheese for the best flavor. Fresh garlic is a must—look for firm cloves with no soft spots. Using the best ingredients improves your meatloaf's flavor and texture. For the full recipe, check the Full Recipe section. - Preheat oven to 375°F (190°C). - Prepare the baking sheet with parchment paper. I always start by preheating my oven. This step ensures the meatloaves cook evenly. While the oven warms up, I line a baking sheet with parchment paper. This makes cleanup fast and easy. - Combining ground chicken and spices. - Incorporating wet ingredients. Next, I take a large bowl to mix my ingredients. I combine 1 pound of ground chicken, 1/2 cup of breadcrumbs, and 1/4 cup of grated Parmesan cheese. Then, I add 2 cloves of minced garlic and 1/4 cup of fresh parsley. I also include 1 large egg, 1 teaspoon of dried Italian herbs, 1/2 teaspoon of kosher salt, and 1/4 teaspoon of black pepper. I mix everything gently. It’s key not to overmix. If you do, the meatloaf can turn out dense and tough. - Forming meatloaves. - Creating indentations for marinara sauce. - Baking time and temperature check. Now, I shape the mixture into small meatloaf portions. I aim for each one to be about 2-3 inches long. I place them on the lined baking sheet. I make sure to leave space between each loaf for even cooking. With a spoon or my thumb, I create a shallow indentation in the center of each meatloaf. I fill each dent with about a teaspoon of marinara sauce. This sauce adds flavor as the meatloaves bake. Next, I lightly drizzle each meatloaf with olive oil. This step helps achieve a golden-brown finish. I then place the baking sheet in the oven. I bake the meatloaves for 25-30 minutes. I check that their internal temperature reaches 165°F (75°C). When done, I take them out and let them rest for 5 minutes. This helps keep each bite juicy and full of flavor. For the full recipe, you can refer to the earlier section. To make your meatloaf light and tender, do not overwork the mix. When you combine the ground chicken and breadcrumbs, mix gently. If you knead it too much, you risk making it dense. Keep it loose, and let the ingredients blend just enough. To maintain moisture in your meatloaf, use fresh ingredients. The egg helps bind everything, while the marinara sauce adds flavor and moisture. Creating a shallow indentation in each meatloaf before baking allows the sauce to soak in. This keeps the meatloaf juicy and flavorful. You can add extra herbs and spices to boost flavor. Fresh herbs like basil or thyme can brighten the dish. Try mixing in some crushed red pepper for a little heat. Using different types of cheese can also change the dish. Instead of Parmesan, try mozzarella for a gooey texture or feta for a tangy flavor. Each cheese gives a unique twist to the meatloaf. For a stunning presentation, arrange the meatloaves on a large platter. Drizzle them with more marinara sauce for color. A sprinkle of grated Parmesan on top adds a nice finish. Garnish with fresh parsley to enhance the look and aroma. You can serve extra marinara on the side for dipping. This not only makes the dish more appealing but also gives guests a chance to customize their flavor. For the full recipe, check out the Garlic Parmesan Chicken Meatloaves. {{image_4}} You can change up the garlic Parmesan chicken meatloaves for fun. Add roasted red peppers for an Italian twist. This gives a sweet and tangy punch. You can also try BBQ sauce for a smoky flavor. For an Asian kick, mix in soy sauce and ginger. Each option brings a new taste without much effort. Want to make a low-carb version? Use cauliflower instead of breadcrumbs. This keeps it light while still being tasty. If you have vegetarian friends, use lentils or mushrooms instead of chicken. You can even make it vegan by replacing the egg with a flaxseed mix. These swaps help everyone enjoy the meal. Garlic Parmesan chicken meatloaves pair well with many sides. Try serving them with roasted vegetables or a fresh salad. A simple green salad with lemon vinaigrette works great. You can also make mashed potatoes for a classic touch. These sides balance out the flavors and make your meal complete. To store leftovers, let the meatloaves cool first. Place them in an airtight container. This keeps them fresh and tasty. Use glass or plastic containers with tight seals. These work best for storing food. Freezing meatloaves is easy. Wrap each meatloaf in plastic wrap. Then, place them in a freezer-safe bag. Remove as much air as you can. This helps avoid freezer burn. To reheat, thaw in the fridge overnight. Bake them at 350°F (175°C) for about 20 minutes. This warms them up and keeps them moist. In the fridge, meatloaves last about 3 to 4 days. If you freeze them, they can last up to 3 months. Check for signs of spoilage. If they smell bad or look odd, throw them away. Always trust your senses when it comes to food safety. Can I make meatloaf ahead of time? Yes, you can make meatloaf ahead. Prepare the mixture and shape it into loaves. Cover and store them in the fridge for up to 24 hours. When ready to cook, just pop them in the oven. This saves time on busy nights and keeps flavors fresh. Why is my meatloaf dry? Meatloaf can dry out for a few reasons. Overcooking is a common cause. Always check the internal temperature, which should be 165°F (75°C). Using lean meat without enough fat can also lead to dryness. Mixing in wet ingredients like marinara sauce helps keep it moist. Can I replace ground chicken with another meat? Absolutely! You can use ground turkey or beef instead. Each meat brings its own taste and texture. If you choose beef, consider using a mix of lean and fatty cuts for the best flavor. This ensures your meatloaf remains juicy and tender. What can I use instead of breadcrumbs? For a gluten-free option, use gluten-free breadcrumbs or almond flour. Crushed crackers also work well. If you're low-carb, try ground oats or even cooked quinoa. These alternatives will still hold the meatloaf together while adding a unique flavor. Can I cook meatloaf in an air fryer? Yes! Cooking meatloaf in an air fryer is quick and easy. Shape the meatloaf and place it in the air fryer basket. Cook at 350°F (175°C) for about 20-25 minutes. The air fryer gives it a nice, crispy edge while keeping it juicy inside. Is it possible to grill meatloaf? Yes, grilling meatloaf can add great flavor! Shape the meatloaf into patties or use a loaf pan on the grill. Make sure to keep the grill temperature low to ensure it cooks through. Add some smoky flavor by using wood chips in your grill. In this blog post, we explored how to make tasty Garlic Parmesan Chicken Meatloaves. We covered ingredients, step-by-step instructions, tips for great texture, and fun variations. You can even adapt the recipe for different diets and flavors. Remember, the right ingredients and techniques lead to a delicious meal. Enjoy creating your own meatloaf with these ideas and tips. Happy cooking!

Garlic Parmesan Chicken Meatloaves Flavorful Delight

Welcome to a flavorful delight that will have your taste buds dancing! Garlic Parmesan Chicken Meatloaves are simple to make,

To make Chocolate Chip Cookie Dough Dip, you will need: - 1 cup all-purpose flour - 1/2 cup unsalted butter, at room temperature - 1/4 cup packed brown sugar - 1/4 cup granulated sugar - 1 teaspoon pure vanilla extract - 1/4 teaspoon fine sea salt - 1 (8 oz) package cream cheese, softened - 1/2 cup mini chocolate chips - 1/4 cup finely chopped nuts (optional for added crunch) - A selection of dippers (graham crackers, fresh apple slices, pretzel twists) You can swap some ingredients to fit your taste or needs. Here are a few ideas: - Use almond flour instead of all-purpose flour for a gluten-free option. - Replace unsalted butter with coconut oil for a dairy-free version. - If you don’t have brown sugar, you can use more granulated sugar. - For a creamier dip, try mascarpone cheese instead of cream cheese. - Use dark chocolate chips for a richer flavor or swap them with white chocolate chips for a sweet twist. This dip is a tasty treat, but be aware of its nutritional content. Here’s a rough idea per serving (based on 6 servings): - Calories: 220 - Total Fat: 12g - Saturated Fat: 7g - Cholesterol: 30mg - Sodium: 120mg - Total Carbohydrates: 25g - Dietary Fiber: 1g - Sugars: 14g - Protein: 2g Feel free to adjust serving sizes based on your needs. Enjoy your dip with your favorite snacks! Check out the Full Recipe for more details. Start by gathering your ingredients. You need a few simple items. First, take 1 cup of all-purpose flour. Next, grab 1/2 cup of unsalted butter, softened at room temperature. You will also need 1/4 cup of both packed brown sugar and granulated sugar. Don’t forget 1 teaspoon of pure vanilla extract and 1/4 teaspoon of fine sea salt. Lastly, get an 8-ounce package of softened cream cheese, 1/2 cup of mini chocolate chips, and 1/4 cup of finely chopped nuts if you like a little crunch. In a medium bowl, place the softened cream cheese and unsalted butter. Mix them together until smooth. You can use a hand mixer or a sturdy spatula. Gradually add in the brown sugar and granulated sugar. Keep mixing until everything is fluffy. Pour in the vanilla extract and sea salt, then mix until you have a velvety blend. Now, carefully add the flour to the bowl. Use a spatula to fold it in gently. Be careful not to overmix, or the dip may turn out too dense. Finally, fold in the mini chocolate chips and nuts for extra flavor. Transfer the dip into a serving bowl and cover it tightly with plastic wrap. Place it in the refrigerator for about 30 minutes. Chilling allows the flavors to blend well. It also helps the dip firm up, making it easier to scoop. When you are ready to serve, take it out and pair it with your favorite dippers, like graham crackers, apple slices, or pretzel twists. Enjoy the delicious taste of your Chocolate Chip Cookie Dough Dip! For the full recipe, check the recipe section above. One big mistake is using raw flour. Always heat treat your flour first. Spread it on a baking sheet and bake at 350°F for five minutes. This kills any bacteria and keeps your dip safe to eat. Avoid overmixing the dough. Mixing too much can make the dip too dense. You want it creamy and light. To get a smooth dip, use room temperature cream cheese and butter. Cold ingredients will not blend well. Mix until creamy and fluffy before adding flour. Fold in the flour gently. This keeps the dip light. Chill the dip for at least 30 minutes. This step firms it up and melds the flavors. To boost flavor, use high-quality vanilla extract. You can also try different types of chocolate chips, like dark or white chocolate. Adding a pinch of sea salt can enhance sweetness. Nuts add crunch and depth. Try adding a splash of almond extract for a new twist. For a seasonal touch, mix in some cinnamon or pumpkin spice during fall. For the complete recipe, visit the [Full Recipe]. {{image_4}} You can change the dip with different add-ins. Try using peanut butter chips or toffee bits. Nuts add a nice crunch, too. I like to use finely chopped walnuts or pecans. You can also swirl in some caramel sauce for extra sweetness. Each add-in brings a new taste to the mix. Want to mix things up? Change the vanilla to almond extract for a new flavor. You can even use cocoa powder for a richer chocolate taste. Another fun idea is to add a hint of espresso powder. This gives the dip a coffee kick that pairs well with chocolate. Seasonal dips can add fun to your table. In fall, I love adding pumpkin spice to the mix. A pinch of cinnamon and nutmeg will warm up this treat. For winter, think about peppermint extract. This gives the dip a fresh and festive taste. You can even top it with crushed candy canes for a holiday twist. Each variation lets you create your own version of this dip. Get creative and have fun! For the full recipe, check the details above. After enjoying your dip, store any leftovers in an airtight container. Place it in the fridge. This helps keep it fresh for up to five days. Always cover the dip to prevent it from drying out. If you notice any change in texture or smell, it's best to toss it. You can freeze Chocolate Chip Cookie Dough Dip for longer storage. Use a freezer-safe container and seal it well. The dip can last for about three months in the freezer. To thaw, transfer it to the fridge overnight. Mix it well before serving to bring back its creamy texture. This dip is best served cold, so reheating isn’t necessary. If you prefer a warm version, heat it gently in a microwave. Use short bursts of 10-15 seconds, stirring in between. Be careful not to overheat, as this can change the consistency. Enjoy it with your favorite dippers for a warm treat! Chocolate Chip Cookie Dough Dip stays fresh in the fridge for about five days. Store it in an airtight container to keep it from drying out. If you see any changes in smell or color, it’s best to throw it away. Yes, you can make this dip ahead of time. In fact, making it a day before can help the flavors blend better. Just cover it well and chill it in the fridge. This way, all you need to do is grab it when you’re ready to serve. You can dip many tasty items in this dip! Here are some great options: - Graham crackers - Fresh apple slices - Pretzel twists - Vanilla wafers - Sliced bananas Feel free to mix and match your favorite dippers! In this blog post, we explored how to make Chocolate Chip Cookie Dough Dip. We discussed key ingredients, techniques, and tips to avoid common mistakes. Remember the chilling process to enhance texture, and feel free to try different flavors. Storing and reheating your leftovers ensures no waste. Overall, this dip is fun and easy to make. With these insights, you can enjoy this sweet treat anytime. Don’t hesitate to share your favorite variations and ideas!

Chocolate Chip Cookie Dough Dip Tasty and Simple Recipe

Who doesn’t love cookie dough? This Chocolate Chip Cookie Dough Dip is a quick treat you can whip up in

Gather these simple items for a tasty meal: - 1 pound large shrimp, peeled and deveined - 4 cloves garlic, minced - 1/4 cup finely grated Parmesan cheese - 2 tablespoons extra virgin olive oil - 1 tablespoon freshly squeezed lemon juice - 1 teaspoon smoked paprika - 1 teaspoon Italian seasoning blend - Sea salt and freshly cracked black pepper to taste - Fresh parsley, finely chopped (for garnish) - Lemon wedges (for serving) You can swap some ingredients if needed: - Use frozen shrimp if fresh is not available. Just thaw them first. - If you lack Parmesan, try another hard cheese, like Pecorino. - Olive oil can be replaced with melted butter for a richer taste. - For lemon juice, you may use lime juice for a different zing. - Smoked paprika can be switched with regular paprika if desired. Getting the right amounts is key for great flavor: - Use a kitchen scale for shrimp to ensure you have exactly one pound. - A microplane works best for grating Parmesan finely. This helps it melt evenly. - When measuring liquids, use a clear measuring cup for accuracy. - For minced garlic, aim for small, even pieces to release full flavor. - For dry ingredients like spices, level off the measuring spoon with a knife. For the complete recipe, check the Full Recipe section. First, set your oven to 400°F (200°C). A hot oven helps the shrimp cook well. Next, grab a large bowl. In this bowl, mix together the olive oil, minced garlic, lemon juice, smoked paprika, and Italian seasoning. Add a good pinch of salt and pepper. Whisk until everything blends nicely. This mix will give your shrimp a great flavor. Now it’s time to add the shrimp. Make sure they are peeled and deveined. Toss the shrimp in the marinade until every piece is covered. This step is key for flavor. After that, line a baking sheet with parchment paper. This makes cleaning up easy. Spread the shrimp out evenly. They should not touch each other. This helps them roast properly. Once your shrimp are arranged, sprinkle the Parmesan cheese on top. This will create a nice cheesy crust. Place the baking sheet in the hot oven. Roast for about 8 to 10 minutes. You will know they are done when they turn pink and curl slightly. If you want a crispy topping, switch the oven to broil for 1 to 2 minutes. Keep an eye on them to avoid burning. After cooking, take them out and sprinkle with fresh parsley. Serve with lemon wedges on the side for a fresh taste. Check out the Full Recipe for more details! When picking shrimp, look for firm, shiny shells. Fresh shrimp smells sweet, not fishy. Choose shrimp that are pink or gray, depending on the type. Try to buy wild-caught shrimp for the best taste. If you can, ask your fishmonger for recommendations. Cooking shrimp is quick. At 400°F (200°C), they roast in just 8-10 minutes. Watch them closely. They turn pink and curl slightly when done. If you want a crispy top, broil for 1-2 more minutes. Just be careful not to burn them! To make your shrimp pop, use garlic, lemon juice, and smoked paprika. These flavors mix well with Parmesan cheese. Add sea salt and black pepper to taste. Feel free to experiment! Try different herbs or spices to create your unique twist. For more ideas, check the Full Recipe. {{image_4}} To make your dish hot and flavorful, add red pepper flakes. Start with a small amount, like 1/2 teaspoon, and adjust to taste. This variation gives your shrimp a nice kick. You can also use diced jalapeños for a fresh twist. The heat pairs well with the creamy Parmesan, making each bite exciting. For a rich and buttery flavor, swap olive oil with melted butter. Add fresh herbs like thyme or rosemary to the mix. This variation makes the dish taste more decadent. You can also mix in some lemon zest for a bright, fresh flavor. This version works well if you want a cozy, comforting meal. You can turn your Garlic Parmesan Roasted Shrimp into a full meal by adding veggies. Try tossing in asparagus, cherry tomatoes, or bell peppers with the shrimp. Just cut them into bite-sized pieces and mix them with the shrimp in the marinade. This not only adds color but also makes the dish more nutritious. You can find the full recipe for this delicious shrimp dish in the previous sections. To store leftover Garlic Parmesan Roasted Shrimp, place it in an airtight container. This keeps the shrimp fresh and prevents any odors from other foods. It’s best to eat leftovers within two days for the best taste. If you want to keep it longer, freezing is a good option. When you reheat the shrimp, do it gently. Use a microwave on low power to warm it up. You can also use a skillet over low heat. This helps keep the shrimp moist and tasty. Adding a splash of lemon juice can bring back some of that bright flavor. To freeze Garlic Parmesan Roasted Shrimp, place it in a freezer-safe bag. Remove as much air as possible before sealing. Label the bag with the date. You can freeze it for up to three months. To use, thaw in the fridge overnight before reheating. Enjoy the flavors again! For the full recipe, check the section above. Yes, you can use frozen shrimp! Just make sure to thaw them first. Place the shrimp in a bowl of cold water for about 15 minutes. Once thawed, pat them dry with a paper towel. This helps the marinade stick better. Using frozen shrimp can save you time and still taste great in your Garlic Parmesan Roasted Shrimp dish. Shrimp are fully cooked when they turn pink and curl slightly. They should have an opaque look, not shiny or gray. You can also check the internal temperature. It should reach 120°F (49°C). Don’t overcook them, as they can become tough. If you follow the cooking time in the Full Recipe, you'll get perfectly cooked shrimp. You can easily cook Garlic Parmesan Roasted Shrimp on the stovetop! Heat a large skillet over medium-high heat. Add a bit of olive oil and then the marinated shrimp. Cook them for about 2-3 minutes on each side until they turn pink. Add the Parmesan cheese towards the end, allowing it to melt slightly. This method is quick and still delivers great flavor! This article covered how to make Garlic Parmesan Roasted Shrimp. You learned about the key ingredients and tips for perfecting your dish. I shared ways to alter the recipe and enhance flavors. You also discovered storage methods and answers to common questions. Always remember, fresh or frozen shrimp can work. With practice, you’ll master this recipe. Enjoy your cooking adventure and share it with friends!

Garlic Parmesan Roasted Shrimp Quick and Tasty Delight

Looking for a quick and tasty dish? Garlic Parmesan Roasted Shrimp is your answer! This dish is simple, flavorful, and

To make Tuscan shrimp and scallops, you need the following ingredients: - 1 lb large shrimp, peeled and deveined - 1 lb sea scallops, patted dry - 2 tablespoons olive oil - 1 teaspoon garlic, minced - 1 cup cherry tomatoes, halved - 1 cup fresh spinach, roughly chopped - 1/2 cup heavy cream - 1 teaspoon lemon zest (from about 1 lemon) - 1 tablespoon fresh lemon juice (juice of half a lemon) - 1 teaspoon Italian seasoning blend - Salt and freshly ground black pepper, to taste - Fresh basil leaves, for garnish - Grated Parmesan cheese, for serving You can add a pinch of red pepper flakes for heat or a splash of white wine for depth. These optional ingredients can enhance both flavor and presentation. To cook this dish, gather these essential tools: - A large skillet - A spatula - Measuring cups - A knife - A cutting board For quality results, I recommend using a heavy-bottomed skillet, like a cast iron or non-stick pan. These types provide even heat, which is key for perfectly cooked seafood. To make the shrimp and scallops just right, start by heating olive oil in a large skillet over medium-high heat. Once the oil shimmers, add the shrimp and scallops. - Make sure not to crowd the pan. This keeps the seafood from steaming and gives it a nice sear. - Sauté the shrimp for about 2-3 minutes until it turns pink. Cook the scallops until they are golden brown on the outside. After cooking, place the seafood on a plate to keep warm. This step helps keep the perfect texture. Now, let's make the creamy tomato-spinach sauce. In the same skillet, lower the heat to medium and add minced garlic. Sauté it for about 30 seconds until fragrant. Next, add halved cherry tomatoes, Italian seasoning, and a pinch of salt and pepper. Cook this mixture for about 3-4 minutes. You want the tomatoes to soften and start releasing their juices. Add roughly chopped spinach next. Cook this for another 1-2 minutes until the spinach is bright and wilted. Then, lower the heat and pour in heavy cream. Stir in lemon zest and fresh lemon juice. Let the sauce simmer gently for 2 minutes. This melds the flavors beautifully. Now, it’s time to bring everything together. Gently fold the cooked shrimp and scallops back into the creamy sauce. Heat them through for about 1 minute. Check the seasoning and add more salt and pepper if needed. Before serving, plate the Tuscan shrimp and scallops warm. Top with fresh basil leaves and a sprinkle of grated Parmesan cheese. This dish looks beautiful and is ready to impress! Remember, serving it hot makes all the difference. Enjoy! To cook shrimp and scallops well, avoid these common mistakes: - Overcrowding the pan: This traps steam and makes the seafood soggy. Cook in batches if needed. - Not drying seafood: Pat your shrimp and scallops dry with a paper towel. This helps them brown nicely. - Cooking at too high heat: Medium-high heat works best. It cooks the seafood evenly without burning. For cooking times: - Large shrimp: Cook for 2-3 minutes on each side. - Scallops: Sauté for 2-3 minutes until golden brown. To boost the taste of your Tuscan shrimp and scallops, try these spices and herbs: - Italian seasoning: This mix adds depth to your dish. - Red pepper flakes: For a bit of heat, sprinkle some in. - Fresh herbs: Basil and parsley add freshness. Adjust creaminess or acidity by: - Adding more heavy cream: For a richer flavor, add a touch more cream. - Using lemon juice: Increase acidity by adding more lemon juice. This brightens the dish. For the complete cooking instructions, check out the Full Recipe. {{image_4}} You can switch up the proteins in this dish. If you don’t have shrimp or scallops, try using chicken or firm tofu. Both will soak up the sauce well. For a twist, add mussels or clams for a seafood feast. If you need gluten-free options, serve the dish with gluten-free pasta or rice. You can also skip the cream for a lighter version. Replace it with coconut milk or a nut-based cream for a dairy-free version. Pairing is key to a delightful meal. Serve Tuscan shrimp and scallops over a bed of pasta or rice. Crusty bread works great too. It helps to soak up the creamy sauce. To impress your guests, elevate your plating. Use a wide, shallow bowl for a chic look. Place the seafood in the center, then drizzle the sauce around. Finish with fresh basil leaves for color. A sprinkle of Parmesan cheese adds a gourmet touch. For a special occasion, consider adding a sprig of rosemary on the side. For the complete cooking details, check out the Full Recipe. To keep your Tuscan shrimp and scallops fresh, store leftovers in the fridge. Place them in an airtight container. This helps prevent any strong smells from other foods. Make sure to eat leftovers within three days for the best taste. If you want to keep them longer, consider freezing. Use a freezer-safe container to avoid freezer burn. For reheating, use a skillet over low heat. Add a splash of cream or broth to keep the dish moist. Stir gently to maintain the texture of the shrimp and scallops. Avoid the microwave, as it can make seafood rubbery. If you want to enjoy leftovers, pair them with fresh pasta or a side salad for a fun twist. To check if shrimp are done, look for a pink color. Cooked shrimp also curl into a C shape. For scallops, a golden-brown crust means they’re ready. Cook scallops until they are opaque in the center. They should feel firm to the touch. Aim for about 2-3 minutes on each side. Yes, you can prepare some parts ahead of time. Cook the shrimp and scallops, then store them separately. You can also make the sauce and keep it in the fridge. When you are ready to eat, simply heat the sauce and add the seafood back in. This keeps everything fresh and tasty. You have many great options! Pasta is a classic choice, especially with the creamy sauce. Crusty bread works well, too, for dipping. Try a light salad for a fresh touch. Rice or quinoa can also soak up the sauce nicely. Feel free to get creative with your sides! For complete cooking guidance, check out the Full Recipe. It has all the steps and tips you need to make this dish. In this post, we explored how to create delicious Tuscan Shrimp and Scallops. You learned about essential ingredients, cooking supplies, and step-by-step instructions for perfect seafood. I shared tips to avoid common mistakes and enhance flavor. You can adapt the recipe using different proteins or vegetables. Proper storage techniques and reheating tips ensure your leftovers stay tasty. Now, equipped with this knowledge, you can cook with confidence and impress your guests with this delightful dish. Enjoy your culinary journey!

Tuscan Shrimp and Scallops Flavorful Dinner Delight

Looking for a dinner that impresses with ease? My Tuscan Shrimp and Scallops recipe is just the ticket! This dish

- 1 large sweet potato, peeled and diced into 1-inch cubes - 1 cup canned chickpeas, thoroughly drained and rinsed - 1/2 cup red lentils, rinsed under cold water until the water runs clear - 1 medium onion, finely chopped - 2 cloves garlic, minced - 2 carrots, diced (about 1/2-inch pieces) - 1 celery stalk, diced (about 1/2-inch pieces) - 6 cups vegetable broth (preferably low-sodium) - 1 teaspoon ground cumin - 1 teaspoon ground turmeric - 1/2 teaspoon smoked paprika - Salt and freshly ground black pepper to taste - 2 tablespoons extra virgin olive oil - Fresh parsley or cilantro, chopped, for garnish - Juice of 1 fresh lemon Sweet potatoes are rich in vitamins A and C. They boost your immune system and support eye health. Chickpeas add protein and fiber, helping you feel full longer. Red lentils offer iron, which is good for energy. Onions provide antioxidants that fight disease. Garlic can lower blood pressure and improve heart health. Carrots are high in beta-carotene, which is great for vision. Celery adds hydration and low calories. Vegetable broth keeps the soup light while adding flavor. Using fresh sweet potatoes gives a great taste and texture. Canned chickpeas save time and are still healthy. Rinsing them helps reduce sodium. Fresh vegetables like onions, garlic, carrots, and celery enhance flavor. While canned lentils exist, I recommend dried lentils for better texture. They cook down nicely and blend well. If you have time, fresh ingredients often yield the best results. 1. Sauté the Aromatics: Start by heating the olive oil in a large pot over medium heat. Add the chopped onion, minced garlic, diced carrots, and diced celery. Cook these for about 5-7 minutes. Stir them occasionally until the vegetables soften and the onion becomes clear. 2. Add Spices: Next, sprinkle in the ground cumin, turmeric, and smoked paprika. Stir these with the veggies for 1-2 minutes until they smell great. 3. Combine Ingredients: Now, add the cubed sweet potato, rinsed chickpeas, and red lentils to the pot. Gently mix everything together. 4. Add Broth: Pour in the vegetable broth carefully. Stir again and turn the heat up to bring it to a gentle boil. 5. Simmer: When it boils, reduce the heat to low and cover the pot. Let it simmer for 25-30 minutes. Check that the sweet potatoes and lentils become tender. 6. Blend (Optional): If you want a creamier soup, you can use an immersion blender. Blend part of the soup right in the pot or move half to a blender. Blend until smooth and mix it back into the pot. 7. Season: Taste the soup. Add salt and black pepper according to your liking. Stir well to mix the seasonings. 8. Finish with Lemon: Just before you serve, stir in the fresh lemon juice. This adds a bright flavor. 9. Garnish: Serve the soup hot. Top it with chopped fresh parsley or cilantro for color and taste. If you want a smoother texture, blending is great. You can use an immersion blender. This tool lets you blend soup right in the pot. If you don’t have one, just take half of the soup out and blend it in a regular blender. Then mix it back into the pot. This will give your soup a nice creaminess without losing all the chunky goodness. Cooking times may change based on your stove and pot. If your sweet potatoes are larger, they may need a bit more time. If you want to speed up cooking, cut your sweet potato smaller. Always check the tenderness of the sweet potatoes and lentils. They should be easy to pierce with a fork. Adjust the cooking time as needed. To boost flavor in your soup, consider adding fresh herbs. Basil, thyme, or rosemary can add depth. A splash of soy sauce or tamari brings umami. For a spicy kick, add red pepper flakes or diced jalapeños. Adjust these as you like. Taste your soup as it cooks. If it feels bland, sprinkle in more spices. You can add an extra teaspoon of cumin or turmeric for warmth. If you prefer a milder soup, reduce the smoked paprika. This soup is great for tweaking to fit your taste. You can make this soup in advance. It tastes even better the next day. Store it in an airtight container in the fridge. Reheat it on the stove when ready. If you freeze it, let it cool first. This way, you can enjoy a quick meal later. For the full recipe, check the Cozy Sweet Potato & Chickpea Red Lentil Soup section. {{image_4}} You can swap ingredients to suit your taste. Instead of sweet potato, try butternut squash for a different flavor. If you prefer another legume, use black beans or kidney beans instead of chickpeas. For lentils, yellow or green lentils work well too. This soup is flexible, so feel free to mix and match. For a gluten-free option, check that your broth is gluten-free. You can also make this soup lower in carbs by reducing the sweet potato. If you want a protein boost, add cooked chicken or quinoa. For a spicy kick, toss in some red pepper flakes or diced jalapeños. Get creative with toppings! You can add a dollop of yogurt or a sprinkle of feta cheese for creaminess. Fresh herbs like cilantro or basil can enhance the flavor. If you want some crunch, try toasted pumpkin seeds or croutons. For a richer taste, drizzle a bit of balsamic glaze before serving. Check out the Full Recipe for more details on how to make this delicious soup! To keep your Sweet Potato, Chickpea, and Red Lentil Soup fresh, follow these steps: - Cool Down: Let the soup cool to room temperature first. - Use Airtight Containers: Transfer the soup to airtight containers. This keeps moisture out and flavor in. - Label with Date: Write the date on the container. This helps you remember when you made it. - Refrigerate: Store the soup in the fridge for up to 4-5 days. If you want to save soup for later, freezing is a great choice: - Portion It Out: Divide the soup into single-serving containers. This makes it easy to thaw later. - Leave Space: Don’t fill containers to the top. Soup expands when frozen. - Seal Well: Make sure containers are sealed tightly. You can use freezer bags as well. - Store for Up to 3 Months: Frozen soup can last for about three months. When you’re ready to enjoy your soup again, here’s how to reheat it: - Thaw First: If frozen, thaw the soup in the fridge overnight. - Stovetop Method: Reheat on the stove over medium heat. Stir often to avoid sticking. - Microwave Option: Use a microwave-safe bowl, cover loosely, and heat in short bursts. Stir in between. - Add Freshness: Squeeze in some lemon juice before serving. It brightens the flavors! For the full recipe, check out Cozy Sweet Potato & Chickpea Red Lentil Soup. You can use cooked white beans, like cannellini or navy beans. Black beans are another great option. They add a nice flavor and texture. If you want a different taste, try lentils. The soup will still be hearty and delicious. Yes, this soup is both vegan and vegetarian. It uses vegetable broth and plant-based ingredients. You can enjoy this soup no matter your diet. It is a great choice for everyone. Definitely! To make this soup in a slow cooker, add all the ingredients in the pot. Set it on low for 6-8 hours or high for 3-4 hours. This method lets the flavors blend nicely. You will love the rich taste. You can store this soup in the fridge for up to 5 days. Make sure to let it cool before putting it in a container. Keep it in an airtight container to maintain freshness. Just reheat it on the stove or in the microwave when you're ready to eat. This soup goes well with crusty bread or warm pita. You can also serve it with a fresh salad or some roasted veggies. These sides add a nice balance to the meal. They complement the soup's rich flavors perfectly. For a fun twist, try adding a dollop of yogurt on top. You can find the full recipe [here](#Full Recipe). This post shared how to make delicious Sweet Potato, Chickpea, and Red Lentil Soup. We explored key ingredients, their benefits, and suggestions for fresh versus canned options. I provided step-by-step cooking instructions and tips for adjusting flavors to fit your taste. You can customize the recipe with variations and learn how to store leftovers for later. Remember, each step helps you create a soup that warms both the heart and belly. Enjoy your cooking journey and the comforting meal ahead!

Savory Sweet Potato, Chickpea, and Red Lentil Soup

Looking for a warm, hearty meal that packs a punch? You’ve found it! This Savory Sweet Potato, Chickpea, and Red

To make this dish, you need the following ingredients: - 8 ounces penne pasta - 1 tablespoon olive oil - 12 ounces smoked sausage, sliced - 1 medium onion, finely chopped - 3 cloves garlic, minced - 1 bell pepper (red or green), diced - 1 can (14.5 oz) diced tomatoes, drained - 2 cups chicken broth - 1 teaspoon Italian seasoning - 1/2 teaspoon red pepper flakes (optional, for heat) - Salt and freshly ground black pepper to taste - 1 cup fresh spinach, roughly chopped - 1/2 cup grated Parmesan cheese - Fresh basil leaves, for garnish Using fresh ingredients is key to great flavor. Fresh vegetables like bell peppers and spinach add color and crunch. They also bring a bright taste that dried or canned versions can't match. Fresh herbs, especially basil, give your dish an aromatic lift. The quality of your sausage will also impact the dish. A good smoked sausage will add depth and richness, making every bite a delight. You can boost the flavor even more with a few optional ingredients. Consider adding: - A squeeze of lemon juice for brightness - Chopped sun-dried tomatoes for a sweet bite - Extra spices like smoked paprika for a deeper flavor Feel free to mix and match based on what you love! This flexibility makes the recipe fun and personal. For the full recipe, check out the detailed steps in the cooking section. First, gather your ingredients for the One Pot Smoked Sausage Pasta. You need penne pasta, smoked sausage, onion, garlic, bell pepper, diced tomatoes, chicken broth, Italian seasoning, and spinach. Start by heating olive oil in a large pot over medium heat. Add the sliced smoked sausage and cook for about 5-7 minutes. You want it browned and warm. Next, toss in the chopped onion, diced bell pepper, and minced garlic. Sauté these for about 3-4 minutes. This makes the veggies soft and fragrant. Incorporate the drained diced tomatoes and then add the penne pasta. Stir well to mix everything. Now, pour in the chicken broth. Add the Italian seasoning and red pepper flakes if you want some heat. Make sure the pasta is fully submerged in the broth. Increase the heat to bring it to a gentle simmer. Cover the pot and reduce the heat to low. Let it cook for 12-15 minutes. Stir often to prevent any sticking. The pasta should be al dente and absorb most of the liquid. Once done, fold in the fresh spinach. Let it wilt for about 2 minutes while stirring gently. Remove the pot from heat. Stir in the grated Parmesan cheese until it melts into the pasta. Season with salt and pepper to your taste. To ensure your One Pot Smoked Sausage Pasta turns out great, follow these tips: - Cut sausages evenly: This helps them cook at the same rate. - Stir regularly: This prevents the pasta from sticking to the pot. - Taste as you go: Adjust seasoning if needed before serving. - Choose fresh spinach: It adds a vibrant color and boosts nutrition. While cooking, you can use visual aids to help guide you. Look for video tutorials online. They show each step clearly. You can also find images of the finished dish. This gives you a good idea of what your pasta should look like. If you want the full recipe, check out the detailed instructions and tips provided. It makes the cooking process even easier and more fun! When making one pot smoked sausage pasta, avoid overcooking the pasta. It should be al dente when you finish. Another mistake is not stirring often. This helps prevent the pasta from sticking to the pot. Also, be careful with the salt. The smoked sausage and broth add salt, so taste before adding more. To boost the flavors, use fresh herbs like basil or parsley. A splash of lemon juice brightens the dish. For extra heat, add more red pepper flakes. You can also mix in different cheeses like mozzarella or feta. These add creaminess and depth to every bite. If you prefer softer pasta, increase the cooking time by a few minutes. Just remember to check often. If you want a thicker sauce, cook with the lid off for the last few minutes. This allows steam to escape and thickens the sauce nicely. For the Full Recipe, check the earlier section. {{image_4}} You can change up the protein in this dish. Try chicken or shrimp for a tasty twist. Just cook them the same way as the sausage. Cooked chicken or shrimp adds a nice flavor and keeps it simple. You can also use plant-based sausage for a different taste. For a vegetarian or vegan version, skip the sausage. Instead, add more veggies like mushrooms or zucchini. You can also use chickpeas for protein. They add a great texture and flavor. Use vegetable broth instead of chicken broth for a full vegan dish. This keeps the meal hearty and satisfying. While penne pasta works great, you can swap it for other pasta shapes. Try rotini or fusilli for fun texture. Gluten-free pasta is also an option if needed. Just make sure to adjust the cooking time based on the type of pasta you choose. This way, you can enjoy this meal no matter your dietary needs. For the complete recipe, check out the [Full Recipe]. To keep your One Pot Smoked Sausage Pasta fresh, let it cool first. Place the pasta in an airtight container. Store it in the fridge if you plan to eat it within three days. Keep it away from strong-smelling foods to avoid flavor transfer. If you want to save it longer, freezing is a good option. Divide the pasta into smaller portions. Use freezer-safe bags or containers for storage. Be sure to leave some space for expansion. The pasta can last up to three months in the freezer. When you're ready to enjoy your pasta again, thaw it overnight in the fridge. For quick reheating, use a microwave or stovetop. Add a splash of chicken broth or water to keep it moist. Heat until it’s warm throughout. Enjoy your meal just as you did the first time! For the complete recipe, refer to the Full Recipe section. To make One Pot Smoked Sausage Pasta, follow these easy steps. Start by heating olive oil in a large pot. Add sliced smoked sausage and cook until browned. Stir in chopped onion, diced bell pepper, and minced garlic. Cook until the veggies are soft. Next, add drained diced tomatoes and penne pasta. Pour in chicken broth and add Italian seasoning. Bring to a simmer, cover, and cook until the pasta is tender. Finally, mix in fresh spinach and grated Parmesan. Serve warm with basil on top. Yes, you can use different sausages! Options like kielbasa, chicken sausage, or turkey sausage work well. Each type will add its own unique flavor. Just slice them and cook them the same way as the smoked sausage. Adjust the cooking time if needed. You can serve One Pot Smoked Sausage Pasta with a simple salad. A green salad with vinaigrette is a great choice. Garlic bread is another tasty side. You can also pair it with roasted vegetables for a healthy touch. For dessert, consider a light fruit salad to finish the meal. For the full recipe, check out the details above. In this blog post, we covered all the key points for making One Pot Smoked Sausage Pasta. You learned about fresh ingredients and optional items that add flavor. Step-by-step instructions helped you grasp the cooking process. Tips highlighted common mistakes and flavor enhancements. We also shared storage tips for leftovers and answered common questions. Now, you have every tool to create a delicious dish. Enjoy cooking and sharing your tasty meal!

One Pot Smoked Sausage Pasta Easy and Flavorful Meal

Are you craving a quick and tasty meal? Look no further! This One Pot Smoked Sausage Pasta recipe delivers big

To make this tasty dish, you need: - 8 oz spaghetti or fettuccine - 4 tablespoons unsalted butter - 4 cloves garlic, finely minced - 1 teaspoon red pepper flakes (optional for heat) - 1 cup heavy cream - 1 cup grated Parmesan cheese - Kosher salt and freshly ground black pepper, to taste - 2 tablespoons fresh parsley, finely chopped - Zest of 1 lemon These ingredients create a rich and creamy sauce. The garlic brings a strong flavor, while the Parmesan adds a nice salty touch. You may not have all the ingredients on hand. Here are some easy swaps: - For pasta, use any shape you like, such as penne or rotini. - If you need a dairy-free option, try coconut cream instead of heavy cream. - You can replace unsalted butter with olive oil for a lighter taste. - Use nutritional yeast if you want a vegan alternative to Parmesan. These substitutes help you make this dish even if you're missing something. To cook this dish, you'll need: - A large pot for boiling water - A colander for draining pasta - A large skillet for making the sauce - A wooden spoon for stirring Having these tools ready will help you cook faster and easier. Don't forget to use the Full Recipe for all the steps! Start by boiling water in a large pot. Add salt to the water for flavor. Once it’s boiling, add 8 oz of spaghetti or fettuccine. Cook the pasta until it is al dente, which usually takes about 8-10 minutes. Reserve ½ cup of the starchy pasta water before draining. Set the drained pasta aside while you make the sauce. In a large skillet, melt 4 tablespoons of unsalted butter over medium heat. As it melts, it will bubble and smell great. Add 4 finely minced cloves of garlic. Sauté the garlic for about 1-2 minutes, but don’t let it brown; you want it to be fragrant. If you like heat, add 1 teaspoon of red pepper flakes and stir for 30 seconds. Next, slowly pour in 1 cup of heavy cream while stirring. Let it warm for 2-3 minutes. Gradually mix in 1 cup of grated Parmesan cheese. Stir until the cheese melts and the sauce is creamy. If the sauce is too thick, add some of the reserved pasta water, a tablespoon at a time, to reach the right consistency. Finally, season with kosher salt, black pepper, and the zest of one lemon for some bright flavor. Now it’s time to bring it all together. Add the cooked pasta directly into the skillet with the sauce. Gently toss the pasta to coat each strand in the creamy sauce. Heat everything together for one more minute to meld the flavors. Once it’s warmed through, remove the skillet from heat. Sprinkle with 2 tablespoons of fresh parsley just before serving. This adds a fresh touch that looks great. Serve your Garlic Parmesan Pasta in warm bowls, and enjoy this simple and flavorful delight! For the full recipe, check out the original details. To keep your pasta from getting mushy, follow these steps: - Use a large pot with plenty of boiling water. - Add a generous amount of salt to the water. - Cook the pasta until it is al dente, which means it has a slight firmness. - Always check the package for cooking times. - Set a timer and taste a strand a minute before the time is up. This way, you keep the perfect texture! To make your sauce creamy, follow these tips: - Use heavy cream for the richest flavor. - Heat the cream slowly and stir it well. - Gradually add the Parmesan cheese while stirring. - If your sauce gets too thick, add some reserved pasta water little by little. This will help you reach that dreamy, creamy consistency you want. Want to elevate your dish? Here are some fun ideas: - Add a pinch of nutmeg for warmth. - Stir in some sautéed mushrooms or spinach for extra depth. - Try using fresh herbs like basil or thyme for a burst of flavor. - For more heat, toss in some chopped jalapeños or extra red pepper flakes. These simple tweaks can change the whole dish! For the full recipe, check out the Garlic Parmesan Pasta 🧄 recipe section. {{image_4}} You can make this dish vegetarian by skipping meat and adding veggies. Try bell peppers, spinach, or mushrooms. Sauté them in butter before adding garlic. This way, they soak up the rich flavors. You can also add some fresh peas or cherry tomatoes for a pop of color and taste. The creamy sauce pairs perfectly with these veggies, making it hearty and satisfying. For a protein boost, add chicken, shrimp, or tofu. If using chicken, cook it in the skillet first. Slice it into strips and toss it with the pasta and sauce. For shrimp, simply sauté them until pink and tender. They cook quickly, so keep an eye on them. If you prefer tofu, use firm tofu. Press it to remove moisture, then cube and fry until golden. Each protein option adds a unique flavor and texture. If you need gluten-free pasta, options are abundant. Look for brown rice or chickpea pasta. These types hold up well in the sauce. Always check the package for cooking times, as they may differ from regular pasta. You can still enjoy the same rich garlic and parmesan flavor without gluten. Just prepare the sauce as usual and combine it with your chosen gluten-free pasta. For the full recipe, check out the complete instructions. Enjoy your cooking adventure! To store your Garlic Parmesan Pasta, let it cool first. Place it in an airtight container. This keeps the pasta fresh and tasty for later. You can keep it in the fridge for up to three days. If you want to enjoy it later, move to the next step. When you're ready to eat the leftovers, reheating is easy. You can use the microwave or the stove. For the microwave, place the pasta in a bowl. Add a splash of cream or water to keep it from drying out. Heat it in short bursts until warm. If using the stove, add the pasta to a pan on low heat. Stir gently until heated through. This helps maintain the creamy sauce. If you have more than you can eat, freezing is a great option. First, let the pasta cool down. Then, place it in a freezer-safe container. Make sure to leave some room at the top, as it may expand. You can keep it frozen for about one month. To enjoy later, thaw it overnight in the fridge before reheating. This keeps the flavors and texture nice. For the full recipe, check the earlier section. You can pair Garlic Parmesan Pasta with many tasty sides. A fresh green salad works well. You can add crunchy romaine, juicy tomatoes, and a light dressing. Garlic bread is another great choice. The warm bread complements the pasta's flavors perfectly. For protein, grilled chicken or shrimp adds heartiness. You can also serve it with steamed veggies for a healthy touch. To add heat, use red pepper flakes. You can start with one teaspoon in the sauce. If you like it hotter, add more to taste. Try fresh diced jalapeños or crushed chili peppers for extra spice. You could also mix in a dash of hot sauce. Just be careful; a little goes a long way! Yes, you can use pre-shredded Parmesan cheese. It saves time and still tastes good. However, fresh cheese gives a better flavor and melts more smoothly. If you want the best result, grate it yourself. The texture and taste will enhance your dish. For a simple meal, pre-shredded works just fine! For the complete recipe, check the Full Recipe section above. Garlic Parmesan pasta is easy and tasty. We covered the key ingredients, helpful tools, and clear steps to make it. I shared tips to ensure creamy sauce, the best ways to store leftovers, and fun variations to suit your taste. Now you can enjoy this dish in many ways. Experiment with flavors and spices to make it personal. Your kitchen can be full of flavor with these simple ideas. Enjoy your cooking!

Garlic Parmesan Pasta Simple and Flavorful Delight

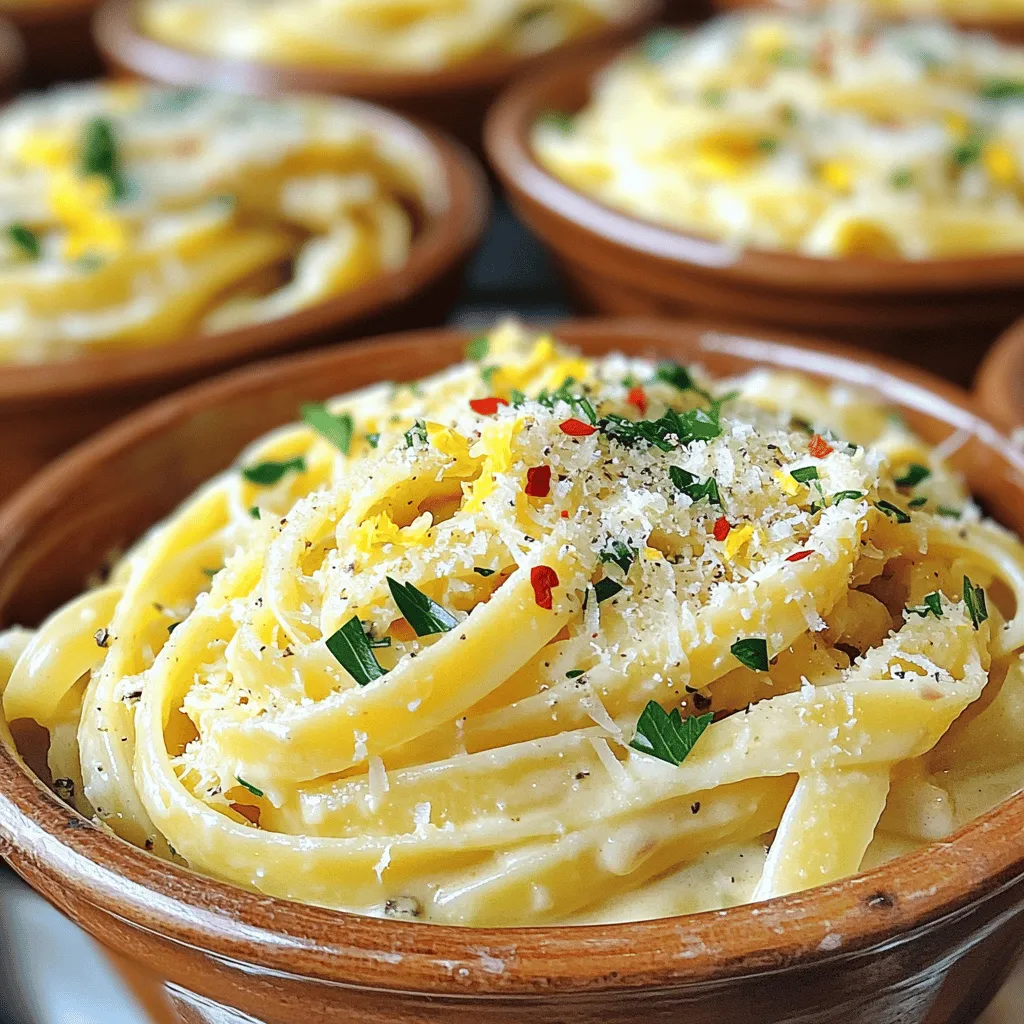
Looking for a quick and tasty dish? Garlic Parmesan Pasta is your answer! This simple recipe blends rich flavors with

Older posts
Newer posts
← Previous Page1 … Page7 Page8 Page9 … Page27 Next →

dsad

© 2025 mealinmoments • Built with GeneratePress

Our Policies

  • Copyright Policy
  • Cookie Policy
  • GDPR Policy
  • Privacy Policy
  • Disclaimer
  • Terms Of Use

More Information

  • Home
  • About
  • Contact
  • Appetizers
  • Dessert
  • Dinner
  • Drinks
©2025, mealinmoments About Back To Top