![- 2 boneless, skinless chicken breasts, diced into bite-sized pieces - 8 oz pasta (choose fettuccine or penne for optimal sauce adherence) - 4 cloves garlic, finely minced - 1 cup heavy cream (for that luscious texture) - 1 cup chicken broth (low-sodium recommended) - Sea salt, black pepper, Italian seasoning, parsley - Spinach, additional vegetables, or proteins For this creamy garlic chicken pasta, the main ingredients are key. The chicken provides protein, while the pasta serves as a hearty base. Garlic adds flavor, and cream gives that rich, velvety texture. Chicken broth enhances the sauce's depth. Seasonings like sea salt and black pepper elevate the taste. Italian seasoning brings in herbs, making it fragrant. Fresh parsley adds a nice touch when garnished. You can customize the dish with optional add-ins. Spinach brings nutrition and color. You can also use other veggies or proteins like shrimp. These choices let you make the dish your own. For the full recipe, check the detailed instructions to create this delightful meal! Cooking the pasta to al dente Start by boiling a large pot of salted water. Add your pasta and cook it until it is al dente. This usually takes about 8 to 10 minutes. Al dente means the pasta is firm but not hard. Before you drain it, save 1/2 cup of the pasta water. This starchy water helps the sauce stick later. Preparing the chicken for sautéing While the pasta cooks, get your chicken ready. Cut the chicken breasts into bite-sized pieces. Heat olive oil in a large skillet over medium heat. When the oil is hot, add the chicken. Season it with sea salt, black pepper, and Italian seasoning. Sauté the chicken for about 5 to 7 minutes until it is nicely browned and no longer pink. Sautéing garlic and incorporating liquids After cooking the chicken, take it out and keep it warm. In the same skillet, lower the heat and add minced garlic. Sauté the garlic for about 30 seconds. You want it fragrant but not burned. Next, pour in the chicken broth and bring it to a gentle simmer. Let it simmer for 2 to 3 minutes to reduce a bit. Thickening the sauce and integrating ingredients Now, stir in the heavy cream. Let the sauce simmer for about 5 minutes. This helps it thicken and become smooth. Once thickened, return the chicken to the skillet. Add the spinach too. Stir until the spinach wilts. Gradually mix in the grated Parmesan cheese until it melts into the sauce. If the sauce is too thick, add a splash of the reserved pasta water. Combining pasta with the creamy chicken sauce Add the drained pasta to the skillet. Toss everything together until the pasta is well-coated in the creamy sauce. Taste it and adjust the seasoning if needed. Presentation tips for serving Divide the pasta among plates. For a nice touch, sprinkle chopped fresh parsley on top. You can also add more grated Parmesan cheese. This adds color and makes the dish look fancy. Enjoy your creamy garlic chicken pasta! To sauté chicken perfectly, start with a hot skillet. Use medium heat and add olive oil. Once the oil shimmers, add the diced chicken. Let it brown well for that great flavor. Stir it occasionally, but don’t stir too much. This helps it cook evenly. For the sauce, you want it creamy and smooth. After adding the cream, let it simmer gently. This thickens the sauce nicely. If it gets too thick, adding a bit of reserved pasta water helps bring it back. Add fresh herbs for extra taste. Basil and thyme work well. You can also sprinkle in some red pepper flakes for heat. For a richer flavor, mix different cheeses. Try using a blend of Parmesan and mozzarella. This will give your sauce a lovely depth. Prep your ingredients before you start cooking. Chop the chicken and mince the garlic first. This makes the cooking process quick and easy. If you’re short on time, use rotisserie chicken. Just shred it and add it to the sauce. This shortcut keeps the dish fast while still being delicious. {{image_4}} You can change up the pasta type in this recipe. Choose fettuccine, penne, or even farfalle. Each shape holds the sauce a bit differently. I often like to use whole wheat pasta for a healthier twist. If you want a seafood option, swap the chicken for shrimp. Cook the shrimp until they turn pink, then follow the same steps. Tofu is another great swap for a plant-based meal. Just ensure you press the tofu to remove excess water before cooking. To make this dish gluten-free, use gluten-free pasta. Many brands offer options that taste great. For a dairy-free version, choose coconut cream instead of heavy cream. The flavor will change a bit, but it adds a nice twist. If you want a vegetarian option, skip the chicken and add more veggies. Try bell peppers, zucchini, or asparagus. Each will give the dish a fresh taste while keeping it hearty. You can add sun-dried tomatoes for a tangy burst of flavor. Just chop them up and toss them into the sauce. Mushrooms also work well, adding a rich and earthy taste. Sauté them in the same pan as the garlic for the best flavor. Experimenting with different cheeses can enhance the dish. While Parmesan is classic, try adding mozzarella for creaminess or feta for a salty kick. Each cheese brings its own unique profile to the creamy garlic chicken pasta. For the [Full Recipe], refer back to the earlier sections and enjoy making this dish your own! To keep creamy garlic chicken pasta fresh, store it in an airtight container. Place it in the fridge within two hours of cooking. This helps prevent bacteria growth. It stays good for about 3-4 days. If you want to save it longer, consider freezing it. For freezing, use a freezer-safe container. You can freeze it for up to 3 months. Just remember to let it cool completely before freezing to avoid ice crystals. When reheating, you want to avoid drying out the pasta. A stovetop is best for this. Add a splash of water or broth to the pan. Heat it on low until warm. Stir often to keep it moist. If you use a microwave, cover it with a damp paper towel. This keeps the steam in and helps it heat evenly. Heat for 1-2 minutes. Check and stir halfway through. If you plan to meal prep, scaling the recipe is easy. Just double or triple the ingredients based on your needs. Make sure to adjust cooking times as needed. For larger gatherings, consider increasing the portion of pasta and chicken. This way, everyone gets a filling serving. You can also serve it with a side salad or garlic bread to stretch the meal further. You can prepare creamy garlic chicken pasta in advance. Cook the pasta and chicken as usual. Once cooled, store them in separate airtight containers. Keep the sauce in its own container. When ready to serve, reheat each component. Add the pasta to the sauce and mix well. This method keeps the flavors fresh and the pasta from getting soggy. Yes, you can use alternatives to heavy cream. Try half-and-half for a lighter option. Coconut milk adds a unique flavor and is dairy-free. You can also use Greek yogurt, but mix it in after cooking to avoid curdling. Each option changes the texture and flavor slightly, so choose based on your taste. This dish pairs well with several sides. A simple green salad adds freshness. Garlic bread complements the flavors nicely. You can also serve steamed vegetables for added nutrition. Each option enhances your meal without stealing the spotlight from the pasta. Adjusting flavors is easy! You can add more garlic for a stronger taste. If you like spice, sprinkle in some red pepper flakes. For a zestier dish, add lemon juice or zest. Fresh herbs like basil or thyme can brighten the flavors. Experiment and find what you love most! This blog post covered making creamy garlic chicken pasta. You learned about key ingredients, like chicken and garlic. I showed you the step-by-step instructions and shared helpful tips for cooking. You can also try different variations to suit your tastes. Finally, I explained how to store leftovers and adjust the recipe for meal prep. With these ideas, you can create a delicious dish that fits your needs. Enjoy your cooking journey!](https://mealinmoments.com/wp-content/uploads/2025/05/640ff99e-18ba-4aff-8a84-b64dfc80f650.webp)
Creamy Garlic Chicken Pasta Quick and Tasty Recipe
Are you ready to whip up a delicious meal in no time? This Creamy Garlic Chicken Pasta recipe is your
Are you ready to whip up a delicious meal in no time? This Creamy Garlic Chicken Pasta recipe is your
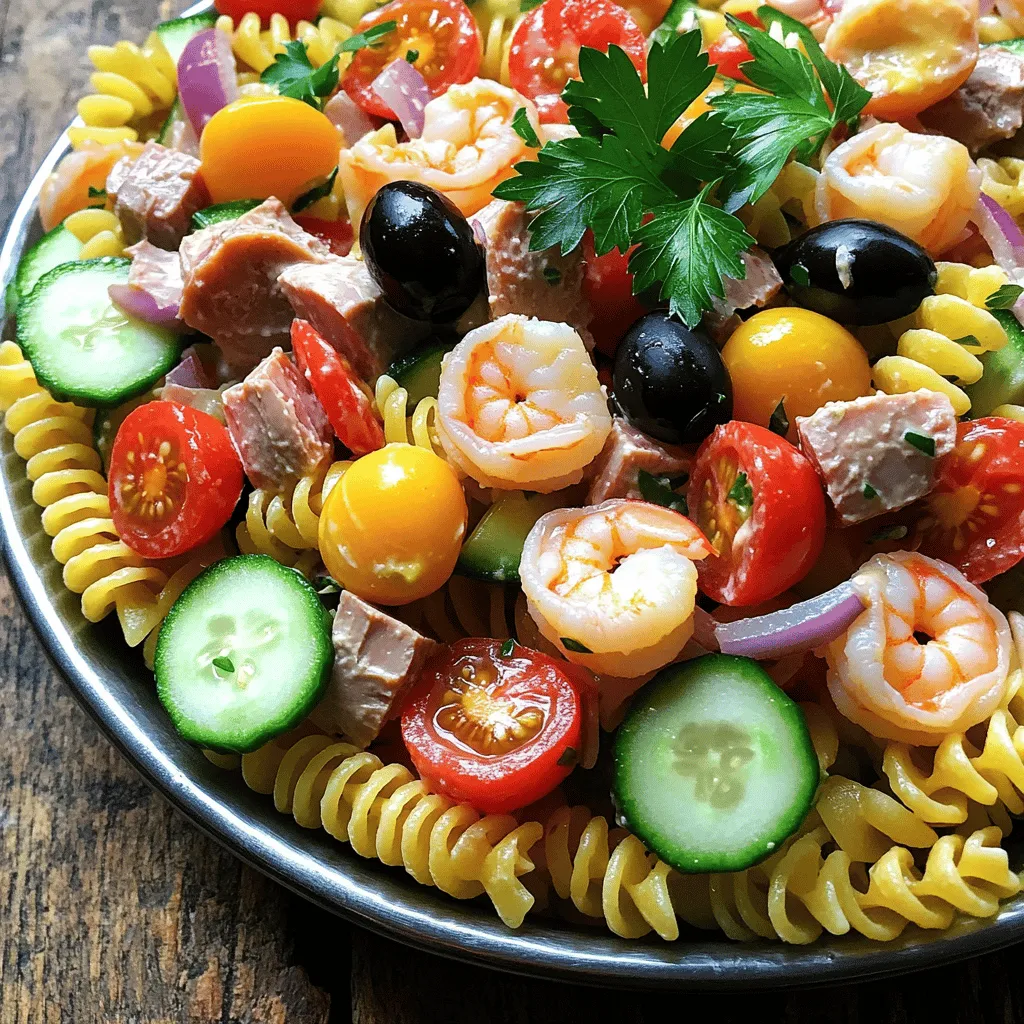
Dive into the delicious world of Seafood Pasta Salad with my easy, flavorful recipe! Perfect for lunch or dinner, this
![To make Southern Bananas Foster, you need a few key items. Here’s what to gather: - 4 ripe bananas, peeled and sliced lengthwise - 1/2 cup packed brown sugar - 1/4 cup unsalted butter - 1 teaspoon ground cinnamon - 1 teaspoon pure vanilla extract These ingredients create the sweet, warm sauce that makes this dessert shine. The ripe bananas bring a soft texture and rich flavor, while the brown sugar and butter form a delightful caramel. You can add a few optional items to enhance your dish. Try these: - 1/4 cup chopped pecans These pecans add a nice crunch and nutty taste. You can also consider a splash of rum if you want to bring in a classic twist. To serve your Southern Bananas Foster, scoop some creamy vanilla ice cream into bowls. Then, spoon the warm banana mixture over the ice cream. This gives a beautiful contrast of hot and cold. For a touch of elegance, drizzle a bit more caramel sauce on top. You can also sprinkle cinnamon or add whole pecans for a fancy finish. This makes your dessert not only tasty but also visually stunning. For the full recipe, check out [Full Recipe]. To make Southern Bananas Foster, start by gathering your ingredients. You need ripe bananas, brown sugar, unsalted butter, ground cinnamon, pure vanilla extract, and optional chopped pecans. 1. In a large skillet, melt the unsalted butter over medium heat. Watch it become bubbly and fragrant. 2. Gradually add in the packed brown sugar and ground cinnamon. Whisk this mix until smooth. You want the sugar to dissolve completely; this takes about 1-2 minutes. 3. Carefully place the lengthwise banana slices into the skillet. Make sure each slice gets coated in that sweet caramel. Cook them for about 2-3 minutes on each side. You want them to caramelize and soften. 4. Next, pour in the pure vanilla extract. Stir it into the sauce and let it simmer for one more minute. This boosts the flavor. 5. If you like, sprinkle in the chopped pecans. Stir them in and let the mix cook for another minute. This adds a nice crunch. When it's time to serve, scoop some creamy vanilla ice cream into clear dessert bowls. This lets you see the beautiful layers. Spoon the warm banana mixture over the ice cream. Let the caramel sauce drizzle down. For extra flair, drizzle more caramel on top. A light sprinkle of cinnamon and a few whole pecans make it look fancy. To get that perfect caramel, keep the heat at medium. Too high can burn the sugar. Stir gently but not too much. This helps the bananas get that nice golden color without breaking apart. If you want a thicker sauce, let it cook a bit longer before adding the bananas. Enjoy your Southern Bananas Foster as a sweet treat! For the complete recipe, check out the [Full Recipe]. When you slice bananas, cut them lengthwise. This way, they stay thicker and hold their shape. Use a sharp knife to avoid squishing them. Aim for about half an inch thick slices. This keeps them sturdy when cooking. Taste your sauce as you mix in the brown sugar. You can always add more sugar if it’s not sweet enough. If you prefer less sweetness, reduce the sugar by a spoonful. The caramel will still be rich and tasty, even with less sugar. One mistake is cooking the bananas too long. They can get mushy if overcooked. Watch them closely and flip them gently. Another mistake is not using ripe bananas. They should be spotted and soft for the best flavor. Lastly, don’t skip the vanilla extract; it adds a lovely depth to your sauce. For the complete recipe, check out the Full Recipe. Enjoy your Southern Bananas Foster! {{image_4}} You can add fun twists to Southern Bananas Foster. Try using different fruits, like peaches or pineapples. They bring a fresh taste. You can also swap brown sugar for maple syrup. This change gives a unique flavor. For a touch of spice, add a pinch of nutmeg. It pairs well with cinnamon and adds warmth. Seasons inspire great changes to this dish. In fall, add pumpkin spice to the mix. It gives a cozy taste perfect for cooler weather. In summer, use fresh berries with the bananas. They add vibrant colors and a burst of flavor. For winter, consider warming spices like ginger or cloves. They make the dish feel festive. If you have dietary needs, don't worry! You can make Bananas Foster work for you. Use dairy-free butter and ice cream for a vegan option. You can also replace brown sugar with coconut sugar for a lower glycemic index. If you're nut-free, skip the pecans or use seeds instead. These swaps keep the dish tasty and enjoyable for everyone. Check out the Full Recipe for more details on making this dessert! If you have leftover Southern Bananas Foster, store it in an airtight container. Place the warm banana mixture in the container first, then let it cool. After it cools, add it to the fridge. Use the leftovers within two days. This keeps the bananas tasty and fresh. To reheat, gently warm the banana mixture in a skillet over low heat. Stir it often to avoid burning. If it seems dry, add a bit of butter to bring back the creaminess. Heat until warm, then serve over fresh ice cream again. This way, you enjoy the same great taste. Freezing Bananas Foster can change the texture. If you want to freeze it, scoop the banana mixture into a freezer-safe container. Make sure to leave space for expansion. When ready to eat, thaw it in the fridge overnight. Reheat gently on the stove. Fresh ice cream will make it even better. Bananas Foster comes from New Orleans. Chef Paul Blangé created it in the 1950s. He made it for a special guest at his restaurant, Brennan's. The dessert quickly became a local favorite. It combines bananas, brown sugar, and rum, creating a rich, warm sauce. This dish reflects the vibrant flavors of Southern cuisine. Yes, you can make Bananas Foster without alcohol. Simply skip the rum in the recipe. Use extra vanilla extract instead for flavor. The dessert will still taste great. The caramel sauce remains sweet and delicious with just bananas and sugar. You can enjoy it without the alcohol. Southern Bananas Foster tastes great with many dishes. Here are a few ideas: - Vanilla ice cream: The creamy texture complements the warm bananas. - Pancakes: Serve the warm banana mixture on top for a special breakfast. - French toast: Add it for a fancy brunch twist. - Waffles: Top your waffles with this sweet sauce for added flavor. These pairings enhance the dessert experience, making each bite a delight. For the full recipe, check out the instructions above. In this post, we explored the ingredients, steps, and tips for making Southern Bananas Foster. You learned about essential and optional ingredients, along with presentation and cooking tips. I shared common mistakes to avoid and unique variations to try. Proper storage and reheating methods help keep your dish tasty. Bananas Foster offers rich flavors and fun pairings, making it a dessert worth mastering. Enjoy your time creating this classic dish, and don't hesitate to experiment for your perfect version!](https://mealinmoments.com/wp-content/uploads/2025/05/5cc4bc75-067c-43b9-9502-5b97aea04d3b.webp)
Indulging in Southern Bananas Foster is like a sweet journey to the heart of New Orleans. This dessert pairs warm
![To make Butter Paneer, gather these fresh ingredients: - 250g paneer, cut into bite-sized cubes - 2 tablespoons unsalted butter - 1 tablespoon vegetable oil - 1 medium onion, finely chopped - 2 ripe tomatoes, pureed until smooth - 1 tablespoon ginger-garlic paste - 1 teaspoon cumin seeds - 1 teaspoon garam masala - 1 teaspoon red chili powder - ½ teaspoon turmeric powder - 100ml heavy cream - 1 tablespoon kasuri methi (dried fenugreek leaves) - Salt, to taste - Fresh coriander leaves, chopped, for garnish Each ingredient plays a key role in the dish. The paneer gives a soft texture. Butter and cream create a rich, smooth sauce. The spices add warmth and depth. Use fresh ingredients for the best flavor. You can find the full recipe [Full Recipe]. Enjoy cooking! Preparing the base sauce Start with a large non-stick pan. Add 2 tablespoons of unsalted butter and 1 tablespoon of vegetable oil. Heat them on medium until hot. Add 1 teaspoon of cumin seeds. Let them sizzle for about 30 seconds. This brings out their flavor. Cooking the onions and tomatoes Next, add 1 medium onion, finely chopped. Sauté the onion until it turns golden brown. This takes about 7-10 minutes. Then, add 1 tablespoon of ginger-garlic paste. Cook for 2-3 minutes, stirring to remove the raw smell. Now, pour in 2 ripe tomatoes, pureed until smooth. Cook this mixture for 5-7 minutes. Stir until it thickens and the oil separates. Incorporating spices and paneer Once your sauce is ready, sprinkle in 1 teaspoon of red chili powder, ½ teaspoon of turmeric powder, and 1 teaspoon of garam masala. Mix well to spread the spices. Gently fold in 250g of cubed paneer, ensuring each piece gets coated. Slowly pour in 100ml of heavy cream while stirring. Let the dish simmer for 5 minutes. This helps the paneer absorb all those rich flavors. Finally, add 1 tablespoon of kasuri methi, crumbled, and salt to taste. Stir gently one last time before removing it from heat. You can find the full recipe [here](#). To get the best taste in butter paneer, adjust the spices to your liking. If you prefer more heat, add extra red chili powder. For a milder dish, reduce it. Your taste buds guide the spice level. Balancing creaminess with acidity is key. The heavy cream brings richness, but ripe tomatoes add a tangy kick. This balance makes each bite delightful. If it feels too creamy, add a splash of lemon juice for a bright contrast. Simmering is very important for flavor. After adding the heavy cream, let the dish cook for five more minutes. This allows the paneer to soak up the spices. The longer you simmer, the better the taste becomes. For a complete experience, check out the Full Recipe. {{image_4}} You can change Butter Paneer in many ways. This makes it fun to cook and taste new flavors. - Using tofu for a vegan version: Tofu works great if you want a vegan dish. It soaks up the sauce and gives a nice texture. Cut the tofu into cubes like paneer. Cook it gently to avoid breaking. Use the same cooking steps as for paneer. - Incorporating different vegetables: You can add veggies for more color and taste. Peas, bell peppers, or spinach are great choices. Add them after the onions are soft. This keeps them bright and fresh. - Substituting spices for unique twists: Change up the spices to create new flavors. Try adding curry powder for a different kick. A bit of smoked paprika can give a nice depth. Mix and match spices to find what you love. These variations can transform your Butter Paneer into something new every time you cook. Explore and enjoy! For the complete experience, check out the Full Recipe. Storing Butter Paneer is easy and helps keep it fresh. - Storing in the refrigerator: Place leftover Butter Paneer in an airtight container. It stays good for up to three days. Keep it in the fridge to maintain its creamy texture. - Freezing tips for longer storage: If you want to keep it longer, you can freeze it. Use a freezer-safe container. It can last for about one month. When you're ready to eat, let it thaw in the fridge overnight before reheating. - Reheating instructions: To warm up Butter Paneer, use a non-stick pan. Heat it gently on low heat. Stir occasionally to prevent sticking. You can add a splash of water or cream if it feels too thick while reheating. Do you want to try making this dish? Check out the Full Recipe! Enjoy your cooking! Can I make Butter Paneer in advance? Yes, you can make Butter Paneer ahead of time. Prepare the dish and let it cool. Store it in an airtight container in the fridge. It stays fresh for up to three days. Reheat it gently on the stove before serving. What can I serve with Butter Paneer? Butter Paneer pairs well with many sides. You can serve it with: - Warm naan or roti - Steamed basmati rice - Jeera rice for added flavor - A fresh salad for crunch These options balance the rich flavors of the dish. Is Butter Paneer spicy? Butter Paneer is not very spicy. It has a mild heat. You can adjust the spice level easily. Add less red chili powder for a milder version. The creamy sauce helps tone down the heat. How can I make Butter Paneer less rich? To make Butter Paneer lighter, you can: - Use less butter and cream - Substitute half-and-half for heavy cream - Add more tomato puree for a thinner sauce These changes will help reduce the richness while keeping the flavor. For the full recipe, check out Creamy Butter Paneer Delight. This blog post covered everything you need to make Butter Paneer. We talked about key ingredients, step-by-step cooking, and helpful tips. I shared ways to change the dish and store it well. Remember, balance flavors and have fun experimenting with your meal. Whether you choose paneer or tofu, you can create a tasty dish. Enjoy your cooking and the delicious Butter Paneer you make!](https://mealinmoments.com/wp-content/uploads/2025/05/728edb3d-2c15-4734-93cf-89e9f9cdf0de.webp)
Get ready to dive into the world of Butter Paneer, also known as Paneer Makhani! This creamy, rich dish is
![To make a tasty pizza grilled cheese, you need a few key items: - 4 slices of hearty sourdough bread - 4 ounces of fresh mozzarella cheese, shredded - 2 ounces of savory pepperoni slices These ingredients bring all the classic pizza flavors into a warm, cheesy sandwich. Sourdough adds a nice tang, while the mozzarella melts perfectly. The pepperoni gives that delicious, savory bite. To elevate your pizza grilled cheese, consider these flavor enhancers: - 1/4 cup of rich marinara sauce - 1 tablespoon of fragrant Italian seasoning - 1 tablespoon of extra virgin olive oil Marinara sauce adds moisture and depth. Italian seasoning brings out the pizza essence. Olive oil gives a nice crisp to the bread when grilled. You may already have these kitchen staples at home: - 1 clove of fresh garlic, minced - Salt and freshly cracked black pepper to taste These simple items can boost flavor and make your grilled cheese even better. Garlic adds a lovely aroma, while salt and pepper enhance all the other tastes. For the full recipe, check out the details above. Enjoy your cooking! To start, heat your skillet over medium heat. This step is key for a nice crust. While the skillet warms up, mix olive oil and garlic in a small bowl. This mixture will give the bread a lovely flavor. Use a brush or spoon to spread it on one side of each slice of sourdough. Make sure the garlic covers the bread well for even taste. Now, take two slices of the sourdough and place them unbrushed side up. On these slices, layer half of the shredded mozzarella cheese. Next, add pepperoni slices evenly over the cheese. Spoon a tablespoon of marinara sauce on top of the pepperoni. Spread it out gently for full flavor. Sprinkle a pinch of Italian seasoning, salt, and freshly cracked black pepper on the sauce. Finally, add the rest of the mozzarella cheese and cap your sandwich with the other two slices of sourdough. The brushed side should face outward. Carefully place the sandwiches into the heated skillet. Cook them for about 3-4 minutes on each side. You want a golden brown crust. Flip the sandwiches gently to avoid spilling the insides. Check the doneness by looking for melted cheese. Once they are cooked, take them out and let them cool for a minute on a cutting board. Slice them in half for a better presentation. Enjoy your pizza grilled cheese delight! For the full recipe, refer to the earlier section. To get the best crunch in your pizza grilled cheese, choose hearty sourdough bread. This bread has a firm crust and soft inside. It holds up well during cooking. You want a slice that won’t fall apart with gooey cheese inside. For cheese melting, fresh mozzarella works wonders. Shred it finely so it melts evenly. This gives you that stretchy, delicious cheese pull. You can also cover the skillet with a lid. This helps the cheese melt faster without burning the bread. You can mix cheeses for more flavor. Try adding sharp cheddar or creamy provolone. These cheeses blend well with mozzarella. It creates a rich taste that jazzes up your sandwich. Feel free to add other pizza toppings too. Some great options are sliced olives, bell peppers, or even mushrooms. Just remember, don’t overload your sandwich. This keeps it easy to grill and eat. Pair your pizza grilled cheese with sides for a full meal. A fresh salad or crispy fries works great. You can also serve it with extra marinara sauce for dipping. This adds a fun twist! For presentation, slice your sandwich diagonally. It makes it more inviting. You can garnish with fresh basil leaves. This small touch adds color and a burst of flavor. Enjoy your delightful dish! {{image_4}} You can make a tasty vegetarian pizza grilled cheese by adding vegetables. Try using bell peppers, mushrooms, or spinach. These fresh toppings give great flavor and texture. You can also use olives or artichokes for a Mediterranean twist. If you want to skip pepperoni, use roasted vegetables instead. Zucchini or eggplant work well. They add depth and keep the sandwich filling. To make a gourmet version, you can add specialty cheeses. Try goat cheese, gouda, or provolone. These cheeses melt beautifully and add rich flavors. Mixing different cheeses can also enhance the taste. Unique sauces can boost flavor too. Instead of marinara, try pesto or a spicy arrabbiata sauce. These sauces give a fresh twist to your grilled cheese. For gluten-free lovers, choose gluten-free bread. Many brands offer great-tasting options that work well. Look for breads made from rice or almond flour. You can also find gluten-free cheese alternatives. Brands like Daiya and Violife offer mozzarella-style cheese. These options melt nicely and taste good. Enjoy your gluten-free pizza grilled cheese without missing out! For the full recipe, check out the [Full Recipe]. To keep your Pizza Grilled Cheese fresh, store leftovers in the fridge. Wrap each sandwich in plastic wrap or foil. This helps prevent them from drying out. You can also place them in an airtight container. They stay good for up to three days. After that, the taste may drop. To reheat, use a skillet over low heat. This way, the bread gets crispy. If you prefer, you can use an oven. Set it to 350°F (175°C) and bake for about 10 minutes. This helps the cheese melt without making the bread soggy. Avoid microwaving. It makes the bread chewy and wet. You can freeze assembled sandwiches for later. Wrap each one tightly in plastic wrap. Then place them in a freezer bag. They can last up to three months. When ready to eat, thaw them in the fridge overnight. Cook them in a skillet or oven until warm and crispy. Enjoy the same great taste as fresh! Don’t forget to check the Full Recipe for more details! For the best flavor, I recommend using fresh mozzarella cheese. It melts beautifully and adds a rich taste. You can mix in some sharp cheddar for a kick. Another option is provolone for a smoky note. Combining these cheeses gives you a great blend. Yes, you can use various breads. If you prefer a softer texture, try white bread or whole wheat. For a crunchier bite, use ciabatta or focaccia. Each bread type brings its own charm to the sandwich. To make it healthier, use whole grain bread. You can also reduce the cheese amount or choose low-fat cheese. Adding fresh veggies like spinach or bell peppers boosts nutrition. Try using a little less olive oil, too. Absolutely! To air fry, preheat your air fryer to 375°F. Assemble your sandwich like in the skillet method. Place it in the air fryer basket. Cook for 5-7 minutes, flipping halfway. This gives you a crispy sandwich with gooey cheese. Enjoy your Pizza Grilled Cheese delight! For the full recipe, check out the main article. In this blog post, we explored how to create a tasty pizza grilled cheese. We covered the best ingredients, from sourdough bread to fresh mozzarella and pepperoni. You learned the steps to prepare, assemble, and cook your sandwich for a perfect bite. I also shared tips for texture and flavor, plus variations for different diets. Remember, this dish is easy to customize! Have fun trying new flavors and ingredients. Enjoy making this delicious meal!](https://mealinmoments.com/wp-content/uploads/2025/05/89eee6a9-0d86-4f46-b6c4-f393dea182e5.webp)
Get ready for a mouthwatering twist on a classic! In this post, you’ll learn how to make an easy Pizza
![- 1 pound ground beef - 1 tube of refrigerated biscuit dough (about 8 biscuits) - 1 teaspoon garlic powder - 1 teaspoon onion powder - 1 tablespoon Worcestershire sauce - Salt and pepper, to taste - 1 cup shredded sharp cheddar cheese - 1/4 cup finely grated Parmesan cheese To make Garlic Parmesan Cheeseburger Bombs, gather these key ingredients. The ground beef forms the heart of the dish. It brings rich flavor and juiciness. The biscuit dough wraps around the filling, creating a delightful outer layer. Next, flavor enhancers like garlic powder and onion powder boost the taste. Worcestershire sauce adds depth and umami. Don't forget salt and pepper for seasoning. Cheese is vital in this recipe. The sharp cheddar adds a creamy texture and bold flavor. The finely grated Parmesan cheese on top gives a nice crust and an extra kick. With these ingredients, you are set to create a fun and tasty snack. For a full recipe, check the complete details. To start, mix the ground beef with spices. In a large bowl, combine: - 1 pound ground beef - 1 teaspoon garlic powder - 1 teaspoon onion powder - Salt and pepper, to taste Use your hands or a spoon to mix until everything blends well. This step enhances the flavor of the beef. Next, add in the cheese and Worcestershire sauce. Stir in: - 1 cup shredded sharp cheddar cheese - 1 tablespoon Worcestershire sauce Mix again until the cheese is evenly distributed. This combination gives your filling a rich and savory taste. Now it’s time to assemble. Open the tube of biscuit dough and separate it into individual biscuits. Flatten each biscuit into a small circle, about 4 inches wide. You can use your hands or a rolling pin for this. Scoop a tablespoon-sized portion of the beef mixture and place it in the center of each biscuit. Gently fold the edges over the filling, pinching them tightly to seal. This keeps the filling from leaking out during baking. Arrange the bombs seam side down on a baking sheet, leaving about 2 inches between each. Preheat your oven to 375°F (190°C). This temperature is key for a perfect bake. Bake the bombs for 15-20 minutes until they puff up and turn golden brown. Once baked, remove them from the oven and let them cool on the sheet for a few minutes. Finally, sprinkle with chopped fresh parsley for a pop of color and freshness. You can find the full recipe details at [Full Recipe]. Enjoy your tasty snack! To achieve the perfect dough texture, handle the biscuit dough gently. Do not overwork it. When you flatten the dough, aim for about 4 inches wide. This size helps wrap the filling well. If the dough is too thick, it may not cook evenly. To avoid leakage during baking, ensure the edges of each bomb are pinched tightly. Seal them well to keep the filling inside. Also, place the bombs seam side down on the baking sheet. This will help them stay closed in the oven. For serving ideas, place the bombs on a rustic wooden board. This adds a nice touch to your table. Offer dips like ketchup, mustard, or a spicy aioli. They make eating these bombs even more fun. Garnishing with fresh parsley makes a big difference. It adds color and freshness. Sprinkle finely chopped parsley on top just before serving. This makes your dish pop. You can add optional spices or ingredients for a twist. Try adding a pinch of smoked paprika or cayenne pepper for heat. If you love extra cheese, include mozzarella or pepper jack in the filling. To make it spicier or cheesier, mix in some jalapeños or crushed red pepper flakes. You could also use a blend of cheeses for more depth. Experiment with your favorite flavors for a unique spin on these bombs. For the full recipe, check out [Full Recipe]. {{image_4}} You can easily swap out the ground beef for turkey. Turkey makes a lighter option. You can also use plant-based meat if you want a vegetarian choice. This way, everyone can enjoy these tasty bombs. For cheese, think beyond cheddar. Try mozzarella for a gooey texture. You could also use pepper jack if you want a spicy kick. Mixing cheeses can create unique flavors. You have options for cooking these bombs. Air frying is a great choice for a crispy outside. Set your air fryer to 375°F and cook for about 10-12 minutes. Grilling is another fun way to cook them. Just wrap the bombs in foil and place them on the grill. This method adds a smoky flavor that is hard to resist. Making mini versions of these bombs is a fun idea. Use smaller biscuit dough pieces to create bite-sized treats. They’re perfect for parties or game days. Pair these bombs with sides like fresh salads or crispy fries. A side of ranch or spicy ketchup makes a great dip. You can also serve them with a cool coleslaw for a refreshing crunch. For the full recipe, check out the Garlic Parmesan Cheeseburger Bombs. Enjoy cooking! To keep your Garlic Parmesan Cheeseburger Bombs fresh, follow these tips: - Refrigeration: Place leftover bombs in an airtight container. They stay fresh for up to 3 days. - Freezing: For longer storage, wrap each bomb in plastic wrap. Store them in a freezer bag. They can last up to 3 months in the freezer. When it's time to enjoy leftovers, use these methods: - Oven: Preheat your oven to 350°F (175°C). Place the bombs on a baking sheet. Heat for about 10-15 minutes until warm. - Microwave: Use a microwave-safe plate. Heat for 30 seconds at a time until heated through. This method may soften the dough. For the best taste, enjoy your bombs within these time frames: - Refrigerated: Consume within 3 days for optimal flavor and texture. - Frozen: For the best quality, eat them within 3 months. - Signs of spoilage: Look for off smells, changes in color, or visible mold. If you notice any, it's best to discard them. For the full recipe, check out the detailed instructions above. To make Garlic Parmesan Cheeseburger Bombs gluten-free, you can use gluten-free biscuit dough. Many brands offer ready-made options in stores. Always check labels to ensure the dough is certified gluten-free. You can also try making your own dough with gluten-free flour blends. Yes, you can make the meat mixture ahead of time. After mixing the ground beef and spices, store it in an airtight container in the fridge. It will stay fresh for up to two days. Just remember to let it come to room temperature before filling the biscuits. These tasty bombs pair great with various sides. Some popular choices include: - French fries - Onion rings - Salad - Veggie sticks with dip You can also serve them with sauces like ketchup, mustard, or ranch for added flavor. For the full recipe, check out the details provided. In this post, we explored how to make tasty Garlic Parmesan Cheeseburger Bombs. We covered main ingredients like ground beef and biscuit dough, plus flavor boosts from spices and cheese options. You learned step-by-step instructions for preparing, assembling, and baking these treats. I shared tips for perfect texture and presentation, noted substitutions, and offered storage tips. These bombs are fun, easy, and great for sharing. Enjoy making them your own!](https://mealinmoments.com/wp-content/uploads/2025/05/76610d5f-9a3c-4808-a9b7-98fa3470a9a9.webp)
Looking for a fun and tasty snack? Try these Garlic Parmesan Cheeseburger Bombs! They combine juicy ground beef, soft biscuit
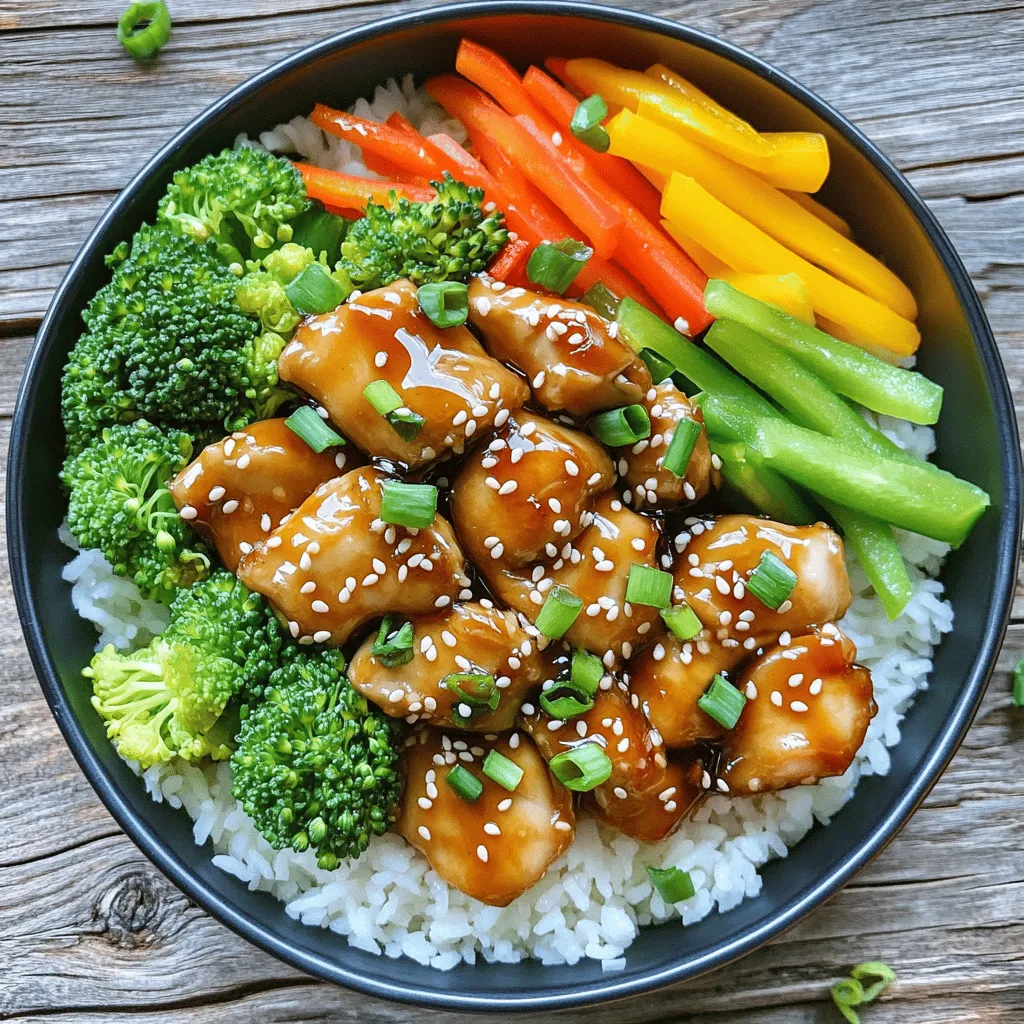
Ready to make dinner easy and delicious? These Easy Chicken Teriyaki Bowls are a hit with everyone! Packed with flavor
![- 1 cup unsalted butter, softened to room temperature - 3/4 cup packed brown sugar - 1/2 cup granulated sugar - 2 large eggs, at room temperature - 2 teaspoons pure vanilla extract - 2 1/4 cups all-purpose flour - 1 teaspoon baking soda - 1/2 teaspoon fine sea salt - 1 cup semi-sweet chocolate chips - 1/2 cup chopped nuts (walnuts or pecans are optional) - Ice cream (for serving, optional but great) Each ingredient plays an important role in making your skillet cookie perfect. The butter gives it that rich, creamy flavor. When using room temperature butter, it mixes well with sugars to create a fluffy texture. The eggs also need to be at room temperature. They help the dough rise and create a chewy center. If you have nut allergies, you can skip the nuts. You can also use dairy-free butter and egg substitutes for dietary restrictions. This way, everyone can enjoy this delicious dessert! For the full recipe, check out the complete instructions. 1. Start by prepping your skillet. I like using a cast-iron skillet for this recipe. Grease the skillet lightly with butter or cooking spray to keep the cookie from sticking. 2. Next, mix your wet ingredients. In a large bowl, combine 1 cup of softened butter, 3/4 cup of brown sugar, and 1/2 cup of granulated sugar. Use an electric mixer to blend them until they are fluffy. 3. Add the eggs, one at a time. Mix well after each egg. This step makes your cookie soft and rich. Then, pour in 2 teaspoons of vanilla extract and mix until it is combined. 4. For the dry ingredients, take another bowl. Whisk together 2 1/4 cups of all-purpose flour, 1 teaspoon of baking soda, and 1/2 teaspoon of sea salt. This mix is key for a balanced flavor. 5. Gradually add the dry mix to the wet ingredients. Stir gently until just combined. Avoid over-mixing; you want a soft dough. 6. Now, fold in 1 cup of semi-sweet chocolate chips and 1/2 cup of chopped nuts if you want. Use a spatula to keep the dough airy and light. - Preheat your oven to 350°F (175°C). This temperature helps bake the cookie evenly. - Pour your dough into the prepared skillet, spreading it out evenly. Bake for about 25 to 30 minutes. Keep an eye on your cookie. It should have golden edges and a soft center. - To check for doneness, insert a toothpick into the center. If it comes out with a few moist crumbs, it’s done. If it’s wet, bake it a bit longer. Let it cool for a few minutes before serving. For the full recipe, refer to the provided instructions to enjoy this delicious treat! To get that chewy center, there are a few key tips to follow. First, do not overmix your dough. Mix just until the dry and wet ingredients combine. Overmixing can lead to a tough cookie. Also, use softened butter. This helps create a rich, creamy texture. Chill your dough for about 30 minutes before baking. Chilling helps control spreading, giving you that perfect cookie shape. Common mistakes often come from oven temperature and baking time. Always preheat your oven to 350°F (175°C). An oven that is too hot will burn the edges. If your cookie skillet looks golden brown around the edges, it’s time to check for doneness. The center should still look slightly soft. It will firm up as it cools. Serving your cookie skillet can be just as fun as making it! I love to add a scoop of vanilla ice cream right on top. The warm cookie and the cold ice cream create a delightful contrast. You can also drizzle caramel or chocolate sauce over the top. For extra crunch, sprinkle some toasted nuts or crushed cookies. Pair your cookie skillet with a cold glass of milk or a warm cup of coffee. Both drinks complement the sweet flavors well. If you're feeling adventurous, try serving it alongside a slice of fruit pie. The flavors blend nicely and create a special dessert experience. For more ideas, check out the [Full Recipe] and explore different toppings! {{image_4}} You can have fun with flavors in your chocolate chip cookie skillet. Here are some ideas: - Different Chocolates: Use dark, milk, or white chocolate chips for a twist. - Fruits: Add chopped nuts or dried fruits like cranberries or cherries. - Seasonal Flavors: For fall, mix in pumpkin spice. In winter, try peppermint extract. These changes can keep your skillet cookie exciting every time you bake it. Making this dessert fit your diet is easy. Here’s how: - Gluten-Free: Swap all-purpose flour for a gluten-free blend. - Vegan: Use coconut oil instead of butter and flax eggs instead of real eggs. - Sweetener Options: Try using coconut sugar or a low-calorie sweetener instead. These swaps help you enjoy this treat without worry. For the full recipe, check out the complete guide. After you enjoy your chocolate chip cookie skillet, let it cool down. This is key to keeping it fresh. Place it in an airtight container. If you don’t have one, cover it tightly with plastic wrap. Store it in the fridge for up to five days. When you want to enjoy it again, you can reheat it. Just slice a piece and pop it in the microwave for about 20 seconds. This will give you that warm, gooey goodness once more. If you want to keep your cookie skillet longer, freezing is a great option. First, let the skillet cool completely. Then, cut it into pieces. Wrap each piece tightly in plastic wrap. Place all the wrapped pieces in a freezer-safe bag. This helps prevent freezer burn. You can freeze it for up to three months. When you’re ready to eat, take a piece out and leave it in the fridge overnight to thaw. Once it’s thawed, reheat it in the microwave for about 30 seconds. Enjoy that fresh-baked taste again! How do I prevent my skillet cookie from burning? To stop your skillet cookie from burning, watch the time closely. Bake it for about 25-30 minutes. The edges should be golden brown while the center stays soft. If it looks too brown, you can cover it with foil. Can I use a different type of skillet? Yes, you can use other oven-safe skillets like stainless steel or ceramic. Just make sure they can handle high heat. Cast iron is best for even baking, but other types work too. What can I substitute for eggs in the recipe? You can use applesauce or mashed bananas as egg substitutes. Use 1/4 cup of either for each egg. Flaxseed meal mixed with water also works well. Mix 1 tablespoon of flaxseed with 2.5 tablespoons of water and let it sit for a few minutes. How long does a chocolate chip cookie skillet last? Your skillet cookie can last up to three days if stored properly. Keep it in an airtight container at room temperature. You can also refrigerate it for longer freshness. Can I make this recipe ahead of time? Yes, you can prepare the dough ahead of time. Chill it in the fridge for up to 24 hours. When you're ready, let it sit at room temp for a bit before baking. What’s the best way to serve this dessert warm? Serve it straight from the oven for the best taste. Add a scoop of ice cream on top for a warm and cold mix. You can also drizzle chocolate sauce over it for extra fun. Where can I buy pre-made cookie skillets? You can find pre-made cookie skillets at some grocery stores or online. Check your local bakery for fresh options. Many stores sell them frozen, which you can bake at home. In this blog post, we explored how to make a delicious chocolate chip cookie skillet. We discussed key ingredients, the importance of room temperature butter and eggs, and how to adjust for dietary needs. I provided step-by-step instructions, baking tips, and serving suggestions to help you succeed. Remember, perfecting your cookie skillet takes practice, but with the right techniques and ideas, you can create a fun dessert for any occasion. Enjoy experimenting with flavors and share this treat with family and friends!](https://mealinmoments.com/wp-content/uploads/2025/05/20d3875c-9ef3-49d6-b50d-d2ce167797a4.webp)
Craving a warm, gooey dessert? Let’s dive into the bliss of a chocolate chip cookie skillet! This easy-to-follow recipe creates

If you’re craving a tasty meal that’s both simple and healthy, you’re in the right place! These Spicy Chickpea Tacos
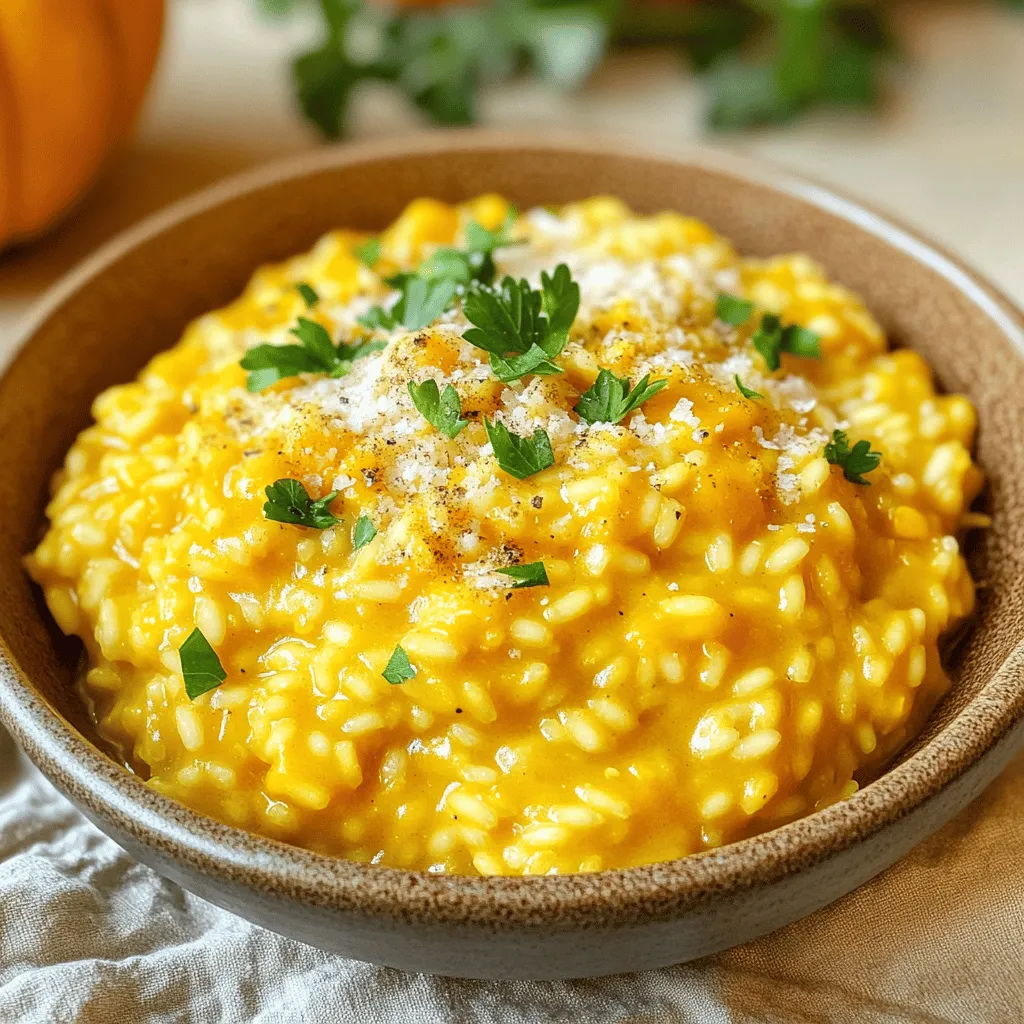
Fall flavors come alive in my Creamy Pumpkin Risotto! This rich and flavorful dish warms the heart with its smooth
