Skip to content
DisclaimerTerms Of UseGDPR PolicyCookie Policy

mealinmoments

  • Home
  • Drinks
  • Appetizers
  • Dinner
  • Dessert
  • About
  • Contact
  • Privacy Policy
DisclaimerTerms Of UseGDPR PolicyCookie Policy

Megan

- 1 lb shrimp: Choose fresh shrimp if possible. Look for shrimp that are firm and smell like the ocean. You can use large shrimp or medium-sized shrimp based on your preference. Sourcing from local markets often ensures better quality. - Fresh vegetables: I like to use cherry tomatoes, avocado, and corn. Cherry tomatoes add sweetness. Avocado gives a creamy texture. Corn brings a nice crunch. You can use fresh corn or canned, but fresh is best when in season. - Essential spices: For this recipe, I use chipotle powder, cumin, and smoked paprika. Chipotle powder gives a smoky heat. Cumin adds warmth and earthiness. Smoked paprika enhances the flavor with a rich, smoky taste. - Olive oil & seasonings: Always choose high-quality extra virgin olive oil. It enhances flavor and adds healthy fat to the dish. Use fresh lime juice and good salt for the best taste. - Quinoa: Quinoa is a great base for this bowl. It's full of protein and fiber. To cook it, rinse the quinoa first to remove any bitterness. Then, use a 2:1 water-to-quinoa ratio. Cook it until it fluffs up nicely. - Canned black beans: When choosing black beans, look for organic options without added sugar. Rinse them well to remove excess sodium. They add protein and fiber, making the bowl more filling. For the full recipe, follow the details in the previous section. To make the marinade, combine the following in a large bowl: - 1 lb shrimp, peeled and deveined - 2 tablespoons extra virgin olive oil - 1 teaspoon chipotle powder - 1 teaspoon ground cumin - 1/2 teaspoon smoked paprika - Juice of 2 fresh limes - Salt and freshly ground black pepper, to taste Stir gently to coat the shrimp well. This step is key for flavor. Let the shrimp marinate for 15-20 minutes. This gives the spices time to seep in. While the shrimp marinates, cook the quinoa. Use 2 cups of water for 1 cup of quinoa. Bring the water to a boil, then add the quinoa. Cover and reduce the heat to low. Cook for about 15 minutes. When done, remove from heat and let it sit for 5 minutes. Fluff the quinoa with a fork to make it light and airy. Heat a large skillet over medium-high heat. Once hot, add the shrimp in a single layer. Cook for about 2-3 minutes on each side. Watch for the shrimp to turn pink and opaque. This means they are fully cooked. Remove from heat. Start with a scoop of quinoa as the base in each bowl. Then, layer the following ingredients: - 1 cup canned black beans, rinsed and drained - 1 cup cherry tomatoes, halved - 1/4 cup corn (fresh or canned) - 1 ripe avocado, diced Arrange them in sections for a pretty look. Finally, top each bowl with the cooked shrimp. Sprinkle fresh cilantro over the shrimp for a burst of flavor. Serve with lime wedges on the side for a zesty touch. Enjoy your Chipotle Lime Shrimp Bowl with this [Full Recipe]. To make your Chipotle Lime Shrimp Bowl just right, you can adjust the spice. If you like more heat, add extra chipotle powder. For less spice, use less. You can also mix in some lime zest for a bright kick. For garnishing, consider topping with fresh cilantro or a slice of lime. This not only adds flavor but also makes your bowl look pretty. A sprinkle of sea salt can enhance all the flavors too. You can save time by preparing ingredients ahead. Cook your quinoa and let it cool. You might even want to make it the day before. Keep canned black beans on hand for quick use. They save you time on soaking and cooking. Using pre-cooked quinoa is smart. This lets you whip up the dish quickly. You can also rinse canned black beans to make them clean and ready to eat. You have a few options for cooking shrimp. Grilling adds a smoky flavor, while pan-searing is quick and easy. Both methods work well, so choose what fits your kitchen best. If you have leftover shrimp, don’t toss it! You can use it in tacos, salads, or even pasta. Just reheat gently to keep the shrimp tender. {{image_4}} You can switch shrimp for chicken or tofu in your bowl. If you choose chicken, use boneless, skinless chicken breast. Cut it into small pieces. Marinate it the same way as shrimp. Cook the chicken until it reaches 165°F. This will take about 5-7 minutes on medium heat. For tofu, use firm or extra-firm tofu. Cut it into cubes and marinate. Cook it for about 4-5 minutes until golden. Adjust cooking times to ensure the proteins are fully cooked and flavorful. Want to add sweetness? Toss in mango or pineapple chunks. These fruits pair well with the spicy chipotle. You can also try different spices. Cajun or Italian seasoning can change the flavor profile. Use a dash of your favorite spice mix to make it unique. These changes keep the dish fresh and fun. Experiment and find what you love most! Using seasonal produce makes your bowl even better. In the summer, add fresh corn or zucchini. In the fall and winter, consider roasted butternut squash or Brussels sprouts. These ingredients change the taste and keep your meals varied. You will enjoy the fresh flavors that each season brings. Adjust your bowl based on what is available and in season. This will make your cooking more sustainable and delicious. To keep your Chipotle Lime Shrimp Bowl fresh, store leftovers in an airtight container. Make sure to cool the bowl to room temperature before sealing. This helps prevent sogginess. It can stay good in the fridge for up to 3 days. After that, the shrimp may lose texture and taste. If you want to save it for later, you can freeze the bowl. However, some parts freeze better than others. The shrimp and quinoa freeze well, but fresh veggies like avocado and tomatoes do not. Assemble the bowl without these ingredients before freezing. When you’re ready to eat, thaw it overnight in the fridge. To reheat, warm the shrimp and quinoa in a skillet over low heat. Stir often to keep the texture nice. Avoid the microwave, as it can make shrimp rubbery. Add fresh veggies and a squeeze of lime just before serving for that fresh taste. Enjoy your meal! A Chipotle Lime Shrimp Bowl is a tasty meal featuring shrimp marinated in chipotle spices and lime juice. This dish blends fresh and bold flavors. It likely comes from Mexican cuisine, where lime and chili are common. The shrimp is cooked quickly and served over quinoa with veggies. This bowl is colorful, healthy, and easy to make. Yes! To make a gluten-free Chipotle Lime Shrimp Bowl, use gluten-free quinoa. Ensure that your spices are gluten-free too. Most canned black beans are gluten-free, but always check the label. You can replace any other non-gluten ingredients with gluten-free options without losing flavor. To amp up the heat, add more chipotle powder or fresh chopped jalapeños. You can also use a dash of hot sauce or cayenne pepper. If you want extra spice, consider marinating the shrimp longer to absorb more flavor. Adjust each ingredient to your taste. This bowl pairs well with a simple side salad or grilled vegetables. You could also serve it with tortilla chips and salsa for a crunchy texture. Another great option is a refreshing mango salsa that adds sweetness. Each side enhances the meal. Yes! A Chipotle Lime Shrimp Bowl is healthy and balanced. Shrimp are high in protein and low in calories. Quinoa adds fiber and essential nutrients. The fresh veggies, like tomatoes and avocado, provide vitamins and healthy fats. Overall, this dish is a great choice for a nutritious meal. In this post, we explored how to create a delicious Chipotle Lime Shrimp Bowl. We covered essential ingredients, step-by-step cooking instructions, and tips for perfecting flavor. You can adjust the recipe to fit your tastes or switch proteins easily. Remember, fresh and quality ingredients make a big difference. Cook with confidence and enjoy this tasty dish. Experimenting will help you discover new flavors you love. Get ready to enjoy a healthy meal that’s easy to make and fun to share!

Chipotle Lime Shrimp Bowl Flavorful and Fresh Recipe

Are you craving a fresh and tasty meal that’s easy to make? Look no further than my Chipotle Lime Shrimp

- 1 cup glutinous rice (sticky rice) - 1 1/2 cups coconut milk - 1/2 cup granulated sugar - 2 ripe mangoes, peeled and cut into thin slices - 1 tablespoon sesame seeds or shredded coconut - Fresh mint leaves Selecting Ripe Mangoes Pick mangoes that are slightly soft to the touch. They should smell sweet and fruity. Look for a vibrant color, as this indicates ripeness. Avoid mangoes with dark spots or wrinkles. Choosing the Best Coconut Milk Select a high-quality coconut milk for the best flavor. Look for brands with minimal additives. For a richer taste, choose full-fat coconut milk. Shake the can before opening to mix the cream and liquid well. For the full recipe, check out the details above. - Rinsing the Rice: Start by rinsing 1 cup of glutinous rice. Use cold, running water. Rinse until the water runs clear. This step removes excess starch and keeps the rice from being too sticky. - Soaking Recommendations: Next, soak the rinsed rice in water. Cover it completely and leave it for at least 3 hours. For the best texture, soak it overnight. - Steaming Process: After soaking, drain the rice well. Set up a steamer by lining it with cheesecloth or a clean kitchen towel. Place the soaked rice in the steamer. Steam over boiling water for about 30 to 40 minutes. The rice should be tender and sticky when done. - Combining Ingredients: While the rice steams, grab a saucepan. Mix 1 1/2 cups of coconut milk, 1/2 cup of granulated sugar, and 1/4 teaspoon of salt in it. - Heating and Dissolving Sugar: Heat the mixture over medium heat. Stir it often until the sugar dissolves completely. Don't let the mixture boil; keep it warm. - Mixing Rice and Sauce: Once the rice is ready, transfer it to a large bowl. Pour 1 cup of the warm coconut sauce over it. Fold the rice gently to mix. Let it rest for about 10 minutes. This helps the rice soak up the sauce. - Slicing the Mango: Take 2 ripe mangoes and peel them. Cut them into thin slices or wedges. Aim for nice, neat pieces to make the dish look great. - Plating the Dish: To serve, place a good portion of sticky rice on a plate. Add the sliced mango next to it. - Drizzling with Coconut Sauce: Drizzle the remaining coconut sauce over the rice and mango. This adds extra flavor and makes it look beautiful. Enjoy your Tropical Mango Sticky Rice! For the complete recipe, check the Full Recipe section. - Soaking Duration: Soak glutinous rice for at least 3 hours. For best results, soak it overnight. This helps soften the grains and enhances the sticky texture. - Steaming Tips: Use a steamer lined with cheesecloth. Make sure the water is boiling before placing the rice in. Steam for 30 to 40 minutes until the rice is tender and sticky. - Coconut Sauce Variations: You can add a splash of vanilla extract to the coconut sauce. This gives a warm flavor that pairs well with the mango. - Additional Dairy-Free Options: If you want a nutty twist, try using almond or cashew milk instead of coconut milk. This change adds a unique depth to the dish. - Arranging Mango Slices: Slice the mangoes thinly and fan them out on the plate. This makes the dish look more inviting and colorful. - Creative Garnishing Techniques: Sprinkle sesame seeds or shredded coconut on top for added texture. Fresh mint leaves not only look great but also add a fresh taste to each bite. For the full recipe, check out the Tropical Mango Sticky Rice instructions. {{image_4}} You can swap mangoes for other tropical fruits. Pineapple, papaya, or banana work well. Each fruit brings a unique taste. For seasonal options, try strawberries in summer or apples in fall. These fruits add a twist and keep the dish exciting. This recipe can fit many diets. For gluten-free needs, glutinous rice is naturally safe. If you want vegan options, use plant-based sugar and coconut milk. Both choices keep the dish rich and creamy without animal products. Get creative by mixing in different ingredients. Add a splash of lime juice for tang. You can also try a little ginger for warmth. Incorporating other Asian flavors like matcha or black sesame can elevate the dish. Each addition creates a new experience, making it fun to explore. When you have leftover Tropical Mango Sticky Rice, store it in the fridge. Place the rice in an airtight container. This keeps it fresh for about 2 to 3 days. Make sure to cover the mango slices. They can brown quickly. To enjoy the mango slices, eat them within a day. If you want to save your sticky rice for longer, freezing is a great option. Allow the rice to cool completely before freezing. Place it in a freezer-safe bag or container. Remove as much air as possible to prevent freezer burn. You can freeze it for up to a month. Just remember to label the bag with the date. To reheat sticky rice, use a steamer if possible. This method keeps the rice moist and fluffy. You can also microwave it. Add a splash of water to the rice and cover it. Heat for 30-second intervals until warm. Avoid heating too long to prevent it from drying out. Enjoy your Tropical Mango Sticky Rice just like fresh! To select ripe mangoes, look for a few key signs. Choose mangoes that are slightly soft when you gently squeeze them. They should have a sweet aroma near the stem. The skin color varies by type, but a golden hue often means ripeness. Avoid mangoes with dark spots or wrinkles. Using regular rice won’t give the same sticky texture. Glutinous rice, also known as sticky rice, is essential for this dish. It absorbs coconut milk well, creating a creamy finish. For the best results, stick with glutinous rice. Tropical Mango Sticky Rice can last up to three days in the fridge. Store it in an airtight container to keep it fresh. Make sure to separate the mangoes from the rice to avoid sogginess. Yes, you can make this dish ahead of time. Prepare the sticky rice and coconut sauce in advance. Just slice the mangoes right before serving to keep them fresh. This way, you save time and still impress your guests. If you need a substitute for coconut milk, use almond milk or cashew milk. These alternatives add creaminess but have different flavors. You can also make a blend of regular milk with a little coconut extract for a similar taste. Tropical Mango Sticky Rice is a delightful treat made from simple, fresh ingredients. We’ve looked at how to select ripe mangoes and the best coconut milk for flavor. I shared step-by-step cooking tips and creative ways to serve this dish. Remember, you can customize it with different fruits or clever garnishes. Enjoy making this recipe. It’s easy and fun, and it brings a taste of the tropics to your kitchen. Try it today!

Tropical Mango Sticky Rice Fresh and Tasty Delight

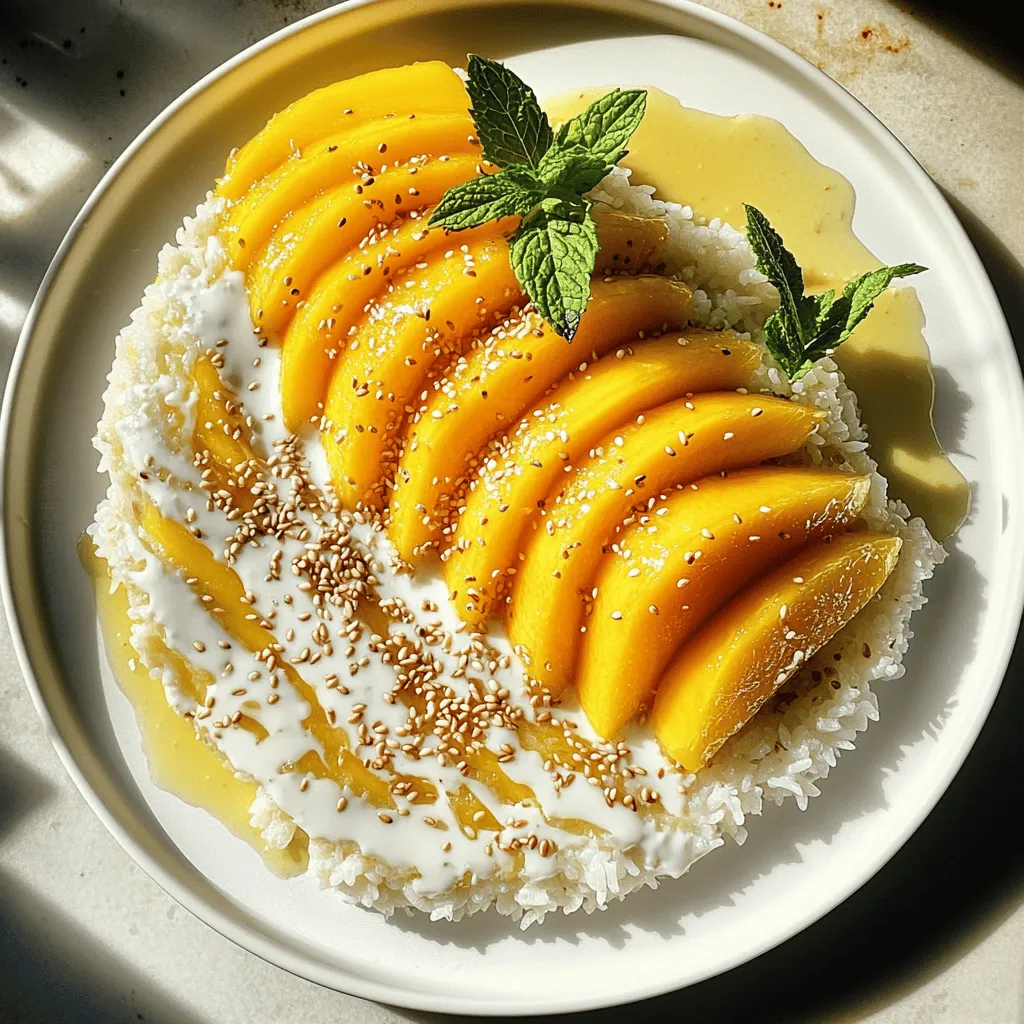
If you’re craving a sweet and fresh treat, look no further than Tropical Mango Sticky Rice! This dish combines creamy

To make Meat Lovers Pizza Tacos, you need these key items: - 1 lb ground beef - 1/2 lb Italian sausage, casing removed - 1/2 lb pepperoni slices - 1 cup shredded mozzarella cheese - 1 cup pizza sauce - 8 small flour tortillas - 1/2 cup chopped bell peppers (red and green) - 1/2 cup sliced black olives - 1/4 cup grated Parmesan cheese - Fresh basil leaves for garnish - Olive oil for cooking - Salt and pepper to taste These ingredients create a rich, savory taco that bursts with flavor. You can add extra ingredients for more flavor: - Sliced jalapeños for heat - Fresh spinach for a healthy touch - Diced onions for extra crunch - Avocado for creaminess - A sprinkle of red pepper flakes for spice Feel free to mix and match to suit your taste. Having the right tools makes cooking easier: - Large skillet for browning meat - Shallow pan for warming tortillas - Spatula for stirring and flipping - Measuring cups and spoons for accuracy - Baking sheet for broiling tacos These tools help ensure a smooth cooking process and great results. For the full recipe, check the details above. Start by heating a large skillet over medium heat. Add a drizzle of olive oil to the pan. Once the oil is hot, add the ground beef and Italian sausage. Season them with salt and pepper. Cook the meat, stirring often, until it’s browned and cooked through. This should take about 7 to 10 minutes. After cooking, drain any extra fat from the skillet. Next, stir in half of the pepperoni slices. Let them cook for another 2 minutes. This helps blend the flavors together very well. While the meat mixture cooks, take a shallow pan and warm the tortillas. Heat them over low heat for about 30 seconds on each side. This makes them soft and easy to fold. After warming, cover the tortillas with a clean kitchen towel. This keeps them warm and pliable until you are ready to assemble. Now it’s time to build your tacos! Spread about one tablespoon of pizza sauce on each tortilla. Next, add a generous scoop of the meat mixture on top of the sauce. Sprinkle a hearty amount of shredded mozzarella cheese over the meat. Then, evenly add the remaining pepperoni slices, chopped bell peppers, and sliced black olives on top of the cheese. Place these assembled tacos under a broiler for 2 to 3 minutes. Watch them closely! You want the cheese to melt and bubble, not burn. Once the cheese is melted to your liking, take the tacos out of the oven. Sprinkle them with grated Parmesan cheese and fresh basil leaves for a burst of flavor. Serve the tacos warm and enjoy the tasty blend of flavors in your Meat Lovers Pizza Tacos! For the complete recipe, check out the Full Recipe section. To make perfect tacos, start with high-quality ingredients. Use fresh ground beef and sausage for the best flavor. Always cook meats in a hot skillet. This helps brown the meat evenly. Don't forget to drain excess fat after cooking. Add half of the pepperoni to the meat mix for extra flavor. When warming tortillas, be gentle. Heat them just enough to make them soft and pliable. For a great presentation, use a large platter. Arrange the tacos neatly and garnish with fresh basil leaves. You can add a bowl of marinara sauce for dipping. A side salad brings freshness to your meal. Try adding colorful veggies to brighten up the plate. This makes your dish look more inviting and appetizing. A common mistake is overcooking the meat. It should be browned but not dry. Keep an eye on the cheese under the broiler. You want it bubbly, not burnt. When assembling, don’t overload the tortillas. Less is more! If you stuff them too much, they may tear. Lastly, serve the tacos right away. They taste best when warm and fresh. For the complete recipe, check out the Full Recipe link. {{image_4}} You can make Meat Lovers Pizza Tacos vegetarian by swapping out the meat. Use a mix of mushrooms, zucchini, and bell peppers. These veggies add a great texture and flavor. You can also try plant-based sausage or ground meat. Use your favorite cheese and keep the pizza sauce. This way, you still get that delicious pizza taste without the meat. For a gluten-free version, use corn tortillas instead of flour. Corn tortillas have a nice flavor and hold up well. Check labels for gluten-free pizza sauce and cheese. You can use gluten-free sausage or ground beef as well. This keeps the dish safe for those with gluten sensitivities while still being tasty. Feel free to mix and match different meats in your tacos. You can use chicken or turkey for a lighter option. For a spicy kick, add chorizo or spicy sausage. Bacon bits can also add a crispy, rich flavor. The key is to find meats you enjoy. Each combination offers a new flavor profile while keeping that classic pizza taste. After a fun meal, you might have some tacos left. To store them, place the tacos in an airtight container. Keep them in the fridge. They will stay fresh for up to three days. If you have extra toppings, store them separately. This helps keep everything fresh. When you want to eat your leftover tacos, you can reheat them easily. The best way is to use an oven. Preheat the oven to 350°F (175°C). Place the tacos on a baking sheet. Heat for about 10 minutes. This method keeps them crispy. You can also microwave them. Just place them on a microwave-safe plate. Heat for 30 seconds to 1 minute, checking often. If you want to save the tacos for a longer time, you can freeze them. First, let them cool completely. Then, wrap each taco in plastic wrap. Place wrapped tacos in a freezer bag. Squeeze out the air and seal it tightly. You can freeze them for up to three months. To eat, thaw them in the fridge overnight and reheat as mentioned above. This way, you can enjoy your Meat Lovers Pizza Tacos anytime! For the full recipe, check out the main section. Yes, you can switch the cheese. Try cheddar, provolone, or even gouda. Each cheese adds a unique flavor. Cheddar gives a sharp taste, while gouda adds a creamy texture. Feel free to mix cheeses for extra flavor too! You have many options for toppings! Add fresh veggies like spinach, mushrooms, or onions. You can also try jalapeños for heat. If you like more meat, add cooked bacon or ham. Don’t forget about sauces! BBQ or ranch can give a fun twist. To reheat tacos, use an oven or a skillet. Preheat your oven to 350°F (175°C). Place tacos on a baking sheet and heat for about 10 minutes. If using a skillet, warm them on low heat for about 5 minutes. This keeps them crispy and delicious. For a quick fix, use the microwave but wrap them in a damp paper towel to avoid sogginess. For the full recipe, check out the complete instructions and enjoy your cooking! Meat lovers pizza tacos are a fun twist on two classics. We covered essential ingredients, cooking tips, and ways to store leftovers. You can even make veggie or gluten-free versions. Remember, with a few simple steps, you can create a tasty meal. Experiment with flavors and share your tacos with friends and family. Enjoy the process and make it your own!

Savory Meat Lovers Pizza Tacos Easy Cooking Recipe

Craving a new twist on dinner? Try my savory Meat Lovers Pizza Tacos! This easy cooking recipe combines all your

- 1 cup all-purpose flour - 1/2 cup unsweetened cocoa powder - 1/2 cup packed brown sugar - 1/4 cup granulated sugar - 1/2 cup unsalted butter, melted - 1/4 teaspoon salt - 1 can (14 oz) sweetened condensed milk - 1 cup granulated sugar (for the caramel) - 1/4 cup heavy cream - 1 teaspoon vanilla extract - 1/2 teaspoon sea salt (for topping) - 1/4 cup semi-sweet chocolate chips (optional, for drizzling) The key ingredients in salted caramel bars are simple but essential. The flour and cocoa powder create a rich base. Butter adds flavor and moisture. Sweetened condensed milk gives the bars their creamy texture. Salt brings out the sweet notes in the caramel. - 1/4 cup chopped nuts (like pecans or walnuts) - 1/2 teaspoon espresso powder (for a coffee flavor) - Sea salt flakes (for a gourmet touch) You can add nuts for crunch or espresso powder for depth. Both variations balance well with the sweetness. A sprinkle of sea salt flakes on top enhances the look and taste. - 8x8 inch baking dish - Parchment paper - Medium saucepan - Mixing bowls - Whisk - Rubber spatula Having the right tools makes cooking easier. An 8x8 inch baking dish is perfect for even baking. Parchment paper helps with easy removal. A medium saucepan is key for making caramel. Use a whisk to combine dry ingredients and a spatula for mixing. For the full recipe, check out the detailed steps. To start, preheat your oven to 350°F (175°C). Grab an 8x8 inch baking dish and line it with parchment paper. Let the paper hang over the sides; this helps you lift the bars out later. In a medium bowl, whisk together the all-purpose flour, cocoa powder, brown sugar, granulated sugar, and salt. Mix until it looks even. Now, pour in the melted butter. Stir until it feels like wet sand. Firmly press this mixture into the bottom of the lined dish. Make sure it's even across the base. Bake the crust for 10 to 12 minutes. It should feel slightly firm but still soft. Let it cool a bit after baking. While the crust cools, let’s make the caramel. In a medium saucepan, add 1 cup of granulated sugar. Place it over medium heat. Watch carefully as it melts. Stir constantly until it turns a rich caramel color. This will take about 5 to 7 minutes. Caution! When the sugar melts, it can be very hot. Carefully pour in the heavy cream. It will bubble up, so be careful. Stir until it’s smooth. Then, mix in the sweetened condensed milk and vanilla extract. Keep stirring and cook for another 2 to 3 minutes. Once your caramel is ready, pour it evenly over the cooled crust. Make sure to cover every bit. Now, sprinkle sea salt generously on top. Let the bars cool at room temperature first. Then, place them in the fridge for at least 2 hours. This helps them set properly. After chilling, grab the edges of the parchment paper and lift the bars out of the dish. Cut them into squares or bars as you like. If you want to add a fancy touch, melt some semi-sweet chocolate chips. Drizzle them over the bars for extra flair. Enjoy your delicious salted caramel bars from this Full Recipe! To get smooth caramel, heat sugar slowly. Stir it often as it melts. Aim for a rich amber color. If it burns, start over. Once you add cream, keep stirring until smooth. The key is patience. Don’t rush this step. If you notice lumps, just keep stirring. They will dissolve. Salt enhances sweetness. Use sea salt for a great touch. Start with a small amount. Taste your caramel before adding more salt. You want a balanced flavor, not too salty or sweet. When serving, add a pinch of salt on top. This makes each bite pop! Avoid cooking sugar too fast. It can burn easily, ruining your caramel. Don’t skip the cooling step for the crust. This helps the layers stick well. Also, ensure your cream is at room temperature before adding it to caramel. Cold cream can cause splattering. Lastly, cut bars only after they fully set. This keeps them neat and pretty. For more insights, check the Full Recipe for Salted Caramel Delight Bars. {{image_4}} To make gluten-free salted caramel bars, swap all-purpose flour for a gluten-free blend. Look for a blend that combines rice flour, potato starch, and tapioca flour. This mix mimics the texture of regular flour well. When you bake, check that the crust holds together just like the original. The taste remains rich and delicious. For a vegan version, use plant-based butter instead of regular butter. You can also switch sweetened condensed milk for coconut cream or a store-bought vegan version. These swaps keep the bars creamy and tasty while being friendly to a vegan diet. Just make sure your chocolate chips are dairy-free, too. You can change up the flavors in many fun ways. For nutty bars, add chopped walnuts or pecans into the crust. This adds crunch and taste. If you prefer fruity flavors, try mixing in dried cherries or cranberries. They add a nice tartness to balance the sweet caramel. You can even add a hint of orange zest for a citrus twist. Each variation makes the bars unique and exciting! To keep your salted caramel bars fresh, store them in an airtight container. Place parchment paper between layers if you stack them. This prevents sticking and keeps them intact. Keep the container in a cool, dry place. Avoid direct sunlight or heat sources. If it's warm, the caramel can get gooey. Freezing these bars is simple. First, let them cool completely. Then, cut them into squares or bars. Wrap each piece in plastic wrap. After that, place the wrapped bars in a freezer bag. Squeeze out all the air before sealing. They can stay in the freezer for up to three months. Salted caramel bars last about a week at room temperature. If you refrigerate them, they stay fresh for up to two weeks. The cold helps preserve the texture and flavor. Just remember to bring them back to room temperature before serving. This makes them taste even better! To make salted caramel from scratch, you need just three main ingredients: sugar, cream, and salt. First, heat sugar in a pot over medium heat. Stir it until it melts and turns golden. This takes about 5 to 7 minutes. Next, carefully add heavy cream. It will bubble, so be cautious. Stir until smooth. Finally, mix in sea salt to taste. This process gives you a rich flavor that adds depth to your salted caramel bars. You can find great salted caramel bars at local bakeries and specialty shops. Many gourmet stores also carry them. If you prefer online shopping, websites like Amazon and artisanal bakeries often sell unique versions. Look for bars made with high-quality ingredients for the best taste. Don't forget to check reviews to ensure you pick the best options available. Yes, you can use different types of chocolate in this recipe. Dark chocolate, milk chocolate, or even white chocolate will work well. Each type gives a unique taste. If you want a richer flavor, dark chocolate is a great choice. Milk chocolate will add sweetness, while white chocolate brings creaminess. Feel free to experiment with what you like best. Check out the Full Recipe for guidance on variations! In this article, we explored how to make salted caramel bars. We covered key ingredients, step-by-step instructions, and tips for perfect bars. Remember, achieving the right caramel texture is key. Don't shy away from trying gluten-free or vegan options for variety. Proper storage keeps them fresh longer. With these insights, you can create tasty treats that impress. Enjoy your baking and savor every bite!

Salted Caramel Bars Irresistible Sweet Treat Recipe

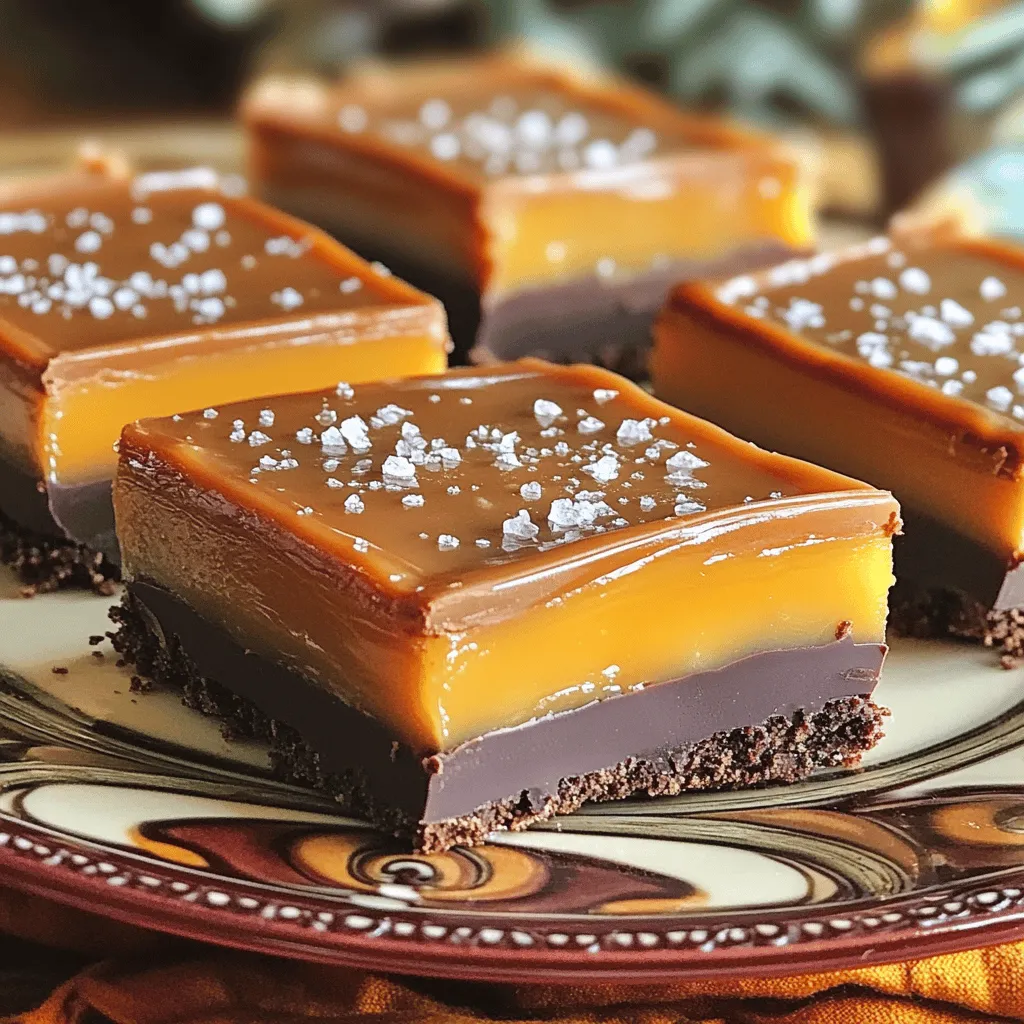
Are you ready to whip up a sweet masterpiece? My salted caramel bars are the perfect blend of gooey and

To make your Pineapple Cream Cake, gather these ingredients: - 1 cup all-purpose flour - 1/2 cup granulated sugar - 1/4 cup unsalted butter, softened at room temperature - 1/2 cup milk, at room temperature - 1 teaspoon baking powder - 1/4 teaspoon salt - 1/2 teaspoon vanilla extract - 1 cup crushed pineapple, well-drained - 1 cup heavy cream, chilled - 2 tablespoons powdered sugar - Fresh pineapple slices and mint leaves for garnish Choosing the best pineapple is key. Look for these signs: - A sweet smell at the base. - Firm skin without soft spots. - Leaves that are green and fresh. - A golden color, especially at the bottom. These signs show that the fruit is ripe and ready to eat. Fresh pineapple will add a juicy burst of flavor to your cake. If you're missing an ingredient, here are some great substitutes: - All-purpose flour: Use cake flour for a lighter texture. - Granulated sugar: Coconut sugar offers a unique taste. - Unsalted butter: Use coconut oil for a dairy-free option. - Milk: Almond or oat milk can replace regular milk. - Heavy cream: Full-fat coconut cream works well for a vegan option. These substitutes help you adjust the recipe to your taste or needs. You can still create a delightful cake while keeping it personal and fun! For the complete recipe, check out the Full Recipe provided. First, you need to prepare your cake pan. Grab an 8-inch round cake pan. Lightly grease it with butter or cooking spray. This step helps prevent your cake from sticking later. Make sure to cover the bottom and sides well. Preheat your oven to 350°F (175°C) while you work on the batter. Start by creaming the softened butter and granulated sugar. Use an electric mixer for about 2-3 minutes. You want it to look light and fluffy. Next, add the milk and vanilla extract. Mix until everything blends smoothly. Now, in a separate bowl, whisk together the flour, baking powder, and salt. This helps avoid lumps. Mix the dry ingredients into the wet mixture slowly. Stir just until combined. Avoid overmixing, as it can make your cake dense. Lastly, fold in the drained crushed pineapple gently. This adds a tropical flavor to each bite. Pour the batter into your prepared cake pan. Spread it out evenly on top. Place it in the oven and bake for 25-30 minutes. To test for doneness, insert a toothpick into the center. If it comes out clean, your cake is ready. The top should be golden brown. Let the cake cool in the pan for about 10 minutes. Then remove it and place it on a wire rack to cool completely. This keeps the cake fluffy and moist. For a stunning finish, whip the cream and layer it generously on top after cooling. You can find the full recipe to guide you through this process. To make your cake moist and fluffy, use room temperature ingredients. Cold ingredients can lead to a dense texture. Be sure to cream the butter and sugar well. This step adds air to your batter, making it light. Fold in the crushed pineapple gently. This helps keep the cake airy without deflating it. One big mistake is overmixing the batter. When you mix too much, the cake can become tough. Always mix until just combined. Another mistake is not measuring ingredients correctly. Use measuring cups and spoons for accuracy. Finally, do not skip cooling the cake properly. If you cut into it too soon, it can crumble and lose moisture. Start with chilled heavy cream for the best results. Use a clean bowl and beaters to prevent any grease. Beat on medium speed until soft peaks form. This takes about 2-3 minutes. Avoid overwhipping, as this can turn your cream grainy. For extra sweetness, add powdered sugar while whipping. This creates a smooth and sweet topping for your cake. For the full recipe, check out the details provided earlier. {{image_4}} You can make your pineapple cream cake even more tropical by adding coconut. Simply mix in 1/2 cup of sweetened shredded coconut to the batter. This will give your cake a delightful chewiness and a richer flavor. When you slice your cake, you'll see the beautiful flecks of coconut alongside the crushed pineapple. It’s a fun twist that brings a taste of the tropics right to your kitchen. While whipped cream is delicious, you can try other frostings. A cream cheese frosting pairs nicely with pineapple. Just blend 8 oz of cream cheese with 1/4 cup of butter, 1 cup of powdered sugar, and 1 teaspoon of vanilla. This frosting adds a tangy flavor that balances the sweetness of the cake. You might also consider a simple glaze made from powdered sugar and pineapple juice for a lighter option. You can easily adapt this recipe for different diets. For a gluten-free cake, use a gluten-free flour blend in place of all-purpose flour. Make sure to check that your baking powder is gluten-free too. For a vegan version, swap the butter for coconut oil or vegan butter, and use almond or soy milk instead of dairy. Replace heavy cream with coconut cream for a rich topping. These options ensure everyone can enjoy this delicious cake! To keep your leftover pineapple cream cake fresh, wrap it tightly in plastic wrap. This helps keep moisture in and prevents it from drying out. Place the wrapped cake in an airtight container. Store it in the fridge for up to five days. If you want to enjoy it later, freezing is a great option. To freeze your cake, first ensure it is completely cool. Slice the cake into pieces if you prefer single servings. Wrap each piece in plastic wrap, then place them in a freezer-safe bag. Make sure to label the bag with the date. You can freeze the cake for up to three months. Thaw the pieces in the fridge before serving for the best taste. For whipped cream, keep any leftover cream in a clean, airtight container. Store it in the fridge and use it within two days. If you need to keep it longer, consider whipping it fresh again. You can also stabilize whipped cream by adding a bit of powdered sugar or cornstarch when whipping. This helps it hold up better for a longer time. Follow the full recipe to make this dessert even more delightful! You can tell the cake is done when a toothpick comes out clean. It should also look golden and spring back when you lightly touch it. Baking times can vary, so start checking around 25 minutes. Trust your senses; the smell will be delightful! Yes, you can make this cake a day before serving. Just store it in an airtight container at room temperature. If you want to keep it fresh longer, refrigerate it. Just wait to add the whipped cream topping until right before serving. You can get creative with toppings! Here are some tasty ideas: - Toasted coconut flakes - Chopped nuts, like pecans or walnuts - Fresh berries for a pop of color - A drizzle of chocolate or caramel sauce These options can add texture and flavor to your cake. At higher altitudes, you may need to adjust your baking. Decrease the sugar by 1-2 tablespoons. Also, add an extra tablespoon of flour. This helps the cake rise better in thin air. Keep an eye on the baking time, as it may need more or less time. In this article, we explored the key ingredients for Pineapple Cream Cake, along with tips for baking success. I shared how to select fresh pineapple and suggested substitutes. We also covered moisture tips, common mistakes, and variations like coconut and dietary modifications. Lastly, I explained storage methods for your cake. Remember, happy baking leads to delicious results. Enjoy your cake, and share it with friends!

Pineapple Cream Cake Delightful and Easy Recipe

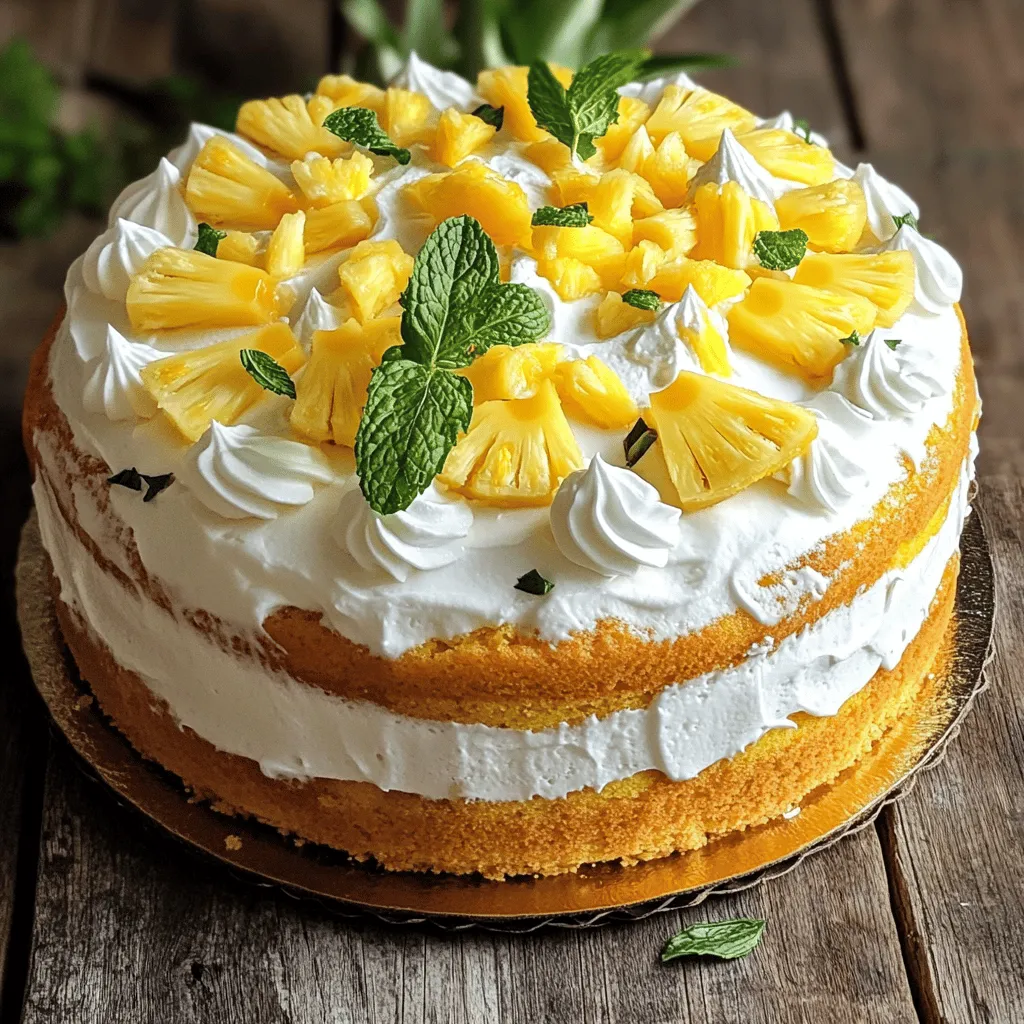
Welcome to my Pineapple Cream Cake recipe! This cake is a fruity delight that’s simple to make. You only need

- 10 cups of popped popcorn - 1 cup unsalted butter - 2 cups packed brown sugar - 1/2 cup light corn syrup - 1 teaspoon pure vanilla extract - 1/2 teaspoon baking soda - 1/2 teaspoon sea salt - 1 cup assorted mixed nuts - 1 cup chocolate chips You can swap some ingredients if needed. Here are a few ideas: - Caramel Sauce: Instead of making caramel from scratch, you can use store-bought caramel sauce. It's fast and easy. - Nuts: Feel free to use different nuts like walnuts or peanuts. Just pick what you love! - Dietary Options: To make this snack gluten-free, choose gluten-free popcorn. For a vegan option, use coconut oil instead of butter. You can also find dairy-free chocolate chips. These choices make Moose Munch Caramel Popcorn fun and easy for everyone. You can enjoy this treat your way! If you want the full recipe, you can find it above. 1. Start by preheating your oven to 250°F (120°C). 2. Line a large baking sheet with parchment paper. This helps with easy cleanup. 3. Pop 10 cups of popcorn according to package directions. 4. After popping, carefully remove any unpopped kernels. Place the popcorn in a large bowl. 1. In a medium saucepan, melt 1 cup of unsalted butter over medium heat. 2. Stir in 2 cups of packed brown sugar and 1/2 cup of light corn syrup. 3. Bring the mixture to a gentle boil. Stir constantly to avoid burning. 4. Once it boils, let it cook without stirring for 4-5 minutes. 5. Carefully take the saucepan off the heat. Add 1 teaspoon of pure vanilla extract, 1/2 teaspoon of baking soda, and 1/2 teaspoon of sea salt. 6. Watch out! The mixture will bubble up. This is normal and part of the fun! 1. Pour the hot caramel sauce over the popcorn in the bowl. 2. Use a spatula or wooden spoon to mix well. Make sure every piece is coated. 3. Add 1 cup of assorted mixed nuts to the bowl. Fold them in gently. 1. Spread the caramel-coated popcorn evenly on the prepared baking sheet. 2. Place the sheet in the preheated oven. Bake for about 1 hour. 3. Stir the mixture every 15 minutes. This keeps it from burning and helps coat all the popcorn. 1. While the popcorn cools, melt 1 cup of chocolate chips in a microwave-safe bowl. 2. Heat the chocolate in 30-second intervals. Stir in between until it's smooth. 3. Drizzle the melted chocolate over the cooled popcorn mixture. 4. Let the chocolate set for about 30 minutes. 5. Break the popcorn into fun clusters to enjoy! For the full recipe, check out the detailed steps. To coat your popcorn evenly with caramel, work quickly. Pour the hot caramel sauce over the popcorn and mix right away. Use a large spatula to fold the popcorn gently. This helps spread the caramel without crushing the popcorn. To avoid burning and ensure crunchiness, keep an eye on your baking time. Stir the popcorn every 15 minutes while it bakes. This prevents any pieces from getting too dark. The goal is a nice golden color, not burnt. For serving, think outside the box! You can use fun themed containers for parties. Colorful bags look great as gifts too. Fill them with Moose Munch and tie them with a ribbon. This adds a personal touch that friends will love. Make sure your caramel is the right consistency. If it’s too thin, it won’t coat well. If too thick, it won’t stick. A soft ball stage is ideal. Watch your baking time closely. Over-baking can lead to hard popcorn, while under-baking means it won’t be crunchy. Striking the right balance is key to perfect Moose Munch! {{image_4}} You can easily change the taste of Moose Munch Caramel Popcorn. One fun way is to add spices. A dash of cinnamon gives it warmth. Nutmeg adds a nice twist too. You can also throw in dried fruits. Cranberries add a tartness, while raisins give a sweet touch. These simple additions elevate the flavor and make each bite unique. Chocolate can take your Moose Munch to the next level. You can choose between milk, dark, or white chocolate. Each type brings a different taste. If you want a richer flavor, go for dark chocolate. If you prefer something sweeter, milk chocolate is your best bet. You can also add chocolate chunks or drizzles on top. This adds a fun texture and makes it look amazing. Nuts add crunch and nutrition to your popcorn. You can use walnuts, peanuts, or even cashews. Each nut gives a different flavor. If you want a nut-free option, you can skip them entirely. Your Moose Munch will still taste great without them. Just remember to add more popcorn or chocolate to fill the mix! To keep your Moose Munch caramel popcorn fresh, store it in an airtight container. This step helps lock in flavors and prevents moisture from ruining the crunch. If you use a glass jar with a tight lid or a sealable plastic bag, it works well. How long does it last? If stored properly, Moose Munch can last up to two weeks. After that, it may start to lose its crispness. If your popcorn becomes stale, don’t fret! You can refresh it easily. Spread the popcorn on a baking sheet and pop it in a preheated oven at 250°F (120°C) for about 10 minutes. This will help restore some crunch. For leftovers, consider mixing it with other snacks or using it as a topping for ice cream. It adds a tasty twist! Moose Munch caramel popcorn makes a great gift or treat to share. You can package it in decorative bags or boxes. Add a fun label or a personal note to make it special. Use it as a thoughtful gift for friends or family on special occasions. Everyone loves a sweet, crunchy snack! Moose Munch Caramel Popcorn is a sweet and crunchy snack. It blends popcorn, caramel, and nuts. The flavor is rich, buttery, and slightly salty. You get a delightful mix of textures with every bite. The caramel coats the popcorn, making it sticky and fun to eat. Each handful brings joy, perfect for sharing or enjoying alone. Yes, you can easily customize Moose Munch Caramel Popcorn. You might add your favorite nuts like peanuts or walnuts. For a fruity twist, consider dried cranberries or cherries. If you love spice, sprinkle cinnamon or nutmeg into the caramel. You can even swap chocolate types. Dark chocolate gives a bold taste, while milk chocolate adds creaminess. You can find Moose Munch Caramel Popcorn at many local stores. Check specialty food shops and major grocery chains. Online, retailers like Amazon often carry it. If you like making it at home, try following the full recipe. This way, you can enjoy it fresh and customize it to your taste. To make Moose Munch Caramel Popcorn, start by popping about 10 cups of popcorn. Melt 1 cup of butter in a saucepan. Add 2 cups of brown sugar and 1/2 cup of corn syrup. Stir and let it boil for 4-5 minutes. Then, mix in vanilla, baking soda, and sea salt. Pour the caramel over the popcorn, stirring gently. Add in 1 cup of mixed nuts for crunch. Bake at 250°F for 1 hour, stirring every 15 minutes. Finally, drizzle melted chocolate on top. Enjoy this sweet treat! In this post, we explored how to make Moose Munch Caramel Popcorn. You learned about essential ingredients, step-by-step instructions, and useful tips to make it perfect every time. Remember, customizing flavors can make this treat even more special. Whether you share it as a gift or enjoy it yourself, it’s sure to please. Keep experimenting with different nuts and chocolate to find your favorite mix. Moose Munch offers a fun and delicious experience that you can enjoy anytime!

Moose Munch Caramel Popcorn Irresistible Snack Delight

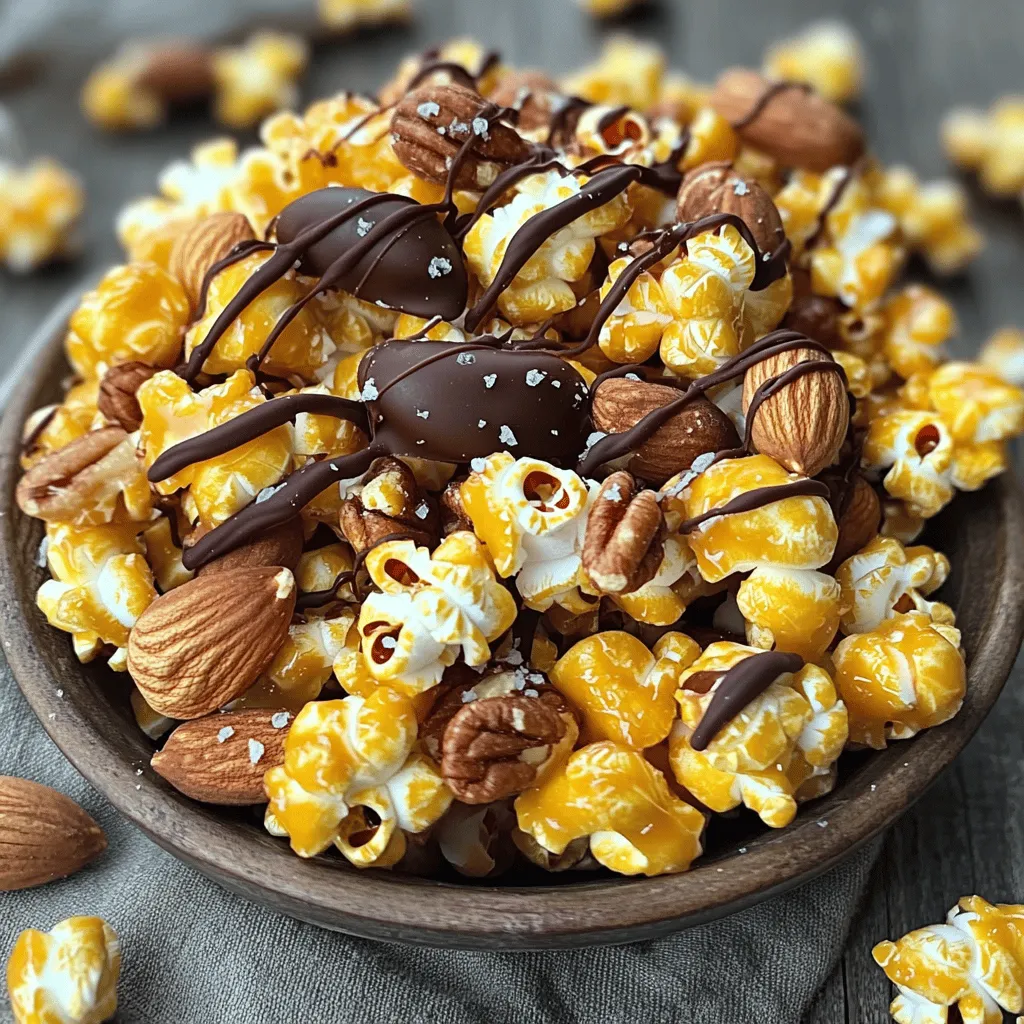
Craving a sweet and salty treat? Let me introduce you to Moose Munch Caramel Popcorn! This irresistible snack combines light

- 1 cup rolled oats - 1 cup almond milk (or any milk of your choice) - 1 ripe banana, sliced - 2 tablespoons peanut butter (choose between creamy or crunchy for texture) - 1 tablespoon honey or maple syrup (optional, for added sweetness) - 1/2 teaspoon vanilla extract - 1/4 teaspoon ground cinnamon - A pinch of salt - Chopped nuts and additional banana slices for garnishing When you gather these ingredients, you set the stage for a tasty breakfast. The rolled oats are the base, giving you fiber that keeps you full. Almond milk adds creaminess and flavor. The ripe banana brings natural sweetness and a lovely texture. Peanut butter is the star here. You can choose creamy for smoothness or crunchy for a fun bite. Honey or maple syrup is optional. It adds sweetness if you like it that way. Vanilla extract gives depth to the flavor, while ground cinnamon adds warmth. Finally, a pinch of salt balances all the flavors. Don’t forget the chopped nuts and extra banana slices. They are great for topping. They make your dish look pretty and add a nice crunch. This recipe is simple yet full of deliciousness. For the complete steps, check out the Full Recipe. 1. In a medium bowl, combine 1 cup of rolled oats and 1 cup of almond milk. 2. Next, add 2 tablespoons of peanut butter. You can choose creamy or crunchy, based on your taste. 3. Then, mix in 1 tablespoon of honey or maple syrup if you want extra sweetness. 4. Add 1/2 teaspoon of vanilla extract, 1/4 teaspoon of ground cinnamon, and a pinch of salt. Stir everything well. 5. Now, gently fold in half of the sliced banana. Be careful not to mash them. 6. Transfer this mixture to a mason jar or an airtight container. 1. Layer the remaining banana slices on top of the oat mixture. This step makes it look nice. 2. Seal the jar tightly, then place it in the fridge for at least 4 hours or overnight. This wait lets the oats soak up the liquid and become soft. 1. When you're ready to eat, stir the oats well. 2. If the oats seem too thick, add a splash of almond milk to make them creamier. 3. Serve the oats in bowls, topping them with extra banana slices and some chopped nuts for crunch. For the full recipe, you can refer to the ingredients list above. Enjoy your delightful breakfast! To get the best texture, soak your oats for at least 4 hours. This gives them time to absorb the liquid and soften. If you want to skip overnight soaking, aim for a minimum of 30 minutes. If your oats are too thick, just add a splash of almond milk when you serve them. This helps to loosen the mixture without losing flavor. Adjusting sweetness is easy; taste before you seal your jar. If you want more sweetness, stir in more honey or maple syrup. Serving your oats in mason jars gives a fun look. It also makes them easy to grab on busy mornings. You can use bowls for a cozy feel, too. To make your oats extra tasty, drizzle some peanut butter on top. Sprinkle a little cinnamon for added flavor. For a creative twist, try adding toppings like seeds, coconut flakes, or even fresh berries. This adds color and crunch to your dish. For the full recipe, check the details above. Enjoy your tasty morning treat! {{image_4}} You can change up the taste of your peanut butter banana overnight oats easily. Try using different nut butters like almond or cashew. Each nut butter adds a unique flavor. You can also mix in cocoa powder or protein powder for an extra health boost. This can make your breakfast more filling. Flavored dairy alternatives, like vanilla almond milk, can give your oats a tasty twist too. Toppings can make your overnight oats even better. Fresh fruits, like berries or apples, add sweetness and color. Seeds such as chia or flaxseed offer health benefits, too. They are rich in fiber and omega-3s. For extra crunch, sprinkle some granola on top. This adds texture and makes your meal more fun to eat. If you have dietary needs, you can still enjoy this recipe. Use gluten-free oats if you have gluten sensitivities. This makes the dish safe for everyone. For vegan options, switch to plant-based sweeteners like maple syrup. These small changes let you enjoy tasty overnight oats without worry. For the full recipe, check out the detailed instructions above. How long do overnight oats last in the refrigerator? Overnight oats stay fresh for about 3 to 5 days in the fridge. This makes them perfect for meal prep! What containers should I use? Use airtight containers or mason jars. These keep your oats fresh and tasty. They also help prevent spills. How can I stop banana slices from browning? To avoid browning, add a splash of lemon juice on the banana slices. You can also add the bananas right before serving. How do I freeze overnight oats? To freeze, portion your oats into containers. Leave some space for expansion. Seal them tight and place them in the freezer. How do I thaw frozen oats? To thaw, move the oats to the fridge overnight. You can also warm them in the microwave for a quick meal. What happens to texture after thawing? The texture may change slightly. Frozen oats can become a bit softer. Stir well and add a splash of milk for creaminess. For the full recipe, check out the Peanut Butter Banana Overnight Oats section. Rolled oats work best for overnight oats. They soak up liquid well and soften nicely. Quick oats can also be used but may become too mushy. Steel-cut oats take longer to soften and are not ideal for this recipe. You can use steel-cut oats, but they need more time to soak. I recommend soaking them for at least 12 hours. Steel-cut oats offer a chewier texture compared to rolled oats. You can use almond milk or any plant-based milk. Coconut milk, soy milk, or oat milk are great options too. These alternatives add flavor and keep the dish creamy. Soaking the oats overnight is key. It helps the oats absorb the liquid and become soft. If you are in a hurry, let them soak for at least 4 hours. Yes, you can make several servings at once. Just layer your oats in separate jars. This way, you have easy, grab-and-go breakfasts ready for the week. Check out the Full Recipe for a detailed guide on making these tasty oats! Overnight oats are simple and fun to make. You learned how to mix basic ingredients, like oats and almond milk, to create a tasty breakfast. You can customize flavors and toppings to fit your taste. Remember to let them chill overnight for the best results. With these tips and variations, you can enjoy overnight oats daily. So grab your jars, get creative, and enjoy this easy, healthy meal!

Peanut Butter Banana Overnight Oats Easy Recipe

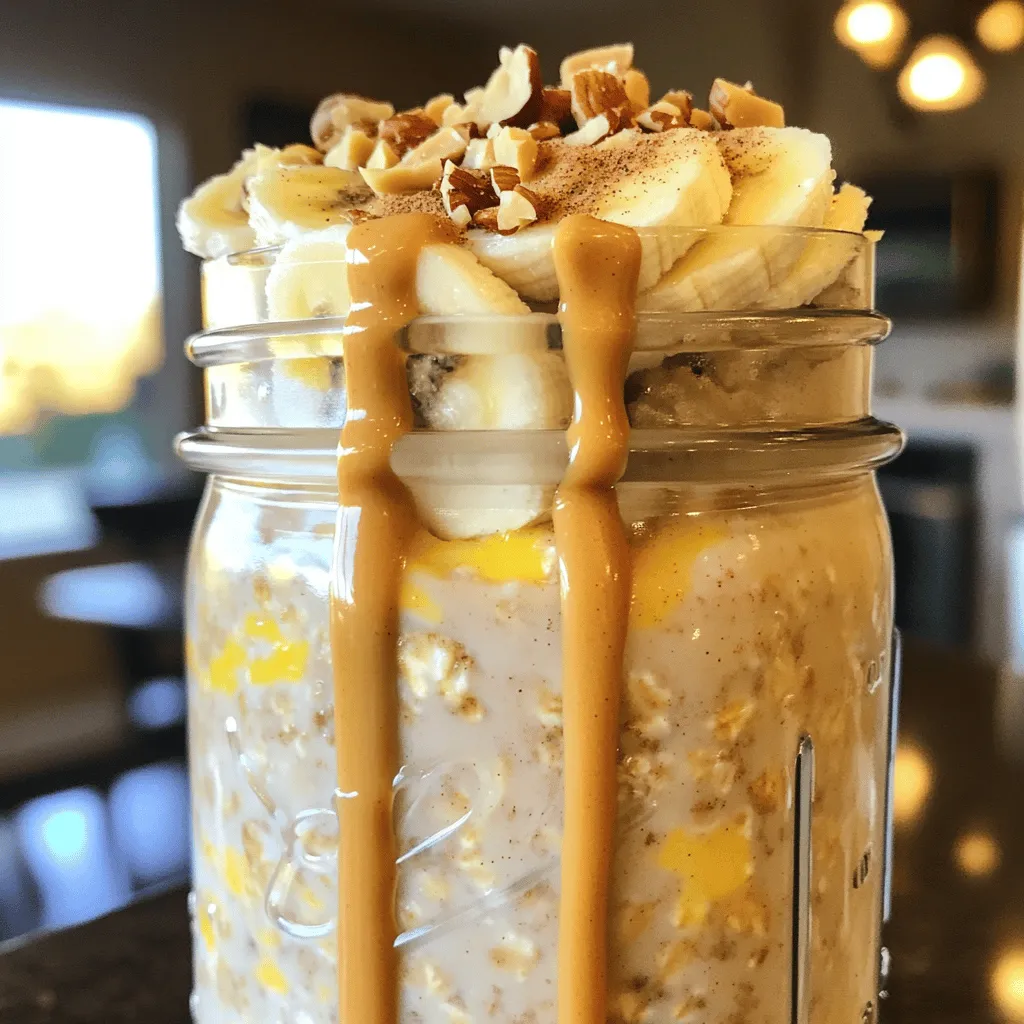
Get ready for a tasty breakfast option that’s quick and easy! Peanut butter banana overnight oats are not only delicious

- 1 cup graham cracker crumbs - 1/4 cup unsweetened shredded coconut - 1/4 cup granulated sugar - 1/2 cup unsalted butter, melted - 1 (14 oz) can coconut milk - 1 cup heavy cream - 1/2 cup powdered sugar - 3 tablespoons cornstarch - 1/4 teaspoon salt - 1 teaspoon vanilla extract - 2 large egg yolks - Toasted coconut flakes for topping To make these Coconut Cream Pie Bars, gather your ingredients first. Start with the graham cracker crumbs. They create a tasty base. The shredded coconut adds great texture. Granulated sugar sweetens the crust perfectly. Melt unsalted butter helps bind it all together. Next, for the filling, you need coconut milk. It gives the bars a rich flavor. Heavy cream adds creaminess to the filling. Use powdered sugar to sweeten it all up. Cornstarch thickens the filling nicely. A bit of salt enhances all the flavors. And don’t forget vanilla extract for that lovely aroma. Lastly, you need two egg yolks to make the filling rich and smooth. Toasted coconut flakes are perfect for topping. They add a nice crunch and boost the coconut taste. With these ingredients ready, you are set to make a delightful treat. You can find the full recipe in the article. Enjoy! - Set oven temperature to 350°F (175°C). - Combine graham cracker crumbs, shredded coconut, granulated sugar, and melted butter. - Press the mixture into an 8x8 inch baking dish. - Whisk together coconut milk, heavy cream, cornstarch, powdered sugar, and salt. - Heat the mixture over medium heat, stirring continuously. You want it to thicken slowly. - Lightly beat the egg yolks in a small bowl. - Temper with hot cream mixture. This means adding a bit of the hot mix to the yolks, stirring fast to avoid cooking them. - Return the mixture to the saucepan and continue cooking. Stir it well until it thickens. - Pour the filling over the cooled crust. Make sure it spreads evenly. - Let it chill in the refrigerator. This will help the bars set properly. - Cut the chilled bars into squares. - Top with toasted coconut flakes. This gives a nice crunch and enhances flavor. For the full recipe, refer to the section above. Enjoy making these delicious bars! To make the best crust, press the graham cracker mixture evenly. This helps create a uniform layer. Bake it until it turns lightly golden. This color gives the crust a great texture and flavor. For a creamy filling, stir the mixture continuously while cooking. This keeps lumps from forming. When adding the egg yolks, temper them with hot coconut cream. This step prevents the yolks from scrambling. Presentation matters! Use a sharp knife for clean cuts. This makes the bars look neat. Lastly, garnish generously with toasted coconut. It adds a lovely crunch and enhances the coconut flavor. Enjoy each bite of your Coconut Cream Pie Bars! {{image_4}} - Add chocolate: You can mix in chocolate for a Coconut Chocolate Cream Pie Bar. Just melt some chocolate and stir it into the coconut cream filling. The rich chocolate adds a deep flavor that pairs well with the coconut. - Incorporate lemon zest: For a bright twist, add lemon zest to the filling. The zesty lemon gives a lovely contrast to the sweet coconut. Just a teaspoon or two can make a big difference in taste. - Substitute gluten-free graham crackers: For those who need a gluten-free dessert, swap out regular graham crackers for gluten-free ones. This keeps the texture similar while making it safe for gluten-sensitive folks. - Use dairy-free alternatives: You can make these bars vegan by using coconut cream instead of heavy cream and plant-based butter. This way, everyone can enjoy them without worry about dairy. - Pair with whipped cream: Serve the bars with a dollop of whipped cream on top. This adds a creamy layer that enhances the dish's richness. - Offer alongside fresh fruit: Fresh fruit like berries or sliced bananas can brighten up the plate. The fruit’s freshness balances the sweetness of the bars, making each bite a delight. For the full recipe, check out the Coconut Cream Pie Bars section above. Store your coconut cream pie bars in an airtight container. They will stay fresh in the refrigerator for up to one week. This way, you can enjoy a sweet treat whenever you want. For longer storage, freeze the bars. Individually wrap each bar in plastic wrap or foil. This will keep them fresh for up to three months. When you’re ready to enjoy them, just pull them out of the freezer. Thawing is easy. Simply place the frozen bars in the refrigerator overnight. This ensures they thaw gently. They will be ready to serve the next day, just like freshly made. Enjoy your delicious coconut cream pie bars! Coconut cream pie bars typically last up to one week in the fridge. Store them in an airtight container to keep them fresh. If you notice any change in texture or smell, it’s best to discard them. Yes, they're perfect for making a day in advance. Preparing them ahead allows the flavors to meld beautifully. Just remember to chill them for at least four hours before serving. You can use almond milk or heavy cream as suitable substitutes. Both options will still give you a creamy filling. If you prefer a lighter option, almond milk works well. To thicken the coconut cream filling effectively, ensure proper heating and continuously stir the mixture. This prevents lumps and helps achieve a smooth texture. Once it simmers, it will thicken nicely. Yes, unsweetened coconut provides a less sugary option for garnish. It adds a great texture and coconut flavor without extra sweetness. You’ll enjoy the crunch it brings to your bars. For the full recipe, check out the detailed instructions above. You now have a simple guide to make delicious Coconut Cream Pie Bars. We covered key ingredients, step-by-step instructions, and tips for success. Remember to chill the bars well for the best texture. Feel free to try different flavors or make dietary swaps. These bars store well, making them perfect ahead of time. Enjoy the creamy coconut flavor in every bite and impress your friends and family with this easy treat!

Coconut Cream Pie Bars Irresistible Dessert Delight

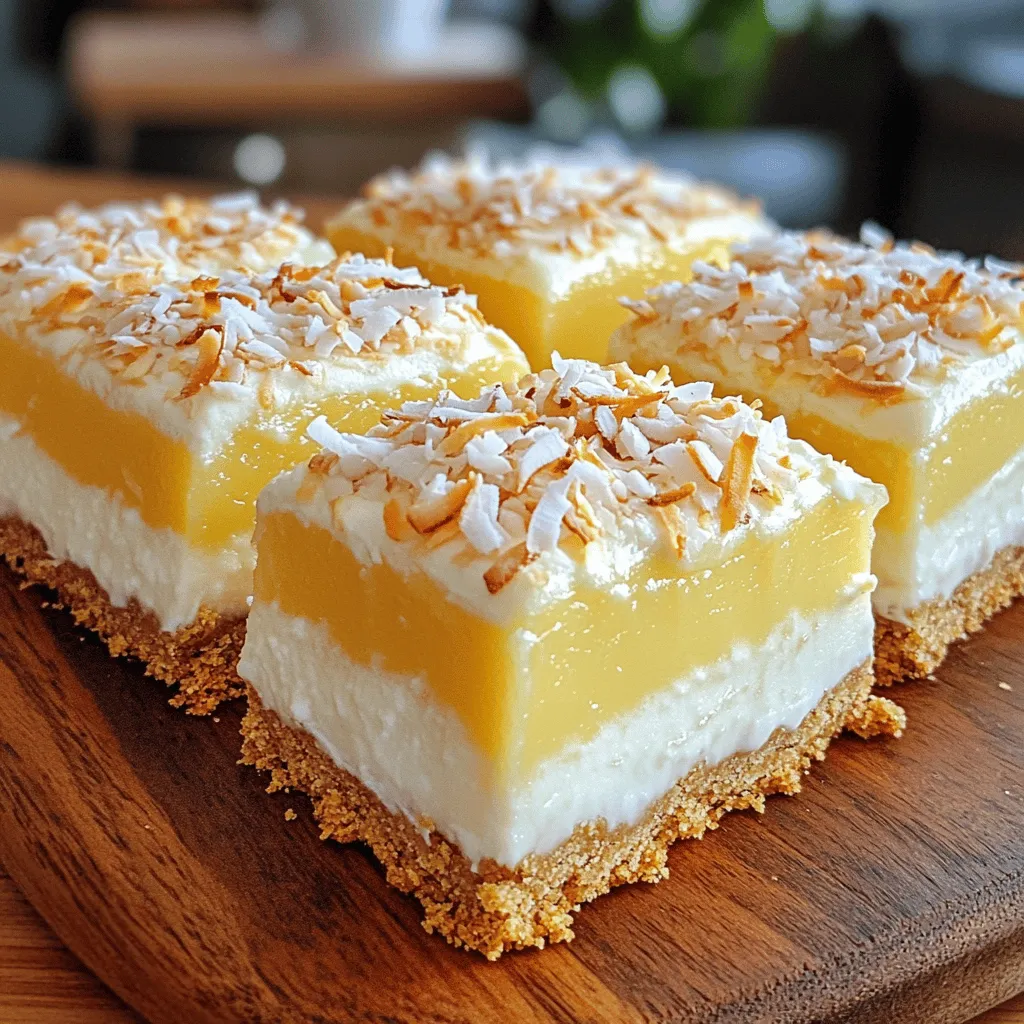
Coconut Cream Pie Bars are an easy, sweet treat that everyone loves. With layers of buttery crust and creamy coconut

- 1 cup all-purpose flour (heat-treated) - ½ cup packed brown sugar - ½ cup granulated sugar - ½ cup unsalted butter, softened to room temperature - 1 teaspoon pure vanilla extract - 1 cup mini chocolate chips The base of our dip starts with heat-treated all-purpose flour. This step kills any bad bacteria. Next, we use unsalted butter and sugars to create a creamy and sweet mix. The chocolate chips add the fun. You can use mini chocolate chips for that perfect bite. - 2 tablespoons milk (adjust for desired consistency) - A pinch of salt Milk helps to make the dip creamy. Start with two tablespoons. You can add more if needed. A pinch of salt enhances the sweet flavors. Adding vanilla extract gives a warm, inviting taste. For dipping, graham crackers are a classic choice. Crunchy apple slices add a fresh crunch. Salted pretzels offer a tasty contrast. To make it extra special, drizzle melted chocolate on top. You can also sprinkle sea salt for a delightful touch. Serve in a nice bowl for a beautiful display. 1. Start by mixing the base ingredients. In a large bowl, combine ½ cup of softened unsalted butter, ½ cup of packed brown sugar, and ½ cup of granulated sugar. 2. Use an electric mixer or a sturdy spatula. Cream these ingredients until light and fluffy. This usually takes about 2-3 minutes. 3. Next, mix in 1 teaspoon of pure vanilla extract. Make sure it blends well with the butter and sugars. 4. Now, it's time to incorporate the flour. Carefully add 1 cup of heat-treated all-purpose flour and a pinch of salt. Mix gently until everything is combined. You want the dough to form without over-mixing. 5. For the fun part, fold in 1 cup of mini chocolate chips. Make sure they are evenly distributed throughout the dip. 1. To get the dip just right, you'll need to adjust the milk levels. Start by adding 2 tablespoons of milk to the mixture. Stir well. 2. Check the consistency. If it's too thick for your liking, add more milk a little at a time until it's creamy. 3. For a perfect texture, aim for a smooth and spreadable dip. If needed, you can always taste and adjust the sweetness or creaminess by adding more sugar or milk. 1. Once you're happy with the dip, transfer it to a stylish serving bowl. Use a spatula to smooth the surface for an appealing look. 2. Cover the bowl with plastic wrap and chill it in the refrigerator. Let it sit for about 30 minutes. This helps all the flavors come together. 3. When ready to serve, consider adding a drizzle of melted chocolate or a sprinkle of sea salt on top. It adds a nice touch and enhances the flavor. For those eager to whip up this delightful treat, check out the Full Recipe! - Over-mixing the dough: This can make your dip too dense. Mix just until combined. - Neglecting to heat-treat the flour: Raw flour can carry germs. Heat-treat it for safety. - Sweetness adjustments: Taste your dip and add more sugar if needed. You can also reduce sugar for a less sweet taste. - Additional mix-ins for variety: Try adding nuts or different chocolates. These can add fun textures and flavors. - Best mixing tools: I recommend using a hand mixer for a smooth consistency. A sturdy spatula works well too. - Ideal serving dishes: Use a clear bowl to show off the dip. A pretty dish makes it more inviting for guests. {{image_4}} Want to switch things up? You can add nuts for crunch. Chopped walnuts or pecans work great. They give a nice texture and flavor to the dip. You can also try different types of chocolate chips. Use dark chocolate for a richer taste. White chocolate adds sweetness. Even peanut butter chips can make it fun! For a gluten-free option, swap the all-purpose flour with a gluten-free blend. Make sure the blend is meant for baking. If you want a vegan dip, use vegan butter and non-dairy milk. Also, choose vegan chocolate chips. This way, everyone can enjoy the treat! You can create holiday versions too. Add pumpkin spice for fall fun! It gives a warm, cozy flavor. For special occasions, think of colors! Use colored sprinkles or festive toppings. You can even shape the dip into fun forms for parties. This makes it more exciting and pleasing to the eyes! To keep your chocolate chip cookie dough dip fresh, store it in the fridge. Use an airtight container to prevent it from absorbing other smells. Make sure the dip is covered tightly. The ideal temperature for refrigeration is below 40°F (4°C). This keeps the dip safe to eat and helps it stay fresh. You can freeze the dip if you want to save it for later. Use a freezer-safe container and leave some space at the top. The dip will expand as it freezes. When you're ready to enjoy it, take it out and thaw it in the fridge overnight. This helps maintain its creamy texture. Avoid thawing it in the microwave, as this may change the dip's consistency. The dip will last about 5 days in the fridge. If you freeze it, it can last for up to 3 months. Always check for signs that the dip has gone bad. If you see mold or if it smells off, it’s best to throw it away. Keeping an eye on these details ensures you enjoy your chocolate chip cookie dough dip at its best. No, you should not use regular flour. Heat-treated flour is safe for raw consumption. It helps to kill any harmful bacteria that might be present. This makes your dip safe to eat right away. You can dip many yummy things in this dip! Here are some great options: - Graham crackers - Apple slices - Pretzels - Vanilla wafers - Fresh strawberries Each of these dippers adds a fun twist to your experience. This dip is quick to make! Here’s a breakdown: - Prep time: 10 minutes - Chill time: 30 minutes - Total time: 40 minutes You can have this treat ready in just over half an hour! Yes, you can make it ahead! I recommend making it a day before. Store it in the fridge for the best taste. Just cover it well to keep it fresh. Enjoy it when you're ready! This blog post explored creating a delicious chocolate chip cookie dough dip. We covered main and optional ingredients, serving suggestions, and step-by-step instructions for preparation. You learned tips to avoid common mistakes and enhance flavor. I also shared variations for dietary needs and seasonal events, plus storage tips for freshness. Enjoy making this treat for any occasion. It’s easy, fun, and sure to impress!

Chocolate Chip Cookie Dough Dip Delightful and Easy Blend

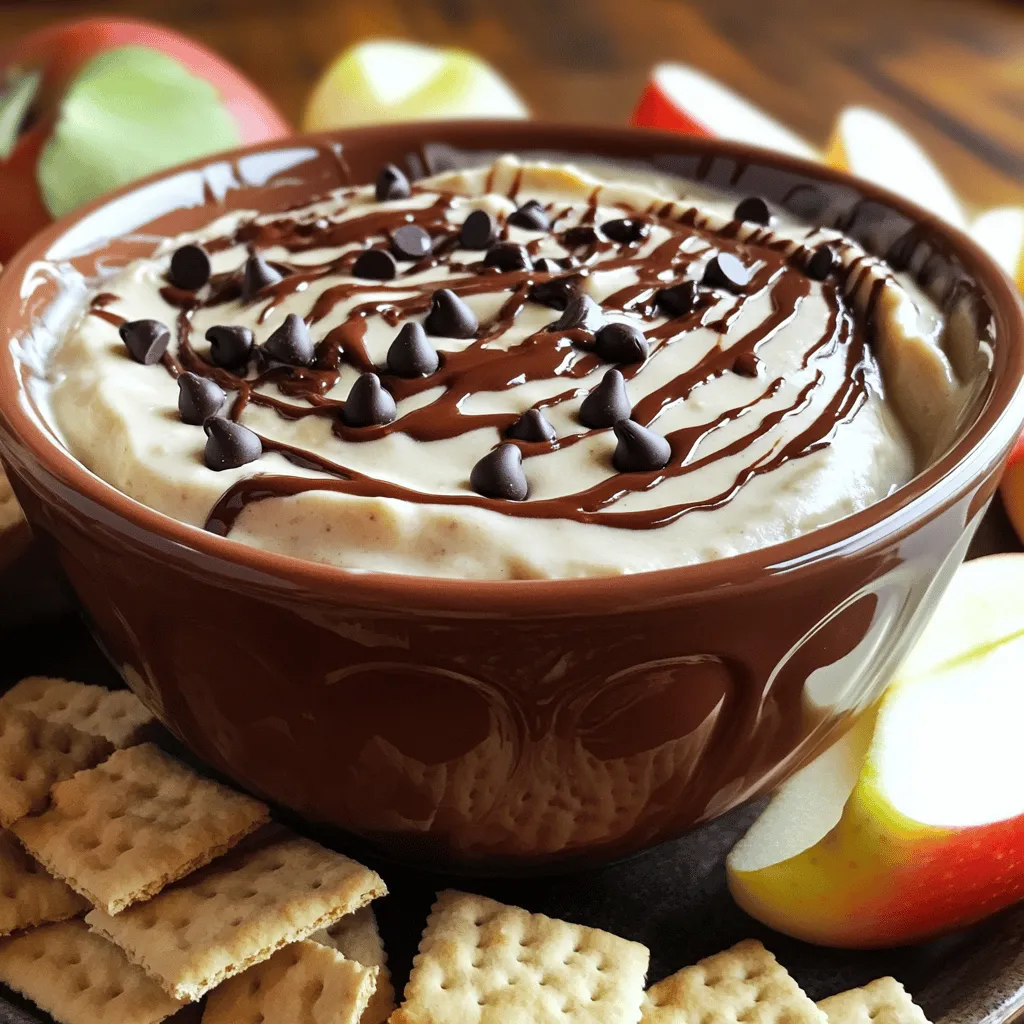
Are you ready to indulge in a sweet treat that’s as easy to make as it is delightful? This Chocolate

To make these amazing lemon blueberry muffins, gather the following ingredients: - 2 cups all-purpose flour - 1 cup granulated sugar - 2 teaspoons baking powder - ½ teaspoon baking soda - ½ teaspoon salt - 1 cup buttermilk - ½ cup unsalted butter, melted and cooled - 2 large eggs - Zest of 2 lemons - 2 tablespoons fresh lemon juice - 1 teaspoon vanilla extract - 1 ½ cups fresh blueberries - Optional: powdered sugar for dusting If you need to change any ingredients, here are some easy swaps: - For buttermilk, mix 1 cup of milk with 1 tablespoon of vinegar. Let it sit for 5 minutes. - You can use frozen blueberries if fresh ones are not available. Just add them straight to the batter without thawing. - If you want to cut sugar, use ¾ cup of sugar instead of 1 cup. You can enhance the taste with these extras: - Add a teaspoon of almond extract for a nutty flavor. - Mix in a handful of chopped nuts, like walnuts or almonds, for crunch. - For a sweeter treat, sprinkle a bit of cinnamon into the batter. This recipe is simple and fun to make. I love how the fresh lemon zest and blueberries blend so well. For the full recipe, check the detailed instructions that follow! To make lemon blueberry muffins, start by gathering your tools and ingredients. You need a muffin tin, mixing bowls, and a whisk. Preheat your oven to 375°F (190°C). Line your muffin tin with paper liners or spray it lightly with cooking spray. This helps prevent sticking. In a large bowl, whisk together the dry ingredients. Combine 2 cups of all-purpose flour, 1 cup of granulated sugar, 2 teaspoons of baking powder, ½ teaspoon of baking soda, and ½ teaspoon of salt. Mix these well. This step is key for even flavor and texture in your muffins. In another bowl, mix the wet ingredients. Combine 1 cup of buttermilk, ½ cup of melted butter, 2 large eggs, the zest of 2 lemons, 2 tablespoons of fresh lemon juice, and 1 teaspoon of vanilla extract. Whisk until smooth. This mixture adds moisture and flavor to your muffins. Now, gently fold in the blueberries. Use 1 ½ cups of fresh blueberries, but frozen ones work too. Be careful not to break them. This step adds bursts of flavor in each bite. You want the blueberries evenly spread without mashing them. Fill each muffin cup about two-thirds full with batter using a spoon or an ice cream scoop. Bake in the oven for 18 to 20 minutes. To check if they are done, insert a toothpick in the center. If it comes out clean, they are ready. Let the muffins cool in the tin for 5 minutes before moving them to a wire rack. This cooling time helps keep them fluffy. For a sweet touch, sprinkle powdered sugar on top just before serving. Enjoy your lemon blueberry muffins! For the full recipe, check the details above. To get a great muffin texture, mix the dry and wet ingredients gently. Overmixing makes muffins dense. I prefer to see a few lumps in the batter. This keeps them light and fluffy. Also, use room temperature ingredients when you can. Room temperature buttermilk and eggs mix in better. One common mistake is not measuring ingredients correctly. Use a kitchen scale for accuracy. Another mistake is baking at the wrong temperature. Always preheat your oven. If the oven is too hot, muffins can burn on the outside and stay raw inside. Lastly, do not open the oven door too early. This can cause the muffins to sink. For a bright, zesty flavor, use fresh lemons. Grate the zest with a microplane for the best results. Add more lemon juice if you want extra tang. I also like to fold in some lemon zest into the batter. This gives every bite a punch of lemon flavor. For that extra kick, try adding a pinch of lemon zest on top before baking. {{image_4}} You can switch up the blueberries for other fruits. Try raspberries, strawberries, or blackberries. Each fruit adds its own flavor. For a tropical twist, use diced pineapple or mango. Adjust the amount of sugar based on the fruit's sweetness. This keeps your muffins tasty and fresh. If you need gluten-free muffins, use a 1:1 gluten-free flour blend. Ensure it has xanthan gum for the best texture. You might notice a slight change in flavor, but the muffins will still be delicious. Always check labels to make sure your ingredients are gluten-free. To make these muffins vegan, replace eggs with flax eggs. Mix one tablespoon of flaxseed meal with three tablespoons of water for each egg. Use almond milk or oat milk instead of buttermilk. Swap melted butter for coconut oil or vegan butter. These changes help keep the flavor rich and satisfying. Explore the [Full Recipe] for additional details on making these lemon blueberry muffins! To keep your lemon blueberry muffins fresh, store them in an airtight container. This prevents them from drying out. You can place wax paper between layers to avoid sticking. Muffins stay good at room temperature for about 2 days. If you need them to last longer, refrigeration is a great option. Just remember, cold muffins may lose some softness. Freezing your muffins is simple and effective. First, let them cool completely. Then, wrap each muffin in plastic wrap. For extra protection, place the wrapped muffins in a freezer bag. Try to remove as much air as possible. They can stay in the freezer for up to 3 months. When you’re ready to enjoy them, just thaw in the fridge overnight. To reheat your muffins, preheat your oven to 350°F (175°C). Place the muffins on a baking sheet. Heat them for about 10 minutes. This restores their soft texture and warm flavor. If you prefer, you can also use a microwave. Just heat for 15-20 seconds. Be careful not to overheat, or they can become tough. Enjoy your muffins warm for the best taste! Yes, you can use frozen blueberries! They work great in this recipe. Just fold them in gently to avoid breaking them apart. Frozen blueberries may make the batter a bit wetter, so adjust baking time if needed. To change the sweetness, you can add or reduce the sugar. Try using less sugar if you prefer less sweetness. If you want sweeter muffins, increase the sugar by a few tablespoons. Taste the batter before baking to ensure it’s just right for you. To help muffins rise, use fresh baking powder. Make sure your oven is preheated. Fill the muffin cups only two-thirds full; this gives them room to grow. Avoid overmixing the batter, as this can lead to dense muffins instead of light ones. You can store these muffins for up to three days at room temperature. Keep them in an airtight container to maintain freshness. If you want to keep them longer, consider freezing them for up to three months. These muffins pair well with a hot cup of tea or coffee. You can also serve them with yogurt or cream cheese for added flavor. Fresh fruit, like more blueberries or sliced lemons, makes a lovely side too. For the full recipe, check out the details above. This guide covers everything you need for perfect Lemon Blueberry Muffins. We looked at the key ingredients, provided step-by-step instructions, and shared helpful tips. I also offered variations for different diets, plus storage tips to keep your muffins fresh. Enjoy your baking journey. With the right ingredients and techniques, you will create tasty muffins every time. Happy baking!

Lemon Blueberry Muffins Simple and Tasty Recipe

If you’re craving a treat that’s both zesty and sweet, you’re in for a delight! This Lemon Blueberry Muffins recipe

Older posts
Newer posts
← Previous Page1 … Page4 Page5 Page6 … Page26 Next →

dsad

© 2025 mealinmoments • Built with GeneratePress

Our Policies

  • Copyright Policy
  • Cookie Policy
  • GDPR Policy
  • Privacy Policy
  • Disclaimer
  • Terms Of Use

More Information

  • Home
  • About
  • Contact
  • Appetizers
  • Dessert
  • Dinner
  • Drinks
©2025, mealinmoments About Back To Top