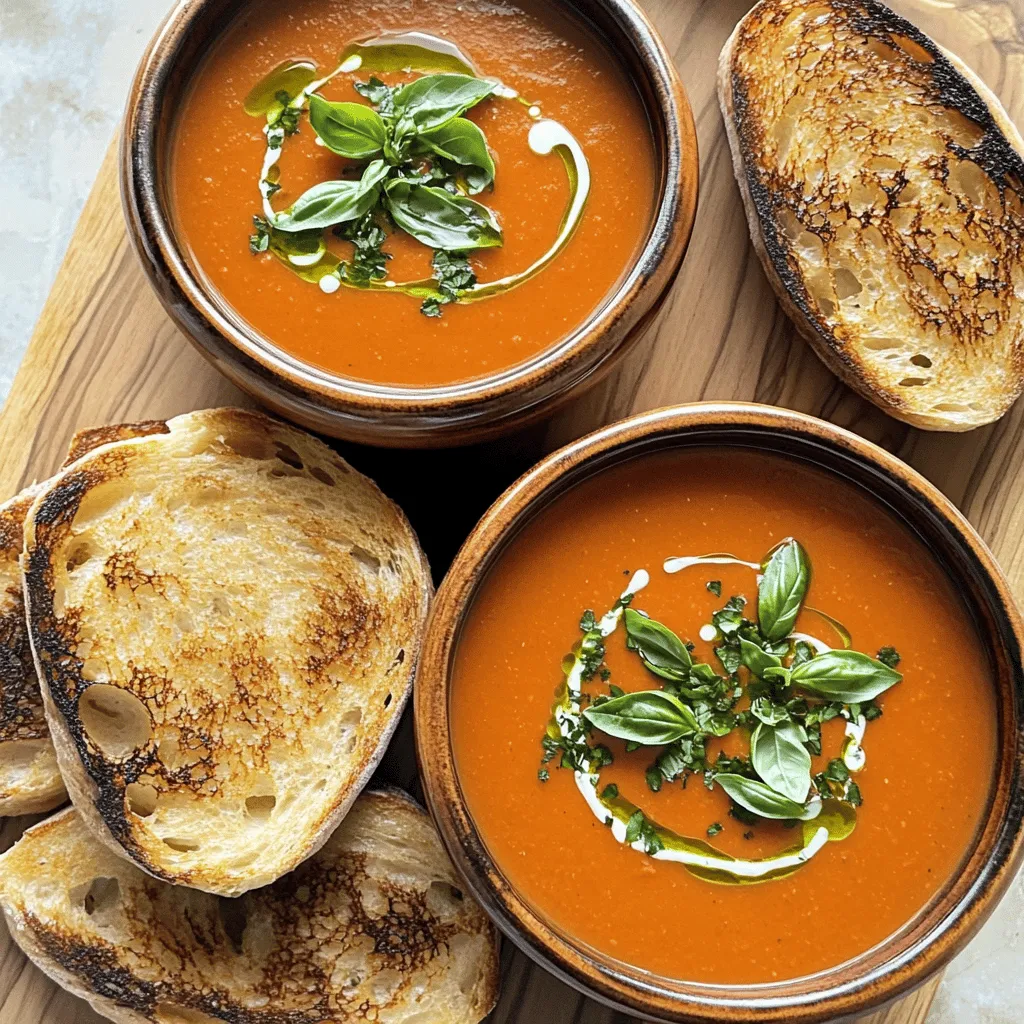
Creamy Tomato Basil Soup Flavorful and Easy Recipe
If you crave a warm, comforting bowl of soup, you’ve found the right recipe. My Creamy Tomato Basil Soup is
If you crave a warm, comforting bowl of soup, you’ve found the right recipe. My Creamy Tomato Basil Soup is
![For a delicious plate of spaghetti aglio e olio, gather these simple items: - 400g spaghetti - 6 cloves garlic, thinly sliced - 1/2 cup extra-virgin olive oil - 1 teaspoon red pepper flakes (more or less according to your spice preference) - 1/4 cup fresh parsley, finely chopped - Zest and juice of 1 lemon - Salt, to taste - Grated Parmesan cheese (optional, for serving) Fresh ingredients make a big difference in this dish. Good garlic brings strong flavor and aroma. Fresh parsley adds brightness and color. Using quality olive oil gives a rich taste. When you use fresh items, your pasta shines. You can taste the love in each bite. It makes the dish feel special and homemade. If you lack some ingredients, don’t worry. You can still enjoy this meal. Here are some swaps: - If you don’t have spaghetti, use another pasta shape, like linguine or fettuccine. - If you want a milder taste, try shallots instead of garlic. - For a different kick, use crushed red pepper or chili flakes. - If you can’t find fresh parsley, dried parsley works too, but use less. - No lemon? A splash of vinegar can add a nice twist. Feel free to get creative! The heart of spaghetti aglio e olio lies in its simplicity, so make it yours. For the full recipe, check out the detailed instructions above. Start by filling a large pot with water. Add a good amount of salt to the water. Bring it to a boil. Once boiling, add the spaghetti. Cook it according to the package's time until it is al dente. This means it should be firm yet cooked. When done, save about one cup of pasta water, then drain the spaghetti in a colander. Grab a large skillet and pour in the olive oil. Set the heat to medium. When the oil gets hot and shimmers, it’s time to add the garlic. Thinly sliced garlic works best here. Add the red pepper flakes next. Let it sauté for about 2-3 minutes. Watch closely; the garlic should turn golden, not brown. Burnt garlic can ruin the dish. Now, add the drained spaghetti to the skillet. Use tongs or a large fork to toss it well in the garlic oil. If the pasta feels dry, add some of the reserved pasta water slowly. This helps it mix better. Next, stir in the fresh lemon zest and juice, and sprinkle the chopped parsley. Toss everything together, making sure the flavors spread evenly. Adjust the salt to your liking. That's it! You can check [Full Recipe] for more details. To keep garlic from burning, cook it low and slow. Start by using medium heat when you add the sliced garlic to the oil. Stir it often and watch closely. It should turn golden, not brown. If it burns, it tastes bitter. If it starts to brown too quickly, lower the heat. This simple step makes all the difference in flavor. Cook your spaghetti until it is al dente. This means it should be firm but not hard. To do this, check the package for cooking times. Start tasting a minute or two before the time is up. When you drain it, save some pasta water. This helps if your dish needs a little moisture later. The right texture makes your dish shine. Adding cheese and herbs boosts the taste of your dish. Grated Parmesan cheese adds creaminess and depth. Fresh parsley gives a bright flavor and color. Try adding lemon zest for a zesty kick. You can also mix in fresh basil or oregano. These little touches can elevate your spaghetti aglio e olio. Don't be afraid to get creative! {{image_4}} You can easily spice up Aglio e Olio. Add more red pepper flakes for heat. If you like it extra spicy, include sliced fresh chili peppers. This change adds warmth and depth to the dish. You can also mix in a bit of smoked paprika for a unique twist. Adjust the spice level to fit your taste buds. Think about tossing in some veggies or proteins. Broccoli, spinach, or cherry tomatoes add color and flavor. If you prefer protein, grilled chicken or shrimp work well. Just cook these ingredients first and add them with the pasta. This makes a filling meal, plus you get more nutrients. For a refreshing spin, try Aglio e Olio with lemon. The zest and juice brighten the dish. Start by preparing the pasta and garlic oil as usual. Add the zest and juice of one lemon at the end. This twist brings a fresh taste that balances the oil and garlic. You’ll love how the lemon enhances every bite. Enjoy this bold flavor in the Full Recipe. Spaghetti Aglio e Olio shines on its own but pairs well with simple sides. Here are some ideas: - Garlic Bread: A classic choice. It complements the garlic in the pasta. - Caprese Salad: Fresh tomatoes, basil, and mozzarella bring a bright taste. - Grilled Vegetables: Zucchini, bell peppers, or asparagus add color and flavor. - Caesar Salad: Crisp romaine and creamy dressing balance the dish. Choosing the right wine can elevate your meal. Here are some good options: - Pinot Grigio: A light white wine that enhances the dish’s flavors. - Chardonnay: A fuller-bodied white that adds richness to the meal. - Sangiovese: This red has enough acidity to match the pasta. - Prosecco: Bubbles can make the meal feel special and festive. How you serve Spaghetti Aglio e Olio matters. Here are some tips to impress your guests: - Warm Pasta Bowls: Serve in heated bowls. It keeps the dish nice and warm. - Garnish with Parsley: A sprinkle of fresh parsley adds color and freshness. - Add Lemon Wedges: Place lemon wedges on the side for a pop of color. - Drizzle Olive Oil: A light drizzle of olive oil gives a nice sheen. These suggestions can help you create a meal that looks as good as it tastes. Enjoy your Spaghetti Aglio e Olio with these pairings! Making Spaghetti Aglio e Olio is quick and easy. It takes about 20 minutes from start to finish. You spend around 10 minutes prepping and 10 minutes cooking. This dish is perfect for a busy weeknight or a quick lunch. Yes, you can make Aglio e Olio in advance. Cook the spaghetti and prepare the garlic oil. Then, store them separately in the fridge. When ready to eat, heat the garlic oil and toss in the spaghetti. Add a splash of pasta water to refresh the dish. If you don’t have red pepper flakes, you can use other spices. Try crushed black pepper for a milder kick. You can also use a dash of hot sauce or fresh chili peppers. Adjust the amount based on your heat preference. Enjoy your Spaghetti Aglio e Olio with your chosen spice! This blog post covered ingredients, cooking steps, tips, and variations for Spaghetti Aglio e Olio. Fresh ingredients are key to great taste. Avoid burning garlic and get the perfect pasta texture for the best dish. Embrace creative variations by adding meats or veggies. Consider side dishes and wine for the perfect meal. Spaghetti Aglio e Olio is simple and flexible. With these tips, you can impress anyone at your table. Enjoy the cooking journey and make each dish your own!](https://mealinmoments.com/wp-content/uploads/2025/04/9905d5c3-d4c6-44ad-91ef-c518e27228b2.webp)
If you’re craving a quick and tasty meal, Spaghetti Aglio e Olio is the answer! This simple dish needs just
![Here is what you'll need to make honey garlic shrimp and broccoli. Each ingredient adds a special touch to the dish. - 1 lb large shrimp, peeled and deveined - 2 cups broccoli florets - 3 tablespoons honey - 4 cloves garlic, minced - 2 tablespoons low-sodium soy sauce - 1 tablespoon cornstarch - 2 tablespoons vegetable oil - 1 teaspoon sesame oil - 1 teaspoon fresh ginger, grated - Salt and pepper, to taste - Garnishes: Sesame seeds and chopped green onions These ingredients work together to create a sweet and savory flavor. The shrimp bring protein, while broccoli adds crunch and nutrients. Honey gives it sweetness, and garlic offers bold taste. Soy sauce ties everything together, making it rich and savory. The cornstarch helps the sauce thicken, ensuring it clings well to the shrimp and broccoli. Vegetable oil is perfect for cooking, while sesame oil adds a nice finish. Fresh ginger provides warmth, and the garnishes make it pretty. When you gather these ingredients, you set the stage for a tasty dinner. Check out the full recipe for more details on how to bring this dish together. To start, I mix the honey garlic sauce. In a medium bowl, I combine three tablespoons of honey, two tablespoons of low-sodium soy sauce, and one tablespoon of cornstarch. I also add four minced garlic cloves and one teaspoon of grated fresh ginger. I whisk these ingredients until smooth. Cornstarch is key here. It helps the sauce thicken and stick to the shrimp and broccoli. This step makes the dish rich and flavorful. Next, I cook the broccoli. I heat one tablespoon of vegetable oil in a large skillet over medium-high heat. Once the oil is hot, I add two cups of broccoli florets. I sauté the broccoli for three to four minutes. It should be bright green and tender-crisp. After that, I remove the broccoli from the skillet and set it aside on a plate. This keeps the texture just right for our dish. Then, I focus on the shrimp. I add the remaining tablespoon of vegetable oil into the same skillet. Once the oil heats up, I place one pound of large, peeled, and deveined shrimp in a single layer. I let them cook for two to three minutes without moving them. This allows one side to turn a lovely pink. After that, I flip the shrimp and cook them for an additional one to two minutes. They should be fully cooked and opaque. Now comes the fun part—combining everything. I return the sautéed broccoli to the skillet with the shrimp. Then, I pour the prepared honey garlic sauce over the shrimp and broccoli. I gently toss everything to ensure even coating. I let it cook for another two to three minutes. This time allows the sauce to thicken and cling to the shrimp and broccoli. It creates a delicious, glossy finish for the dish. To make the honey garlic shrimp shine, adjust the spice with ginger and pepper. Fresh ginger adds warmth and a zing that brightens the dish. You can add more or less ginger based on your taste. If you like it spicy, add a pinch of red pepper flakes. Alternatives like garlic powder or onion powder can also add depth to the flavor. Sautéing shrimp and vegetables is key. Use high heat to give shrimp a nice sear. Don’t overcrowd the pan; cook in batches if needed. This helps shrimp cook evenly and stay juicy. A wok gives you more space to toss the ingredients, but a skillet works well too. Just make sure it’s large enough to fit everything. For a beautiful plate, serve the honey garlic shrimp and broccoli over fluffy jasmine rice or quinoa. Use a colorful plate to make the dish pop. Sprinkle extra sesame seeds on top for added texture and garnish. You can also add sliced green onions for a fresh look. Consider pairing it with a light salad or steamed dumplings for a complete meal. {{image_4}} You can easily swap shrimp for chicken or tofu. Chicken thighs or breasts work well. If using chicken, cut it into bite-sized pieces. Tofu is a great choice for a vegetarian dish. Be sure to press the tofu to remove excess moisture. This helps it absorb flavor better during cooking. Cooking times differ for these proteins. Chicken will need about 5-7 minutes to cook through. Use a meat thermometer to check for doneness—165°F is safe. Tofu generally cooks faster. About 4-5 minutes in the pan should achieve a nice golden color. Feel free to add other vegetables for extra flavor and nutrition. Bell peppers, snap peas, and carrots are excellent choices. These veggies add color and crunch to the dish. Chop them into uniform sizes for even cooking. Blanching vegetables before adding them to the skillet helps keep their bright colors. To do this, boil them for 1-2 minutes, then plunge them into ice water. This technique locks in flavor and nutrients. You can make the dish spicier by adding chili paste. Start with a small amount. Taste as you go to find your perfect heat level. This simple change can elevate the dish. If you want a more savory flavor, try adding extra soy sauce. Just a teaspoon or two can deepen the taste. Be cautious, though; too much can make the dish salty. Balance the flavors to suit your palate. Explore the [Full Recipe] for more details on how to create this dish! To store your honey garlic shrimp and broccoli, first let it cool down. Place it in an airtight container. This keeps the dish fresh and safe. You can store it in the fridge for up to three days. If you want to keep it longer, consider freezing it. Just remember to use a freezer-safe container. This way, you can enjoy it for up to three months. When it's time to eat your leftovers, reheating is key. For best results, use a skillet over medium heat. Add a splash of water or broth to help keep it moist. This prevents the shrimp from getting tough. Stir gently to heat it evenly. Avoid cooking it too long. Just a few minutes should do. You want the shrimp warm, not overcooked. Enjoy your meal just like the first time! For the full recipe, check out the Honey Garlic Shrimp & Broccoli Bliss. It takes about 10 minutes to prepare the ingredients. The cooking time is about 15 minutes. So, the total time for this dish is around 25 minutes. This quick timing makes it perfect for a busy weeknight dinner. Yes, you can use frozen shrimp. Just thaw them first. Place the shrimp in cold water for 15-20 minutes. Pat them dry before cooking. This step helps them cook evenly and prevents excess water in the dish. Yes, this dish is healthy! Shrimp is low in calories and high in protein. Broccoli is full of vitamins and fiber. Honey provides natural sweetness without added sugars. Together, they make a nutritious meal that supports your health. Absolutely! You can use tofu or chickpeas instead of shrimp. For tofu, press it to remove water and cube it. For chickpeas, use canned ones, rinsed and drained. These options will keep the dish hearty and satisfying. There are many great options! Serve it over steamed jasmine rice or quinoa for a filling meal. You can also pair it with a fresh salad or some whole grain noodles. These sides balance the flavors and textures well. This recipe for Honey Garlic Shrimp and Broccoli is easy and delicious. We covered key ingredients and steps, from mixing the sauce to perfecting the shrimp. Follow our tips for flavors and cooking techniques. Don't forget to try variations like adding chicken or veggies. Store leftovers properly and reheat them for the best taste. Cooking at home keeps meals healthy and fun. Now, you can impress friends and family with this tasty dish. Give it a go, and enjoy your cooking journey!](https://mealinmoments.com/wp-content/uploads/2025/04/c69e527e-018b-4b87-936f-0ce8855c3e0f.webp)
Looking for a quick, tasty dinner? My Honey Garlic Shrimp and Broccoli is perfect for you! Filled with sweet and

Craving a sweet treat but short on time? No-Bake Cheesecake Jars are the answer! These simple and delicious desserts come

Looking for a dish that brings warmth to your table? This Irresistible Sweet Potato Casserole with Marshmallows is your answer.
![This Easy Chicken Alfredo Pasta Bake is a delicious meal. You can prepare it with simple ingredients. It blends pasta, chicken, and creamy sauce. This dish is perfect for weeknight dinners. - 2 cups uncooked penne pasta - 2 cups cooked chicken breast, shredded - 1 cup fresh broccoli florets, blanched until bright green - 2 cups Alfredo sauce - 1 cup shredded mozzarella cheese - ½ cup grated Parmesan cheese - 1 teaspoon garlic powder - 1 teaspoon Italian seasoning - Salt and pepper to taste - Fresh parsley for garnish Each ingredient adds flavor and texture. The penne pasta holds the sauce well, while the chicken adds protein. Broccoli gives a nice crunch and color. The Alfredo sauce makes everything creamy and rich. Mozzarella and Parmesan on top create a nice, cheesy crust. This recipe is easy to adjust. You can add more veggies or change the cheese. For the full recipe, please see the instructions above. 1. Preheat the oven and boil pasta: Start by preheating your oven to 375°F (190°C). While the oven heats, fill a large pot with water and add a pinch of salt. Bring the water to a rolling boil. Add 2 cups of uncooked penne pasta and cook until al dente, which is about 8-10 minutes. Once done, drain the pasta and set it aside to cool a bit. 2. Mixing the main ingredients: In a large mixing bowl, combine the drained pasta, 2 cups of shredded cooked chicken, and 1 cup of blanched broccoli florets. Make sure the broccoli is bright green for a pop of color. Pour in 2 cups of your favorite Alfredo sauce and stir everything together until the pasta, chicken, and broccoli are well coated. 3. Seasoning blend: To enhance the flavor, add 1 teaspoon of garlic powder and 1 teaspoon of Italian seasoning. Sprinkle in salt and pepper to taste. Mix thoroughly to ensure the seasoning is evenly distributed throughout the dish. 1. Preparing the baking dish: Take a 9x13 inch baking dish and grease it with olive oil or cooking spray. This will help prevent sticking. Pour the pasta mixture into the dish, spreading it out evenly. 2. First phase of baking: Sprinkle 1 cup of shredded mozzarella cheese and ½ cup of grated Parmesan cheese over the top of the pasta mixture. Cover the dish tightly with aluminum foil. Place it in the preheated oven and bake for 20 minutes. This helps the flavors meld together. 3. Final baking and serving tips: After 20 minutes, carefully remove the foil. Continue baking for an additional 10-15 minutes until the cheese is bubbly and golden brown. When done, let the dish rest for about 5 minutes. If you want, garnish with freshly chopped parsley for a nice touch. Enjoy your warm, creamy chicken Alfredo pasta bake! To get the perfect pasta texture, always cook your penne al dente. This means it should be firm to the bite but not hard. Follow the package instructions carefully and taste a piece just before draining. For even sauce distribution, mix the pasta, chicken, and broccoli in a large bowl. Pour in the Alfredo sauce gradually while stirring. This helps every piece get coated well. For the best melting and flavor, I recommend using mozzarella and Parmesan. Mozzarella gives a creamy stretch, while Parmesan adds a sharp taste. Combining different cheese types works wonders. You can mix in some cheddar for a richer flavor. Try adding a bit of gouda for a unique twist. Each cheese brings its own charm to the dish. To see the full recipe, check out the [Full Recipe]. {{image_4}} You can make this chicken Alfredo pasta bake fit your diet. If you want a vegetarian option, try using mushrooms or firm tofu. Both options work well and give a satisfying texture. You can also add cooked spinach or artichokes for extra flavor. For those who need gluten-free options, choose gluten-free pasta. Many brands offer great choices that taste just like regular pasta. You can find them in most grocery stores. This way, everyone can enjoy this dish without worry. To make your pasta bake even better, consider adding more vegetables. Bell peppers, zucchini, or peas can add color and nutrients. Just sauté them lightly before mixing them in. You might also think about making your own Alfredo sauce. Homemade sauce can taste fresher and richer than store-bought. Use simple ingredients like heavy cream, butter, and Parmesan cheese. If you prefer to save time, a good store-bought sauce is perfectly fine. Just make sure it has a nice flavor profile. For the full recipe, check out the complete instructions on how to create this delicious meal! To keep your Chicken Alfredo Pasta Bake fresh, store leftovers in an airtight container. Let the dish cool to room temperature before sealing it. Place it in the fridge within two hours of baking. This will help prevent bacteria from growing. Properly stored, it will last for up to three days. When you're ready to eat, just reheat portions in the oven or microwave. If you want to save some for later, freezing is a great option. First, let the pasta bake cool completely. Then, cut it into individual portions for easy reheating. Wrap each portion tightly in plastic wrap, then place them in a freezer-safe bag. Label the bag with the date. It can stay frozen for up to three months. To reheat, thaw overnight in the fridge and bake at 350°F (175°C) until hot. You can also microwave it, but the oven gives the best results. For more tips, check out the Full Recipe. How can I make this dish ahead of time? You can prepare the pasta bake a day in advance. Just follow the recipe until the baking step. Cover the dish with foil and store it in the fridge. When ready to cook, bake it straight from the fridge. You may need to add a few extra minutes to the baking time. Can I use rotisserie chicken for convenience? Yes, rotisserie chicken is a great choice! It saves time and adds flavor. Just shred the chicken and mix it into the pasta bake. You’ll enjoy the same great taste with less effort. What can I substitute for Alfredo sauce? If you want to swap out the Alfredo sauce, try a creamy mushroom sauce or a simple cream sauce. You can also use a homemade cheese sauce for a twist. Just ensure it has a creamy texture for best results. How long does it take to reheat the pasta bake? Reheating the pasta bake takes about 20 minutes in the oven at 350°F (175°C). Cover it with foil to keep it moist. You can also use the microwave, but the oven gives a better texture. Enjoy your warm, cheesy meal! This blog post outlined a delicious and easy pasta bake recipe. We covered each ingredient, from penne pasta to fresh broccoli and creamy Alfredo sauce. You learned step-by-step instructions and helpful tips for cooking. Plus, we explored variations and storage methods to keep your dish fresh. In the end, this recipe is versatile and full of flavor. Enjoy making it your own, whether you’re cooking for family or friends. Happy cooking!](https://mealinmoments.com/wp-content/uploads/2025/04/8142cf31-d725-4546-b8ee-9baac3d4777f.webp)
Craving a comforting meal that’s both simple and delicious? Look no further than this Easy Chicken Alfredo Pasta Bake! Packed
Are you ready to transform Brussels sprouts into a dish everyone will rave about? This Balsamic Glazed Brussels Sprouts recipe
![Chicken and Base Ingredients - 2 lbs boneless, skinless chicken thighs, cut into bite-sized pieces - 1 large onion, finely chopped - 4 cloves garlic, minced - 1 tablespoon fresh ginger, grated - 1 can (14 oz) crushed tomatoes - 1 can (13.5 oz) coconut milk - 3 tablespoons tomato paste I love using boneless, skinless chicken thighs for this dish. They stay juicy and tender. The onion, garlic, and ginger form the base of our flavor. They also add depth to the sauce. Crushed tomatoes and coconut milk create a rich, creamy texture. The tomato paste helps to deepen the flavor, making it robust and satisfying. - 2 tablespoons garam masala - 1 tablespoon ground cumin - 1 tablespoon ground coriander - 1 teaspoon turmeric powder - 1 teaspoon paprika - 1 teaspoon cayenne pepper (optional, for those who like it spicy) - Salt and black pepper to taste - 2 tablespoons olive oil Spices are the heart of Chicken Tikka Masala. Garam masala gives it warmth and depth. Ground cumin and coriander add earthiness. Turmeric brightens the sauce with color. Paprika introduces a sweet pepper flavor. Cayenne gives a kick, but you can leave it out if you prefer. Don’t forget to season with salt and black pepper for balance. - Fresh cilantro, chopped (for garnish) - Cooked basmati rice or warm naan for serving For the finishing touch, I recommend fresh cilantro. It adds a pop of color and freshness. Serve your Chicken Tikka Masala over fluffy basmati rice or with warm naan. The rice soaks up the sauce well, while naan is perfect for scooping. This makes for a well-rounded meal that everyone will love. Check out the Full Recipe for more details on preparation! Marinating the Chicken Start with 2 pounds of boneless chicken thighs. Cut them into bite-sized pieces. In a bowl, mix garam masala, ground cumin, ground coriander, turmeric, paprika, cayenne, salt, and black pepper. Add the chicken to this spice mix. Use your hands or a spoon to coat each piece well. This step is key for flavor. Sautéing Aromatics Next, heat 2 tablespoons of olive oil in a skillet over medium heat. Add 1 large chopped onion. Sauté for about 5 minutes until soft and translucent. Then, add 4 minced garlic cloves and 1 tablespoon of grated ginger. Cook for another minute. This mix brings a wonderful aroma to your dish. Combining Ingredients in the Slow Cooker Now, transfer the sautéed onion, garlic, and ginger to your slow cooker. Add the marinated chicken, 1 can of crushed tomatoes, 1 can of coconut milk, and 3 tablespoons of tomato paste. Stir gently to combine everything. Ensure the chicken is covered in the sauce for even cooking. Cooking Time Settings Cover the slow cooker. Set it to low for 6-8 hours or high for 3-4 hours. The chicken should become tender and easy to shred with a fork. This slow cooking really brings out the flavors. Adjusting Seasoning Once the cooking time is up, taste the Chicken Tikka Masala. Adjust the seasoning if needed. You may want to add more salt or spices. Use a fork to break apart the chicken for a hearty texture. This step enhances the dish. Serving Suggestions Serve the Chicken Tikka Masala over fluffy basmati rice or warm naan. Top with fresh chopped cilantro for a burst of color and flavor. This makes your meal not just tasty but also beautiful. Recommended Spice Adjustments To make your chicken tikka masala shine, adjust the spices to fit your taste. If you like it spicy, add more cayenne pepper. For warmth without heat, boost the garam masala. You can also play with the cumin and coriander. Start with small amounts and taste as you go. This way, you build layers of flavor without overwhelming the dish. Techniques for Tender Chicken To keep the chicken tender, choose thighs over breasts. Thighs have more fat, which keeps them juicy. Marinating the chicken for a few hours before cooking helps as well. You can use yogurt and spices for the marinade. It breaks down proteins and adds flavor. When slow cooking, make sure the chicken is fully submerged in sauce. This keeps it moist and tender. Timing Guidelines Timing is key for slow cookers. Cook on low for 6-8 hours or on high for 3-4 hours. If you are short on time, the high setting works well. Just make sure to check the chicken for tenderness. It should shred easily when done. Avoiding Common Mistakes One common mistake is overfilling the slow cooker. Leave some space at the top for steam. If you add too much liquid, the sauce can become watery. Also, avoid opening the lid too often. Each time you open it, you release heat and extend cooking time. Stick to the timer for the best results. For the complete recipe, check the [Full Recipe]. {{image_4}} Using Different Proteins You can swap chicken for other meats. Try turkey or beef for a new taste. If you prefer plant-based options, use chickpeas or tofu. These swaps will keep the dish flavorful and satisfying. Each protein brings its own flavor, making your meal unique. Dairy-Free Alternatives For a dairy-free version, replace coconut milk with almond or cashew milk. These options add creaminess without dairy. You can also skip the cream entirely if you like. The dish remains rich and tasty, perfect for everyone at the table. Adding Vegetables Want to up the nutrition? Add veggies like spinach or bell peppers. They cook well in the slow cooker and add color to your dish. Chopped carrots or peas can also be good choices. This makes the meal more filling and adds extra layers of flavor. Spicing It Up If you love heat, add more cayenne pepper or fresh chili. You can also try different spices like cardamom or cinnamon for warmth. Just a pinch can change the flavor profile. Adjust the spices to your taste, and enjoy a personalized meal every time. To keep your slow cooker chicken tikka masala fresh, proper storage is key. Here are some simple tips: - Refrigerating Leftovers: Once the dish cools, place it in an airtight container. Store it in the fridge for up to three days. This keeps the flavors intact and safe to eat. - Freezing Chicken Tikka Masala: If you want to save some for later, it freezes well. Use a freezer-safe container or a heavy-duty freezer bag. Make sure to remove as much air as possible. It can last for up to three months in the freezer. When you're ready, just thaw it overnight in the fridge before reheating. To enjoy your dish again, reheating properly is important. Here’s how to do it: - Methods for Best Flavor Retention: For the best taste, use the stovetop method. Heat it in a pan over medium heat, stirring often. You can also microwave it in a bowl. Cover it to keep moisture in, and heat in short bursts, stirring in between. - Ensuring Food Safety: Always make sure the chicken reaches 165°F (74°C) when reheating. This ensures it’s safe to eat again. If you see any signs of spoilage, it’s best to throw it away. Can I use chicken breast instead of thighs? Yes, you can use chicken breast. Chicken thighs are juicier and more tender. They add more flavor. Chicken breasts may dry out if cooked too long. If you use breasts, check them often. What can I serve with Chicken Tikka Masala? You can serve Chicken Tikka Masala with: - Fluffy basmati rice - Warm naan bread - A refreshing cucumber salad - Steamed vegetables These sides balance the rich sauce and enhance the meal. How do I make it less spicy? To make it less spicy, omit the cayenne pepper. You can also reduce the amount of garam masala. Adding more coconut milk can help mellow the heat. Taste as you go to find the right balance. For the full recipe, check out the recipe section above. You learned about the key ingredients and steps for a delicious Chicken Tikka Masala. We covered tips for perfecting flavor and shared variations to suit your taste. Remember, slow cookers make it easy and fun. Store leftovers properly to enjoy later. With this knowledge, you can make a dish that impresses everyone. Enjoy crafting your version of Chicken Tikka Masala!](https://mealinmoments.com/wp-content/uploads/2025/04/f26e47e6-360b-42b2-8ad4-eae6e34b454e.webp)
If you love bold flavors and easy cooking, you’ll adore this Slow Cooker Chicken Tikka Masala recipe. You don’t need
![To make this delicious chocolate avocado mousse, you'll need the following ingredients: - Ripe avocados - Unsweetened cocoa powder - Maple syrup - Almond milk - Pure vanilla extract - Sea salt - Additional garnishes: dark chocolate shavings and fresh berries Each ingredient plays a key role. The ripe avocados provide a creamy base. Unsweetened cocoa powder gives that rich chocolate flavor without added sugar. Maple syrup adds sweetness, while almond milk keeps the mousse smooth and light. A dash of pure vanilla extract enhances the overall taste. The sea salt balances the flavors perfectly. Make sure your avocados are ripe for the best texture. If they are too firm, the mousse won't be as creamy. You can adjust the sweetness by adding more maple syrup if you like it sweeter. Don't forget the garnishes! Dark chocolate shavings and fresh berries not only look great but also add extra flavor. For the full recipe, check out the Chocolate Avocado Mousse 🥑. Trust me, you’ll love making this dessert! First, grab two ripe avocados. Cut them in half and remove the pits. Use a spoon to scoop the green flesh into a food processor. This creamy fruit is the key to our mousse. Next, add the unsweetened cocoa powder, maple syrup, almond milk, pure vanilla extract, and a pinch of sea salt. Secure the lid tightly on the food processor. Blend the mixture on high until it is smooth and creamy. Pause if needed to scrape down the sides with a spatula. This step ensures everything mixes well. Taste the mousse and adjust the sweetness by adding more maple syrup if you like. Blend again to mix the new sweetness. To get the best texture, blend until no lumps remain. The mousse should be silky and glossy. Cooling the mousse is crucial. After blending, transfer it to individual serving dishes or a large bowl. Cover it with plastic wrap or a lid. Place it in the fridge for at least 30 minutes. This helps the flavors meld and gives the mousse a firmer feel. When ready to serve, take the mousse out of the fridge. Garnish each serving with dark chocolate shavings and fresh berries. This adds a pop of color and extra flavor. For a stunning look, use clear glass cups. You can see the rich, dark hue of the mousse, making it even more tempting. This Chocolate Avocado Mousse is a delightfully creamy dessert that you will love. For the complete recipe, check the [Full Recipe]. To enhance sweetness, try adding more maple syrup. Start with a little and taste. You can also mix in spices like cinnamon or a dash of espresso powder. Both add warmth and depth to the mousse. To test the mousse's consistency, scoop it with a spoon. If it flows too easily, blend in more avocado. For a creamier texture, add more almond milk. Blend again until you reach your desired smoothness. For a fun serving idea, place the mousse in clear cups. This way, guests can see its rich color. Garnish each cup with dark chocolate shavings and fresh berries. These touches make the dessert look inviting and delicious. {{image_4}} You can make this mousse vegan by swapping out a few ingredients. Instead of regular milk, use almond milk or coconut milk. For sweetening, maple syrup works great. If you want a creamier texture, try adding some plant-based yogurt. These simple swaps keep the mousse rich and tasty. For a sugar-free mousse, you can use alternative sweeteners. Stevia or erythritol is perfect choices. They add sweetness without the sugar. Adjust the amount based on your taste. Remember, start with less, then add more if needed. This way, you control the sweetness without extra calories. Mix in different flavors for a fun twist! You can add a dash of almond extract for a nutty taste. Or, try a spoonful of espresso powder for a coffee kick. For a fruity touch, blend in some pureed berries. Each variation adds a new layer of delight to your mousse. For the Full Recipe, check out the complete ingredient list and instructions. To keep your chocolate avocado mousse fresh, store it in airtight containers. Plastic wrap works well, too. Make sure the mousse is covered tightly to prevent air from getting in. This helps keep it creamy and prevents it from browning. In the fridge, your mousse can last up to three days. After that, it may lose its smooth texture and flavor. If you see any browning on top, simply scrape it off before serving. It’s best to enjoy it fresh for the best taste. If you want to freeze the mousse, place it in a freezer-safe container. Leave some space at the top since it can expand. To thaw, move it to the fridge overnight. Avoid thawing at room temperature to keep its texture nice and creamy. Enjoy your mousse chilled! You can find the full recipe to make it again later. Avocados are a great choice for desserts. They are full of good fats and nutrients. These healthy fats can help with heart health. They also provide fiber, which aids digestion. Avocados contain vitamins like K, E, and C. These vitamins are important for skin health and immunity. Plus, using avocados lowers the need for heavy creams and butter in recipes. This makes your dessert lighter and more nutritious! Yes, you can use other types of milk in this recipe. If you don’t have almond milk, try coconut milk for a tropical twist. Soy milk is another good option that is creamy and rich. Oat milk works well too, giving the mousse a sweet touch. Just choose a milk that fits your taste and needs. This way, you can make it perfect for you! Making this mousse nut-free is easy. Instead of almond milk, use oat milk or coconut milk. Both give a smooth texture without nuts. You can also skip any nut toppings. Use seeds like pumpkin or sunflower seeds instead. They add crunch and are safe for nut-free diets. Enjoy your creamy dessert without worry! You now have a simple guide to make a delicious chocolate avocado mousse. We explored the key ingredients, blending techniques, and tips for perfecting texture. Variations like vegan options and storage advice give you full control over this treat. With this fun recipe, you can impress friends and family while enjoying a healthy dessert. Don’t forget to experiment with flavors and toppings. Your creativity is the only limit! Enjoy your mousse-making adventure!](https://mealinmoments.com/wp-content/uploads/2025/04/2f2ef30e-f69b-4ae8-b7ce-4f106e4a04ea.webp)
Looking for a dessert that’s both healthy and delicious? You’re in the right place! This Chocolate Avocado Mousse is rich,
![- 2 cups long-grain white rice - 1 lb boneless, skinless chicken thighs, cut into bite-sized pieces - 1 small onion, diced - 3 cloves garlic, minced The main ingredients are simple yet vital. The long-grain white rice gives a fluffy texture. Chicken thighs add a juicy flavor. Diced onion and minced garlic build a strong base. - 2 cups chicken broth - 1 cup frozen mixed vegetables - 1 teaspoon dried thyme - Salt and pepper to taste The chicken broth is the key to moisture. It also adds depth to the dish. Mixed vegetables bring color and nutrients. Thyme offers a warm, herbal taste. Don’t forget salt and pepper to boost flavor. - 1 cup shredded cheddar cheese - Fresh parsley, chopped (for garnish, optional) Cheddar cheese melts beautifully on top. It adds a creamy finish. Parsley gives a fresh touch and bright color. These toppings elevate the dish's look and taste. For the complete ingredient list and step-by-step instructions, check out the Full Recipe. 1. Sauté the Onion and Garlic: Start by setting your Instant Pot to 'Sauté' mode. Pour in 2 tablespoons of olive oil and add 1 small diced onion. Sauté for 2-3 minutes until the onion becomes soft and clear. Then, add 3 minced garlic cloves. Sauté for another 30 seconds, stirring often, until you smell the garlic's aroma. 2. Brown the Chicken with Seasonings: Next, add 1 pound of bite-sized boneless, skinless chicken thighs to the pot. Sprinkle in 1 teaspoon of dried thyme, 1 teaspoon of paprika, salt, and pepper to taste. Cook this mix for about 5-6 minutes. Stir occasionally until the chicken is lightly browned on all sides. 3. Incorporate Rice and Broth: Now, stir in 2 cups of long-grain white rice. Make sure the rice gets coated well with the chicken and onion mix. Next, pour in 2 cups of chicken broth. Be careful to scrape any brown bits off the bottom of the pot. This helps prevent a burn notice during cooking. 4. Mix in the Vegetables: Add 1 cup of frozen mixed vegetables, like peas, carrots, and corn. Gently fold these into the rice and chicken mixture, ensuring they spread evenly throughout. 5. Set the Instant Pot and Cooking Times: Close the lid of the Instant Pot. Ensure the valve is in the sealing position. Choose the 'Manual' or 'Pressure Cook' setting, and set the timer for 10 minutes. 6. Natural Pressure Release and Cheese Melting: After the cooking time finishes, let the pressure release naturally for 10 minutes. Then, switch the valve to venting to release any leftover pressure before opening the lid. Fluff the casserole with a fork. Sprinkle 1 cup of shredded cheddar cheese on top. Close the lid slightly and let it sit for about 2-3 minutes. This allows the heat to melt the cheese. The full recipe gives you a delicious way to enjoy this comforting dish! How to avoid burn notice in the Instant Pot To avoid the burn notice, always scrape the bottom of the pot. After you sauté the onion and chicken, make sure to deglaze the pot. This means you should stir in the chicken broth, scraping any browned bits. These bits add flavor but can cause burning. Key points for perfectly cooked rice Using long-grain white rice helps achieve fluffy results. Rinse the rice with cold water before adding it to the pot. This removes excess starch. The ratio of rice to broth is 1:1. Make sure to measure accurately for best results. Best sides to complement the meal This casserole pairs well with a simple side salad or steamed broccoli. You can also serve it with garlic bread for a heartier meal. These sides add freshness and balance. Presentation tips for an appetizing look Serve the casserole in colorful bowls. This makes the dish more inviting. Add a lemon wedge on the side for a pop of color and flavor. A sprinkle of fresh parsley on top adds brightness and freshness. For the full recipe, check out the [Full Recipe]. {{image_4}} You can switch things up with different proteins or rice. If you want to use turkey, it works great in this dish. Tofu is an excellent choice for a vegetarian twist. Just cut it into small pieces and add it like you would with chicken. For the rice, you can try brown rice or jasmine rice. Brown rice adds a chewy texture and more fiber. Jasmine rice gives a nice floral aroma and flavor. Both options give a new taste to this classic recipe. Spices and herbs can change the taste of the dish. Try adding a little cumin or Italian herbs for a twist. You can also toss in some red pepper flakes for heat. When it comes to cheese, you’re not limited to cheddar! Monterey jack melts beautifully and adds creaminess. Mozzarella can give the dish a stretchy, cheesy texture. Choose what you like best for a fun twist. If you need a gluten-free option, make sure your broth is gluten-free. Many brands offer this, so read the label. You can also skip the cheese or use a dairy-free version if you want to keep it lighter. For low-sodium or low-fat options, use low-sodium broth and lean chicken. You can cut back on cheese too. This way, you enjoy a healthy meal without losing flavor. For the full recipe, check [Full Recipe]. To store leftovers, cool the casserole to room temperature. Transfer it to airtight containers. This keeps the dish fresh and safe to eat. Use glass or plastic containers with tight lids. They help seal in moisture and flavor. Label the containers with the date. Consume leftovers within three to four days for the best taste. If you want to freeze the casserole, let it cool completely first. Portion it into freezer-safe bags or containers. Try to remove as much air as possible. This prevents freezer burn and keeps your meal tasting fresh. To reheat frozen portions, thaw them in the fridge overnight. You can also use the microwave for quick defrosting. Heat until hot all the way through, stirring occasionally. This ensures even heating and keeps your casserole delicious. For best results, enjoy the dish within two to three months of freezing. For the full recipe of Instant Pot Chicken and Rice Casserole, check the main content above. Can I use other types of chicken? Yes, you can use other chicken cuts. Chicken breasts work well too. Just make sure they are cooked until tender. If you prefer dark meat, you can use chicken legs or thighs. They add great flavor! How do I make it vegetarian? To make this dish vegetarian, swap the chicken with tofu or chickpeas. Use vegetable broth instead of chicken broth. You can also add more vegetables like bell peppers or spinach for added taste and nutrition. How does pressure cooking affect cooking times? Pressure cooking speeds up cooking time. It traps steam to cook food quickly. For rice, it usually takes about 10 minutes at high pressure. Always check your Instant Pot manual for exact times. Can I double the recipe in the Instant Pot? Yes, you can double the recipe. Just make sure not to overfill the pot. The Instant Pot should be no more than two-thirds full. Adjust the cooking time slightly if needed, but usually, the same time works well. How many servings does this recipe yield? This recipe yields about four servings. It’s great for a family meal or leftovers for lunch. Can I scale down the recipe for fewer servings? Absolutely! You can cut the ingredients in half for two servings. Just remember to keep the cooking time the same for best results. Enjoy your meal! This blog post covers everything you need for Instant Pot chicken and rice casserole. You learned about key ingredients, cooking steps, and helpful tips. Making this dish is simple and fun. You can change it up with different proteins and flavors. Storing leftovers is easy too. Enjoy your meal with family and friends. You now have all the tools for a tasty dinner. Happy cooking!](https://mealinmoments.com/wp-content/uploads/2025/04/2e56e8d5-44c4-4d0c-9d18-c8fd12f83ffa.webp)
Are you ready to whip up a delicious meal that’s easy and comforting? My Instant Pot Chicken and Rice Casserole
