Skip to content
DisclaimerTerms Of UseGDPR PolicyCookie Policy

mealinmoments

  • Home
  • Drinks
  • Appetizers
  • Dinner
  • Dessert
  • About
  • Contact
  • Privacy Policy
DisclaimerTerms Of UseGDPR PolicyCookie Policy

Megan

To make this dip, gather these ingredients: - 2 cups fresh spinach, finely chopped - 1 can (14 oz) artichoke hearts, drained and roughly chopped - 1 cup cream cheese, softened to room temperature - 1/2 cup sour cream - 1/2 cup mayonnaise - 1 cup shredded mozzarella cheese - 1/4 cup grated Parmesan cheese - 2 cloves garlic, minced - 1/2 teaspoon red pepper flakes (optional) - Salt and freshly ground black pepper to taste - Tortilla chips or slices of crusty baguette, for serving For the best flavor, pick fresh spinach. Look for bright green leaves without yellow spots. Choose artichoke hearts packed in water, not oil. This keeps the dip light and fresh. Use full-fat cream cheese for a rich and creamy texture. Fresh garlic adds a punch. If you like spice, opt for fresh red pepper flakes. They have more flavor than dried ones. Lastly, always use quality cheeses. This enhances the overall taste of your dip. If you're vegan or lactose intolerant, swap the cream cheese with a vegan cream cheese. Use plant-based sour cream and mayonnaise too. For a lower fat option, use Greek yogurt in place of sour cream. If you can't find artichokes, try using roasted red peppers. They add a nice twist to the dish. To keep the dip gluten-free, serve it with veggie sticks or gluten-free crackers. Each change keeps the flavor strong while meeting your needs. Start by preheating your oven to 350°F (175°C). This step is key for even baking. While the oven heats, gather your ingredients. You will need fresh spinach, artichoke hearts, cream cheese, sour cream, mayonnaise, mozzarella, Parmesan, garlic, and spices. Make sure everything is ready to go. This makes mixing easier and faster. In a large mixing bowl, combine the cream cheese, sour cream, and mayonnaise. Use a hand mixer or a spatula to blend them until smooth. This creamy base is the heart of the dip. Next, fold in the chopped spinach and artichokes gently. Add the minced garlic and optional red pepper flakes. Season with salt and pepper. Mix until everything is well combined. Finally, sprinkle in the mozzarella and Parmesan cheese. Fold these in carefully to keep the mixture fluffy. Once mixed, spoon the creamy blend into an oven-safe baking dish. Spread it out evenly to ensure it bakes well. Place the dish in your preheated oven. Bake for 25 to 30 minutes. Look for a golden brown top and bubbling edges. This means it’s ready! After baking, let it cool for a few minutes. This helps the flavors mix well and makes it easier to serve. Enjoy your delicious dip warm with tortilla chips or crusty baguette. For the full recipe and tips, check out the [Full Recipe]. To get that creamy texture, start with softened cream cheese. This helps blend well with the other ingredients. I mix the cream cheese, sour cream, and mayonnaise first. Use a hand mixer or a spatula to blend until smooth. No lumps should remain. Once smooth, fold in the spinach and artichokes gently. This keeps the mix fluffy. Don't rush this step; take your time for the best outcome. For extra flavor, I love to add minced garlic. It gives the dip a rich taste. You can also sprinkle in red pepper flakes for a little heat. Adjust the salt and pepper to your liking. Fresh herbs like parsley can brighten the flavors too. If you want a cheesy kick, add more Parmesan. Each little tweak can make a big difference in taste. One common mistake is overmixing the dip. This can make it dense and heavy. Be gentle when folding in the spinach and artichokes. Another mistake is not preheating the oven. A hot oven helps the dip cook evenly. Lastly, don’t skip the cooling time after baking. Letting it cool a few minutes makes serving easier. For the full recipe, check out Creamy Spinach Artichoke Delight. {{image_4}} You can make a vegan version of this dip easily. Use cashew cream or tofu instead of cream cheese. Swap sour cream and mayonnaise for vegan yogurt or tahini. Nutritional yeast adds a cheesy flavor without dairy. You still get that creamy texture and rich taste. This option is great for plant-based diets. Plus, it tastes just as good! Want to make your dip heartier? Consider adding proteins like shredded chicken or lump crab meat. Cooked chicken works well and adds a nice flavor. If you love seafood, crab meat gives a sweet taste. Just mix it in with the other ingredients. This variation turns your dip into a more filling dish. Your guests will love the added protein! Cheese is key in this dip. While mozzarella and Parmesan are classic, feel free to experiment. Try using sharp cheddar for a stronger taste. Goat cheese can give a tangy flavor that many enjoy. Mix in some cream cheese for extra creaminess. You can also use feta for a Mediterranean twist. Different cheeses make every dip unique and exciting! For a full recipe, check out Creamy Spinach Artichoke Delight. To store leftover creamy spinach artichoke dip, let it cool completely. Then, transfer it into an airtight container. Make sure the lid seals well to keep the dip fresh. You can store it in the fridge for up to three days. If you want to keep it longer, consider freezing it. When reheating, place the dip in an oven-safe dish. Cover it with foil to keep moisture in. Heat it at 350°F (175°C) for about 20 minutes. Stir halfway through for even heat. For freezing, store the dip in a freezer-safe container. You can freeze it for up to three months. Just remember to label it with the date. The creamy spinach artichoke dip lasts about three days in the fridge. If you freeze it, it stays good for three months. Watch for signs of spoilage, like an off smell or mold. If you see any, it's best to throw it away. Always trust your senses; they help keep your food safe. You can pair this dip with many tasty options. Tortilla chips are a classic choice. They add crunch and flavor. You can also use slices of crusty baguette. These are great for scooping up the dip. Fresh veggies work well too. Carrot sticks, celery, or bell peppers add a healthy touch. For a fun twist, try pita chips. They offer a unique flavor that complements the dip nicely. Yes, you can make this dip ahead of time! Prepare everything and store it in the fridge. You can mix all the ingredients and keep them chilled. Just remember to bake it before serving. This saves time when you have guests. You can prepare the dip a day before your party. It’s a great way to reduce stress and enjoy your event. Reheating this dip is simple. Preheat your oven to 350°F (175°C). Transfer the dip into an oven-safe dish if it's not already in one. Heat it for about 15-20 minutes. Stir it halfway through to ensure even warming. You can also use a microwave. Heat in short bursts, stirring in between. This method is faster but may make the dip less creamy. Enjoy it warm for the best taste! In this post, we covered everything you need to make creamy spinach artichoke dip. We shared a full ingredient list and tips for choosing the best items. You learned step-by-step instructions for mixing and baking. I also gave ways to customize the dip for different diets and tastes. Remember to store leftovers properly and check for spoilage. With these tips, you can impress anyone with your delicious dip. Enjoy your cooking journey and make it a hit at your next gathering!

Creamy Spinach Artichoke Dip Flavorful Party Favorite

Get ready to impress your guests with my Creamy Spinach Artichoke Dip! This flavorful dip is a party favorite that

To make savory breakfast muffins, you need: - 1 cup all-purpose flour - 1 cup whole wheat flour - 2 teaspoons baking powder - 1/2 teaspoon baking soda - 1/2 teaspoon salt - 1 teaspoon garlic powder - 1/2 teaspoon black pepper - 1/2 cup shredded cheddar cheese - 1/2 cup diced cooked ham or crispy cooked bacon - 1/2 cup finely chopped fresh spinach or kale - 3 large eggs - 1 cup buttermilk (or 1 cup milk mixed with 1 tablespoon vinegar) - 1/4 cup extra virgin olive oil These ingredients work together to create a light, fluffy muffin that bursts with flavor. You can change the recipe to fit your taste. Try these: - Chopped fresh herbs (like chives or parsley) for garnish - Different cheeses, such as feta or mozzarella - Cooked sausage or turkey bacon for protein - Other vegetables, like bell peppers or zucchini Feel free to mix and match to make these muffins your own! If you have allergies, here are some easy swaps: - Use gluten-free flour instead of all-purpose flour. - Replace eggs with flaxseed meal or applesauce for a vegan option. - Swap buttermilk with a dairy-free milk alternative, mixed with lemon juice. - Use dairy-free cheese for a lactose-free choice. These substitutions ensure everyone can enjoy these tasty muffins! 1. Preheat your oven to 375°F (190°C). This ensures even baking. 2. Prepare a 12-cup muffin tin. You can line it with paper liners or spray it with cooking spray. This makes it easy to remove the muffins later. 3. In a medium bowl, sift together the all-purpose flour, whole wheat flour, baking powder, baking soda, salt, garlic powder, and black pepper. Whisk these dry ingredients until mixed well. This step helps avoid lumps. 4. In a large bowl, crack three large eggs. Beat them lightly. Add the buttermilk and olive oil. Whisk until everything is well combined. 5. Gradually add the dry mix to the wet ingredients. Stir gently to combine. Don’t overmix; it’s okay if a few lumps remain. 6. Carefully fold in the shredded cheddar cheese, diced ham or bacon, and chopped spinach or kale. This helps ensure every bite is tasty. 7. Use a scoop or spoon to fill each muffin cup about 3/4 full. This allows space for rising during baking. 8. Place the muffin tin in your preheated oven. Bake for 18 to 22 minutes. The muffins are done when their tops are golden brown and a toothpick comes out clean. 9. Once baked, remove the tin from the oven. Let the muffins cool for a few minutes. Then, gently transfer them to a wire rack to cool completely. This helps keep them from getting soggy. 10. For a pop of flavor, sprinkle fresh chopped herbs on top before serving. You can arrange the muffins on a platter or serve them warm in a basket. Enjoy your savory breakfast muffins! To make your savory breakfast muffins shine, measure your flour carefully. Use a spoon to fill your measuring cup, then level it off. This keeps your muffins light and fluffy. Mix your wet and dry ingredients gently. Overmixing can lead to tough muffins. Aim for a few lumps in the batter for best results. Set your oven to 375°F (190°C). Bake your muffins for 18 to 22 minutes. Check for doneness by inserting a toothpick. If it comes out clean, your muffins are ready. Keep an eye on them as ovens can vary. Golden tops show they are baked well. Don’t skip the buttermilk; it adds moisture and flavor. Also, avoid using cold eggs and milk. Room temperature ingredients mix better. Watch the baking time closely. Opening the oven too soon can cause them to sink. Lastly, don’t skip the cooling step. Letting them cool allows the texture to improve. For the full recipe, check the details above. {{image_4}} You can switch up the cheese in your muffins. Cheddar is great, but try others! - Feta adds a tangy kick. - Mozzarella gives a creamy texture. - Parmesan adds a nutty flavor. Mix and match these cheeses to find your favorite blend. Vegetables add color and nutrients to your muffins. You can use many options! - Bell peppers bring sweetness and crunch. - Zucchini keeps them moist and adds fiber. - Mushrooms offer a rich, earthy taste. Feel free to mix different veggies for a fun twist! Want to boost flavor? Add some fun ingredients! - Sun-dried tomatoes add a burst of flavor. - Olives give a salty kick. - Nuts or seeds add crunch and protein. Experiment with spices too, like cumin or paprika, to make them unique. For the full recipe, check out the detailed instructions above! To keep your savory breakfast muffins fresh, store them in an airtight container. Place a piece of paper towel at the bottom to absorb moisture. This helps keep them soft. You can also wrap them in plastic wrap before placing them in the container. Make sure to let them cool completely before storing. When you want to enjoy your muffins again, you can reheat them easily. Preheat your oven to 350°F (175°C). Place the muffins on a baking sheet. Heat them for about 5 to 10 minutes. This brings back their fresh-baked taste. You can also use the microwave. Heat on low for about 15 to 20 seconds. Be careful not to overheat, as they can become tough. For long-term storage, freezing is a great option. Wrap each muffin tightly in plastic wrap. Then place them in a freezer-safe bag. Remove as much air as possible. Label the bag with the date. You can freeze the muffins for up to three months. When you’re ready to eat them, thaw them in the fridge overnight. Reheat them using the oven or microwave for a quick breakfast treat. Check out the Full Recipe for more details on making these delightful muffins! Yes, you can easily make these muffins gluten-free. To do this, substitute the all-purpose and whole wheat flour with a gluten-free flour blend. Ensure it is a 1:1 replacement for the best results. You might need to adjust the liquid slightly, so keep an eye on the batter’s consistency. Gluten-free muffins can be just as fluffy and tasty! Savory muffins usually last about three to five days when stored properly. Keep them in an airtight container at room temperature. If you want them to last longer, you can refrigerate them for up to a week. Just make sure to reheat them before serving to regain their fresh taste. Absolutely! You can swap out the ham or bacon for other proteins. Try cooked sausage, turkey, or even tofu for a vegetarian option. Just ensure that any meat you choose is fully cooked before mixing it into your batter. This way, you'll have endless flavor options for your savory breakfast muffins! Savory breakfast muffins are fun and easy to make. You learned about key ingredients, helpful tips, and ways to customize your muffins. Remember to use fresh veggies and flavors you love. Avoid common mistakes for perfect texture. Store leftovers properly or freeze them for later. With this guide, you can enjoy tasty muffins anytime. Now it’s your turn to bake and share these delights with others!

Savory Breakfast Muffins Easy and Flavorful Recipe

Start your day with a new twist on breakfast! Savory breakfast muffins are tasty, easy to make, and packed with

- 1 lb boneless, skinless chicken thighs, cut into bite-sized pieces - 1 tablespoon olive oil - 1 cup broccoli florets - 1 cup bell peppers, sliced (use a mix of red and yellow for vibrant color) - 1 carrot, sliced into thin rounds - 2 cups cooked jasmine rice - 1 tablespoon sesame seeds (for garnish) - 2 green onions, thinly sliced (for garnish) - Salt and pepper, to taste - 1/4 cup soy sauce (or opt for tamari for a gluten-free version) - 2 tablespoons honey or maple syrup - 1 tablespoon rice vinegar - 1 teaspoon freshly grated ginger - 1 teaspoon minced garlic - 1 teaspoon cornstarch mixed with 1 tablespoon water - Salt and pepper - Optional spices for added flavor When you gather these ingredients, make sure they are fresh. Fresh veggies add color and taste. Using chicken thighs gives you a juicy bite every time. The sauce is the heart of this dish. Choose either soy sauce or tamari based on your needs. Honey or maple syrup adds sweetness. Rice vinegar gives it a nice tang. When cooking, season your chicken well. Salt and pepper are key for a good flavor base. You can also try adding spices like garlic powder or red pepper flakes for a kick. This simple yet rich mix will make your meal shine. Check the [Full Recipe] for a step-by-step guide to bring it all together. Enjoy your cooking! To start, you need to mix the sauce ingredients. In a small saucepan, combine: - 1/4 cup soy sauce (or tamari) - 2 tablespoons honey (or maple syrup) - 1 tablespoon rice vinegar - 1 teaspoon grated ginger - 1 teaspoon minced garlic Stir these together over medium heat until they simmer. Next, we need to thicken the sauce. Add 1 teaspoon of cornstarch mixed with 1 tablespoon of water. Keep stirring for about 2 minutes. The sauce should thicken nicely. Once done, remove it from heat and set aside. Now, let’s cook the chicken. Heat 1 tablespoon of olive oil in a large skillet over medium-high heat. Season 1 lb of boneless, skinless chicken thighs with salt and pepper. Put the chicken in the skillet and cook for 5-7 minutes. Stir it now and then until the chicken is browned and cooked through. Time to add some color! Toss in 1 cup of broccoli florets, 1 cup of sliced bell peppers, and 1 sliced carrot. Stir-fry everything together for 4-5 minutes. You want the veggies to be tender but still crisp. Now, let’s get saucy! Pour the teriyaki sauce over the chicken and veggies. Mix well to coat everything evenly. Heat it all together for 2-3 minutes. This helps the flavors blend beautifully. It’s time to serve! In four bowls, divide 2 cups of cooked jasmine rice evenly. Top the rice with the teriyaki chicken and veggies. For a great look, arrange the ingredients nicely in the bowl. To finish, sprinkle 1 tablespoon of sesame seeds and 2 sliced green onions on top. This adds flavor and makes your dish pop! For a nice touch, use chopsticks to serve. This makes each bowl a feast for the eyes and the taste buds. Enjoy your teriyaki chicken bowls! You can find the Full Recipe for more details and tips. When making teriyaki chicken bowls, you can choose between a skillet or a wok. A skillet is great for beginners. It heats evenly and is easy to manage. A wok, however, allows for faster cooking and can give your veggies a nice char. If you use a wok, keep the heat high and stir often. To get perfect chicken texture, always cut the chicken into even pieces. This ensures they cook at the same rate. Season the chicken with salt and pepper before cooking. This adds flavor right from the start. Marinating the chicken ahead of time boosts flavor. Just mix soy sauce, honey, and ginger, then let the chicken soak for at least 30 minutes. This simple step can make a big difference in taste. You can also add spices to the chicken. Try red pepper flakes for heat or sesame oil for a nutty note. Just a pinch can elevate your dish. When cooking for a crowd, simply double the ingredient quantities. Use about 2 pounds of chicken and increase the veggies accordingly. Make sure to adjust your cooking time as well. Larger batches might need a bit more time to cook through. For serving, use large bowls and let guests build their own plates. This way, everyone can choose how much rice, chicken, and veggies they want. It makes for a fun, interactive meal. For the full recipe, check out the detailed instructions above. {{image_4}} You can make this dish without chicken. Try using tofu or tempeh instead. Both options soak up flavor well. Marinate them in the teriyaki sauce for extra taste. For extra veggies, add snap peas or mushrooms. Both add great color and crunch. If you need a gluten-free dish, use tamari instead of soy sauce. Tamari tastes just as good and keeps the flavor strong. You can also swap out the honey for maple syrup to keep it gluten-free. This small change keeps the dish sweet and tasty. Jasmine rice is great, but there are other options. Brown rice adds a nutty flavor and more fiber. You can also try quinoa for a protein boost. If you want a low-carb choice, use cauliflower rice. It absorbs flavors well and makes the dish lighter. To store your teriyaki chicken bowls, let them cool first. Then, place leftovers in an airtight container. This helps keep the flavors fresh. You can store them in the fridge for up to 3 days. If you want to enjoy them later, freezing is a good option. For freezing, separate the chicken and vegetables from the rice. This keeps everything fresh. Use a freezer-safe container or bag. Be sure to remove as much air as possible to prevent freezer burn. Your teriyaki chicken can stay frozen for about 2-3 months. When you're ready to eat, thaw it in the fridge overnight. When reheating, use the microwave or a skillet. If using a microwave, heat in short bursts. Stir in between to keep the heat even. If you're using a skillet, add a splash of water. This helps steam the food and keeps it moist. Avoid high heat to keep the chicken tender and the veggies crisp. Enjoy your flavorful teriyaki chicken bowls again! To make teriyaki sauce, mix soy sauce, honey, rice vinegar, ginger, and garlic. This simple homemade teriyaki sauce recipe brings a sweet and salty flavor. After mixing, heat the sauce and add cornstarch mixed with water to thicken it. You can try adding orange juice or sesame oil for a twist. Yes, you can use beef, shrimp, or even tofu for your teriyaki bowls. If you choose beef, slice it thinly for quick cooking. For shrimp, cook until they turn pink, which takes just a few minutes. Adjust cooking times to ensure each protein is perfectly cooked. Teriyaki chicken bowls go well with steamed rice, edamame, or a fresh salad. You can also serve pickled vegetables for extra crunch. These sides complement the chicken and add variety to your meal. Yes, this recipe is great for meal prep. Cook the chicken and veggies, then store them in airtight containers. Keep the rice separate to prevent it from getting soggy. When you reheat, add a splash of water to the rice for moisture. To add heat, include sliced jalapeños or chili flakes to the chicken. You can also use sriracha or chili oil for a spicy kick. Drizzle some hot sauce on top before serving to make it even hotter. In this blog post, I covered how to make delicious teriyaki chicken bowls. We discussed the key ingredients, including chicken, fresh veggies, and fragrant jasmine rice. I shared simple steps to prepare the teriyaki sauce and stir-fry the dish perfectly. You learned how to enhance flavors and adapt the recipe for various diets. With some tips on storage and meal prep, you can enjoy these bowls anytime. Experiment and make this dish your own! Enjoy creating your tasty, homemade teriyaki chicken bowls.

Teriyaki Chicken Bowls Flavorful and Easy Recipe Guide

Are you ready to elevate your dinner game? Teriyaki Chicken Bowls are a delicious blend of sweet and savory that

To make these tasty bites, you need some key ingredients. Here’s a quick look: - 1 cup rolled oats: This is the base. Oats give texture and energy. - 1/2 cup pumpkin puree: Adds flavor and moisture. Use canned or fresh. - 1/4 cup honey or maple syrup: This is your sweetener. It keeps the bites sticky. - 1/4 cup almond butter: It adds creaminess. You can swap it for peanut butter. - 1 teaspoon pumpkin pie spice: This spice mix gives that classic fall taste. - 1/4 teaspoon ground cinnamon: A little cinnamon boosts the warmth. - 1/4 cup mini chocolate chips (optional): These add sweetness. They’re fun but not needed. - 1/4 cup chopped nuts: Walnuts or pecans add crunch. - A pinch of salt: This enhances all the flavors. For those with allergies, you can use sunflower seed butter instead of nut butter. If you want a vegan option, maple syrup works great for sweetness. You can make these bites even more fun with extra ingredients. Here are some ideas: - Chocolate chips and nuts: These are the most common add-ins. They add flavor and texture. - Other mix-ins: Consider adding seeds, like chia or flaxseeds, for extra nutrition. Dried fruit, like cranberries or raisins, can also work well. Feel free to mix and match based on what you like or have on hand. The [Full Recipe] gives you all the details to create these delightful snacks. Start by mixing the wet ingredients. In a medium bowl, combine the rolled oats, pumpkin puree, honey or maple syrup, and almond butter. Stir until smooth. This mix is the heart of your energy bites. Next, add the dry spices. Sprinkle in pumpkin pie spice, ground cinnamon, and a pinch of salt. Mix again until everything blends well. The spices give these bites their warm flavor. Now it’s time to shape the bites. Use your hands to form the mixture into small balls, about 1 inch in size. Make sure they are even. This helps them cook uniformly. Place each bite on a parchment-lined baking sheet. Keep them spaced apart to avoid sticking together. After shaping, chill the bites in the fridge for at least 30 minutes. This chilling time is key! It helps the bites firm up, making them easier to handle. For a lovely presentation, arrange the energy bites in a decorative bowl. You can sprinkle a little extra pumpkin pie spice on top for a nice touch. Serve them as a healthy snack. They are great on the go or at home. Enjoy these tasty bites as a nutritious treat! For full instructions, check out the Full Recipe. To get the right texture for your energy bites, aim for a thick, sticky mixture. If it feels too dry, add a little more pumpkin puree or nut butter. If it's too wet, add more oats. Common pitfalls include overmixing or not measuring ingredients accurately. Stick to the recipe for the best results. Adjust the spices to your taste. If you love cinnamon, add a little more! You can also try other spices like nutmeg or ginger. When it comes to sweeteners, I prefer honey or maple syrup for a natural touch. If you use processed sugars, the taste will change. Store your energy bites in an airtight container. Keep them in the fridge for a week. This helps maintain their freshness and flavor. To keep them fresh longer, you can freeze them. Just place them in a freezer bag. When you want to enjoy them, thaw a few at room temperature. For serving, arrange the energy bites in a nice bowl. A sprinkle of extra pumpkin pie spice adds a nice touch. Enjoy these tasty bites anytime! For the full recipe, check the section above. {{image_4}} You can change the flavor of your pumpkin spice energy bites to fit your taste. Try using different spices like nutmeg or ginger to mix things up. These spices add warmth and can enhance the fall vibe. You can even add a dash of vanilla extract for a sweet twist. Another fun way to customize these bites is by switching up nut butters. Almond butter is great, but peanut butter or sunflower seed butter works well too. Each nut butter gives a unique taste and creamy texture. If you want to make your energy bites vegan-friendly, simply swap honey for maple syrup. This keeps the sweetness without using animal products. You can also use agave syrup as another alternative. For those who need gluten-free options, stick with certified gluten-free oats. This way, everyone can enjoy these tasty bites without worry. You can also check that your nut butters do not contain added gluten. Pair your energy bites with fresh fruit for a balanced snack. Sliced apples or bananas add a fresh crunch to the creamy bites. You can also serve them with yogurt for a creamy dip that makes snacking even more fun. To perfect the energy bite balance, keep a mix of textures and flavors. Try serving some bites with nuts and others with chocolate chips. This way, you create a fun variety that appeals to everyone's taste buds. For the full recipe, refer back to the main section. Enjoy your pumpkin spice energy bites! To keep your pumpkin spice energy bites fresh, use an airtight container. Glass or plastic containers work well. Make sure the lid seals tightly to keep out air. Refrigeration is key. Cold temperatures help maintain their texture and flavor. These bites last about one week in the fridge. If you want them to last longer, freeze them. They can stay fresh in the freezer for up to three months. To thaw, just take out a few bites and leave them at room temperature for about 30 minutes. You can also heat them in the microwave for a few seconds. Enjoy them again as a quick snack! Pumpkin spice energy bites stay fresh for about one week when stored in the fridge. Use an airtight container to keep them from drying out. If you want them to last longer, you can freeze them. They can last up to three months in the freezer. Just thaw them overnight in the fridge before eating. Yes, you can make these bites ahead of time. They are perfect for meal prep. Just prepare a batch on the weekend. Store them in your fridge for a quick snack during the week. This makes your mornings easier and keeps you fueled. Yes, pumpkin spice energy bites are healthy. They are packed with nutrients from oats and pumpkin. Oats give you fiber, which helps with digestion. Pumpkin adds vitamins A and C. Almond butter provides healthy fats and protein. Each bite has about 100 calories, making them a great snack option. You can find ready-made pumpkin spice energy bites at many grocery stores. Look in the snack aisle or health food section. Brands like Larabar or RXBAR often have similar flavors. You can also check online retailers like Amazon for more options. For homemade goodness, refer to the Full Recipe to make your own! In this post, I shared how to make delicious pumpkin spice energy bites. We discussed key ingredients, fun add-ins, and step-by-step prep. I offered tips for texture, flavor, and storage to keep them fresh. Exploring flavor variations allows for personal touches to fit your taste. These bites are not only tasty but also healthy. Remember, you can customize them to suit any diet. Enjoy making these simple treats for a nutritious snack anytime!

Pumpkin Spice Energy Bites Healthy Fall Snack Recipe

Welcome to the cozy flavors of fall! In this post, I’ll share an easy and healthy recipe for Pumpkin Spice

To make delicious cinnamon sugar tortilla chips, you need a few simple items. Here’s what you will need: - 6 small flour tortillas - 1/4 cup granulated sugar - 1 tablespoon ground cinnamon - 1/4 cup unsalted butter, melted - 1/4 teaspoon salt (optional) - 1 teaspoon vanilla extract (optional) These ingredients come together to create a sweet, crunchy treat. You can easily find them at any grocery store. The flour tortillas serve as the base, while the sugar and cinnamon add that classic sweet touch. The melted butter helps everything stick together and gives the chips a rich flavor. If you want to kick it up a notch, consider adding salt and vanilla extract to enhance the taste. Using fresh ingredients makes a big difference in flavor. Always check the expiration dates on your spices. Fresh spices really elevate your snack. This recipe is flexible; feel free to adjust the sugar and cinnamon amounts to suit your taste. For the full recipe, just follow the detailed instructions to whip up these delightful chips in no time! First, preheat your oven to 350°F (175°C). This step ensures your chips bake evenly. Next, line a baking sheet with parchment paper. This makes cleanup easy and helps prevent sticking. In a small mixing bowl, combine 1/4 cup of granulated sugar and 1 tablespoon of ground cinnamon. Whisk them together until they are mixed well. Set this mixture aside for later use. Melt 1/4 cup of unsalted butter. You can do this in the microwave or on the stove. Using a pastry brush, coat both sides of each tortilla with the melted butter. For extra flavor, mix in 1 teaspoon of vanilla extract with the butter before brushing. Stack the buttered tortillas neatly. Use a sharp knife or pizza cutter to slice them into triangles or strips. Aim for 6 to 8 pieces per tortilla. The size can be adjusted based on your preference. Lay the tortilla pieces in a single layer on the lined baking sheet. Make sure they do not overlap. Put the baking sheet in the preheated oven. Bake the chips for 8 to 10 minutes. Keep an eye on them as baking times can vary. You want them to be golden brown and crispy. Once baked, take the chips out of the oven. While they are still warm, sprinkle any leftover cinnamon sugar over the top. If you want, add a dash of salt to boost the flavor. Let the chips cool on the baking sheet for a few minutes. Then, transfer them to a serving bowl. Enjoy your sweet and crunchy cinnamon sugar tortilla chips! To get your tortilla chips nice and crispy, always use fresh tortillas. Old tortillas can turn out chewy. Brush the melted butter evenly over both sides. This helps them crisp up in the oven. Arrange the chips in a single layer on the baking sheet. Overlapping will cause soggy spots. Bake them until they turn golden brown, usually around 8-10 minutes. Keep a close eye on them! You can add more flavor to your cinnamon sugar tortilla chips. Try mixing in a pinch of nutmeg or cardamom with the cinnamon. It gives a warm spice kick. If you enjoy a bit of zest, a drop of orange or lemon zest in the sugar mix works wonders. You can also dip the chips in chocolate or caramel sauce for extra sweetness. One common mistake is not preheating the oven. A hot oven helps the chips cook evenly. Avoid using too much butter; too much will make them greasy. Don’t forget to sprinkle the cinnamon sugar evenly; uneven coating can lead to bland bites. Lastly, let them cool slightly before serving. They will crisp up even more as they cool! For the full recipe, check out the steps above! {{image_4}} If you want gluten-free chips, use corn tortillas. They give the same crunch and flavor. Just follow the same steps in the recipe. Brush them with melted butter or oil, then coat with cinnamon sugar. Bake until golden. Enjoy your gluten-free snack with no worry! For vegan chips, swap the butter for coconut oil or a vegan butter. The process remains the same. Brush the tortillas with your chosen oil and sprinkle with cinnamon sugar. Bake until crisp. These chips are just as tasty, and everyone can enjoy them! You can use different sweeteners for your chips. Try using brown sugar for a richer flavor. Or, opt for coconut sugar for a healthier twist. For a low-calorie version, consider using a sugar substitute like stevia. Just remember to adjust the amount based on the sweetness level. Each choice brings a unique taste to your cinnamon sugar tortilla chips! To keep your cinnamon sugar tortilla chips fresh, store them in an airtight container. Make sure they are completely cool before sealing. This helps prevent moisture buildup. You can also use a resealable plastic bag. If you have space, place a piece of parchment paper inside to absorb any excess moisture. This will keep your chips crisp! If your chips lose their crunch, don’t worry! You can easily recrisp them. Preheat your oven to 350°F (175°C). Spread the chips in a single layer on a baking sheet. Bake for about 5 minutes, watching closely. Remove them once they are warm and crisp. This method works wonders and brings back that delightful crunch. When stored properly, cinnamon sugar tortilla chips last about 5 days. If you want to extend their freshness, consider freezing them. Wrap the chips tightly in plastic wrap or foil, then place them in a freezer bag. They can last up to 2 months in the freezer. Just remember to let them thaw before you recrisp them. Enjoy your sweet snack anytime! For the complete recipe, check out the Full Recipe section. To make Cinnamon Sugar Tortilla Chips from scratch, follow these steps: 1. Preheat your oven to 350°F (175°C) and line a baking sheet with parchment paper. 2. Mix 1/4 cup of sugar with 1 tablespoon of ground cinnamon in a bowl. 3. Melt 1/4 cup of unsalted butter. Brush both sides of 6 small flour tortillas with the melted butter. 4. Sprinkle the cinnamon sugar mixture on one side of each tortilla. 5. Cut the tortillas into triangles or strips and arrange them on the baking sheet. 6. Bake for 8-10 minutes until they are golden and crispy. This method gives you fresh, warm chips right from your oven. Yes, you can buy pre-made Cinnamon Sugar Tortilla Chips at many grocery stores. Look in the snack aisle or the international foods section. Brands may vary, so check the ingredients for quality. However, homemade chips often taste better and are fresher. Cinnamon Sugar Tortilla Chips can provide some benefits: - Whole grains: If you use whole wheat tortillas, they offer more fiber. - Cinnamon: This spice may help regulate blood sugar. - Energy boost: The sugar gives a quick energy lift. Remember, these chips are a treat. Enjoy them in moderation for a balanced diet. You can serve these chips in many fun ways: - Place them in a colorful bowl or on a decorative platter. - Pair with melted chocolate or caramel sauce for dipping. - Use them as a topping for ice cream or yogurt. These ideas will enhance your snack experience and impress your guests. Several dipping sauces work great with Cinnamon Sugar Tortilla Chips: - Chocolate sauce: A classic choice for sweet flavors. - Caramel sauce: This adds a rich, buttery taste. - Cream cheese dip: Blend cream cheese with sugar and vanilla for a creamy treat. - Fruit salsa: Fresh fruit mixed with lime juice adds a refreshing twist. Experiment with these options to find your favorite! For a complete guide on making these chips, check the Full Recipe. You now know how to make tasty cinnamon sugar tortilla chips. Start with simple ingredients like flour tortillas and granulated sugar. Follow the easy steps to mix, bake, and store your chips. Remember the tips to get perfect crispiness and explore tasty variations for everyone. Enjoy your homemade snacks, whether for a party or movie night. With a little effort, you create a delightful treat that brings smiles. Keep this guide handy for your next snack adventure!

Cinnamon Sugar Tortilla Chips Tasty and Simple Snack

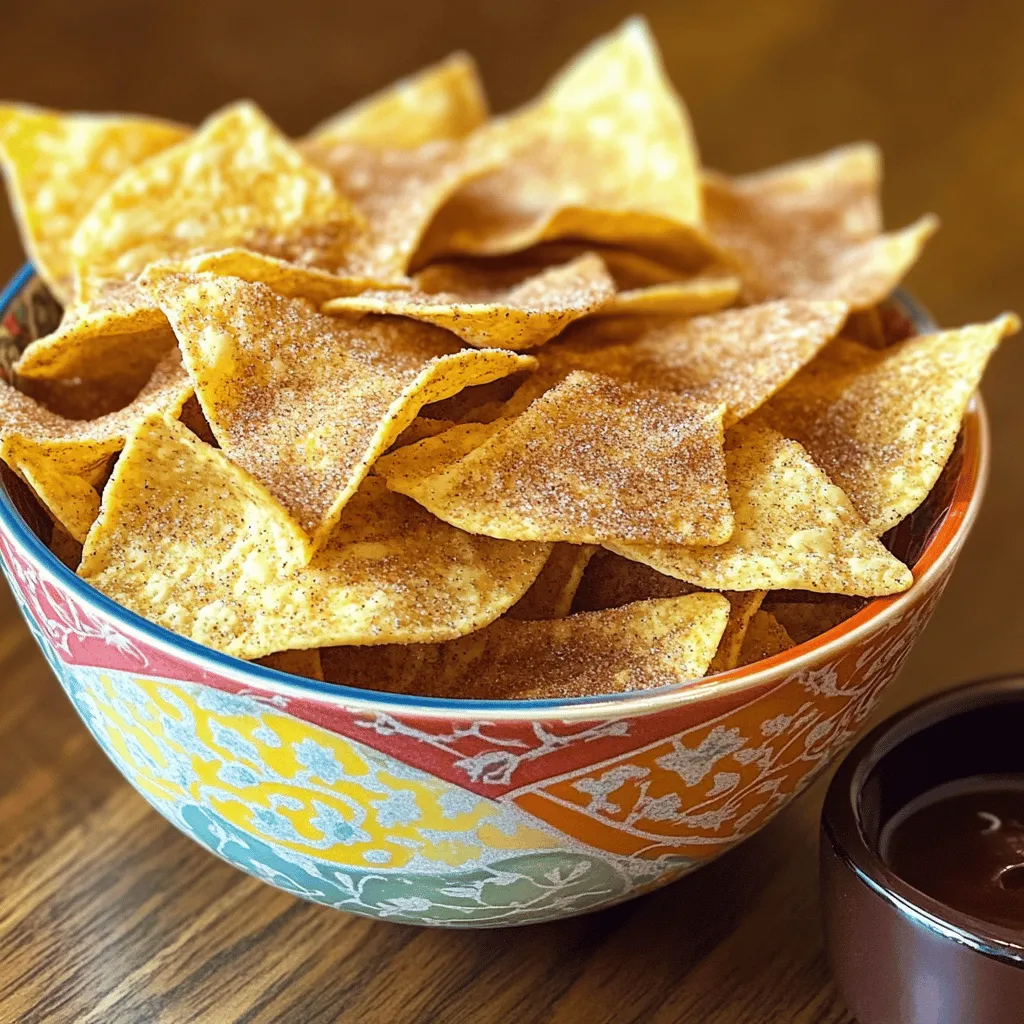
Looking for a quick and tasty snack? You’ll love these Cinnamon Sugar Tortilla Chips! They are easy to make with

- 4 large bell peppers (any color for visual appeal) - 1 cup cooked quinoa (preferably cooled) - 1 can (15 oz) black beans, rinsed and drained - 1 cup corn kernels (fresh or frozen) - 1 medium onion, finely chopped - 2 cloves garlic, minced - 1 cup diced tomatoes (canned or fresh) - 1 cup shredded cheese (cheddar or Monterey Jack) - 2 tablespoons fresh cilantro (optional) - Lime wedges (for serving) When making stuffed bell peppers, the right ingredients matter. Bell peppers serve as a colorful base, adding crunch and taste. I love using large peppers, as they hold more filling. You can choose any color—red, green, yellow, or orange—each brings its own flavor and charm. Quinoa is my go-to grain in this dish. It cooks fast, is healthy, and adds protein. Make sure it's cooled before mixing. Black beans add fiber and a rich taste. Rinsing them well helps reduce sodium. For extra flavor, I mix in sweet corn, onion, and garlic. These ingredients create a savory base. The onion should be finely chopped for even cooking and a smooth texture. Garlic brings a lovely aroma and taste. Optional ingredients like diced tomatoes add moisture and brightness. Cheese, whether cheddar or Monterey Jack, melts beautifully on top. Finally, fresh cilantro adds a burst of freshness. Serve with lime wedges for a zesty kick. Check out the Full Recipe to see how to combine these ingredients into a delightful meal. - Preheat the oven to 375°F (190°C) - Prepare the bell peppers by cutting the tops and removing seeds To start, I set my oven to 375°F. This gets it ready for baking. Next, I take my bell peppers and carefully cut off the tops. I make sure to remove all the seeds and membranes. This step is key for a tasty and healthy meal. Once done, I brush a little olive oil on the outside. This helps them brown nicely in the oven. - Sauté onion and garlic in olive oil until translucent - Add spices and cook briefly to release their flavors I heat olive oil in a skillet over medium heat. I add chopped onion and minced garlic. I sauté them for about 3-4 minutes. They should turn soft and fragrant. This makes the base of my filling. Next, I sprinkle in ground cumin and smoked paprika. I stir well and cook for another minute. This allows the spices to bloom and gives the dish a rich flavor. - Combine quinoa, black beans, corn, and tomatoes in a bowl - Mix in sautéed onion and garlic, and season to taste In a big bowl, I combine cooked quinoa, black beans, corn, and diced tomatoes. I then add the sautéed onion and garlic mix. A pinch of salt and pepper goes in next. I mix everything well. This ensures all the flavors come together. The filling is now both colorful and nutritious. - Spoon filling into the bell peppers and pack it in - Add cheese on top and cover with aluminum foil - Bake for 25 minutes, then uncovered for an additional 10-15 minutes Now comes the fun part: stuffing the peppers! I take a spoon and carefully fill each pepper. I pack the filling in tight to fit as much as I can. After that, I sprinkle cheese on top. I cover the baking dish with aluminum foil to keep the moisture in. I bake them for 25 minutes. Then, I remove the foil and bake for another 10-15 minutes. This makes sure the peppers are tender and the cheese is melty. For the full recipe, check the section above. - Ensure quinoa is fully cooked and cooled before mixing. This helps it blend well. - Adjust seasoning as per personal taste preferences. Feel free to add more salt or spices. - Use a colorful platter for serving. This makes the dish more inviting. - Garnish with fresh cilantro and a drizzle of olive oil. It adds freshness and flavor. - Use a sharp knife for easily cutting the peppers. This makes preparation quick and safe. - A large skillet for sautéing ingredients. It allows for even cooking and easy mixing. These tips will make your stuffed bell peppers shine. For a complete guide, check the Full Recipe. Enjoy cooking! {{image_4}} You can easily adapt stuffed bell peppers to fit your needs. For a vegetarian option, simply replace the meat with more veggies. Think about adding mushrooms, zucchini, or spinach for added flavor and nutrition. If you want a low-carb option, use cauliflower rice instead of quinoa. This keeps the dish light while still being satisfying. Adding different spices can really change the taste. For heat, sprinkle in some chili powder or cayenne pepper. You can also switch up the beans. Try kidney beans or pinto beans for a different texture and flavor. This keeps your meal exciting and full of surprises. Feel free to experiment with various kinds of meat. Ground turkey or beef can make a heartier filling. If you want a unique twist, consider adding grains like brown rice or couscous. These options give you more choices and can fit any palate. Explore these variations to create your perfect stuffed bell peppers. For the complete recipe, check the Full Recipe section. Store any leftovers in an airtight container. They will stay fresh in the refrigerator for up to 3 days. This makes it easy to enjoy your meal again without much fuss. You can freeze the stuffed peppers for up to 3 months. Make sure to wrap them tightly to avoid freezer burn. When you're ready to eat, simply thaw them in the fridge overnight before reheating. To reheat, use the microwave or the oven. If using the oven, heat until they are warmed through. This keeps the peppers soft and delicious, making each bite as good as the first. For the full recipe, you can follow the steps to create this tasty dish. Look for tender peppers and melted cheese on top. You want the peppers soft but not mushy. A fork should slide in easily. The cheese should be bubbly and slightly golden. This means they are ready to enjoy! Yes, prepare them a day ahead and just bake before serving. This saves time and brings great flavor. Just store them covered in the fridge. When you are ready, pop them in the oven to warm up! Options include rice, lentils, or even shredded chicken for a protein boost. You can mix and match your favorite ingredients. Try adding spinach or mushrooms for extra nutrition. The possibilities are endless! Yes, they can be nutritious, especially with whole grains and vegetables as filling. Bell peppers are rich in vitamins. Using quinoa or brown rice adds fiber. This makes them a great meal for everyone. Absolutely, for a dairy-free option, simply skip the cheese or use dairy-free alternatives. You can still have a tasty stuffed pepper without it. Try adding more spices or herbs for flavor! For the full recipe, check out my vibrant quinoa and black bean stuffed bell peppers! Stuffed bell peppers are simple and tasty. You can use quinoa, black beans, and corn for a healthy mix. Adding spices and cheese makes them flavorful. Remember, you can change the recipe to fit your taste or diet. Store leftovers in the fridge or freeze them for later. Enjoy making these fun dishes and feel free to get creative. Happy cooking!

Stuffed Bell Peppers Flavorful and Healthy Meal Idea

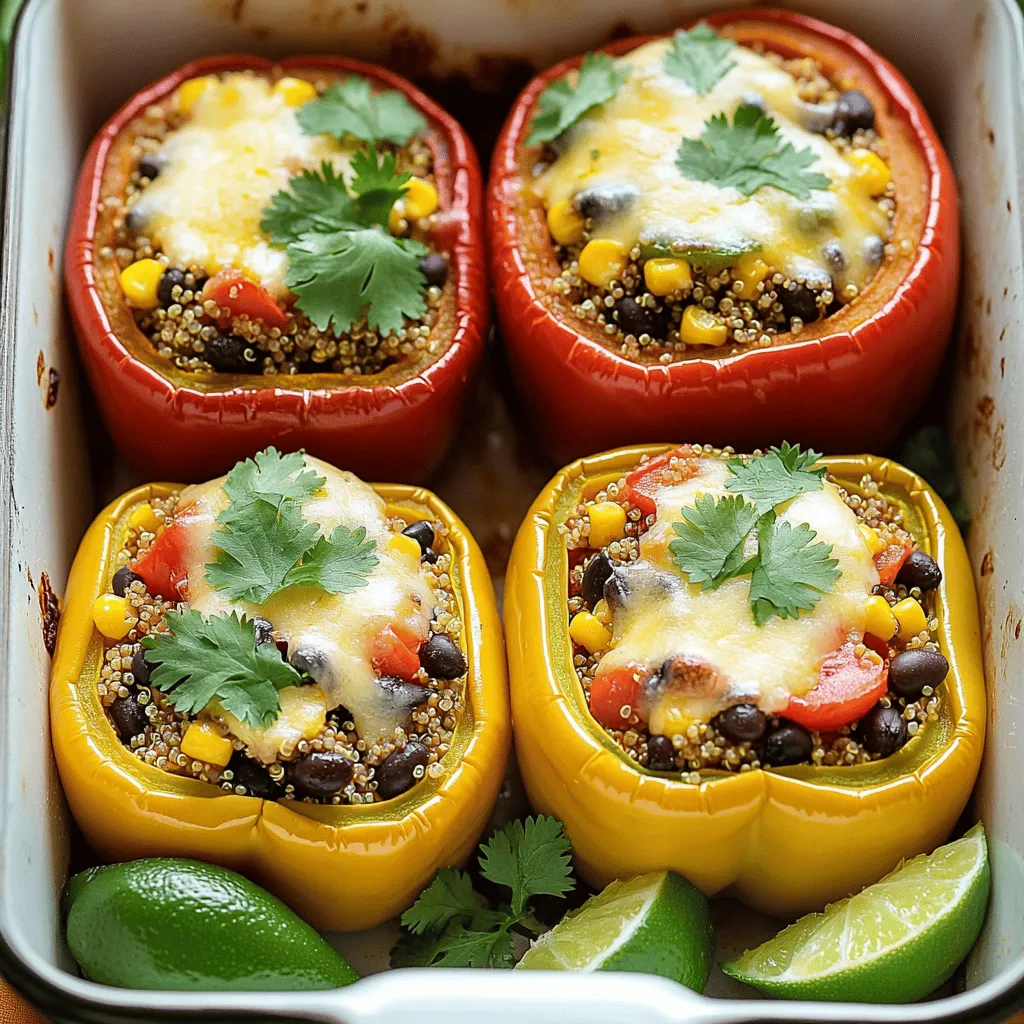
Looking for a meal that’s both delicious and good for you? Stuffed bell peppers are your answer! This colorful dish

- 1 cup quinoa, thoroughly rinsed - 2 cups water - 1 medium cucumber, diced into small pieces - 1 cup cherry tomatoes, halved for a pop of color - 1/2 cup red bell pepper, diced - 1/2 cup Kalamata olives, pitted and sliced - 1/4 cup red onion, finely chopped - 1/4 cup feta cheese, crumbled into small bits - 1/4 cup fresh parsley, coarsely chopped Quinoa is the star of this dish. It is full of protein and fiber. This tiny seed packs a punch. I love its nutty flavor and fluffy texture. Fresh vegetables add crunch and color. Cucumber, cherry tomatoes, and bell pepper make it bright. Kalamata olives bring a briny bite. Feta cheese adds creaminess, while parsley gives a fresh finish. - 3 tablespoons extra virgin olive oil - 2 tablespoons freshly squeezed lemon juice - 1 teaspoon dried oregano - Salt and freshly ground black pepper to taste The dressing ties everything together. Extra virgin olive oil is rich and smooth. Lemon juice adds a zesty twist. Dried oregano gives an earthy taste. A sprinkle of salt and pepper enhances all the flavors. - Additional herbs like basil or mint - Proteins like chicken or chickpeas Want to make it heartier? Add cooked chicken or chickpeas. They provide extra protein. Fresh herbs like basil or mint can add a unique twist. Each add-in can change the flavor profile. Feel free to mix and match. This salad can be your canvas! For the full recipe, check the instructions section. To start, boil 2 cups of water in a medium saucepan. Rinse your quinoa well under cold water. This helps remove bitter flavors. Once the water is boiling, add the rinsed quinoa and a pinch of salt. Lower the heat and cover the pot. Let it simmer for about 15 minutes. You will know it’s ready when all the water is gone and the quinoa looks fluffy. Take it off the heat and let it cool to room temperature. While the quinoa cools, chop your fresh vegetables. Dice the cucumber into small pieces. Halve the cherry tomatoes for a burst of color. Dice the red bell pepper. Slice the Kalamata olives. Finely chop the red onion. Crumble the feta cheese. Combine all these fresh ingredients in a large bowl. Using fresh produce makes your salad taste great and adds nutrition. In a small bowl, whisk together 3 tablespoons of extra virgin olive oil and 2 tablespoons of freshly squeezed lemon juice. Add 1 teaspoon of dried oregano for flavor. Season with salt and freshly ground black pepper to taste. This dressing brings all the flavors together and adds a nice zing. Once the quinoa is cool, fluff it gently with a fork. Add it to the bowl with the chopped vegetables. Drizzle your dressing over the salad. Make sure to cover everything evenly. Toss the salad carefully to mix all the ingredients well. This ensures that every bite is flavorful. Finally, sprinkle coarsely chopped parsley on top for a fresh finish. Enjoy your Mediterranean Quinoa Salad! For the full recipe, check out the link provided. To get the best texture for your quinoa, start by rinsing it well. Rinsing removes bitter saponins that can affect the taste. Place the quinoa in a fine mesh strainer and rinse under cold water for about 30 seconds. This step is key for a pleasant flavor. After cooking, fluff the quinoa with a fork. Fluffing separates the grains and keeps the texture light. For a burst of flavor, use fresh herbs and spices. I recommend parsley, oregano, and mint. These herbs add a fresh taste. When mixing the dressing, balance acidity and richness. The lemon juice adds brightness, while the olive oil provides smoothness. Season with salt and pepper to enhance all flavors. Presentation matters! Serve your salad in a large glass bowl. This shows off the colorful ingredients. For a special touch, garnish with extra parsley and whole Kalamata olives. This makes your salad look great. Pair this dish with grilled chicken or pita bread for a complete meal. Enjoy the fresh and vibrant taste! {{image_4}} You can swap out ingredients easily in this salad. Try different cheeses like goat cheese or ricotta. Each cheese adds its own taste. If you want more crunch, add bell peppers or radishes. You can also toss in some artichoke hearts or sun-dried tomatoes. These swaps can change the flavor and texture of your salad. If you need a vegan option, skip the feta cheese. You can add avocado instead for creaminess. For gluten-free needs, quinoa is already a safe choice. You can also add beans, like chickpeas, for protein. This keeps the salad filling and healthy without gluten. Seasonal veggies can make this dish shine. In summer, add fresh corn or zucchini. In autumn, consider butternut squash or beets for color and taste. These ingredients reflect the season and keep your salad exciting. You can also serve it warm in colder months. Just mix the quinoa with roasted veggies to create a cozy meal. For more ideas and inspirations, check out the [Full Recipe]. To keep your Mediterranean quinoa salad fresh, store it in the refrigerator. Use an airtight container to prevent moisture loss and keep out other odors. This salad stays tasty for up to five days. Always cool the quinoa before mixing in the veggies. This helps keep everything crisp. Avoid mixing the dressing until you are ready to eat. It helps the salad stay vibrant and crunchy. You can prepare this salad ahead of time. Cook the quinoa and chop the veggies the day before. This allows the flavors to blend well. If stored properly, the salad lasts about five days. Just remember to keep the dressing separate until serving. This keeps everything fresh and delicious. You can enjoy this salad cold or warm. If you like it warm, gently heat the quinoa in a microwave. Be careful not to overheat it, or it will lose its texture. Cold quinoa salad makes a great lunch. The flavors mix well when chilled. Just give it a good stir before serving. This keeps every bite tasty and fun. For the full recipe, check out the complete guide. To cook quinoa perfectly, rinse it first. Rinsing removes bitterness. Use a ratio of 1 cup quinoa to 2 cups water. Bring the water to a boil, then add the rinsed quinoa. Reduce heat, cover, and simmer for about 15 minutes. When done, let it cool before using. Fluff the grains with a fork for a light texture. Yes, you can make this salad ahead. Prepare the quinoa and chop the veggies. Store them separately in the fridge. Mix them together right before serving. This keeps the salad fresh and crunchy. The flavors blend well if you let it sit for a few hours. However, avoid adding dressing until just before serving to keep it fresh. You can add proteins like grilled chicken or chickpeas. These options boost protein and make the salad hearty. You could also use beans like black beans or kidney beans. If you want a veggie option, add more nuts or seeds. These choices add texture and flavor, making your salad satisfying. Yes, this salad is gluten-free. Quinoa is a great gluten-free grain. It’s safe for people with gluten allergies or sensitivities. Always check that other ingredients, like feta cheese, are gluten-free too. This salad works well for those who need to avoid gluten. To adjust the seasoning, taste the salad before serving. Add more lemon juice for tanginess or extra olive oil for richness. You can also mix in herbs like basil or mint for a fresh twist. If you like spice, consider adding a pinch of chili flakes. Adjusting seasoning helps customize flavors to your liking. This blog post covers how to create a delicious Mediterranean quinoa salad. We explored ingredients like quinoa, fresh veggies, feta, and olives. You learned step-by-step cooking and preparation tips to achieve the perfect texture and flavor. We shared storage advice and meal prep ideas for your busy days. Finally, I highlighted fun variations to keep this dish exciting. Remember, a great salad starts with fresh ingredients and flavors that sing together. Enjoy making this salad your own!

Mediterranean Quinoa Salad Fresh and Healthy Delight

Looking for a fresh, healthy dish that packs a flavor punch? This Mediterranean Quinoa Salad is your answer! With crisp

- Cooked chicken - Black beans - Corn kernels - Enchilada sauce For this easy chicken enchiladas recipe, you will need some basic ingredients. Start with cooked chicken. You can use leftover chicken or quickly cook some. Next, add black beans. Make sure they are rinsed and drained. Corn kernels add sweetness and texture. You can use fresh, frozen, or canned corn. Finally, use enchilada sauce. You can buy it at the store or make your own. - Shredded cheese - Fresh cilantro - Sour cream for serving While the main ingredients make a great dish, optional ingredients can enhance it. Shredded cheese adds richness. I recommend Cheddar or Monterey Jack. Fresh cilantro gives a bright flavor. You can sprinkle it on top before serving. Lastly, sour cream adds creaminess. Serve it on the side for those who want it. - Mixing bowl - Baking dish - Aluminum foil You will need some simple tools to make this dish. A mixing bowl helps combine the filling. Use a baking dish to hold your enchiladas while they bake. Finally, aluminum foil keeps them covered in the oven. This ensures even cooking and helps the cheese melt perfectly. For the full recipe, check out the details above. First, preheat your oven to 375°F (190°C). This step warms the oven for perfect cooking. While it heats, prepare your ingredients. Gather the following items: - 2 cups cooked chicken, shredded - 1 cup black beans, rinsed and drained - 1 cup corn kernels - 1 teaspoon ground cumin - 1 teaspoon chili powder - ½ teaspoon garlic powder - 8 small flour tortillas - 2 cups enchilada sauce - 1 cup shredded cheese - ¼ cup fresh cilantro, chopped In a large bowl, mix the shredded chicken, black beans, corn, cumin, chili powder, and garlic powder. Stir well until all ingredients blend together. This filling is the heart of your enchiladas. It packs flavor and protein into each bite. Now it's time to fill your tortillas. Take one tortilla and lay it flat. Spoon about ½ cup of the chicken mixture in the center. Roll the tortilla tightly around the filling. Make sure to seal the ends well. Place it seam-side down in a 9x13 inch baking dish. Repeat this for all tortillas. Next, pour the remaining enchilada sauce evenly over the rolled tortillas. Sprinkle the shredded cheese on top. This layer of cheese melts beautifully during baking. Cover the dish with aluminum foil. Place it in the preheated oven to bake for 20 minutes. After this, carefully remove the foil and bake for an additional 10 minutes. The cheese should be bubbly and golden. After baking, let the dish cool for a few minutes. Garnish with fresh cilantro for a tasty finish. Serve warm and enjoy your delicious chicken enchiladas! For the complete process, check the Full Recipe. To make great enchiladas, start by ensuring even filling distribution. Use a measuring cup to scoop the filling. Aim for about half a cup per tortilla. This way, each bite has a good mix of flavors. When rolling tortillas, keep them warm. This helps them stay soft and flexible. If they cool, they may crack. Place your tortilla on a flat surface and add the filling in the center. Roll it tightly, tucking in the ends as you go. This keeps everything inside. You can adjust the spice levels to fit your taste. If you like heat, add more chili powder or some diced jalapeños. For milder enchiladas, reduce the spices a bit. Using homemade sauce can boost flavor. You can control the heat and ingredients. However, store-bought sauces save time and still taste great. Choose one with good reviews for the best results. For serving, you can keep enchiladas in the baking dish. It looks homey and inviting. If you want to impress guests, use a colorful platter. Drizzle extra sauce over the top for a nice touch. Garnishing adds appeal. A sprinkle of fresh cilantro brightens the dish. You can also add a dollop of sour cream for creaminess. These small details can elevate your enchiladas to a new level. Enjoy your meal! {{image_4}} If you want a vegetarian option, swap the chicken for beans or lentils. You can mix in sautéed spinach or mushrooms for more flavor. Use gluten-free tortillas to make this dish safe for those with gluten sensitivities. Many brands offer great-tasting gluten-free tortillas that hold up well. When it comes to cheese, you have options! Try using a blend of Cheddar and Monterey Jack for a creamy texture. You can also use pepper jack for a spicy kick. For added crunch, toss in diced bell peppers or zucchini into your filling. These veggies not only add texture but also boost the dish’s nutrition. The choice between red and green enchilada sauce can change the dish's flavor. Red sauce gives a rich and bold taste, while green sauce offers a tangy zest. You can also add toppings like sour cream or guacamole for creaminess. These additions enhance the flavors and make each bite more enjoyable. For the full recipe, check back on the earlier sections! After you make your easy chicken enchiladas, store any leftovers properly. To refrigerate, place the enchiladas in an airtight container. They will stay fresh for about four days. You can also freeze them for longer storage. For freezing, wrap the enchiladas tightly in plastic wrap and then place them in a freezer-safe bag. This helps prevent freezer burn. When it's time to enjoy your leftover enchiladas, you want them warm and tasty. The best method for reheating is to use an oven. Preheat your oven to 350°F (175°C). Place the enchiladas in a baking dish and cover them with foil to keep them moist. Heat for about 20 minutes or until they are hot throughout. You can also use a microwave, but they may lose some texture. You can keep refrigerated chicken enchiladas for up to four days. If you freeze them, they can last for about three months. Check for signs of spoilage before eating. If you see any mold or if they smell off, it is best to throw them away. Enjoying your enchiladas fresh will always taste best. You can use many options instead of chicken. Some great alternatives are: - Ground turkey or beef - Shredded pork - Tofu or tempeh - Black beans or lentils These choices keep the dish tasty and fun. You can mix and match proteins to suit your taste. Try different spices to enhance the flavors! Yes, you can make enchiladas ahead of time. Here are some tips: - Prepare the filling and assemble the enchiladas. - Cover them tightly with foil and store in the fridge for up to 24 hours. - Bake them right before serving. Just add a few extra minutes to the baking time. This method saves time and lets you enjoy more moments with family and friends. Enchiladas are great with many side dishes. Here are some tasty ideas: - Spanish rice or cilantro lime rice - Refried beans or black bean salad - Fresh guacamole or salsa - A simple green salad with lime dressing These sides add color and flavor to your meal. They balance the richness of the enchiladas while keeping it fun and fresh. Enjoy the full recipe to make your meal complete! In this blog post, we explored how to make delicious enchiladas. We covered essential ingredients like chicken, beans, and enchilada sauce. I also shared tips for perfecting your filling and enhancing flavors. You learned about dietary options, storage practices, and serving ideas. Remember, making enchiladas can be fun and rewarding. You can personalize them to fit your taste. Enjoy your cooking adventure, and don't hesitate to try new flavors and styles!

Easy Chicken Enchiladas Flavorful Comfort Dish

Are you ready to enjoy a warm, tasty dish that brings comfort to any meal? These Easy Chicken Enchiladas combine

To make this dish, you need a few key ingredients. They work together to create a fresh and zesty flavor. Here’s what you need: - 8 oz spaghetti or linguine - 1 lb large shrimp, peeled and deveined - 4 tablespoons olive oil, divided - 4 cloves garlic, finely minced - Zest of 1 lemon - 1/4 cup fresh lemon juice - 1/2 teaspoon red pepper flakes (optional) - Salt and freshly cracked black pepper, to taste - 1/4 cup fresh parsley, chopped - Grated Parmesan cheese, for serving (optional) These ingredients blend perfectly for a bright and tasty meal that you'll want to enjoy often. You can customize this dish to suit your taste. If you want a creamier sauce, add a splash of heavy cream. For a veggie boost, toss in some spinach or cherry tomatoes. If you can't find large shrimp, medium shrimp will work too. You can also use whole wheat pasta for a healthier option. Feel free to adjust the red pepper flakes based on your heat preference. When you shop for shrimp, freshness is key. Look for shrimp that smell like the ocean, not fishy. The shells should be shiny and firm. If you buy frozen shrimp, check that they are not freezer burned. Always choose shrimp that are peeled and deveined for easy cooking. This way, you can focus on making your meal delicious without any fuss. To cook the pasta, start with a large pot. Fill it with water and add salt. Bring the water to a strong boil. Once boiling, add 8 oz of spaghetti or linguine. Cook the pasta according to the package instructions. I like to cook it until it is al dente. This gives the pasta a nice bite. Before draining, save 1 cup of the starchy water. This water is great for the sauce. Drain the pasta in a colander and set it aside. For the shrimp, get a large, deep skillet. Heat 2 tablespoons of olive oil over medium heat. When the oil is warm, add 4 cloves of finely minced garlic. If you want some heat, add red pepper flakes. Sauté the garlic for about 1 minute. You want it fragrant, but not browned. Next, raise the heat to medium-high. Add 1 lb of large peeled and deveined shrimp to the skillet. Season with salt and black pepper. Cook the shrimp for 2-3 minutes. Turn them occasionally. The shrimp should turn pink, opaque, and curl up. This shows they are cooked. Now it’s time to mix everything. Lower the heat back to medium. Toss the cooked pasta into the skillet with the shrimp. Add lemon zest and lemon juice from one lemon. Pour in the remaining 2 tablespoons of olive oil. Stir everything together gently. Then, add the reserved pasta water a little at a time. This helps the sauce come together. Mix until you reach your desired sauce thickness. This usually takes between 1/4 to 1/2 cup of the pasta water. Finally, stir in chopped parsley, tasting as you go. Adjust seasoning if needed. Serve hot, topped with grated Parmesan cheese if you like. Enjoy this flavorful dish, inspired by the full recipe! To make the garlic shine in your dish, start with fresh cloves. I prefer using four cloves for a bold taste. Mince them finely to release their oils. This step is key! Sauté the garlic in olive oil over medium heat. Watch it closely so it doesn’t burn. A light golden hue is perfect. Adding red pepper flakes gives a nice kick. You can adjust the amount based on your taste. Cooking shrimp is quick and easy. I recommend using large, peeled, and deveined shrimp. Heat oil in a skillet, then add the shrimp. Season with salt and pepper. Cook for two to three minutes, turning them occasionally. Watch for that beautiful pink color! When they curl and turn opaque, they are done. This means they are tender and juicy. Sometimes, you might face issues while cooking. If your shrimp is rubbery, it means you overcooked them. Cook them just until they are pink and curled. If your sauce is too thin, add a bit more pasta water. This helps thicken it up nicely. Don’t forget to taste and adjust seasoning. Adding salt and pepper can make a big difference. For more detailed guidance, check the Full Recipe. {{image_4}} You can make this dish creamy for a richer taste. To do this, add about 1 cup of heavy cream to the skillet after you sauté the shrimp. Stir it in with the lemon juice and pasta. This will create a silky sauce that clings to the noodles. You can also use half-and-half if you want a lighter option. This creamy version pairs well with a sprinkle of fresh herbs on top. Adding veggies boosts the flavor and nutrition of your meal. You can toss in fresh spinach, cherry tomatoes, or zucchini. Add them to the skillet right after the shrimp. Sauté them for a few minutes until they soften. This not only adds color but also makes your dish more filling. You can also use broccoli or bell peppers for extra crunch and taste. If shrimp is not your favorite, you can swap it out for other seafood. Scallops are a great choice and add a sweet flavor. You can also use firm white fish, like cod or tilapia. Just cut the fish into bite-sized pieces and cook it the same way as shrimp. You can also try adding mussels or clams for a seafood medley. Each option gives a new twist to the classic lemon garlic flavor. For the full recipe, check out the detailed instructions above! After enjoying your Lemon Garlic Shrimp Pasta, you may have some leftovers. Store them in an airtight container. Make sure to cool the pasta to room temperature before sealing it. This keeps the flavor fresh and helps prevent sogginess. Store it in the fridge for up to three days. If you want to keep it longer, freezing is a good option. When you're ready to enjoy the leftovers, reheating is key. Use a skillet over medium heat. Add a splash of olive oil or a bit of water. This helps to keep the pasta moist. Stir gently and heat until warm. You can also use a microwave if you're short on time. Just cover it with a damp paper towel to trap steam and keep it from drying out. If you want to freeze your dish, do it as soon as it cools. In an airtight container, place the pasta and shrimp. Make sure to leave some space for expansion. You can freeze it for up to two months. When ready to eat, thaw it in the fridge overnight. Then, reheat it in a skillet as mentioned before. Enjoy that tasty flavor again! For the complete cooking process, check out the Full Recipe. You can pair this dish with many sides. Here are some great options: - Garlic bread: It adds a nice crunch and flavor. - A fresh salad: A mix of greens with lemon vinaigrette works well. - Roasted vegetables: Try asparagus or zucchini for a healthy touch. - Steamed broccoli: This adds color and nutrition to your meal. Each of these sides complements the bright flavors of the pasta. Shrimp cook quickly. Look for these signs: - Color change: Raw shrimp are gray. Cooked shrimp turn pink. - Shape: They curl into a tight "C" shape when done. - Texture: Cooked shrimp feel firm, not mushy. Once you see these changes, your shrimp are ready to enjoy! Yes, you can prepare parts of this dish in advance. Here’s how: - Cook the pasta and shrimp separately, then cool them. - Store them in airtight containers in the fridge. - When ready to eat, just reheat and combine. However, fresh flavors taste best when served right away. You can find the full recipe for details on cooking. Lemon garlic shrimp pasta is a simple dish that brings great flavor to your table. We explored the key ingredients, cooking steps, and helpful tips to enhance your dish. Try variations like creamy versions or add nutritious veggies. Storing and reheating the leftovers can keep the taste fresh. With these insights, you can create a dish that impresses not just yourself but others too. Enjoy the fun of cooking and experimenting with flavors!

Lemon Garlic Shrimp Pasta Flavors to Savor Daily

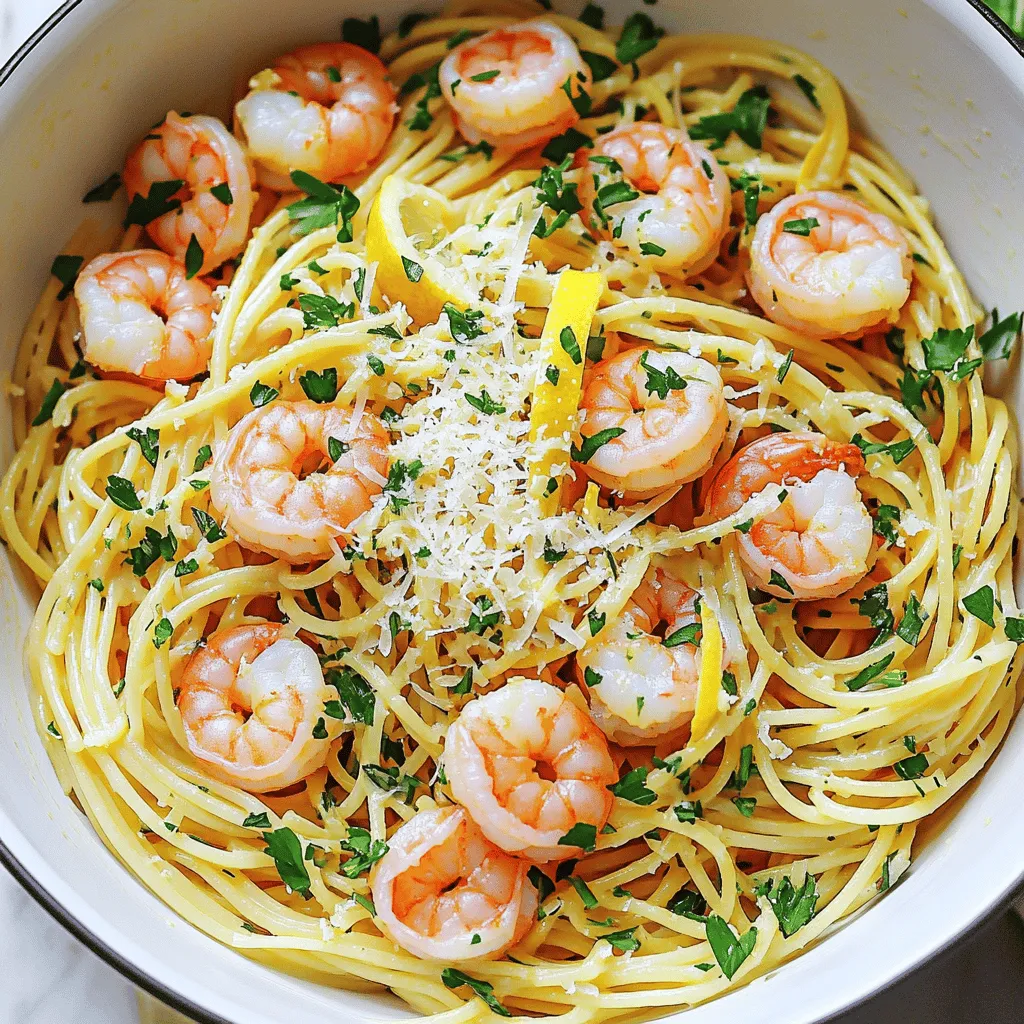
Looking for a quick, tasty meal? Lemon Garlic Shrimp Pasta brings bold flavors to your kitchen. It’s easy to make

To make these raspberry lemonade bars, you need: - 1 cup all-purpose flour - 1/2 cup powdered sugar (plus extra for dusting) - 1/4 teaspoon salt - 1/2 cup cold unsalted butter, cubed - 2 large eggs - 1 cup granulated sugar - 1/4 cup fresh lemon juice (about 2 lemons) - Zest of 1 lemon - 1 cup fresh raspberries (or thawed frozen raspberries) - 1 tablespoon cornstarch - 1/2 teaspoon baking powder If you don't have some ingredients, don't worry! Here are some easy swaps: - Instead of all-purpose flour, use gluten-free flour for a gluten-free version. - If you run out of powdered sugar, blend granulated sugar until fine. - Use coconut oil or margarine in place of cold unsalted butter. - For a dairy-free option, replace eggs with a flax or chia seed mixture. Fresh raspberries are key to these bars. Here’s how to pick the best ones: - Look for firm berries that are bright in color. - Avoid any raspberries that are mushy or have spots. - Check for mold or moisture in the container. - If you can, smell the raspberries. They should have a sweet, fruity scent. - Buy your raspberries close to when you plan to use them for the best taste. These tips help ensure your raspberry lemonade bars shine with flavor! For the full recipe, check out the entire guide. Start by preheating your oven to 350°F (175°C). This helps create a nice, even bake. While that heats up, grab an 8x8-inch baking dish. You can grease it with butter or line it with parchment paper. Lining makes it easier to lift the bars out later. In a mixing bowl, combine 1 cup of all-purpose flour, 1/2 cup of powdered sugar, and 1/4 teaspoon of salt. Mix these dry ingredients well. Next, add in 1/2 cup of cold, cubed unsalted butter. Using a pastry cutter, or your fingers, mix until it looks like coarse crumbs. You want some pea-sized pieces of butter to stay. Once mixed, take this crumbly mixture and press it into the bottom of your prepared dish. Make sure it’s even. Bake the crust for 15 minutes until it’s just lightly golden around the edges. While the crust bakes, let’s make the filling. In a separate bowl, whisk together 2 large eggs, 1 cup of granulated sugar, 1/4 cup of fresh lemon juice, the zest of 1 lemon, and 1/2 teaspoon of baking powder. You want this mixture to be smooth. Now, for the raspberries! Take 1 cup of fresh raspberries and toss them in another bowl with 1 tablespoon of cornstarch. This helps thicken the filling. Carefully fold these coated berries into your lemon mixture. Be gentle to keep the raspberries whole. Once your crust is baked, pour this raspberry-lemon filling right over it. Spread it out evenly. Bake this in the oven for another 20-25 minutes. The filling should be set but still have a slight jiggle in the center. After baking, let the bars cool completely in the pan. Then, move them to the fridge. Chill them for at least 2 hours. This helps the bars set up nicely. When you're ready, dust them with extra powdered sugar and cut them into squares. Enjoy your flavorful summer delight! For the full recipe, check out the complete guide. To enhance the lemonade flavor, use fresh lemon juice. It brings bright notes and tang. Zesting the lemon adds a lovely aroma and flavor. For a twist, add a splash of lemon extract. This small change elevates the taste. Balance the sweetness with the tartness of raspberries. You want a refreshing punch in every bite. To prevent overbaking, watch the filling closely. When the edges are set, but the center jiggles, it’s ready. Remove it from the oven right away. Overbaking makes the bars dry and less enjoyable. Cooling the bars in the pan also helps them set. Chill them in the fridge for a firm texture. For a stunning presentation, slice the bars evenly into squares. Dust the top with powdered sugar for a touch of elegance. Arrange them on a colorful platter. Garnish with fresh raspberries and lemon wedges. This adds color and freshness to the dish. Your guests will be impressed by the beautiful display. {{image_4}} You can mix up the flavors with different fruits. Try blueberries for a sweet twist. Strawberries add a fun touch, too. If you love tropical flavors, mango works great. Each fruit gives a fresh taste, making your bars unique. Just remember to adjust the sugar based on the fruit's sweetness. No worries if you need gluten-free bars! Swap the all-purpose flour for a gluten-free blend. Make sure it includes xanthan gum for the right texture. The rest of the recipe stays the same. You still get that tasty flavor and soft texture. To make these bars vegan, replace the eggs with a flax egg. Mix one tablespoon of ground flaxseed with three tablespoons of water. Let it sit for five minutes to thicken. Use coconut oil instead of butter for the crust. You can enjoy these fruity treats without eggs or dairy! For the full recipe, check out Raspberry Lemonade Bliss Bars . To keep your Raspberry Lemonade Bars fresh, store them in an airtight container. Place parchment paper between layers to prevent sticking. You can keep them in the fridge for a cool treat. You can freeze these bars for longer storage. First, cut them into squares. Then, wrap each square in plastic wrap. Place all wrapped bars in a freezer bag. They stay good for about three months. When stored in the fridge, the bars last about one week. If frozen, they last around three months. Just thaw them in the fridge before serving. Enjoy the fresh taste of summer any time! For the full recipe, check out the Raspberry Lemonade Bliss Bars! Yes, you can use frozen raspberries. Just thaw them first. Drain any extra juice. Lightly coat the thawed raspberries with cornstarch. This helps keep them from sinking in the filling. Using frozen raspberries can work well, especially when fresh ones are not in season. To tell if the bars are done, look for a few signs. The filling should be set but still jiggle slightly in the center. The edges may turn a light golden color. If you insert a toothpick, it should come out clean or with a few moist crumbs. Keep an eye on the time, usually around 20-25 minutes after adding the filling. There are many fun ways to serve these bars. You can dust them with powdered sugar for a nice touch. Pair them with whipped cream for a creamy contrast. Fresh mint leaves can add an extra pop of color. Serve them on a pretty platter with lemon slices and raspberries for a beautiful display. Consider serving them with iced tea or lemonade for a refreshing treat. For the full recipe, check out the Raspberry Lemonade Bliss Bars section above. This blog post covered how to make delicious Raspberry Lemonade Bars. We explored the key ingredients and offered helpful substitutions. I shared tips for choosing fresh raspberries and explained step-by-step instructions for baking. You learned methods to enhance flavor and avoid overbaking. We also delved into variations, storage options, and answered frequent questions. In the end, these bars are easy to make and perfect for any occasion. Enjoy every bite!

Raspberry Lemonade Bars Flavorful Summer Delight

Are you ready for a burst of summer flavor? Raspberry Lemonade Bars are the perfect treat to cool you down

Older posts
Newer posts
← Previous Page1 … Page22 Page23 Page24 … Page27 Next →

dsad

© 2025 mealinmoments • Built with GeneratePress

Our Policies

  • Copyright Policy
  • Cookie Policy
  • GDPR Policy
  • Privacy Policy
  • Disclaimer
  • Terms Of Use

More Information

  • Home
  • About
  • Contact
  • Appetizers
  • Dessert
  • Dinner
  • Drinks
©2025, mealinmoments About Back To Top