Skip to content
DisclaimerTerms Of UseGDPR PolicyCookie Policy

mealinmoments

  • Home
  • Drinks
  • Appetizers
  • Dinner
  • Dessert
  • About
  • Contact
  • Privacy Policy
DisclaimerTerms Of UseGDPR PolicyCookie Policy

Megan

For a delightful dish, you need the following ingredients: - 4 lobster tails - 6 tablespoons unsalted butter - 4 cloves garlic, finely minced - 1 tablespoon freshly squeezed lemon juice - 1 teaspoon smoked paprika - 1 teaspoon fresh parsley, finely chopped - Salt and freshly ground black pepper to taste - Lemon wedges, for serving Each ingredient plays a key role in bringing out the rich flavors of the lobster. The lobster tails are the star of the show. They offer a sweet and delicate taste that pairs perfectly with garlic and butter. Using unsalted butter allows you to control the salt level. Freshly minced garlic adds a punch of flavor. Lemon juice brightens the dish, while smoked paprika gives a warm, smoky touch. Fresh parsley adds color and freshness, while salt and pepper enhance all the flavors. I always recommend using fresh ingredients. It makes a big difference in taste. If you want to impress guests, serve this dish alongside lemon wedges. They add a zesty kick that elevates the meal. For the full recipe, check the detailed steps to create this flavorful feast at home. - Preheat the oven: Start by preheating your oven to 375°F (190°C). This step ensures that your lobster tails cook evenly and perfectly. - Cut the shell and expose the meat: Use kitchen scissors to carefully cut along the top shell of each lobster tail. Cut down the center and stop just before the tail fin. This method keeps the meat intact. Pull the shell open gently to reveal the juicy lobster meat inside. For a nicer look, slightly pull the meat out of the shell, letting it rest on top. - Elegant presentation tips: Arrange the lobster tails on a beautiful platter. Drizzle any leftover garlic butter on top for a shiny finish. Garnish with fresh parsley and lemon wedges for a pop of color. - Melting the butter: In a small saucepan over medium heat, melt 6 tablespoons of unsalted butter. This gives the sauce a rich, creamy base. - Adding garlic and spices: Once the butter melts, add 4 cloves of finely minced garlic. Sauté for about 1 minute. Watch closely so the garlic does not brown. This can make it taste bitter. - Mixing the final sauce: Stir in 1 tablespoon of freshly squeezed lemon juice, 1 teaspoon of smoked paprika, and a pinch of salt and pepper. Mix well to combine all flavors. - Coating the lobster meat: Use a brush to generously coat the exposed lobster meat with the garlic butter mixture. Leave some butter to baste later. - Baking instructions: Place the lobster tails on a lined baking sheet. Bake for 12-15 minutes. The meat should turn opaque and firm when done. - Basting tips: Halfway through cooking, baste the lobster meat with the reserved garlic butter. This adds flavor and keeps the meat moist. For the full recipe, check out the detailed instructions provided above. Enjoy your cooking adventure! - Timing for perfect doneness: Bake lobster tails for 12-15 minutes. The meat should turn opaque. Use a meat thermometer; it should read 145°F (63°C). - Avoiding common pitfalls: Do not overcook the lobster. It can become tough and rubbery. Always baste halfway through cooking to keep it moist. - Plating ideas: Place lobster tails on a large platter. Drizzle extra garlic butter over them. Garnish with parsley and lemon wedges for color. - Wine pairings: Try a chilled Chardonnay or a light Pinot Grigio. These wines complement the rich flavors of the lobster. - Additional herbs and spices: Add fresh thyme or dill to the garlic butter. This brings a new layer of flavor to the dish. - Sauce variations: Mix in some chili flakes for heat. You can also try adding a splash of white wine for a tangy twist. For the full recipe, refer to the Garlic Butter Lobster Tails section. {{image_4}} You can add fresh herbs like thyme or dill for a unique taste. These herbs give a light, fresh flavor that pairs well with the rich butter. For a kick, try a spicy garlic butter option. Just add red pepper flakes or a dash of hot sauce to the classic garlic butter mix. This twist gives your lobster a bold, exciting flavor. Grilling lobster tails adds a smoky flavor that many love. Just brush them with garlic butter and grill for 5-7 minutes. This method gives a lovely char to the lobster. Baking is another great option. It keeps the meat tender and juicy. Broiling is perfect if you want extra char. Place the lobster tails under the broiler for 2-3 minutes at the end of cooking. This creates a crispy top while keeping the inside moist. You can switch butter types for different flavors. Try garlic herb butter or even olive oil for a lighter option. The size of the lobster tails also matters. Larger tails may need extra cooking time, while smaller ones will cook faster. Adjust the cooking time based on the size for the best results. For more details, check the Full Recipe. To keep your lobster tails fresh, store any leftovers in the fridge. Place the lobster tails in an airtight container. This keeps moisture in and prevents them from drying out. Use the leftovers within two days for the best taste. You can also freeze lobster tails. Wrap each tail in plastic wrap, then place them in a freezer bag. This way, they can last up to three months. When reheating lobster tails, do it gently. Use the oven or stovetop over low heat. This helps maintain the lobster's texture. Avoid the microwave; it can make the meat rubbery. If using the oven, preheat it to 350°F (175°C). Place the lobster tails in a baking dish with a splash of water. Cover with foil and heat for about 10 minutes. You can prep some ingredients ahead of time. Chop the garlic and parsley and store them in the fridge. This makes cooking quicker. For the garlic butter, you can prepare it in advance. Just melt the butter and mix in the garlic and spices. Store the mixture in the fridge for up to a week. When ready to use, just reheat it gently. This helps save time on busy days. Check out the Full Recipe for more tips! To tell if lobster tails are cooked, look for a few signs. The meat should be opaque and firm. It should also be white or slightly translucent. If the tail curls tightly, it is likely done. Use a meat thermometer to check the internal temperature. It should reach 145°F (63°C). If you're not sure, it's better to cook them a bit longer. Yes, you can use frozen lobster tails! Just make sure to thaw them first. You can do this by placing them in the fridge overnight. If you're short on time, you can also run them under cold water for about 30 minutes. This will help them cook evenly and taste great in the dish. Many sides go well with Garlic Butter Lobster Tails. Here are some great choices: - Garlic mashed potatoes - Steamed asparagus - Rice pilaf - Fresh green salad - Grilled corn on the cob These sides will complement the rich flavors of the lobster tails. Making the garlic butter sauce ahead of time is easy! Just follow these steps: 1. Melt the butter and add minced garlic as per the recipe. 2. Let the sauce cool and then store it in an airtight container in the fridge. 3. When you're ready to use it, just reheat it gently on the stove. This way, you save time on busy days, and your meal stays delicious! Eating lobster tails can be fun and tasty. Here’s how to do it: 1. First, use kitchen scissors to cut the shell down the middle. 2. Pull the meat out slightly for easy access. 3. Use your hands or a fork to enjoy the tender meat. 4. Don’t forget to dip it in the leftover garlic butter for extra flavor. This method makes sure you savor every bite of those rich flavors. For the full recipe, check out Garlic Butter Lobster Tails. You learned how to make Garlic Butter Lobster Tails from the steps above. We covered ingredients, preparation, cooking methods, and storage tips. Cooking lobster can be easy and fun. With these tips, you can impress your guests. Try new flavors or methods from the variations section. Don’t forget to enjoy your meal with a nice drink. Now, get cooking and savor your delicious lobster creation.

Garlic Butter Lobster Tails Flavorful Feast Awaits

Get ready to delight your taste buds with Garlic Butter Lobster Tails! This simple recipe brings rich flavor and elegance

To make Coconut Curry Butternut Squash Soup, gather these ingredients: - 1 medium butternut squash, peeled and cut into 1-inch cubes - 1 can (13.5 oz) full-fat coconut milk - 1 tablespoon coconut oil - 1 medium onion, finely chopped - 2 cloves garlic, minced - 1 tablespoon fresh ginger, grated or minced - 2 tablespoons red curry paste - 4 cups vegetable broth - 1 teaspoon ground cumin - 1 teaspoon turmeric powder - Salt and pepper, to taste - Fresh cilantro leaves, chopped, for garnish - Lime wedges, for serving When cooking, precise measurements can make a big difference. Here are some tips: - Use a kitchen scale to weigh the butternut squash for accuracy. - Measure coconut milk and broth in liquid measuring cups for best results. - For spices, use measuring spoons to ensure you add just the right amount. Choosing fresh ingredients can uplift your soup's taste. Here’s how: - Pick a butternut squash that feels heavy and has a smooth skin. - Select onions that are firm and free from bruises. - Choose garlic bulbs that are plump and tight. - Look for ginger that is firm with smooth skin. - When picking cilantro, ensure the leaves are bright green and fresh. By following these tips, you can enhance the quality of your Coconut Curry Butternut Squash Soup. For full details on making this delicious dish, check the Full Recipe. Start by heating coconut oil in a large pot over medium heat. Once it melts, add the chopped onion. Sauté the onion for about 5 minutes. You want it soft and clear. Next, stir in minced garlic and grated ginger. Cook this mix for 1-2 minutes. You’ll notice a lovely aroma filling your kitchen. Now, add your cubed butternut squash to the pot. Stir well to coat each piece with the onion mix. Then, pour in the vegetable broth. Add ground cumin and turmeric to the mix. Increase the heat until it begins to boil. Once boiling, lower the heat and cover. Let it simmer for 20-25 minutes. Check the squash with a fork; it should be tender. Take the pot off the heat. Use an immersion blender to purée the soup until it’s smooth and creamy. If you don’t have one, carefully transfer the soup to a regular blender. Blend in batches until silky. Return the soup to low heat, then stir in the coconut milk. Add salt and pepper to taste. Warm it through for about 5 minutes. Now, you have a delicious Coconut Curry Butternut Squash Soup! For the full recipe, check out the details above. To make your Coconut Curry Butternut Squash Soup sing, use the right spices. The red curry paste is key. It adds warmth and depth. Don't hesitate to adjust the amount based on your spice level. Ground cumin and turmeric bring earthiness and color. If you like it spicy, add a pinch of cayenne pepper. Fresh herbs like cilantro add brightness at the end. Just chop some and sprinkle it on top. A creamy soup is all about the blend. Use an immersion blender for ease. It gives a smooth finish without much hassle. If you prefer a chunkier texture, blend only half the soup. You can mix it back in for some bite. If the soup feels too thick, add more vegetable broth. A little coconut milk can also help. Stir gently until you reach your desired creaminess. Watch out for overcooking the squash. You want it tender but not mushy. Keep an eye on the cooking time. Taste your soup before serving. This way, you can adjust the salt and pepper. If it feels flat, a squeeze of lime juice brightens the flavors. Lastly, don’t skip the garnish! Fresh cilantro and lime make a big difference. For the full recipe, check the ingredients section. {{image_4}} This soup is already dairy-free thanks to the coconut milk. You can enhance the creaminess by adding more coconut milk or using cashew cream. If you want to avoid coconut, try using almond milk or oat milk. These options keep the soup rich and flavorful while staying dairy-free. To make this soup heartier, add protein. You can toss in cooked chickpeas or lentils. They blend well with the flavors and add a nice texture. For meat lovers, shredded chicken or tofu work great too. Just make sure to add them during the last few minutes of cooking to heat them through. Feel free to swap out the butternut squash with other seasonal veggies. Sweet potatoes, pumpkin, or carrots can replace squash. Each option brings its own unique taste and texture. In summer, zucchini or fresh corn can make a delightful addition. Adjust your spices to suit the new veggies for a fresh twist. For the complete recipe, check out the [Full Recipe]. To keep your Coconut Curry Butternut Squash Soup fresh, let it cool first. Then, pour the soup into an airtight container. Seal it tightly to avoid air getting in. Store it in the fridge for up to 4 days. Make sure to label it with the date, so you remember when you made it. If you want to save some soup for later, freezing is a great option. Use freezer-safe containers or bags. Leave some space at the top, as soup expands when frozen. You can freeze the soup for up to 3 months. When you are ready to eat it, just thaw it in the fridge overnight. Reheating your soup can be easy and quick. For the best taste, heat it on the stove. Pour the soup into a pot and warm it over medium heat. Stir often to prevent sticking. If you are in a hurry, you can use the microwave. Just warm it in short bursts, stirring in between. Enjoy your delicious soup again! Check out the Full Recipe for more tips and ideas. Yes, you can make this soup ahead of time. Make it up to two days before you plan to eat. Store it in an airtight container in the fridge. When you are ready, simply reheat it on the stove. Stir it well to keep it creamy. The flavors may even improve after sitting overnight, giving you a richer taste. If you don't have coconut milk, you can use other options. Almond milk or oat milk will work in a pinch. For a creamier texture, use cashew cream or soy cream. Keep in mind, these substitutes will change the flavor a bit. You can also add a touch of coconut extract for that coconut flavor if you like. Absolutely! This soup is great for meal prep. It stores well and tastes amazing after reheating. You can portion it out into individual containers. It will last in the fridge for about three to four days. If you want to keep it longer, freeze it for up to three months. Just remember to leave some space in the container for expansion. For the full recipe, check out the details above. To recap, we covered how to make Coconut Curry Butternut Squash Soup. We listed all the ingredients, their measurements, and tips for freshness. I shared easy steps for cooking, blending, and enhancing flavors. You now know variations to suit your taste and how to store leftovers. In the end, this soup is simple and perfect for meal prep. Enjoy every bowl, knowing you made a delicious choice!

Coconut Curry Butternut Squash Soup Delightful Recipe

Are you ready to warm your soul with a bowl of Coconut Curry Butternut Squash Soup? This delightful recipe combines

For making delicious vegetarian stuffed bell peppers, you will need the following ingredients: - 4 large bell peppers (any color), tops cut off and seeds removed - 1 cup quinoa, thoroughly rinsed - 2 cups vegetable broth - 1 can (15 oz) black beans, rinsed and drained - 1 cup corn kernels (can be fresh, frozen, or canned) - 1 medium onion, finely chopped - 2 cloves garlic, minced - 1 teaspoon ground cumin - 1 teaspoon smoked paprika - 1 teaspoon chili powder - Salt and pepper, to taste - 1 cup diced tomatoes (canned is fine) - ½ cup shredded cheese (optional, cheddar or a blend works best) - Fresh cilantro, chopped, for garnishing These ingredients combine to create a vibrant and filling dish. The quinoa serves as a great base, adding texture and protein. Black beans and corn give a hearty feel, while spices like cumin and smoked paprika bring warmth and depth. Diced tomatoes add moisture and flavor, making each bite delightful. You can find the full recipe for more details on cooking these tasty stuffed peppers. - Preheat the oven to 375°F (190°C). - Cook quinoa in vegetable broth until fluffy. To start, you need a hot oven. Preheating helps cook the peppers evenly. While the oven heats, rinse your quinoa. Place it in a medium pot with vegetable broth. Bring it to a boil, then lower the heat. Cook until all the liquid is gone and the quinoa is fluffy, about 15 minutes. - Sauté chopped onion until translucent. - Add minced garlic and sauté briefly. Next, grab a skillet. Heat it over medium heat. Add the chopped onion and cook for 5-7 minutes. You want it soft and clear. When it looks good, toss in the minced garlic. Sauté for just one more minute. This will bring out its great flavor. - Mix quinoa with other ingredients and stuff into bell peppers. - Bake covered for 25-30 minutes, then uncover and bake for an additional 10 minutes. Now, it's time to combine everything. In a large bowl, mix the fluffy quinoa with the sautéed onions and garlic. Add the black beans, corn, diced tomatoes, and spices. Stir until well mixed. Grab your bell peppers and stuff them with the mixture. Press down gently to fit it all in. Place them upright in a greased baking dish. If you like cheese, sprinkle some on top. Add a splash of water to the dish to create steam. Cover the dish with foil and pop it in the oven. Bake for 25-30 minutes. After that, remove the foil and bake for 10 more minutes. This helps the tops brown and the cheese melt. Once done, let them cool a bit. Garnish with chopped cilantro for a fresh touch. You can find the full recipe above. Enjoy your tasty vegetarian stuffed bell peppers! When choosing bell peppers, look for firm and unblemished ones. This will give you the best taste and texture. Peppers come in many colors, like green, red, yellow, and orange. Each color has a different flavor. Green peppers taste a bit bitter, while red peppers are sweet and fruity. Yellow and orange peppers fall in between. To cook quinoa perfectly, rinse it well before using. This removes bitterness and helps it taste better. Use two cups of vegetable broth for every cup of quinoa. Bring it to a boil, then lower the heat and cover it. It should take about 15 minutes to cook. To check if your stuffed peppers are done, look for a soft skin. You can also insert a fork to see if they are tender. When serving the stuffed peppers, pair them with lime wedges for a fresh, zesty touch. You can also sprinkle extra cilantro on top for color and flavor. Present them on a large platter for a beautiful display. A splash of extra color makes your meal more inviting. If you want to add a creamy touch, consider a drizzle of yogurt or sour cream on the side. These little touches can elevate your dish and impress your guests. For the full recipe, check out the vibrant quinoa & black bean stuffed bell peppers. {{image_4}} To make these stuffed peppers vegan, you can skip the cheese. Instead, add toppings like avocado or a sprinkle of nutritional yeast. Nutritional yeast gives a cheese-like flavor without any dairy. For the broth, use unseasoned vegetable broth. This helps keep the flavors clean and bright. You can also add more spices to enhance taste. Always check that your ingredients are gluten-free. Quinoa is naturally gluten-free and a great base for stuffing. If you want to try different grains, consider using brown rice or millet. Both options work well and add a nice texture. Just ensure they are cooked before mixing. You can get creative with the stuffing. Try using lentils or chickpeas for added protein. Both are tasty and healthy options. Seasonal vegetables like zucchini or spinach can be added for extra flavor and nutrition. Just chop them small and mix them with the other ingredients. This keeps your dish fresh and exciting. For more ideas, check out the full recipe. To store leftover stuffed peppers, let them cool first. Wrap each pepper tightly in plastic wrap or place them in an airtight container. This keeps them fresh and prevents them from drying out. In the fridge, you can keep them for about 3 to 4 days. If you want to eat them later, freezing is a great option. To reheat your stuffed peppers, the oven works best. Preheat it to 350°F (175°C). Place the peppers in a baking dish and add a splash of water. Cover the dish with foil to keep them moist. Bake for about 20 minutes until they are hot all the way through. You can also use a microwave. Just place the pepper on a plate, cover it with a damp paper towel, and heat for 2 to 3 minutes. Avoid sogginess by not overcooking them and adding water only when baking. To freeze stuffed peppers, wrap each one in plastic wrap or foil. Then, place them in a freezer-safe bag or container. This helps prevent freezer burn. You can keep them in the freezer for up to 3 months. When you are ready to eat, move them to the fridge to thaw overnight. To reheat, follow the same oven method as before or microwave them until hot. Enjoy your tasty meal at any time! For the full recipe, check the section above. You know stuffed peppers are done when they are tender. The peppers should be soft to touch and cooked through. You can also check the filling. If it is hot and bubbly, your dish is ready. A fork should pierce the peppers easily. Yes, you can make stuffed peppers ahead of time. Prepare them, then store them in the fridge. Cover them tightly with plastic wrap or foil. They will stay fresh for up to two days. When ready to eat, just bake them. If you want to switch out quinoa, try rice or couscous. You can also use farro or bulgur. These grains add texture and taste. Just make sure to adjust cooking times based on the grain you use. Vegetarian stuffed peppers last about three to five days in the fridge. Store them in an airtight container. This keeps them fresh and tasty. Always check for any signs of spoilage before eating. Yes, stuffed peppers are healthy! They are packed with nutrients. Bell peppers are full of vitamins A and C. The filling of beans and grains adds protein and fiber. This makes them a great option for a balanced meal. For a full recipe, check out the vibrant quinoa and black bean stuffed bell peppers. You now have a clear recipe for delicious stuffed peppers. We covered the ingredients, preparation steps, and variations to suit your tastes. Remember to choose firm peppers and check the quinoa for doneness. These stuffed peppers offer a nutritious meal that can cater to different diets. Whether vegan, gluten-free, or classic, there’s an option for everyone. Enjoy experimenting with this dish! Happy cooking!

Vegetarian Stuffed Bell Peppers Flavorful and Filling

Are you ready to enjoy a dish that’s both tasty and filling? Vegetarian stuffed bell peppers are colorful, nutritious, and

- 1 cup rolled oats - 1/2 cup almond butter - 1/4 cup honey or maple syrup - 1/3 cup unsweetened shredded coconut - 1/4 cup dark chocolate chips - 1/4 cup whole almonds - 1 teaspoon vanilla extract - Pinch of salt The main ingredients create a perfect blend of flavors. Rolled oats provide a hearty base. Almond butter adds creaminess and protein. Honey or maple syrup gives it sweetness. Shredded coconut adds texture and taste. Dark chocolate chips make it a treat. Whole almonds offer a nice crunch. Vanilla extract enhances the overall flavor. A pinch of salt balances the sweetness. - Different nut butters (cashew, peanut) - Flavored extracts (coconut, almond) - Sweeteners (agave syrup, stevia) You can switch things up with optional ingredients. Use different nut butters to change the taste. Cashew or peanut butter works well. Flavored extracts can give new twists. Try coconut or almond for unique flavors. If you want it sweeter, use agave syrup or stevia. - Oats: Gluten-free oats - Almond butter: Sunflower seed butter for nut-free version If you need to make substitutions, it's easy! Use gluten-free oats to keep it gluten-free. For a nut-free version, swap almond butter for sunflower seed butter. This way, everyone can enjoy these tasty bites. For the full recipe to make these delicious almond joy energy bites, refer to the [Full Recipe]. Start by mixing the base ingredients. In a large bowl, add 1 cup of rolled oats, 1/2 cup of almond butter, and 1/4 cup of honey or maple syrup. Stir until everything is well combined and thick. This gives a solid base for your bites. Next, it's time to add in the flavor components. Mix in 1/3 cup of unsweetened shredded coconut, 1/4 cup of dark chocolate chips, and 1/4 cup of roughly chopped whole almonds. Also, add 1 teaspoon of vanilla extract and a pinch of salt. Gently fold these ingredients in until they spread evenly through the mixture. Now, let’s form the energy bites. Take about a tablespoon of the mixture and roll it into a ball using your clean hands. This part is fun! Aim for uniform size so they cook evenly. Keep rolling until you've shaped all the mixture. You should get around 12 to 15 tasty bites. Next, arrange the formed energy bites on a baking sheet lined with parchment paper. This helps to prevent sticking and makes cleanup easier. For the chilling step, place your baking sheet in the refrigerator. Let the energy bites chill for at least 30 minutes. This helps them firm up and hold their shape well. While you wait, think about some decorative options before serving. You can top them with a sprinkle of shredded coconut or place a few whole almonds on the plate. This adds a nice touch and makes them look appealing. For the full recipe, check out the details above! To keep your Almond Joy Energy Bites fresh, store them in an airtight container. This will help lock in moisture and flavor. Use a glass jar or a plastic container with a tight lid. You can also place parchment paper between layers to prevent sticking. These energy bites pair well with fresh fruits like bananas or berries. You can also enjoy them with a smoothie for a quick breakfast. They are perfect for lunch boxes, road trips, or as a post-workout snack. Serve them at parties or family gatherings for a tasty treat. To prevent stickiness in the mixture, make sure to measure your ingredients accurately. If the mixture feels too wet, add more oats. For the right bite size, roll them into one-inch balls. This size is easy to eat and perfect for snacking. {{image_4}} You can easily switch up the flavor of your Almond Joy Energy Bites. Try adding different types of chocolate. White or milk chocolate can give a sweet twist. You can also mix in dried fruits like cranberries or raisins. These fruits add a nice chewiness and flavor boost. Adjusting the number of nuts can change the crunch factor. If you want more crunch, add more chopped almonds. You can also use ground flaxseed or chia seeds. These seeds add a bit of crunch and boost nutrition too. If you follow a vegan diet, swap honey for maple syrup. This keeps the bites plant-based. For a keto-friendly version, use sugar-free chocolate and a keto-friendly sweetener. Both options keep your energy bites delicious and satisfying. For the full recipe, check out the complete guide to making these tasty treats! These Almond Joy Energy Bites stay fresh in the fridge for up to a week. After that, they may lose flavor or texture. Look for signs of spoilage, such as an off smell or mold. If they feel too soft or sticky, it’s best to toss them. To freeze your energy bites, place them in a single layer on a baking sheet. Once they are frozen, transfer them to an airtight container. This way, they won’t stick together. For the best texture, thaw them in the fridge overnight before eating. When you’re heading out, use small, airtight containers for travel. These keep the bites fresh and make them easy to grab. You can also portion them into snack bags for quick access. This makes it simple to enjoy a tasty snack anytime, anywhere. Almond Joy Energy Bites can last up to a week when stored properly. Keep them in an airtight container in the fridge. If you want longer storage, consider freezing them. They can last about three months in the freezer. Yes, you can make these bites gluten-free easily. Just use gluten-free rolled oats. They taste just as good and will satisfy your cravings without any gluten. If your energy bites are too crumbly, try adding a bit more almond butter or honey. These ingredients will help bind the mixture better. You can also add a splash of water to help the mixture stick. Absolutely! Almond Joy Energy Bites are great for kids. They are packed with nutrients like fiber, healthy fats, and protein. Plus, they taste like a treat, making them fun to eat. Kids love the chocolate and coconut flavors! You now know how to make Almond Joy Energy Bites with key ingredients and methods. I shared tips on storage and serving suggestions to keep them fresh and flavorful. Experiment with different flavors and textures to suit your taste. Remember, these bites are easy to make and perfect for any snack. Enjoy your healthy treats and feel good about every bite!

Almond Joy Energy Bites Quick and Tasty Snack

Looking for a snack that packs a delicious punch? Try my Almond Joy Energy Bites! These tasty treats blend oats,

To make a refreshing Peach Basil Iced Tea, you need a few simple ingredients. Here’s what you’ll need: - 4 cups water - 2 tablespoons loose green tea or 4 green tea bags - 2 ripe peaches, pitted and sliced - 1/4 cup fresh basil leaves, plus extra for garnish - 1/4 cup honey or agave syrup (adjust to taste) - Ice cubes - Lemon slices for serving These ingredients come together to create a drink that is both sweet and herbal. The peaches add a juicy flavor, while basil brings a fresh taste. You can adjust the sweetness to your liking by adding more or less honey. This recipe is perfect for a hot day or any time you want to impress your friends. For the full recipe, check out the full recipe section. To make the best peach basil iced tea, start by boiling your water. Use a medium saucepan and pour in 4 cups of water. Heat the water on high until it reaches a rolling boil. This means you should see big bubbles forming on the surface. Timing is key here. Once it boils, take it off the heat right away. Overcooking can ruin the flavor. Next, it’s time to steep the tea. Add 2 tablespoons of loose green tea or 4 green tea bags into the hot water. Let it steep for about 5 minutes. This helps to get the nice, delicate flavors from the tea. If you want a stronger taste, you can steep it a little longer, but don’t go too far. While your tea is steeping, focus on your peaches and basil. Choose ripe peaches for the best flavor. They should feel soft but not mushy. After slicing them, place the peaches and 1/4 cup of fresh basil leaves in a blender. Drizzle in 1/4 cup of honey or agave syrup. Blend until you have a smooth puree. This mix adds a sweet and fragrant kick to your drink. After steeping, it’s time to strain the tea. Use a fine mesh sieve to pour the brewed tea into a large pitcher. This step is essential. Straining removes bits of tea leaves and keeps your drink clear. Discard the used tea leaves or remove the tea bags to ensure a clean beverage. Now, let’s combine everything. Gently stir the peach and basil puree into the brewed tea. Mix until fully integrated. Don’t forget to taste it! If you want it sweeter, add more honey or agave syrup. This is your chance to adjust the flavor to your liking. Finally, chill your tea. Let the combined mixture cool to room temperature first. Then, transfer it to the refrigerator. Chill for about 1 to 2 hours, or until it’s cold. When you’re ready to serve, fill glasses with ice cubes. Pour the chilled peach basil iced tea over the ice. For a nice touch, garnish each glass with fresh basil leaves and a slice of lemon. Enjoy your refreshing drink! To make your Peach Basil Iced Tea even more exciting, try some extra herbs. Mint and thyme add a fresh twist. You can also mix in a bit of lemon balm for a citrusy note. When it comes to sweeteners, don't just stick to honey or agave. Try brown sugar or maple syrup for a richer taste. Each sweetener brings its own unique flavor, so feel free to experiment. Peaches are not just tasty; they pack nutrients too. They are high in vitamins A and C. These vitamins help your skin and boost your immune system. Basil, on the other hand, has anti-inflammatory properties. It can help with digestion and add to your overall health. Green tea also has great benefits. It’s rich in antioxidants, which help to fight harmful free radicals. Drinking green tea can also improve brain function and support heart health. Avoid common mistakes for the best tea. One mistake is steeping tea too long. This can make it bitter. Aim for about five minutes, and keep an eye on the color. You can adjust the flavor to fit your taste. If you like it sweeter, add more honey. For a stronger peach flavor, blend in extra peaches. Don't be afraid to try different amounts until you get it just right. For the full recipe, check out the detailed steps above. Enjoy your refreshing drink! {{image_4}} You can make your peach basil iced tea even more fun by adding other fruits. Seasonal fruits work best. Try using strawberries, blueberries, or citrus fruits like oranges and lemons. They add a fresh taste and a splash of color. To mix them in, just slice or mash the fruit and blend it with the peach and basil. This will create a fruity puree that blends well with the tea. Herbs can change the flavor of your iced tea. You can try adding mint or lavender for a unique twist. For mint, just add fresh leaves to the blender with your peach and basil. For lavender, steep the dried flowers in the hot tea while it brews. Both herbs bring a refreshing layer of flavor. You can also mix this tea with other teas, like hibiscus or chamomile, for more depth. If you love fizz, you can make a sparkling peach basil iced tea. Start by following the full recipe. After chilling the tea, mix in sparkling water right before serving. This adds bubbles and a light texture. I recommend using a mild sparkling water so it won’t overpower the peach and basil flavors. Try to serve it in tall glasses to show off the pretty colors. To keep your peach basil iced tea fresh, store it in an airtight pitcher. This prevents other smells in the fridge from seeping in. If you have leftovers, let the tea cool to room temperature first. Then, cover it tightly and place it in the fridge. The optimal fridge temperature is around 34°F to 40°F. This ensures the tea stays cool but not too cold, which can dull flavors. Your peach basil iced tea lasts about 3 to 5 days in the fridge. After this, the flavors may fade. Watch for signs of spoilage, like an off smell or unusual color. If the tea tastes sour or strange, it’s best to toss it out. Always trust your senses when checking for freshness. Freezing peach basil iced tea is a fun option! Pour the cooled tea into ice cube trays. Once frozen, store the cubes in a zip-top bag. This way, they won't take up much space. When you want to use them, just thaw the cubes in the fridge or use them directly in cocktails. They add a fruity flavor to drinks without diluting them. Plus, they look great in a glass! For more details, check the full recipe. To change the sweetness, start with the honey or agave syrup. Add a bit more syrup for a sweeter drink. If it’s too sweet, add more tea or water to balance it. Taste as you go. This way, you’ll find your perfect level. Yes, you can use dried basil, but the taste will be different. Dried basil is stronger than fresh. Use about one-third of the amount. Add it to the tea while it steeps. This helps release its flavor. For a great iced tea, steep green tea for about 5 minutes. If you like it stronger, steep for up to 7 minutes. Just be careful not to steep too long. Over-steeping can make the tea bitter. Peach Basil Iced Tea is not completely caffeine-free. If you use green tea, it will have some caffeine. If you want a caffeine-free drink, use herbal tea instead. Herbal teas can give tasty flavors without the caffeine. This iced tea pairs well with light snacks. Try it with fruit salads, sandwiches, or shrimp cocktails. It also goes great with light desserts, like sorbet or fruit tarts. These foods highlight the tea's peach and basil flavors. For the full recipe, check out the detailed instructions available in the main article! In this post, we explored how to make a refreshing peach basil iced tea. We covered the ingredients, from ripe peaches to green tea, and detailed each step, from boiling water to serving. We also shared tips to enhance flavor and variations like adding other fruits. Remember to store your iced tea properly for the best taste. Enjoy this tasty drink and let the flavors brighten your day. Happy brewing!

Peach Basil Iced Tea Refreshing and Flavorful Drink

Dive into a refreshing world with my Peach Basil Iced Tea! This drink bursts with sweet peach flavor and fragrant

To make savory herb crusty bread, gather these ingredients: - 3 cups all-purpose flour - 2 teaspoons instant yeast - 1 teaspoon sea salt - 1 tablespoon granulated sugar - 1 cup warm water (about 110°F) - 2 tablespoons extra virgin olive oil - 1 tablespoon dried oregano - 1 tablespoon dried thyme - 1 tablespoon fresh rosemary, finely chopped - ½ teaspoon garlic powder - ½ teaspoon freshly ground black pepper - Cornmeal for dusting Each ingredient adds a special touch. The all-purpose flour gives the bread its base. Instant yeast helps the dough rise, making it light and fluffy. Sea salt enhances the taste, while granulated sugar helps with browning. Warm water activates the yeast, leading to a good rise. Extra virgin olive oil adds moisture and richness. Herbs are the stars of this bread. Dried oregano and dried thyme bring depth. Fresh rosemary adds a fragrant note. Garlic powder gives a mild kick, and freshly ground black pepper adds warmth. Together, they create a unique flavor that makes each bite tasty. Don't worry if you lack an ingredient! You can swap some items. For the all-purpose flour, use bread flour for a chewier texture. If you don't have instant yeast, active dry yeast works, too. Just let it sit in warm water a bit longer. For the herbs, fresh herbs can replace dried ones. Use three times the amount of fresh herbs since their flavor is milder. If you prefer no garlic, simply leave it out. You can dust with flour instead of cornmeal for the baking sheet. For a fun twist, add cheese like grated Parmesan or shredded cheddar to the dough. Get creative! The full recipe will guide you through the steps for this delightful bread. Start by gathering your ingredients. In a big mixing bowl, mix together: - 3 cups all-purpose flour - 2 teaspoons instant yeast - 1 teaspoon sea salt - 1 tablespoon granulated sugar - 1 tablespoon dried oregano - 1 tablespoon dried thyme - ½ teaspoon garlic powder - ½ teaspoon freshly ground black pepper Stir these dry ingredients well. Next, create a well in the center of the mix. Pour in: - 1 cup warm water (about 110°F) - 2 tablespoons extra virgin olive oil Use a wooden spoon or your hands to mix until a shaggy dough forms. Once the dough is mixed, transfer it to a lightly floured surface. Begin kneading the dough with your hands. Push the dough down and fold it over itself. Keep kneading for about 8-10 minutes. If the dough sticks, add small amounts of flour. Your goal is smooth and elastic dough. Shape the kneaded dough into a ball. Place it in a greased bowl, turning to coat. Cover the bowl with a damp cloth or plastic wrap. Let it rise in a warm spot for 1-2 hours. The dough should double in size. After it rises, gently punch it down to release air. Add finely chopped fresh rosemary and knead it in. Shape the dough into a round loaf and place it on a cornmeal-dusted baking sheet. Cover again and let it rise for another 30-45 minutes until puffy. These steps will set you up for a lovely loaf of Savory Herb Crusty Bread. For the complete instructions, check the Full Recipe. To get that perfect crust on your bread, start with a hot oven. Preheat it to 425°F (220°C). This high heat helps create steam, which gives the bread a nice rise and a golden crust. Before you bake, make shallow cuts on the surface. This helps the bread expand evenly as it bakes. For an even crunchier crust, place a pan with water on the bottom of the oven. The steam will work magic on your loaf. One common mistake is not letting the dough rise enough. If you skip or shorten the rise time, your bread may turn out dense. Always let the dough double in size. Another mistake is not measuring ingredients correctly. Use a kitchen scale for the best results. Too much flour can make the bread dry, while too little can make it heavy. Lastly, avoid opening the oven door too often while baking. This lets heat out and can ruin the crust. For a flavor boost, consider adding more herbs. Fresh herbs like basil or parsley can brighten the taste. You can also mix in cheese for a savory twist. Grated Parmesan or sharp Cheddar works well. If you like a bit of heat, add red pepper flakes. This will give your bread a nice kick. Try incorporating seeds like sesame or poppy to the top before baking. They add crunch and flavor. For the full recipe, check the links above. Enjoy your baking! {{image_4}} You can play with herbs to change the flavor. Basil brings a sweet touch. Dill offers a fresh taste. Chives add a mild onion flavor. You can even mix herbs for a unique blend. Just remember, fresh herbs give a stronger taste than dried ones. Want to kick up the flavor? Add in some cheese! Parmesan or cheddar work great. You can also mix in sun-dried tomatoes for a tangy twist. Black olives add a briny note. Nuts, like walnuts, bring a crunchy texture. These add-ins make your bread even more special. If you need a gluten-free bread, don't worry! You can use gluten-free flour blends. Look for blends made for bread, as they have the right mix of ingredients. Add a bit of xanthan gum to help with texture. Follow the same steps in the Full Recipe, and you’ll have a delicious gluten-free loaf. To keep your savory herb crusty bread fresh, store it in a paper bag. This helps the crust stay crisp. Avoid plastic bags, as they can make the bread soggy. If you plan to eat the bread within a few days, place it in a cool, dry spot. For longer storage, consider refrigeration, but this may change the texture. To enjoy warm bread, preheat your oven to 350°F (175°C). Place the bread on a baking sheet and cover it with foil to prevent burning. Heat for about 10-15 minutes. This keeps the crust crispy and the inside soft. You can also microwave a slice for 10-20 seconds, but it may turn soft instead of crusty. If you have extra bread, freezing is a great option. Slice the bread first, then wrap each slice tightly in plastic wrap. Place the wrapped slices in a freezer bag or airtight container. This helps keep them fresh for up to three months. To thaw, simply leave the slices at room temperature for a while or reheat them in the oven. Enjoy your homemade bread whenever you wish! For the complete recipe, check the Full Recipe. To make Savory Herb Crusty Bread, start with three cups of all-purpose flour. Add two teaspoons of instant yeast, one teaspoon of sea salt, one tablespoon of sugar, and your dried herbs like oregano and thyme. Mix these dry ingredients well. Next, create a well in the center and pour in one cup of warm water and two tablespoons of olive oil. Mix until you form a shaggy dough. Knead for 8-10 minutes until smooth. Let it rise until doubled, then shape it and let it puff up again. Finally, bake at 425°F for 25-30 minutes. Check the crust color and sound to ensure it's ready. For the full recipe, check the detailed instructions above. Yes, you can use fresh herbs! They add a bright flavor. When using fresh herbs, use about three times more than dried herbs. For example, if a recipe calls for one tablespoon of dried oregano, use three tablespoons of fresh oregano. Chop them finely for even distribution in the dough. If your dough is sticky, it might need more flour. This can happen if you add too much water or not enough flour. Knead in small amounts of flour until it feels smooth and elastic. Remember to avoid adding too much at once. Keep kneading until it comes together nicely. To check if your bread is done, look for a golden brown crust. Tap the bottom of the loaf; it should sound hollow. The internal temperature should be around 190°F to 200°F. If you have a kitchen thermometer, this is a great way to check! Let it cool before slicing for the best texture. This blog post covered how to make savory herb crusty bread from scratch. We explored key ingredients, step-by-step instructions, and useful tips for great results. You now know how to make variations and store your bread properly. Baking bread is fun and rewarding. Don't worry about mistakes; learn from them and keep trying. With practice, your bread will taste amazing. Enjoy sharing your creations with friends and family!

Savory Herb Crusty Bread Simple and Flavorful Recipe

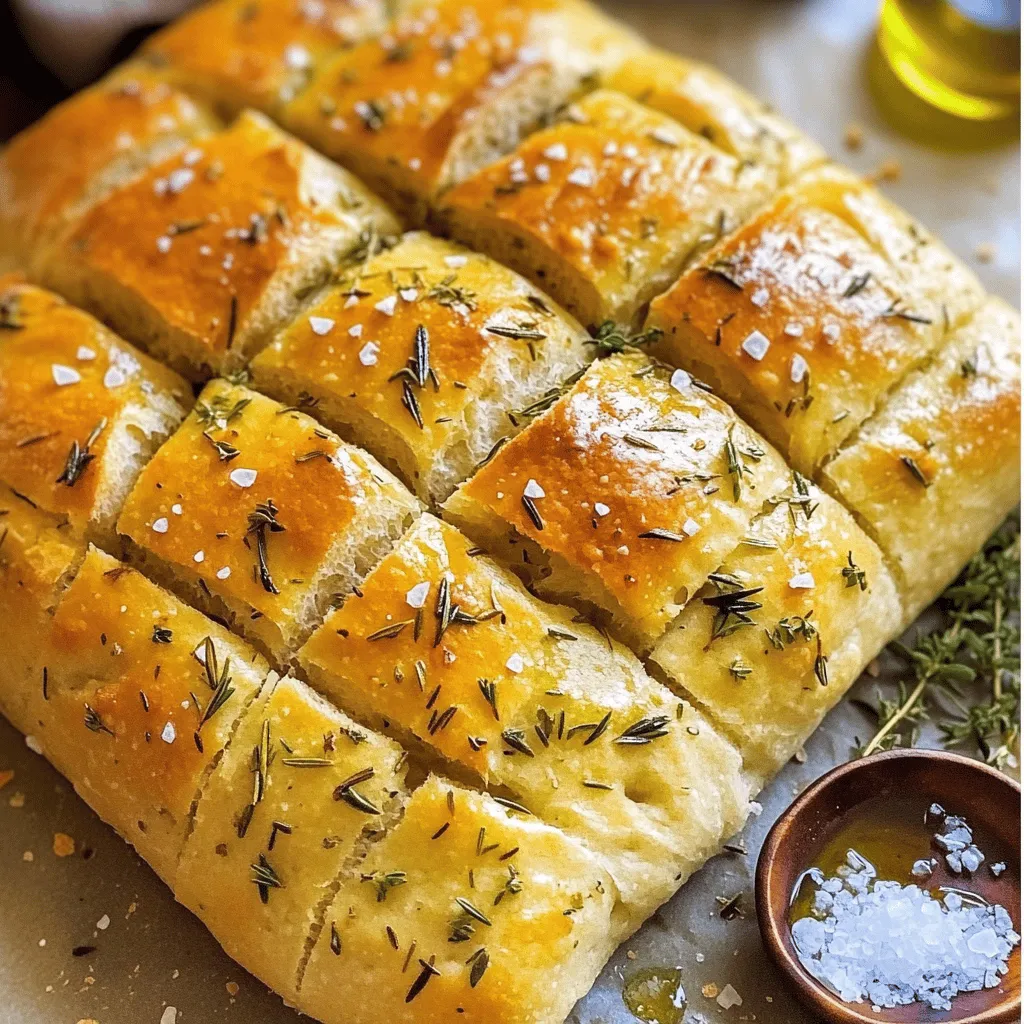
Are you ready to bake the perfect loaf of Savory Herb Crusty Bread? This recipe is simple and packed with

- 1 can chickpeas, drained and rinsed - 1 tablespoon olive oil - 1 teaspoon smoked paprika - 1 teaspoon ground cumin - 1 teaspoon garlic powder - ½ teaspoon onion powder - ½ teaspoon chili powder - Sea salt and freshly ground black pepper to taste - 8 small corn or flour tortillas - 1 cup shredded romaine lettuce - 1 ripe avocado, diced - ½ cup cherry tomatoes, halved - ¼ cup red onion, finely chopped - ¼ cup fresh cilantro, chopped - Lime wedges, for serving - Optional: Hot sauce for drizzling These crispy chickpea tacos are both vegan and gluten-free. You can swap the chickpeas for other legumes, like black beans or lentils, if you wish. Use gluten-free tortillas to keep it safe for those with gluten allergies. If you have nut allergies, this recipe is friendly too. Just focus on fresh veggies and spices. You can mix and match toppings based on what you love or have on hand! 1. Preheat the oven: First, set your oven to 400°F (200°C). This is the perfect temperature for crispy chickpeas. 2. Dry and season the chickpeas: Drain and rinse the chickpeas. Spread them on a clean towel and pat them dry. This step is key for a crunchy texture. In a bowl, mix the chickpeas with olive oil and spices: smoked paprika, ground cumin, garlic powder, onion powder, chili powder, salt, and pepper. Toss well to coat every chickpea. 3. Baking the chickpeas: Line a baking sheet with parchment paper. Spread the seasoned chickpeas in a single layer. Bake for 25 to 30 minutes. Shake the pan halfway through. Look for a golden brown color and a crispy texture. 4. Warming the tortillas: While the chickpeas bake, warm the tortillas. Heat a skillet over low heat. Place each tortilla in the pan for about 30 seconds on each side. You want them warm and soft. 5. Assembling the tacos with toppings: Once the chickpeas are crispy, it’s time to build your tacos. Take a warm tortilla and add a generous scoop of crispy chickpeas. Top with shredded romaine lettuce, diced avocado, halved cherry tomatoes, finely chopped red onion, and fresh cilantro. 6. Finish with lime and spice: Squeeze fresh lime juice over the tacos. If you like heat, drizzle some hot sauce on top. Now you're ready to enjoy a delicious and satisfying meal! For the complete recipe, check out the Full Recipe section. To make crispy chickpeas, drying is key. Start by draining the chickpeas well. After draining, spread them on a clean kitchen towel. Pat them gently to remove moisture. This step is vital for getting that perfect crunch. Wet chickpeas will steam instead of roast, and you’ll miss out on the crispiness you want. For baking, use a high temperature of 400°F (200°C). Spread the chickpeas evenly on a parchment-lined baking sheet. Avoid crowding them; this ensures they roast and not steam. Bake them for 25 to 30 minutes. Shake the pan halfway through to help them cook evenly. When golden brown and crunchy, they are ready. Toppings can truly elevate your tacos. I love adding shredded romaine lettuce for crunch. Diced avocado brings a creamy touch. Halved cherry tomatoes add sweetness, while red onion gives a bit of bite. Fresh cilantro ties everything together with a burst of flavor. For a fun presentation, arrange the tacos on a large platter. Add extra lime wedges around the tacos for color and freshness. A sprinkle of chopped cilantro on top makes it look fancy. You can also drizzle hot sauce over them for those who love spice. For the full recipe, check out the complete guide on how to make these delightful tacos. {{image_4}} You can change up your crispy chickpea tacos in many ways. Spice blends can transform their taste. Try using taco seasoning for a classic twist. You can also add curry powder for an Indian flavor or za'atar for a Middle Eastern vibe. Toppings are another chance to get creative. Here are some options to consider: - Shredded cabbage for crunch - Sliced jalapeños for heat - Crumbled feta for creaminess - Pineapple salsa for sweetness - Cilantro lime crema for richness Mix and match these ideas to find your favorite flavor combo! Tacos can be served in different ways. Traditional tacos use soft tortillas, but that’s not your only option. You can create taco bowls by using a bowl of rice instead of a tortilla. This way, you get all the flavors without the wrap. If you prefer something different, try using lettuce leaves. They add a fresh, crisp element and keep it low-carb. When it comes to tortillas, you have choices too. Corn tortillas are classic, but flour tortillas work well too. You can also find whole wheat or gluten-free tortillas for a healthier option. Experimenting with these styles makes every meal unique! For the full recipe, check out the detailed instructions above. To keep your crispy chickpeas fresh, store them in an airtight container. This helps prevent moisture, which can make them soft. If you have leftover tacos, store the chickpeas and toppings separately. This keeps everything fresh and tasty. You can keep the crispy chickpeas for up to three days. The toppings, like avocado and lettuce, should be eaten sooner for the best flavor and texture. To reheat chickpeas, use the oven. Preheat it to 350°F (175°C). Spread the chickpeas on a baking sheet and heat for about 10 minutes. This method helps them regain their crispiness. For tortillas, you can use a skillet. Heat the skillet over low heat. Place each tortilla in the skillet for about 20 seconds on each side. This warms them up without making them hard. Enjoy your leftover tacos just as much as the first time! You can find the full recipe for these amazing tacos to make again! How long do crispy chickpeas last? Crispy chickpeas can last up to a week if stored properly. Keep them in an airtight container at room temperature. They may lose some crunch over time, but they will still taste good. Can I make crispy chickpeas ahead of time? Yes, you can make crispy chickpeas ahead of time. Just store them in an airtight container. Reheat them in the oven for a few minutes to regain their crispiness before serving. Can I substitute chickpeas with other legumes? Yes, you can use other legumes like black beans or lentils. However, cooking times and methods may differ. Chickpeas work best for a crispy texture, but feel free to experiment with your favorites. What’s the best way to customize taco toppings? You can customize your toppings based on your taste. Try adding shredded cheese, salsa, or pickled jalapeños. You can also mix in fresh herbs like parsley or dill for extra flavor. The full recipe gives you a great base to build on! This blog post shared easy steps to make tasty chickpea tacos. We covered each ingredient, from chickpeas to tortillas, and discussed dietary needs. I shared tips for making crispy chickpeas and presented ideas for serving. You learned how to store leftovers and reheat them properly. In the end, these chickpea tacos are a fun and tasty meal. Enjoy exploring flavors and making your own combinations. You’ll love how simple it is to create a dish you can feel good about.

Crispy Chickpea Tacos Flavorful and Satisfying Meal

Are you ready for a taco night that’s full of crunch and flavor? Crispy chickpea tacos bring a fun twist

Gather these simple ingredients for a tasty meal. Each one plays a key role in making honey mustard chicken thighs flavorful and juicy. - 4 bone-in, skin-on chicken thighs - 3 tablespoons honey - 2 tablespoons Dijon mustard - 1 tablespoon whole grain mustard - 2 tablespoons extra virgin olive oil - 3 cloves garlic, minced - 1 teaspoon fresh thyme leaves (or ½ teaspoon dried thyme) - 1 teaspoon smoked paprika - Salt and pepper to taste - Fresh parsley, chopped (for garnish) These ingredients work together to create a rich blend of sweet and savory flavors. You can find the full recipe and detailed cooking steps in the [Full Recipe]. Set your oven to 400°F (200°C). This step warms up the oven, so your chicken cooks well. In a medium bowl, mix these ingredients: - 3 tablespoons honey - 2 tablespoons Dijon mustard - 1 tablespoon whole grain mustard - 2 tablespoons extra virgin olive oil - 3 cloves garlic, minced - 1 teaspoon fresh thyme leaves (or ½ teaspoon dried thyme) - 1 teaspoon smoked paprika - Salt and pepper to taste Whisk until smooth. This marinade gives the chicken a sweet and tangy flavor. Take 4 bone-in, skin-on chicken thighs and put them in a large bag. Pour the marinade over the chicken, coating each thigh well. Seal the bag or cover the dish. For the best taste, refrigerate for at least 30 minutes or up to 2 hours. After marinating, remove the chicken from the fridge. Let it sit for 10 minutes at room temperature. In a hot, oven-safe skillet, add the chicken skin-side down. Sear for 5-7 minutes until the skin is golden brown. This step adds a nice crunch. Carefully flip the chicken. Spoon some leftover marinade on top. Then, transfer the skillet to your preheated oven. Bake for 20-25 minutes. Make sure the internal temperature hits 165°F (74°C) for safety. Enjoy the delicious Honey Mustard Chicken Thighs! For the full recipe, check out the complete instructions. Marinating chicken thighs makes them juicy and full of flavor. I suggest marinating for at least 30 minutes. For the best taste, try to marinate for up to 2 hours. This time lets the flavors soak in deeply. To get crispy skin, heat your skillet before adding the chicken. Use medium-high heat and place the thighs skin-side down. Let them sear for about 5–7 minutes. Don't rush this step! A good sear adds great texture and flavor. Always check the doneness of chicken to ensure it's safe to eat. The internal temperature should be at least 165°F (74°C). Use a meat thermometer to check the temperature in the thickest part of the thigh. Let the chicken rest for about 5 minutes after cooking. This helps keep the juices in and makes each bite tender. For the full recipe, refer to the earlier section. {{image_4}} To make a thicker honey mustard glaze, try these methods. First, reduce the sauce by simmering it in a small pot. This step helps concentrate the flavors and thicken the glaze. Another option is to add a cornstarch slurry. Mix one tablespoon of cornstarch with two tablespoons of cold water. Stir this mixture into the simmering sauce until it thickens. You can easily spice up your honey mustard chicken thighs. A pinch of cayenne pepper or red pepper flakes adds heat. For a smokier flavor, use smoked paprika in place of regular paprika. You can also try adding ground cumin or coriander for a warm, earthy taste. Feel free to experiment with your favorite spices to create your perfect blend. Pair honey mustard chicken thighs with delicious sides. Roasted vegetables, like carrots and Brussels sprouts, add color and nutrition. A simple green salad with a light vinaigrette balances the dish well. For a heartier option, serve it with fluffy rice or creamy mashed potatoes. Enjoy a mix of flavors and textures for a satisfying meal. To keep your honey mustard chicken thighs fresh, store them correctly. First, let the chicken cool down completely. Then, place the chicken into an airtight container. You can also wrap it tightly in plastic wrap or aluminum foil. This keeps moisture in and prevents odors from other foods. Store the chicken in the fridge. This way, it will last for up to 3 to 4 days. Reheating chicken can be tricky. You want to avoid drying it out. To do this, preheat your oven to 350°F (175°C). Place the chicken thighs on a baking sheet. Add a splash of chicken broth or water to keep the meat moist. Cover the dish with aluminum foil. Heat for about 15 to 20 minutes. Check that it is heated through but not overcooked. This will keep the chicken juicy and tasty. Freezing is a great way to save your leftovers. Start by letting the chicken cool completely. Wrap each thigh in plastic wrap, then place them in a freezer-safe bag. Remove as much air as possible to prevent freezer burn. Label the bag with the date. The chicken can be frozen for up to 3 months. To thaw, place the chicken in the fridge overnight before reheating. This method keeps the chicken safe and delicious. I recommend marinating chicken thighs for at least 30 minutes. This short time allows the flavors to start soaking in. For even better taste, aim for up to 2 hours. This extra time makes the chicken even more juicy and flavorful. If you forget to marinate, even 15 minutes can help. Yes, you can use boneless chicken thighs. They will cook faster than bone-in thighs. Adjust the cooking time to about 15-20 minutes in the oven. Check if the internal temperature reaches 165°F (74°C) to ensure it's safe. Boneless thighs can be just as tasty with this honey mustard glaze. Many side dishes pair nicely with honey mustard chicken thighs. Here are some popular options: - Roasted vegetables, like carrots and Brussels sprouts - Crisp green salad with mixed greens - Creamy mashed potatoes or garlic mashed cauliflower - Quinoa or rice for a hearty side - Steamed asparagus or green beans for a fresh touch These sides help create a balanced meal that complements the chicken's sweet and savory flavor. This recipe for honey mustard chicken thighs is easy and delicious. We covered the ingredients, marinade, and cooking methods. I shared tips for seasoning and serving suggestions too. Use this recipe to impress friends and family with your cooking skills. Remember, marinating adds flavor, and a quick sear gives crispy skin. Feel free to adapt the recipe to fit your taste. Enjoy making this dish, and don’t forget to have fun in the kitchen! Your meals can be simple yet special with just a bit of effort.

Honey Mustard Chicken Thighs Savory and Simple Dish

Looking for a tasty and easy dish? You’ve come to the right place! Honey Mustard Chicken Thighs combine sweet and

- 1 lb (450g) large shrimp, peeled and deveined - 1 cup jasmine rice - 4 tablespoons unsalted butter, divided - 4 cloves garlic, minced - 1 small onion, finely chopped - 1 cup chicken broth - 1 tablespoon fresh lemon juice - 1 teaspoon smoked paprika - Salt and black pepper to taste - 2 green onions, sliced (for garnish) - Fresh parsley, chopped (for garnish) When cooking, I recommend using these units: - Weight: pounds (lb) for shrimp - Volume: cups for rice and broth - Tablespoons: for butter and lemon juice - Teaspoon: for spices If you run out of something, here are some easy swaps: - Shrimp: Use scallops or chicken for a different flavor. - Rice: Any long grain rice works well, like basmati. - Butter: Olive oil can replace butter for a lighter dish. - Chicken broth: Vegetable broth keeps it tasty for vegetarians. - Fresh lemon juice: Lime juice adds a nice twist. - Smoked paprika: Regular paprika works if you don't have smoked. This dish offers flexibility, so don’t worry if you need to adjust! For the full recipe, check the detailed steps to create this delicious meal. To start, I grab a medium saucepan. I add 2 cups of water and a pinch of salt. I bring it to a rolling boil. When it’s boiling, I add 1 cup of jasmine rice. I reduce the heat to low, cover it, and let it simmer for 15 minutes. The rice will absorb all the water and become tender. After that, I remove the pot from heat. I let it rest, covered, for 5 more minutes. Finally, I fluff the rice with a fork. While the rice cooks, I prepare the garlic butter sauce. In a large skillet, I melt 2 tablespoons of butter over medium heat. Then, I add 4 cloves of minced garlic and 1 small finely chopped onion. I sauté them for about 3-4 minutes until the onion is soft and clear. This step fills the kitchen with a lovely aroma. The garlic and onion blend perfectly in the melted butter. Next, I focus on the shrimp. I take 1 pound of peeled and deveined shrimp. In a bowl, I season them with salt, black pepper, and 1 teaspoon of smoked paprika. I make sure they are well-coated for flavor. After that, I increase the skillet heat to medium-high. I add the shrimp and cook them for 2-3 minutes per side. They turn pink and opaque when done. I avoid crowding the shrimp; I cook them in batches if needed. Once cooked, I lower the heat and add the remaining 2 tablespoons of butter, 1 tablespoon of fresh lemon juice, and 1 cup of chicken broth. I stir everything well and let it simmer for 2-3 minutes. This creates a rich sauce. I then combine the shrimp with the rice, pouring the sauce over it. This dish is now ready to serve. You can find the Full Recipe for more details. To cook shrimp just right, use medium heat. High heat can burn them. When the shrimp turn pink, they are ready. Cook for about 2-3 minutes on each side. If you crowd the pan, shrimp may steam instead of sear. Cook in batches if needed for better results. You can boost flavor with a few simple tricks. Use fresh garlic and lemon juice for a bright taste. Smoked paprika adds warmth and depth. If you like heat, add red pepper flakes. Fresh herbs like parsley and green onions also bring freshness. Experiment with these flavors to find your perfect mix! Make your dish look amazing with simple plating tips. Start by creating a fluffy rice base on a large plate. Arrange the shrimp on top in a fan shape. Drizzle the garlic butter sauce over it for shine. Garnish with green onions and parsley for color. Add a lemon wedge for an extra pop! These steps make the dish inviting and fun to eat. For the full recipe, check the provided details. {{image_4}} You can make this dish even better by adding vegetables. Fresh veggies add color and nutrients. I love using bell peppers, snap peas, or spinach. Just chop them up and toss them in during the last few minutes of cooking. They will cook quickly and keep their crunch. This extra step makes the meal more filling and healthy. If you want to switch things up, try using different proteins. Chicken works great in this dish. Just cut it into small pieces and cook it until done. Tofu is another option for a vegetarian twist. Simply press and cube the tofu, then cook it in the garlic butter sauce until golden. Each protein brings a unique taste and texture. While jasmine rice is my go-to, you can use other types too. Brown rice gives a nutty flavor and is more wholesome. Quinoa is a fun option that adds protein and a nice crunch. Both alternatives change the dish while keeping it tasty. Just remember to adjust the cooking time based on the rice type. Check the [Full Recipe] for the best cooking methods. After you make Garlic Butter Shrimp and Rice, cool it down first. Place it in an airtight container. This helps keep it fresh. You can store it in the fridge for up to three days. Make sure to reheat it well before serving. If it looks or smells off, it's best to throw it away. You can freeze Garlic Butter Shrimp and Rice, but it's not my first choice. If you want to freeze it, let it cool completely. Then, use freezer-safe bags or containers. It can stay in the freezer for up to two months. When you're ready to eat, thaw it overnight in the fridge before reheating. To reheat, use a skillet for best results. Add a splash of chicken broth or water to avoid drying out. Heat on medium-low until warm. Stir frequently to ensure even heating. You can also use a microwave. If you choose this method, cover the dish and heat in short bursts, stirring in between. Enjoy your meal just like fresh! Yes, you can use frozen shrimp. Just thaw them first. Place the shrimp in a bowl of cold water. This helps them thaw faster. Change the water every 15 minutes. Once thawed, peel and devein if needed. Then, season them as the recipe shows. Garlic butter shrimp and rice pairs well with many sides. Here are some great options: - Steamed broccoli - Roasted asparagus - Mixed green salad - Garlic bread These sides add color and flavor to your meal. They also bring in more nutrients. Shrimp cook quickly. They are done when they turn pink and opaque. A good test is to look for a "C" shape. If the shrimp curl into a "C," they are done. Cook them just until they reach this point. Overcooking makes them tough. Enjoy your shrimp perfectly cooked! In this post, we covered the key steps to make Garlic Butter Shrimp and Rice. You learned about the ingredients, cooking methods, and tips for perfect flavor. I shared ways to store your dish and answered common questions. Cooking is fun and easy with these simple steps. Enjoy your tasty meal!

Garlic Butter Shrimp and Rice Simple Delight Dish

Welcome to a world of flavor with Garlic Butter Shrimp and Rice Simple Delight Dish. This easy recipe brings together

To make a great Thai peanut noodle salad, you need some key items. Here is your essential list: - 8 oz rice noodles - 1 cup shredded carrots - 1 cup bell peppers, thinly sliced (preferably a mix of red and yellow) - ½ cup red cabbage, finely shredded - ½ cup cucumber, julienned - 1 cup shelled edamame (fresh or frozen) - ¼ cup green onions, thinly sliced - ¼ cup fresh cilantro, roughly chopped - ¼ cup creamy peanut butter - 3 tablespoons soy sauce - 2 tablespoons fresh lime juice - 1 tablespoon maple syrup - 1 tablespoon toasted sesame oil - 1 teaspoon sriracha (add more or less depending on personal spice preference) - Crushed peanuts, for garnish These ingredients create a colorful and tasty salad. Each one brings a special flavor and texture. You can also add a few optional items to make your salad even better. Here are some ideas: - Fresh mint for a burst of freshness - Chopped peanuts for extra crunch - Cooked shrimp or chicken for added protein - Avocado slices for creaminess - Sesame seeds as a garnish These options can help you customize your salad. Feel free to mix and match based on what you like. This salad is not just tasty; it is also good for you. Here are some health benefits of the key ingredients: - Rice noodles are gluten-free and easy to digest. - Carrots are full of vitamins and good for your eyes. - Bell peppers have lots of vitamin C, which boosts your immune system. - Red cabbage is low in calories and high in fiber. - Cucumbers help keep you hydrated. - Edamame is a great source of protein and fiber. - Cilantro adds flavor and may help with digestion. - Peanut butter gives healthy fats and protein. With these ingredients, your salad is not just a meal; it is a healthy choice. Enjoy the flavors and all the benefits that come with them. Start by boiling a large pot of water. Make sure it’s bubbling before you add the rice noodles. Cook them according to the package instructions, usually for about 4-6 minutes. When they finish cooking, drain the noodles in a colander. Rinse them under cold water to stop the cooking. This step keeps the noodles firm and fresh. Grab a big mixing bowl. Toss in the shredded carrots, thinly sliced bell peppers, red cabbage, cucumber, edamame, green onions, and cilantro. Use your hands or tongs to mix them well. This blend gives your salad a colorful and crunchy texture. In a medium bowl, combine creamy peanut butter, soy sauce, fresh lime juice, maple syrup, toasted sesame oil, and sriracha. Whisk these together until the mixture is smooth and creamy. If it feels too thick, add a bit of warm water. Keep whisking until you like the texture. Now, add the cooled rice noodles to the vegetable mix. Pour the peanut dressing over everything. Gently toss to coat all the noodles and veggies evenly. This step ensures that every bite is full of flavor. Scoop the salad into bowls. Top it with crushed peanuts for a nice crunch. For a bright touch, add extra cilantro and a lime wedge on the side. This makes your dish not only tasty but also beautiful. For the complete guide, check the Full Recipe. Enjoy the vibrant flavors! To cook rice noodles just right, start by boiling water in a large pot. Once the water boils, add the noodles. Follow the time on the package, usually about 4-6 minutes. Stir the noodles gently to prevent sticking. After cooking, drain the noodles in a colander. Rinse them under cold water. This stops the cooking and keeps them from getting mushy. Let them cool before adding to your salad. If you have extra peanut dressing, store it in an airtight container. Make sure it cools first before sealing. It keeps well in the fridge for about five days. When you’re ready to use it again, stir well. If it thickens, add a bit of warm water. This helps restore its creamy texture. Avoid overcooking the rice noodles. They should be soft but still a bit firm. If you cook them too long, they become mushy. Also, do not skip rinsing the noodles. This step is key to keeping them from clumping together. Lastly, taste your peanut dressing before adding it to the salad. Adjust flavors, like spice or sweetness, to suit your taste. Follow these tips to make your Thai Peanut Noodle Salad the best it can be! {{image_4}} You can easily change the flavor of your Thai peanut noodle salad by swapping in different ingredients. Think about adding fresh herbs like mint or basil. These herbs add a bright taste. You could also try adding a splash of coconut milk for creaminess. If you want more heat, consider using chili flakes or a dash of hot sauce. Each change can give your dish a new twist! Adding protein makes this salad more filling. You can use cooked chicken, shrimp, or tofu. If you choose chicken, grill or roast it first. For shrimp, sauté them until they turn pink. If you prefer tofu, use firm tofu. Press the tofu to remove water, then cube and pan-fry it. Toss your protein into the salad for extra taste and energy. Mixing in seasonal vegetables keeps your salad fresh and exciting. In the spring, add snap peas or radishes for a nice crunch. In summer, use cherry tomatoes or zucchini for a light touch. In fall, consider roasted butternut squash or sweet potatoes. Winter vegetables like kale or Brussels sprouts can also work well. These swaps bring new flavors and textures to your dish. For the full recipe, check out the detailed instructions above. To keep your Thai Peanut Noodle Salad fresh, store it in an airtight container. Make sure to separate the salad from the dressing if you plan on eating it later. This keeps the noodles from getting soggy. Place the noodles and veggies in one container and the dressing in another. When you are ready to eat, mix them together for the best taste. You can freeze the peanut dressing for later use. Pour the dressing into an ice cube tray or a small, airtight container. Freeze it until solid, then transfer the cubes to a freezer bag. This way, you have single servings ready for your next meal. When you’re ready to use it, just thaw the dressing in the fridge overnight or at room temperature for a few hours. When stored properly, the salad lasts about 3 days in the fridge. If you keep the dressing separate, it can last up to a week. Always check for freshness before eating. If it smells off or looks strange, it’s best to toss it. Enjoy your delicious meal while it's still fresh! Yes, you can make Thai Peanut Noodle Salad ahead of time. This salad tastes great when chilled. It also allows flavors to blend well. Prepare the salad and dressing separately. Combine them just before serving. This keeps the noodles from getting soggy. Store the salad in an airtight container in the fridge. It can last up to three days. If you need a substitute for peanut butter, try almond butter. Sunflower seed butter works well too. Both options provide a similar creamy texture. They also add great flavor. You can also use tahini for a nut-free option. Just remember, these substitutes will change the taste a bit. Yes, Thai Peanut Noodle Salad can be gluten-free. Use gluten-free soy sauce, known as tamari. The rest of the ingredients are naturally gluten-free. This salad is also vegan. All the ingredients are plant-based. You can enjoy this meal without any animal products. For the full recipe, check out the details above! Thai Peanut Noodle Salad is easy to make and full of flavor. We covered key ingredients to enhance taste and boost health. I shared step-by-step instructions, tips for perfect noodles, and tasty variations. Storing your salad and dressing correctly keeps them fresh. Remember, you can adjust flavors and protein options to fit your tastes. This dish is versatile and satisfying, making it a great meal. Enjoy your cooking and impress your taste buds!

Thai Peanut Noodle Salad Flavorful and Fresh Meal

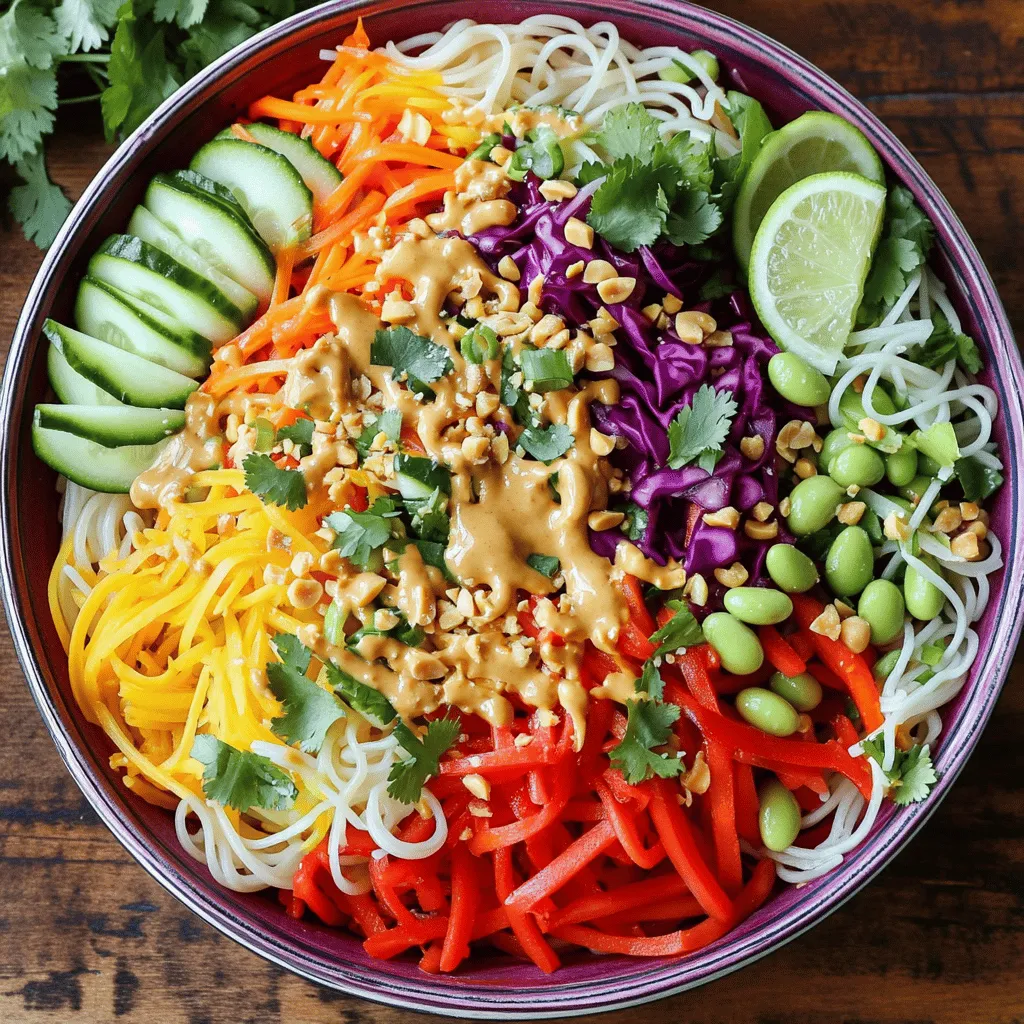
Looking for a fresh and flavorful meal? You’ve just found it! My Thai Peanut Noodle Salad combines the tasty crunch

Older posts
Newer posts
← Previous Page1 … Page20 Page21 Page22 … Page27 Next →

dsad

© 2025 mealinmoments • Built with GeneratePress

Our Policies

  • Copyright Policy
  • Cookie Policy
  • GDPR Policy
  • Privacy Policy
  • Disclaimer
  • Terms Of Use

More Information

  • Home
  • About
  • Contact
  • Appetizers
  • Dessert
  • Dinner
  • Drinks
©2025, mealinmoments About Back To Top