![- 1 lb Brussels sprouts, trimmed and halved - 2 tablespoons olive oil - 1/4 teaspoon salt - 1/4 teaspoon black pepper - 1/4 cup balsamic vinegar - 2 tablespoons honey - 1/4 cup pecans, roughly chopped - 1/4 cup dried cranberries - Fresh parsley, chopped, for garnish When I make balsamic glazed Brussels sprouts, I gather all my ingredients first. The Brussels sprouts are the star of the show. I love using fresh sprouts that are bright green. They should feel firm and not wilted. I always trim and halve them to help them cook evenly. Next, I grab my olive oil, salt, and pepper. Olive oil adds a rich flavor, and the salt and pepper bring out the sprouts' natural taste. For the glaze, I use balsamic vinegar and honey. The vinegar gives a tangy kick, while honey adds sweetness. I also like to include chopped pecans and dried cranberries. The pecans add a nice crunch, and the cranberries give bursts of flavor. Lastly, a sprinkle of fresh parsley makes the dish pop. It adds color and freshness to the plate. For the full recipe, you can check the detailed instructions to make this dish even easier. - Preheat oven to 400°F (200°C). This step ensures the sprouts roast well. - In a bowl, combine Brussels sprouts with 2 tablespoons of olive oil, 1/4 teaspoon salt, and 1/4 teaspoon black pepper. Toss them until every sprout is coated. - Line a baking sheet with parchment paper. This prevents sticking and makes cleanup easy. - Arrange the Brussels sprouts on the baking sheet in a single layer. Roast for 20-25 minutes. Halfway through, stir them to ensure even cooking and browning. - In a small saucepan, combine 1/4 cup of balsamic vinegar and 2 tablespoons of honey. - Heat over medium until it simmers. Then reduce the heat and let it simmer for 5-7 minutes. Stir until it thickens. - Drizzle the balsamic glaze over the roasted Brussels sprouts. Toss gently to coat them well. - Add in 1/4 cup of chopped pecans and 1/4 cup of dried cranberries. This mix adds crunch and sweetness. - Return the baking sheet to the oven for an extra 5 minutes. This step helps the glaze caramelize on the sprouts. For a complete view of the process, check the Full Recipe for Balsamic Glazed Brussels Sprouts with a Twist. To get the best flavor, space the Brussels sprouts on the baking sheet. This allows hot air to circulate around each sprout, helping them cook evenly. If they are too close together, they will steam instead of roast. Stir the sprouts halfway through cooking. This helps them brown nicely and become tender all over. Want to elevate the taste? Add some herbs like thyme or rosemary. A pinch of garlic powder can also boost the flavor. If you want a bit more zing, squeeze a splash of fresh lemon juice over the sprouts right before serving. This adds brightness and freshness to the dish that balances the sweetness. For a beautiful presentation, serve the Brussels sprouts in a shallow dish. Drizzle any extra balsamic glaze over the top. Add a sprinkle of chopped pecans and cranberries for color and texture. Fresh parsley on top gives a nice pop of green, making the dish look even more appealing. Each step enhances the overall look and taste of your Balsamic Glazed Brussels Sprouts. For the full recipe, check out the details above. {{image_4}} You can swap honey for maple syrup in this recipe. Maple syrup gives a lovely flavor. It also makes this dish vegan-friendly. If you want to avoid honey, choose agave nectar. Both options work well with balsamic vinegar. Instead of pecans, try walnuts or almonds. They add nice crunch and flavor. You can also use fresh fruits like apples or pears. These fruits bring a sweet twist to the dish. Dried cranberries add chewiness, but fresh fruits change the texture nicely. You can cook Brussels sprouts on the stovetop, too. Just sauté them in olive oil over medium heat. Stir often until they become tender and golden. If you’re short on time, use an air fryer. Cook them at 375°F for about 15 minutes. This method gives a crisp outside and soft inside. Store any leftover Brussels sprouts in the fridge. Place them in an airtight container. This keeps them fresh for up to four days. If you don't have an airtight container, wrap them tightly in plastic wrap. This method also helps maintain their flavor. You can freeze Brussels sprouts for later use. First, blanch them in boiling water for two minutes. Then, cool them quickly in ice water. Drain well and place them in freezer bags. Remove as much air as possible before sealing. They can last for up to three months in the freezer. When you're ready to use them, thaw the Brussels sprouts overnight in the fridge. To reheat, roast them in the oven or sauté them in a pan. This keeps them crisp and tasty. Leftover Brussels sprouts can be used in many ways. Toss them in salads for a hearty touch. They add great flavor to wraps or sandwiches. You could also mix them into a stir-fry for extra nutrition. For breakfast, try adding them to scrambled eggs or an omelet. These ideas make sure you enjoy every bite of your delicious creation. For the complete Balsamic Glazed Brussels Sprouts recipe, check out the Full Recipe link. To pick fresh Brussels sprouts, look for bright green, firm sprouts. Avoid any that are yellow or wilted. The sprouts should feel heavy for their size. Smaller sprouts are usually more tender and sweeter. Check for tight leaves, as loose ones can mean older sprouts. Always buy from a trusted source for the best quality. Yes, you can make balsamic glazed Brussels sprouts ahead of time. Roast the Brussels sprouts and let them cool. Store them in an airtight container in the fridge for up to three days. When ready to serve, reheat in the oven at 350°F (175°C) for about 10-15 minutes. This keeps them crispy and tasty. Brussels sprouts are very healthy! They are low in calories and high in fiber. One cup has about 38 calories and 3 grams of fiber. They are also rich in vitamins C and K. These nutrients help support your immune system and bone health. Plus, they contain antioxidants that may fight inflammation. Balsamic glazed Brussels sprouts pair well with many dishes. Try serving them with roasted chicken or grilled salmon. They also work great alongside a hearty grain like quinoa or farro. For a vegetarian option, serve with stuffed bell peppers or a fresh salad. This makes for a colorful and balanced meal. For the complete procedure and details on making Balsamic Glazed Brussels Sprouts with a Twist , check out the [Full Recipe]. In this post, we explored how to make balsamic glazed Brussels sprouts. You learned about the key ingredients, including the vital glaze. We covered each step, ensuring your sprouts roast perfectly. I shared tips to enhance flavors and how to present them nicely. You also found variations like swapping sweeteners or nuts. Finally, you discovered storage methods for leftovers. Enjoy these tasty sprouts, knowing they're healthy and easy to prepare!](https://mealinmoments.com/wp-content/uploads/2025/05/22e585b0-671a-46aa-9caf-e08116d7ee6a.webp)
Balsamic Glazed Brussels Sprouts Irresistible Dish
Craving a dish that brings out the best in Brussels sprouts? Look no further! Balsamic Glazed Brussels Sprouts are packed
Craving a dish that brings out the best in Brussels sprouts? Look no further! Balsamic Glazed Brussels Sprouts are packed
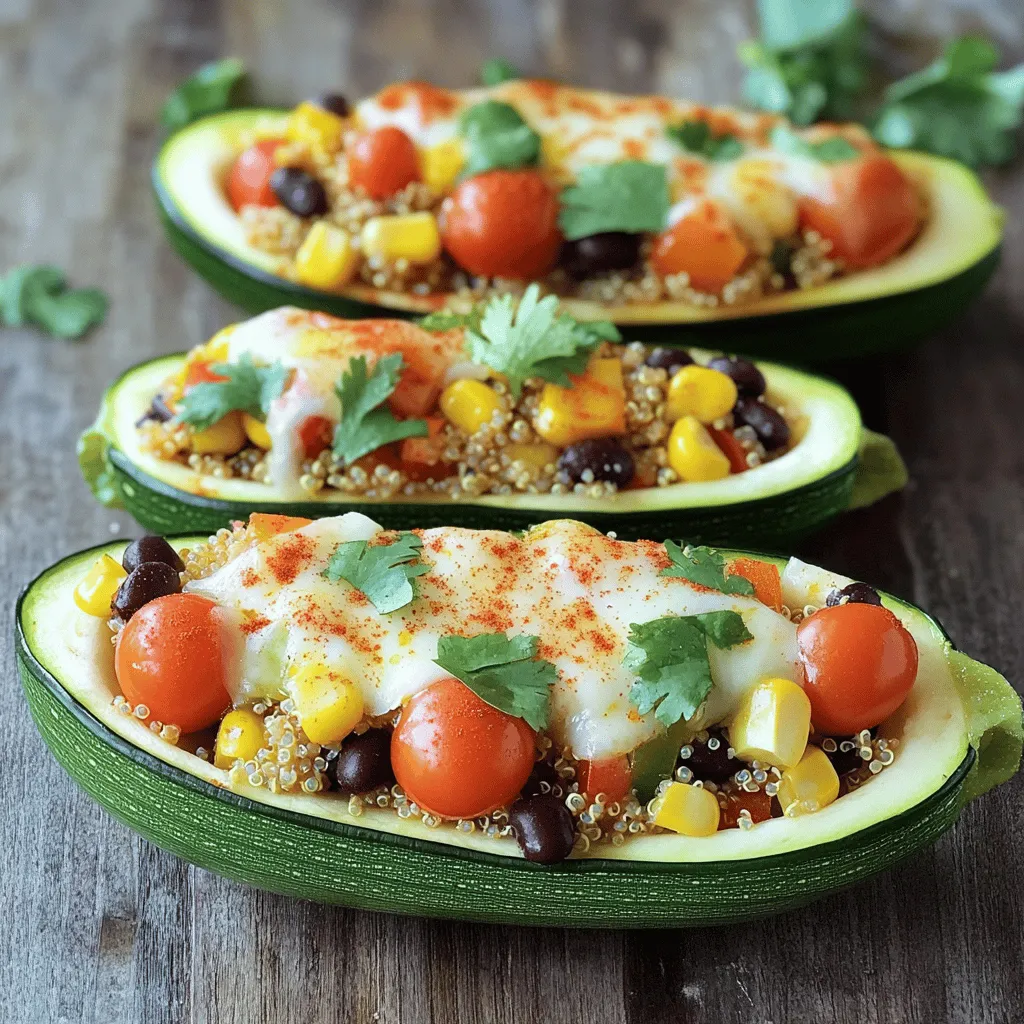
Looking for a quick and tasty meal? Try these vegetarian stuffed zucchini boats! Packed with fresh veggies and flavored with
![- 2 cups all-purpose flour - 1 tablespoon baking powder - 1/2 teaspoon baking soda - 1 teaspoon salt - 1/2 teaspoon ground black pepper - 1 cup shredded sharp cheddar cheese - 1/2 cup cooked and crumbled breakfast sausage - 1/2 cup diced bell peppers - 1/4 cup finely chopped green onions - 3 large eggs - 1 cup buttermilk - 1/4 cup extra virgin olive oil To make savory breakfast muffins, you need a solid list of ingredients. Each element plays a role in flavor and texture. If you prefer gluten-free muffins, you can swap all-purpose flour for a gluten-free blend. Look for a mix that includes xanthan gum for better structure. For a dairy-free option, you can replace buttermilk with a non-dairy milk. Try almond milk mixed with a splash of vinegar for the same tang. If you need a vegetarian version, skip the sausage. You can add cooked mushrooms, spinach, or even chickpeas for extra protein and flavor. This keeps the muffins hearty without meat. Feel free to check out the [Full Recipe] for more details on how to combine these ingredients into a delicious breakfast treat! First, preheat your oven to 375°F (190°C). Next, prepare your muffin tin. You can grease it with cooking spray or use paper liners. This step helps the muffins come out easily. Mixing dry and wet ingredients separately is essential. It ensures even distribution of the baking powder and soda. This way, your muffins rise perfectly and have a great texture. Start by mixing the dry ingredients. In a large bowl, whisk together 2 cups of all-purpose flour, 1 tablespoon of baking powder, 1/2 teaspoon of baking soda, 1 teaspoon of salt, and 1/2 teaspoon of ground black pepper. This blend sets the foundation for your muffins. In another bowl, combine the wet ingredients. Beat 3 large eggs and add 1 cup of buttermilk and 1/4 cup of extra virgin olive oil. Mix until smooth. Pour this mixture into the dry ingredients. Stir gently using a spatula. Make sure not to overmix. A slightly lumpy batter gives the best muffins. Now, fill your muffin cups. Use a spoon or a cookie scoop to fill each cup about three-quarters full. This helps them rise without overflowing. Place the muffin tin in the oven and bake for 18-20 minutes. Keep an eye on them! They are done when golden brown and a toothpick comes out clean. Let the muffins cool in the pan for about 5 minutes. Then, transfer them to a wire rack to cool completely. For more details, check the Full Recipe. To get the best texture in your savory breakfast muffins, avoid overmixing the batter. When you mix too much, the muffins can turn out tough. Instead, stir just until the ingredients come together. A few lumps in the batter are fine. Using room temperature ingredients also helps. When eggs and buttermilk are at room temperature, they mix better. This can lead to a fluffier muffin. Take them out of the fridge about 30 minutes before you start. Adding spices can really boost flavor in your muffins. I recommend using garlic powder or smoked paprika. Just a pinch can make a big difference! You can also add a dash of cayenne for some heat. To balance the taste with cheese and sausage, choose sharp cheddar cheese. It gives a nice bite that pairs well with the savory sausage. Mixing in bell peppers adds freshness and color. This makes your muffins not just tasty, but also pretty to look at. For the full recipe, check the details above to get started! {{image_4}} You can easily change up the flavors in your savory breakfast muffins. For cheese, try using feta or mozzarella instead of cheddar. Feta adds a tangy kick, while mozzarella brings a milder taste. Both will melt beautifully and enhance your muffins. Adding spinach or other veggies can boost nutrition and flavor. Spinach adds a lovely green color and a soft texture. You can also use zucchini, mushrooms, or even sun-dried tomatoes. Just remember to chop them finely for even cooking. If you want to make vegan savory breakfast muffins, replace eggs with flaxseed meal or applesauce. Use almond milk or soy milk in place of buttermilk. You can also swap out the sausage for mushrooms or cooked lentils. These changes will still give you a delicious muffin. For low-carb muffin options, use almond flour or coconut flour instead of all-purpose flour. This will cut down on carbs while keeping your muffins tasty. You can add more eggs to help bind the ingredients together. These variations keep it healthy without losing flavor. For the full recipe, make sure to check the section above. To keep your savory breakfast muffins fresh, store them in a cool place. Place them in an airtight container. This method helps keep them moist. You can also use a zip-top bag. Make sure to remove as much air as possible before sealing. These muffins stay good for about three days at room temperature. For longer storage, freezing is the best option. Wrap each muffin in plastic wrap. Then, place them in a freezer-safe bag. This way, they won’t stick together. Muffins can last up to three months in the freezer. When you’re ready to eat, just take out a muffin. Let it thaw at room temperature. You can also warm it in the oven at 350°F for about 10 minutes. This will make it taste fresh again. Can I make these muffins ahead of time? Yes, you can prepare these muffins ahead of time. I often bake them the night before. Store them in an airtight container. This keeps them fresh for a few days. What is the best way to reheat the muffins? To reheat, warm them in the oven at 350°F for about 5-7 minutes. This helps restore their texture. You can also use a microwave for quicker reheating, but be careful not to overheat them. How do I customize the muffins to my taste? You can easily customize these muffins. Add your favorite veggies like spinach or zucchini. Try different cheeses, such as feta or mozzarella. You can also swap out the sausage for bacon or even tofu for a vegetarian twist. Caloric content per muffin Each muffin has about 200 calories. This makes them a filling option for breakfast. Highlights of key nutrients in the recipe These muffins provide protein from the eggs and sausage. They also contain calcium from the cheese. The bell peppers add vitamins A and C, making these muffins a nutritious choice. Substituting eggs in the recipe If you need an egg substitute, use 1/4 cup of unsweetened applesauce per egg. This keeps the muffins moist and fluffy. Issues with using self-rising flour Self-rising flour may change the texture of the muffins. It already has baking powder and salt, so adjust the recipe. You might need to reduce the baking powder and salt to avoid an overly salty flavor. This blog covered a tasty recipe for savory breakfast muffins. You learned about the ingredients, tips, and baking instructions. You can try different flavors or dietary options to make them your own. Storing muffins well ensures you enjoy them longer. Experimenting with these ideas can lead to delicious breakfasts. Start baking, and enjoy the fun of making your own muffins!](https://mealinmoments.com/wp-content/uploads/2025/05/c1bd5224-cf75-4d24-9a65-3d6b8aa77e64.webp)
Looking for a delicious way to start your day? Try my savory breakfast muffins! Packed with rich flavors from cheese
![To make delicious caramel apple nachos, you need: - 2 large apples (like Granny Smith or Honeycrisp), thinly sliced - 1 cup granola or crushed graham crackers - 1/2 cup caramel sauce (store-bought or homemade) - 1/4 cup mini chocolate chips - 1/4 cup chopped pecans or walnuts (optional) - 1/4 cup whipped cream (for drizzling) - Pinch of cinnamon (optional) This recipe makes about four servings. Each serving provides a great mix of sweet and crunchy flavors. You can share this fun treat with friends or family. If you want more, just double the amounts. - Apples: Choose firm apples for the best crunch. Avoid soft or bruised apples. - Granola: Use your favorite granola for added flavor and texture. Check for added sugars. - Caramel Sauce: If using store-bought, check the label for quality ingredients. Homemade sauce can be richer. - Nuts: If you add nuts, use fresh ones for the best taste. Toast them lightly for extra flavor. - Cinnamon: This spice adds warmth. Use just a pinch to avoid overpowering the dish. With these tips, your caramel apple nachos will shine. For the complete process, follow the Full Recipe to make this tasty dessert! To start, wash and dry your apples well. I like using Granny Smith or Honeycrisp for their crunch. Core the apples using a corer or knife. After that, cut them into thin wedges. Aim for slices that look like nacho chips. Next, take a large platter or parchment paper for easy cleanup. Arrange your apple slices in a neat, overlapping pattern. Now, sprinkle granola or crushed graham crackers over the apples. This adds a nice crunch. Drizzle the caramel sauce generously across the apple and granola mix. Make sure to cover everything, so the taste is even. Then, scatter mini chocolate chips on top. They stick well to the caramel. If you want, add chopped pecans or walnuts for extra crunch. For a hint of spice, dust a light pinch of cinnamon over the nachos. This makes the flavors pop! Finally, drizzle whipped cream over the top, making it look beautiful and inviting. Serve your caramel apple nachos right away. They look best fresh and warm. You want to impress your friends with the sweet, crunchy, and creamy mix. For a fun touch, you can add extra chocolate chips or nuts on the side. This lets everyone customize their nachos. Enjoy this delightful dish! For the full recipe, check out the details above. One big mistake is cutting apples too thick. Thin slices work best for nachos. Another mistake is not drying the apples. Wet apples can make the nachos soggy. Also, don't skip the caramel drizzle. A good, even coating adds the best flavor. Lastly, avoid using too many toppings. Balance is key for a great taste. To boost flavor, try using a mix of apples. Combining tart and sweet apples adds depth. You can also add a splash of lemon juice. This keeps the apples fresh and bright. For a special touch, use flavored caramel sauce. Salted caramel or vanilla caramel can change the game. A sprinkle of sea salt on top gives a nice contrast. Serve your caramel apple nachos right away. They taste best fresh. Use a large platter for a fun presentation. You can also serve them as a dessert bar. Let guests build their own nachos with different toppings. This adds a fun, interactive element to the dish. Remember, the choice of toppings can make it a unique experience. For a quick snack, enjoy them with friends during movie night. For the complete guide on how to make these delicious treats, check the Full Recipe above. {{image_4}} You can mix flavors to make caramel apple nachos even more fun. Try using different apple types, like sweet Fuji or tart Granny Smith. Each type adds its own taste. You can also add a hint of vanilla in your caramel sauce. This small change can enhance the flavor. If you love spicy notes, a pinch of cayenne pepper in the caramel can surprise your taste buds. Feel free to get creative with your toppings. Besides chocolate chips, you can use dried fruits like cranberries or raisins. They add sweetness and chewiness. For a salty twist, sprinkle some pretzel pieces on top. If you want a tropical vibe, add shredded coconut or pineapple bits. Drizzling some peanut butter or Nutella over the nachos can also bring a new flavor. If you need to make dietary changes, no problem! For a vegan option, use dairy-free caramel sauce and skip the whipped cream. You can also replace regular chocolate chips with dairy-free ones. If you're gluten-free, make sure to use gluten-free granola or graham crackers. This dish can fit many diets while still being delicious. Try these ideas from the Full Recipe to suit your needs! To keep your caramel apple nachos fresh, place them in an airtight container. Use parchment paper to separate layers if needed. This prevents sogginess from the caramel and whipped cream. Store them in the fridge to maintain their crunch and flavor. Reheating is not recommended for this dish. The apples may become mushy, and the caramel can lose its texture. If you prefer warm nachos, make a fresh batch using the [Full Recipe]. It’s quick and easy! These nachos are best enjoyed right away. If stored well, they can last up to two days in the fridge. However, for the best taste and texture, eat them within one day. The longer they sit, the less appealing they become. To make homemade caramel sauce, you need sugar, butter, and cream. Start by melting sugar in a pot over medium heat. Stir it until it turns golden brown. Then, add butter and mix well. Slowly pour in heavy cream while stirring. Let it simmer for a few minutes until thick. This sauce is creamy and rich, perfect for drizzling over your caramel apple nachos. Yes, you can use different fruits! Pears, bananas, or even strawberries work well. Just slice them thinly, like the apples. Each fruit adds its own unique flavor. Mixing fruits can make your nachos more colorful and fun. Experiment to find your favorite combination. Caramel apple nachos blend classic treats into one dish. They likely came from the desire to combine two favorites: caramel apples and nachos. This dish gained popularity at fairs and festivals. It’s an easy way to enjoy the sweet taste of caramel apples. You can find many variations, but the fun stays the same. For the full recipe, check out the steps above! This article covered the key parts of making caramel apple nachos. We discussed the best ingredients and important tips for quality. I shared simple steps for prepping and serving this tasty treat. Common mistakes were highlighted to help you avoid issues. You also learned about different flavor combos and how to store leftovers. In conclusion, crafting caramel apple nachos is fun and easy. Enjoy your delicious creation!](https://mealinmoments.com/wp-content/uploads/2025/05/566c6455-6b0d-4d25-bb81-94aa59cf40f9.webp)
If you crave a fun and tasty treat, you need to try Caramel Apple Nachos! This dish combines crunchy apples,
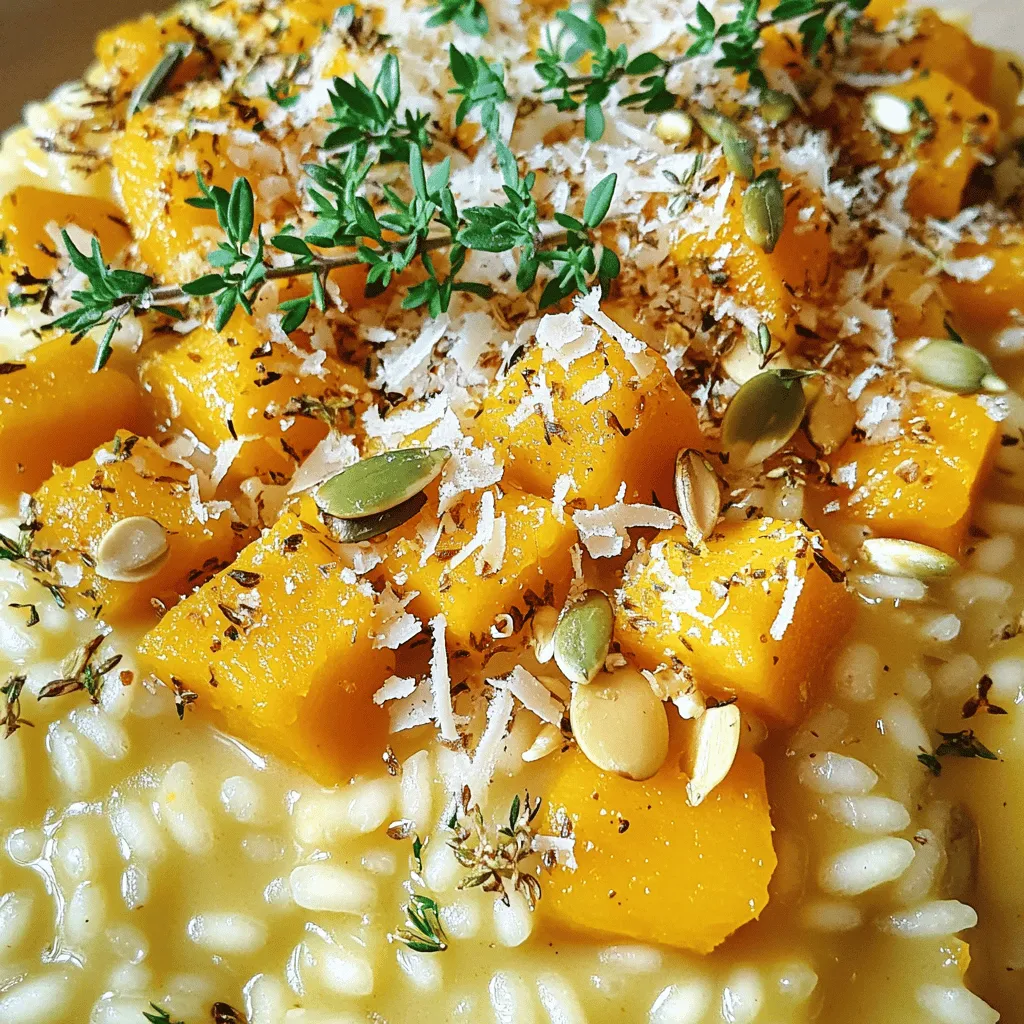
Dreaming of a dish that wraps you in warmth and comfort? Butternut squash risotto is the answer. With its creamy
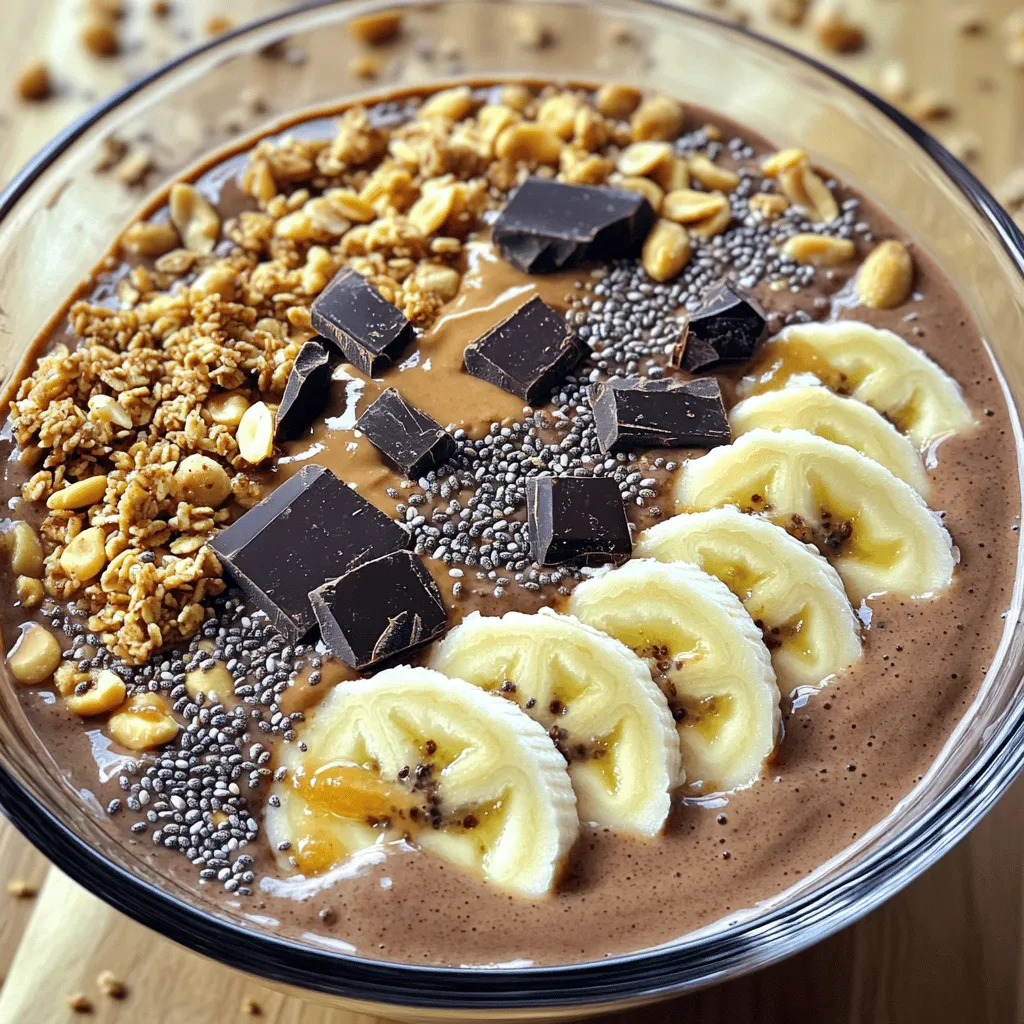
Are you ready to treat yourself to a delicious and healthy snack? A Chocolate Peanut Butter Smoothie Bowl is both
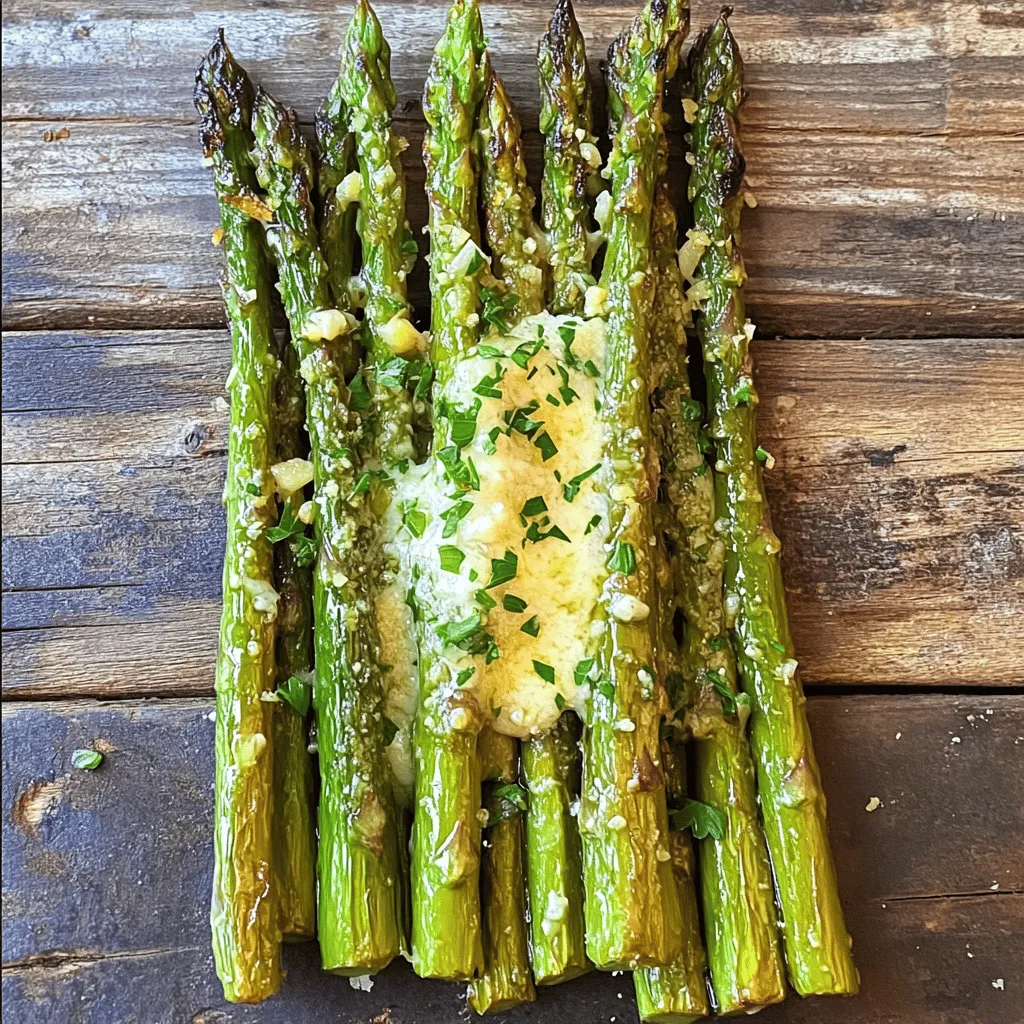
If you’re looking for a quick and tasty side dish, I’ve got you covered! Lemon Garlic Roasted Asparagus is simple
![To make the best pumpkin spice pancakes, gather these simple ingredients: - 1 cup all-purpose flour - 1/2 cup canned pumpkin puree - 1 tablespoon baking powder - 1 tablespoon pumpkin pie spice - 1/4 teaspoon salt - 1 tablespoon brown sugar - 1 large egg - 1 cup milk (almond or oat milk options) - 2 tablespoons melted butter (plus extra for cooking) - Whipped cream (optional, for topping) - Maple syrup (for serving) These ingredients come together to create a warm and cozy breakfast. The pumpkin puree adds moisture and flavor. Pumpkin pie spice gives that classic fall taste. Choosing the right milk is key. Almond or oat milk work great for a dairy-free option. You can also adjust sweetness with brown sugar. For a richer taste, use extra melted butter while cooking. This pancake recipe is easy to follow and perfect for any skill level. You can find the full recipe above for detailed instructions on how to make these delicious pancakes. Enjoy the comforting flavors of fall with every bite. - In a large bowl, combine: - 1 cup all-purpose flour - 1 tablespoon baking powder - 1 tablespoon pumpkin pie spice - 1/4 teaspoon salt - 1 tablespoon brown sugar - Whisk these dry ingredients until mixed well. - In another bowl, mix: - 1/2 cup canned pumpkin puree - 1 large egg - 1 cup milk (almond or oat milk works too) - 2 tablespoons melted butter - Stir these wet ingredients until smooth. - Pour the wet mix into the dry mix. - Gently stir until just combined. A few lumps are okay. - Preheat a non-stick skillet over medium-low heat. - Lightly coat the skillet with melted butter. - For each pancake, pour about 1/4 cup of batter onto the skillet. - Cook until bubbles form on the surface (about 2-3 minutes). - Flip the pancake and cook for another 2 minutes. It should turn golden brown. - Repeat this with the rest of the batter, adding butter as needed. - Serve warm pancakes topped with: - Whipped cream (optional) - Maple syrup - For a beautiful presentation, stack the pancakes on a plate. - Drizzle with syrup and sprinkle extra pumpkin pie spice or chopped nuts. - Enjoy them warm for the best taste! For the detailed recipe, refer to the Full Recipe. To make the best pumpkin spice pancakes, avoid over-mixing the batter. When you combine the wet and dry ingredients, stir gently. Small lumps are okay. Over-mixing makes the pancakes tough. The ideal cooking temperature is medium-low heat. This lets your pancakes cook evenly. If the skillet is too hot, the outside burns before the inside cooks. You can add chocolate chips or chopped nuts for extra flavor. They add a nice texture and sweetness. Try walnuts or pecans for a warm taste. Using different spices can also lift the flavor. Consider cinnamon or nutmeg for a twist. A pinch of ginger can add warmth too. You can prepare the batter a day in advance. Just mix the dry and wet ingredients and keep them separate. Store the wet mix in the fridge. Combine them right before cooking. To reheat, place pancakes in a microwave for about 20 seconds. You can also warm them in a skillet for a minute on each side. This keeps them fluffy and fresh. For the full recipe, check here: [Full Recipe]. {{image_4}} To make gluten-free pumpkin spice pancakes, swap the all-purpose flour with a gluten-free blend. Look for a mix that includes xanthan gum. This helps mimic the texture of regular flour. Keep the other ingredients the same. Cook the pancakes as usual. You may need to adjust the cooking time slightly. If they feel too soft, cook for an extra minute. For a vegan version, replace the egg with a flaxseed meal. Use one tablespoon of flaxseed mixed with three tablespoons of water. Let it sit for five minutes to thicken. For milk, almond or oat milk works great. You can also use a plant-based butter for cooking. The pancakes will still turn out light and fluffy. Want a savory twist? Add a bit of shredded cheese or fresh herbs to the batter. Cheddar cheese pairs well with pumpkin flavor. Fresh rosemary or thyme can add a nice touch too. Serve these pancakes with crispy bacon or a dollop of sour cream. This makes for a unique and tasty breakfast option. Enjoy the mix of sweet and savory! To keep your pumpkin spice pancakes fresh, store them in the fridge. Place them in a sealed container or wrap them tightly in plastic wrap. This helps prevent them from drying out. You can keep them in the fridge for up to three days. If you want to save them for a longer time, freezing works well. Stack the pancakes with wax paper between each one. This keeps them from sticking together. Then, place the stack in a freezer-safe bag. They can last up to two months in the freezer. When it’s time to enjoy your leftover pancakes, you have a few options. The best way to reheat them is in a skillet over low heat. This method keeps them warm and fluffy. You can also use a toaster. Just pop them in until they warm up. To keep the texture and flavor, avoid using a microwave if you can. Microwaving can make them chewy and dry. If you must use a microwave, heat them in short bursts. Just a few seconds at a time will help. In the fridge, pumpkin spice pancakes last about three days. In the freezer, they can stay good for up to two months. Always check for any off smells or changes in texture before you eat them. This ensures you enjoy your pancakes at their best. For the full recipe, refer to the earlier section. To make pumpkin spice pancakes from scratch, follow these steps: 1. In a large bowl, mix 1 cup of all-purpose flour, 1 tablespoon of baking powder, 1 tablespoon of pumpkin pie spice, 1/4 teaspoon of salt, and 1 tablespoon of brown sugar. 2. In another bowl, combine 1/2 cup of canned pumpkin puree, 1 large egg, 1 cup of milk, and 2 tablespoons of melted butter. Mix well. 3. Pour the wet mix into the dry mix. Stir gently until just combined. A few lumps are okay. 4. Preheat a skillet over medium-low heat. Use a little melted butter to coat the pan. 5. Pour 1/4 cup of batter for each pancake. Cook until bubbles form, about 2-3 minutes. Flip and cook for another 2 minutes until golden. 6. Serve warm with whipped cream and maple syrup. Yes, you can use fresh pumpkin! Here’s how: - Start with a small pumpkin. Cut it, remove the seeds, and roast it until soft. - Allow it to cool, then scoop out the flesh. - Blend it until smooth for a great puree. - This fresh puree can replace the canned pumpkin. It may taste slightly different and fresher. Many toppings can enhance your pancakes. Here are some tasty ideas: - Whipped cream is a classic and adds great fluff. - Maple syrup gives a sweet touch that pairs well. - Chopped nuts, like walnuts or pecans, add crunch. - A sprinkle of extra pumpkin pie spice gives more flavor. - Chocolate chips can make them even sweeter and fun! Try mixing and matching these for your perfect stack. For the full recipe, check out the earlier section. Now you know how to make delicious pumpkin spice pancakes. We covered the key ingredients, step-by-step cooking, and useful tips to get them just right. You learned about variations like gluten-free and vegan options. I shared storage methods and creative serving ideas. These pancakes are perfect for breakfast or a cozy brunch. Enjoy experimenting with flavors and toppings. You can impress friends or treat yourself. Happy cooking!](https://mealinmoments.com/wp-content/uploads/2025/05/1703c98a-ddc6-42ae-bf44-89b298d54440.webp)
Are you ready to dive into fall with a delicious breakfast treat? Today, I’ll show you how to make cozy
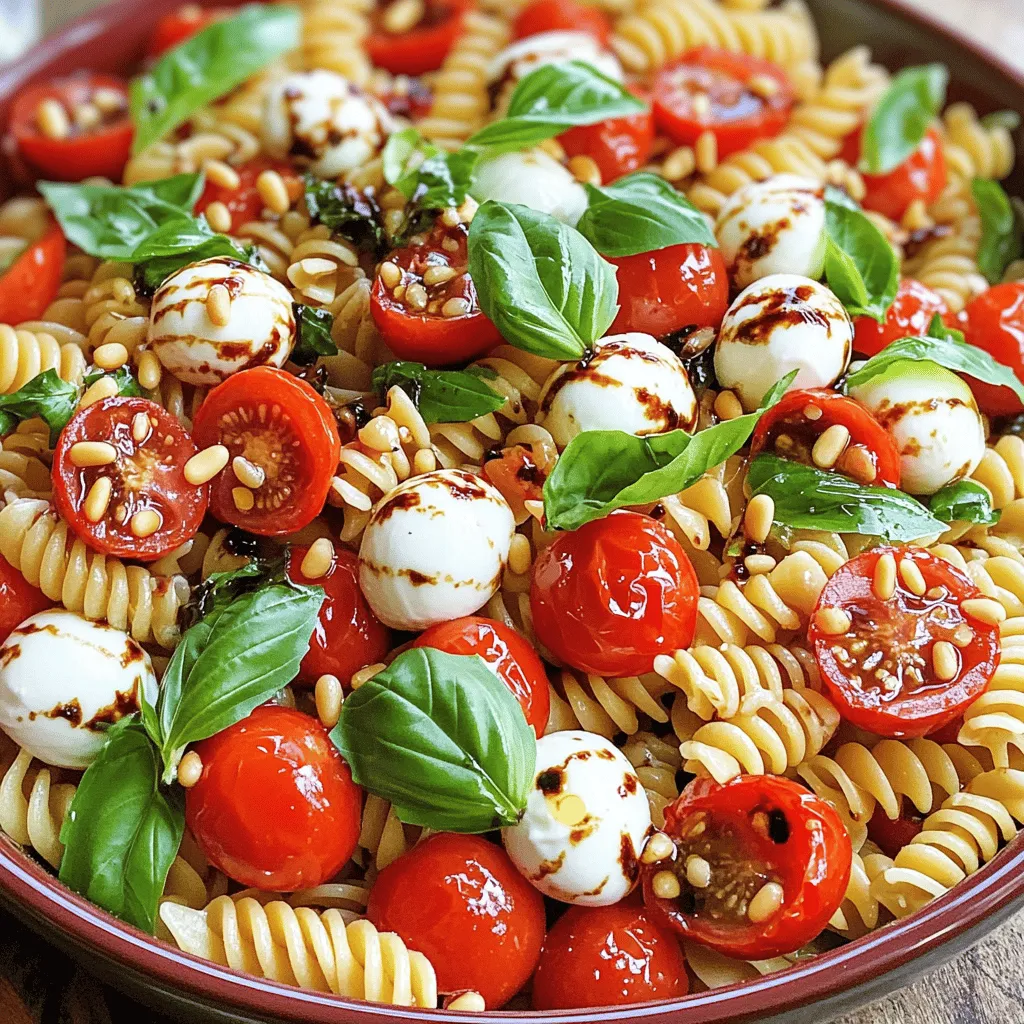
Are you ready to bring a burst of freshness to your table? The Caprese Pasta Salad combines the classic flavors
![To make Peanut Butter Banana Overnight Oats, you need simple ingredients. Here’s what you will use: - 1 cup rolled oats - 2 cups almond milk (or your preferred milk) - 2 ripe bananas (1 mashed, 1 sliced) - 1/4 cup creamy peanut butter - 2 tablespoons maple syrup (or honey, to taste) - 1 teaspoon pure vanilla extract - 1/2 teaspoon ground cinnamon - A pinch of salt - Chopped peanuts and banana slices for garnish Each ingredient plays a special role. The rolled oats give texture and fiber. Almond milk adds creaminess. Bananas bring natural sweetness and flavor. Peanut butter packs protein and richness. Maple syrup or honey sweetens it all up. Vanilla and cinnamon enhance the taste, while salt balances the flavors. You can easily change some ingredients to fit your taste. Here are a few ideas: - Use coconut milk for a tropical touch. - Swap peanut butter for almond or sunflower seed butter for nut-free options. - Add chia seeds for extra fiber and a fun texture. - Mix in some cocoa powder for a chocolatey twist. - Toss in berries or nuts for added flavor and crunch. Feel free to get creative! Each swap can change the taste and nutrition. These overnight oats are not only yummy, but they are also good for you. Here’s a breakdown of what you get: - High in fiber from oats and bananas. - Packed with protein from peanut butter. - Offers healthy fats, which help you feel full. - Contains vitamins and minerals from bananas and almond milk. One serving can give you a balanced breakfast. It’s quick to make and perfect for any busy morning. Check the [Full Recipe] for detailed instructions and enjoy! Making peanut butter banana overnight oats is simple and quick. You need just a few steps to enjoy this tasty treat. Gather your ingredients. You will mix them, store them, and let them sit overnight. The oats will soak up the milk and flavors, making a creamy meal. 1. Combine oats and milk: In a big bowl, add 1 cup of rolled oats and 2 cups of almond milk. Stir well to cover the oats completely. 2. Add banana and peanut butter: Mash one ripe banana and mix it into the oats. Add 1/4 cup of creamy peanut butter next. 3. Mix in sweeteners and spices: Pour in 2 tablespoons of maple syrup, 1 teaspoon of vanilla extract, 1/2 teaspoon of ground cinnamon, and a pinch of salt. 4. Stir vigorously: Mix all the ingredients until they blend well. Make sure the oats soak up the peanut butter and banana. 5. Portion into containers: Divide the mixture into 2 to 4 jars. Adjust the amount based on how many servings you want. 6. Garnish with banana and peanuts: Slice the second banana and put the slices on top. Add chopped peanuts for crunch. 7. Seal and chill: Tightly close the jars and put them in the fridge overnight. Let them sit for at least 4 hours. 8. Enjoy: The next morning, stir the oats well. You can eat them cold or warm them in the microwave for a cozy breakfast. To keep your oats creamy, use rolled oats, not quick oats. Rolled oats soak up milk well without getting mushy. Also, adjust the milk amount if needed. If you like thicker oats, use less milk. For creamier oats, add a little more. Mixing the ingredients thoroughly helps, too. Enjoy your peanut butter banana overnight oats! To make the best peanut butter banana overnight oats, start by picking ripe bananas. Ripe bananas add natural sweetness and creaminess. Use rolled oats instead of quick oats. Rolled oats soak up the milk better and give a heartier texture. Mix all ingredients well to avoid clumps. This ensures each bite is full of flavor. Store your oats in jars with tight lids. This keeps them fresh and makes for easy grab-and-go meals. A common mistake is not allowing enough soak time. Always let your oats sit for at least four hours. This helps them soften and absorb flavors. Another error is using too much liquid. Stick closely to the recipe's milk amount for the right consistency. Leaving out the salt can also dull the taste. A tiny pinch adds depth to the flavor. To boost flavor, try adding a bit more cinnamon. It pairs perfectly with peanut butter and banana. You can also mix in chia seeds for added texture and nutrition. Chopped nuts offer a nice crunch when sprinkled on top. If you want a touch of sweetness, drizzle extra maple syrup just before eating. For more indulgence, a swirl of extra peanut butter makes it even more delightful. You can find the full recipe to see all ingredients and steps. {{image_4}} You can mix in other fruits to change the taste. Fresh berries like strawberries or blueberries work well. Apples add a nice crunch, while peaches give a sweet twist. Just chop them up and stir them in with the oats. You can also try dried fruits like raisins or cranberries for a chewy bite. If you want a different flavor, swap peanut butter for other nut butters. Almond butter or cashew butter both taste great. If you need a nut-free option, try sunflower seed butter. Each choice gives a unique taste while still being creamy and delicious. You can easily adjust this recipe for your diet. For a vegan version, use maple syrup and a plant-based milk. If you want it gluten-free, ensure your oats are certified gluten-free. You can also lower sugar by cutting back on syrup or using a sugar-free sweetener. This recipe can fit many diets while still being tasty! Peanut butter banana overnight oats last for about 3 to 5 days in the fridge. They stay fresh if you store them right. The oats soften and flavors blend over time. You might find they taste even better after a day! Use airtight jars or containers for storing your oats. Glass jars work great because they are easy to clean. Clear containers let you see the layers of oats and fruit, which looks nice. Make sure to seal them tightly to keep the oats fresh. You can enjoy your oats cold or warm them up. To reheat, take the jar out of the fridge. Remove the lid and heat in the microwave for about 30 seconds to 1 minute. Stir well and check the temperature. If it needs more heat, warm it for an extra 15 seconds. Enjoy your creamy oats hot or cold! For the full recipe, check back to the previous section. Yes, you can use quick oats. They absorb liquid faster. This will make your overnight oats softer. However, they may not have the same hearty texture. Absolutely! To make it vegan, use plant-based milk. Almond milk works great. You can also swap the honey for maple syrup. This keeps everything vegan and sweet. To cut sugar, reduce the amount of maple syrup. You can also skip it altogether. Use ripe bananas for natural sweetness. You can add cinnamon for more flavor without sugar. You can add many tasty toppings! Try fresh berries like strawberries or blueberries. Nuts like almonds or walnuts add crunch. Chia seeds or flaxseeds boost nutrition too. For a sweet touch, add a drizzle of honey or more peanut butter. For the full recipe, check out the section above. Peanut Butter Banana Overnight Oats are simple to make and delicious. You learned about key ingredients, variations, and nutritional info. I guided you through each step for perfect oats. Avoid common mistakes and enhance flavor to suit your taste. Remember to store them properly for the best results. Overnight oats are versatile; you can tweak them for your needs. Now, you can enjoy a quick, healthy breakfast every day.](https://mealinmoments.com/wp-content/uploads/2025/05/ea0f7d8d-71ba-4151-b354-c2ad84a21ac7.webp)
If you crave a quick, tasty breakfast, peanut butter banana overnight oats are perfect for you. In just a few
