Skip to content
DisclaimerTerms Of UseGDPR PolicyCookie Policy

mealinmoments

  • Home
  • Drinks
  • Appetizers
  • Dinner
  • Dessert
  • About
  • Contact
  • Privacy Policy
DisclaimerTerms Of UseGDPR PolicyCookie Policy

Megan

- 1 cup coconut milk (or substitute with almond milk) - 1/2 cup mango puree (freshly blended or canned) - 1/4 cup chia seeds - 2 tablespoons maple syrup (or honey for a touch of sweetness) - 1/2 teaspoon pure vanilla extract - Pinch of fine sea salt - Fresh mango slices for a delightful topping - Toasted coconut flakes for garnish Mango Coconut Chia Pudding is not only tasty but also healthy. Chia seeds are rich in fiber, protein, and omega-3 fatty acids. They help you feel full and support good digestion. Coconut milk adds creaminess and healthy fats, while mango brings vitamins A and C. This dish is a great option for breakfast or a snack. You can easily change some ingredients. If you want a nut-free option, use coconut milk. For more sweetness, try agave syrup instead of maple syrup. If you don’t have mango puree, fresh mango works well too. Just blend it until smooth. You can also use other fruits like berries for a different flavor. To make the mango coconut chia pudding, start with a medium bowl. Pour in the coconut milk and add the mango puree. I like to use fresh mangoes for a vibrant taste, but canned works too. Add the maple syrup and vanilla extract next. A pinch of sea salt helps balance the sweetness. Whisk everything until it is smooth. Then, slowly stir in the chia seeds. Make sure they are well mixed in. This helps them soak up the liquid later. Cover the bowl with plastic wrap or use a mason jar if you prefer. The texture is key for great chia pudding. If it seems too thick, add a splash of coconut milk. Mix it well until you reach your desired consistency. A tip I often share is to let it chill overnight. This allows the chia seeds to absorb more liquid and get creamy. Also, remember to stir the pudding after chilling. Sometimes, the seeds can settle at the bottom. A gentle stir will help mix everything back together. I recommend chilling the pudding for at least four hours. However, for the best results, let it sit overnight. This gives the chia seeds plenty of time to expand. When you take it out of the fridge, it should have a lovely pudding-like texture. When serving, I like to layer the pudding in clear glasses. It makes for an eye-catching presentation. Don’t forget to top it with fresh mango slices and toasted coconut flakes! This adds both flavor and a fun crunch. For the full recipe, check out the details above. When making mango coconut chia pudding, avoid using too many chia seeds. They can make the pudding too thick. Also, do not skip the chilling time. If you don’t let it set, the pudding will be runny. Lastly, remember to mix well after adding the chia seeds. This helps them soak up the liquid evenly. To adjust sweetness, taste before serving. You can add more maple syrup or honey if needed. If the pudding is too thick, add a splash of coconut milk. Mix it in until you reach your desired texture. This recipe is flexible, so don’t worry if you want a sweeter or creamier pudding. Serving the pudding in clear glasses makes it look appealing. You can see the beautiful layers. Top with fresh mango slices for a pop of color. A sprinkle of toasted coconut flakes adds a nice crunch. For extra flair, drizzle some mango puree on top. This makes each serving look special and inviting. {{image_4}} You can switch up the mango and coconut flavor. Try adding ripe bananas instead of mango. You can also use pineapple for a tropical twist. Blend strawberries into the coconut milk for a berry delight. Each fruit brings its own taste and fun colors. This chia pudding is already vegan. Use maple syrup for sweetness. You can also swap coconut milk with almond or oat milk. These changes keep it plant-based and delicious. You get the same creamy texture and great taste. Layer your chia pudding with yogurt or granola. This adds texture and flavor. Use clear glasses to show off the layers. Top with fresh fruit, nuts, or seeds for extra crunch. You can even drizzle honey or agave syrup on top. This makes it look great and taste even better. For the full recipe, check out Tropical Mango Coconut Chia Pudding. To store your mango coconut chia pudding, first, place it in an airtight container. Use a mason jar or a bowl with a lid. This keeps the pudding fresh and tasty. Always let it cool if it's warm before sealing. If you made a big batch, divide it into smaller servings. This makes it easy to grab when you need a snack. Make sure to store your chia pudding in the fridge. It likes cool places! Avoid putting it near strong-smelling foods. Chia pudding can soak up smells. To keep it fresh, eat it within a few days. If you notice any changes in texture or smell, it’s best to toss it out. Mango coconut chia pudding lasts about 5 days in the fridge. If you want to keep it longer, you can freeze it. Just scoop your pudding into ice cube trays or freezer-safe containers. When you’re ready to eat, let it thaw in the fridge overnight. Enjoy your pudding as a sweet treat! For the full recipe, check out the details above. Mango coconut chia pudding stays fresh for about 5 days in the fridge. Be sure to keep it in a sealed container. This helps to keep it safe from air and bacteria. If you notice any odd smell or change in color, toss it out. For best taste, enjoy it within the first few days. Yes! You can use many fruits to make this pudding your own. Try berries, bananas, or kiwi. Each fruit adds its own flavor and texture. Just make sure to blend or chop them well. You can mix fresh fruit with the mango puree, too. This makes the pudding even more colorful and fun! Chia seeds are tiny powerhouses. They are full of fiber, protein, and healthy fats. Eating them can help with digestion and keep you feeling full. They also contain omega-3 fatty acids, which are good for your heart. Plus, chia seeds are rich in antioxidants. This helps your body fight off harmful substances. Overall, they are a great addition to your diet! Mango coconut chia pudding is a tasty treat packed with nutrition. We explored key ingredients, their health benefits, and substitutions. You learned how to prepare the pudding with detailed steps and tips. Avoid common mistakes and adjust for sweetness or texture easily. With fun variations and storage tips, you can make this dish your own. Remember, it’s all about creativity and freshness. Enjoy your tasty creation and share it with loved ones!

Savory Mango Coconut Chia Pudding Delight Recipe

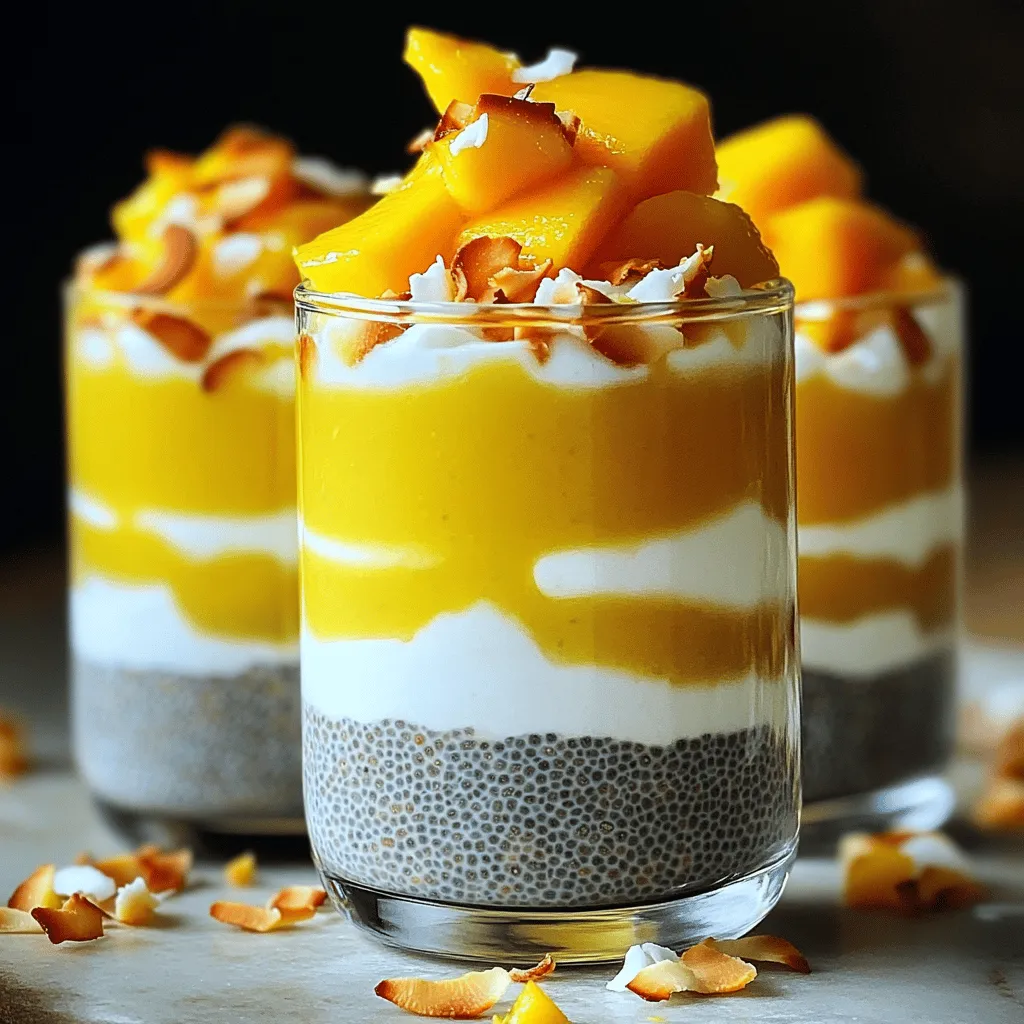
Are you ready to indulge in a sweet and healthy treat? My Savory Mango Coconut Chia Pudding Delight is a

- 1 cup rolled oats - 1 cup almond milk (or your preferred milk) - 1/2 cup pure pumpkin puree - 1/4 cup Greek yogurt (optional) - 2 tablespoons maple syrup (or honey) - 1 teaspoon pumpkin pie spice - 1/2 teaspoon vanilla extract - 1/4 cup chopped nuts (such as pecans or walnuts) - 2 tablespoons dried cranberries or raisins - Pinch of salt The main ingredients for pumpkin spice overnight oats are simple and wholesome. You start with rolled oats, which give your breakfast a nice base. You can select any milk you like, but I enjoy almond milk for its creamy texture. Pure pumpkin puree brings that cozy fall flavor. If you want creaminess, Greek yogurt is a great choice. Maple syrup adds sweetness, but you can swap it for honey if you prefer. Pumpkin pie spice is essential for that warm flavor. Don't forget vanilla extract; it enhances the taste. For texture, I love to add chopped nuts and a touch of dried fruit. They bring crunch and sweetness, making each bite exciting. A pinch of salt balances the flavors. This combination creates a delicious and filling breakfast. You can find the full recipe at the start of this article. 1. Mixing the oats and milk Start by taking a mixing bowl. Pour in 1 cup of rolled oats and 1 cup of almond milk. Stir well until all the oats soak up the milk. 2. Incorporating pumpkin and spices Next, add 1/2 cup of pure pumpkin puree to the bowl. If you want, mix in 1/4 cup of Greek yogurt for creaminess. Add 2 tablespoons of maple syrup, 1 teaspoon of pumpkin pie spice, 1/2 teaspoon of vanilla extract, and a pinch of salt. Blend everything until smooth and creamy. 3. Transferring to jars Carefully spoon the mixture into mason jars or airtight containers. Leave about an inch of space at the top for your tasty toppings. 4. Adding toppings On each jar, sprinkle 1/4 cup of chopped nuts and 2 tablespoons of dried cranberries or raisins. This adds a nice crunch and sweetness to your breakfast. - Soaking time and notes Seal the jars tightly and place them in the fridge overnight, or for at least 4 hours. This soaking time helps the oats absorb all the flavors and soften nicely. - Serving suggestions In the morning, stir the oats well. If you like them creamier, add a little more almond milk. Enjoy them cold straight from the fridge, or heat them in the microwave for about a minute. For a special touch, you can garnish with a sprinkle of pumpkin pie spice and a dollop of yogurt. Enjoy your cozy fall breakfast! You can find the full recipe above. Soaking your oats is key. This step helps them absorb liquid and soften. It makes breakfast easy and delicious. With overnight oats, the longer you soak, the creamier they become. A good soak time is at least four hours or overnight. Adjust the consistency as you like. If you want thicker oats, use less milk. For creamier oats, add more milk. You can also use Greek yogurt for extra creaminess. It’s a great way to boost flavor and texture. Enhance flavors easily. Add a pinch of cinnamon or nutmeg for warmth. Consider using different sweeteners. Honey or agave syrup can change the taste. You can also mix in fruits like bananas or apples. They add natural sweetness and fun textures. Making a big batch is smart. Prepare several jars at once for easy breakfasts. This saves time and makes mornings stress-free. Just double or triple the recipe. Store jars in the fridge for quick grab-and-go meals. For storage, use airtight containers. This keeps your oats fresh for up to five days. Make sure to label each jar with the date. Keep an eye on them, so you enjoy them at their best. {{image_4}} To make vegan pumpkin spice overnight oats, you can switch out the Greek yogurt. Use a plant-based yogurt, like coconut or almond yogurt. This keeps the creaminess without any dairy. For sweeteners, maple syrup works great. You can also try agave nectar or date syrup. These options keep your oats sweet and flavorful. When you need gluten-free oats, choose certified gluten-free rolled oats. This ensures they are safe to eat. If you want added texture, think about using chia seeds or sunflower seeds as toppings. They give a nice crunch and boost nutrition. Enjoy experimenting with these simple swaps! Pumpkin spice overnight oats stay fresh for about 3 to 5 days in the fridge. Store them in airtight containers or mason jars. This keeps the oats moist and flavorful. Make sure to seal them tightly to avoid any odor absorption. If you have toppings like nuts or dried fruit, keep them separate. This prevents them from getting soggy. You can freeze your pumpkin spice oats for up to 3 months. Just make sure to use freezer-safe containers. Portion them out, so you can grab one when needed. To reheat, simply thaw them in the fridge overnight. When ready to eat, microwave for 1 to 2 minutes. Stir well and add a splash of almond milk if they seem thick. Enjoy the cozy flavors anytime! You can store Pumpkin Spice Overnight Oats in the fridge for up to five days. Use airtight containers to keep them fresh. The flavors will deepen over time, making each bite tastier. Yes, you can use steel-cut oats. However, they need more time to soak. I recommend soaking them overnight in milk. This way, they will soften and absorb flavors well. You can add protein powder to your oats. Greek yogurt is another great option. Chia seeds or nut butter also boost protein while adding nice flavors. To reduce sugar, use less maple syrup. You can also try unsweetened almond milk. Adding ripe bananas can naturally sweeten the oats without extra sugar. Yes, you can skip the pumpkin puree. Try using mashed bananas or applesauce instead. This will give your oats a smooth texture and sweet taste. Overnight oats are healthy because they are high in fiber. They help with digestion and keep you full. Oats are also packed with vitamins and minerals, supporting your overall health. In this blog post, we explored how to make Pumpkin Spice Overnight Oats. We covered the main ingredients, step-by-step instructions, and tips for a creamy texture. You learned how to customize your oats for vegan and gluten-free diets. We also discussed how to store them for fresh enjoyment later. Overnight oats are an easy and tasty choice for your morning routine. Try variations and make this recipe yours. Enjoy the flavors and health benefits every day!

Pumpkin Spice Overnight Oats Flavorful and Easy Recipe

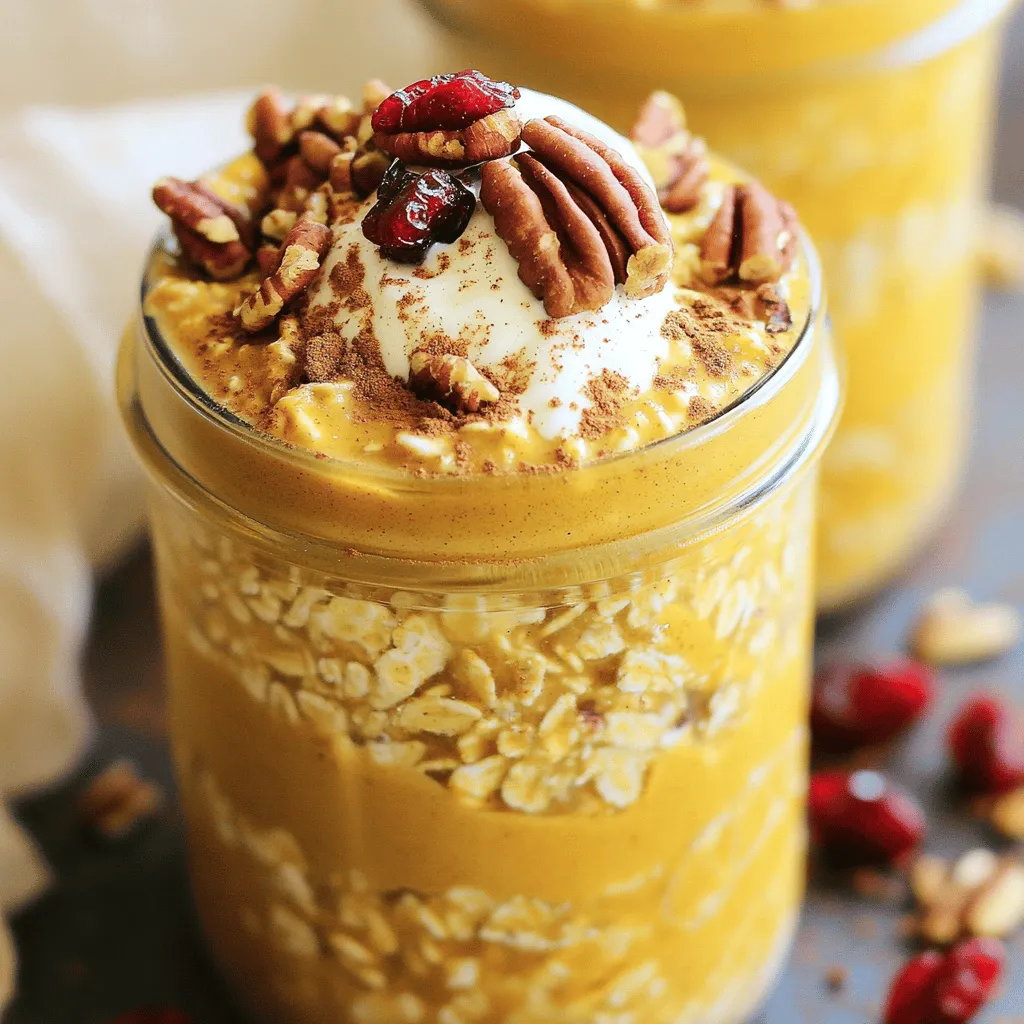
Are you ready to bring the cozy flavors of fall to your breakfast table? Pumpkin spice overnight oats are not

Creating Buffalo Cauliflower Bites starts with gathering the right ingredients. Here’s what you’ll need: - 1 large head of cauliflower, cut into bite-sized florets - 1 cup all-purpose flour - 1 teaspoon garlic powder - 1 teaspoon onion powder - 1 teaspoon smoked paprika - 1 cup water or plant-based milk (like almond or oat milk) - 1 cup buffalo sauce (adjust spiciness to your taste) - 2 tablespoons olive oil - Salt and black pepper to taste - Fresh parsley, finely chopped (for garnish) - Optional: Celery sticks and ranch or blue cheese dressing for serving These ingredients create a tasty snack packed with flavor. The cauliflower acts as the perfect base, while the batter adds texture and crunch. The buffalo sauce gives it that spicy kick we all love. For a fun twist, serve it with celery sticks and your favorite dipping sauce. You can find the complete preparation details in the Full Recipe above. 1. Preheat your oven to 450°F (230°C). This helps the bites get crispy. 2. Line a baking sheet with parchment paper. This prevents sticking and makes cleanup easy. 3. In a large bowl, mix all-purpose flour, garlic powder, onion powder, smoked paprika, salt, and black pepper. Whisk until combined. 4. Slowly add water or plant-based milk to the dry mix. Stir until the batter is smooth and thick enough. 1. Take each cauliflower floret and dip it into the batter. Make sure each piece is fully coated. 2. Place the battered florets on the prepared baking sheet. Leave space between them for even baking. 1. Bake the cauliflower bites in the oven for about 20 minutes. They should turn golden and crispy. 2. While they bake, mix buffalo sauce with olive oil in a bowl. Adjust the spice level to your taste. 3. After 20 minutes, take the bites out of the oven. Drizzle the buffalo sauce mixture over them. Toss gently to coat. 4. Put the bites back in the oven for an extra 10 minutes. This helps the sauce stick and makes them crispier. 5. Once baked, let them cool a bit. Sprinkle fresh parsley over the top for color and flavor. This recipe gives you flavorful Buffalo Cauliflower Bites that are fun to eat. To make your Buffalo Cauliflower Bites crispy, here are a few key steps: - Use high heat: Baking at 450°F (230°C) ensures a crunchy outside. - Don't overcrowd the pan: Give each floret space on the baking sheet. This allows hot air to circulate around them. - Flip halfway: Turn the cauliflower halfway through baking for even crispiness. If you want to adjust the sauce's spice level, follow these tips: - Start with mild sauce: Use a less spicy buffalo sauce if you prefer mild heat. - Add extras: Mix in honey or maple syrup for sweetness to balance the heat. - Serve with cooling dips: Ranch or blue cheese dressing can help tone down the spice. When serving Buffalo Cauliflower Bites, consider these dips: - Ranch dressing: A classic choice, it adds creaminess. - Blue cheese dressing: Perfect for those who love bold flavors. - Guacamole: A fresh, creamy option that adds a fun twist. For creative plating ideas, try these: - Use a large platter: Arrange the bites in a circle with dips in the center. - Add garnishes: Fresh parsley and celery sticks make a colorful display. - Serve in mini cups: This adds a fun touch and makes for easy snacking. For the full recipe, check out the detailed steps above. {{image_4}} You can mix up the flavors of your cauliflower bites easily. Instead of buffalo sauce, try teriyaki or BBQ sauce. Both add a sweet twist. You can also use hot honey for a spicy-sweet treat. For those who follow a vegan or gluten-free diet, use almond flour instead of regular flour. You can swap the buffalo sauce for a gluten-free version to keep it safe for all diets. Buffalo cauliflower bites make a great appetizer or a fun main dish. When serving as an appetizer, pair them with celery sticks and a side of ranch or blue cheese dressing. If you want to make it a meal, serve the bites with a fresh salad, like a simple green salad or coleslaw. This adds a nice crunch and balances the heat. You can even serve them with rice or quinoa for a hearty dish. Check the full recipe for more ideas! After enjoying your Buffalo Cauliflower Bites, store any leftovers in an airtight container. This keeps them fresh and tasty. Place the container in the fridge. They will stay good for about 3-5 days. When reheating, use the oven for the best results. Preheat it to 350°F (175°C). Place the bites on a baking sheet. Heat them for about 10-15 minutes. This method helps keep them crispy. You can also use an air fryer for quick reheating. Set it to 350°F (175°C) and cook for about 5-7 minutes. Yes, you can freeze Buffalo Cauliflower Bites! This is a great way to save some for later. First, let the bites cool completely after cooking. Then, place them in a single layer on a baking sheet. Freeze them for about an hour. This prevents them from sticking together. After they freeze, transfer the bites to a freezer-safe bag. Make sure to remove as much air as possible. They can stay in the freezer for up to 2 months. To reheat, take them out of the freezer. There is no need to thaw. Preheat your oven to 400°F (200°C). Bake the frozen bites for about 15-20 minutes. Keep an eye on them until they are hot and crispy again. Enjoy your tasty snack anytime! For the full recipe, refer back to the original instructions. Yes, you can make Buffalo Cauliflower Bites ahead of time. Prepare the bites and bake them as directed. Once baked, let them cool completely. Store them in an airtight container in the fridge for up to three days. When ready to eat, reheat them in the oven for about 10 minutes at 350°F (175°C). Reheating restores their crispiness. If you want to try something different, you can use broccoli florets. Broccoli gives a nice crunch and flavor. Another option is chickpeas. They offer a hearty texture and absorb the sauce well. Both choices add fun twists to this recipe. To make this recipe spicier, add more buffalo sauce or include hot sauce in the batter. You can also use a spicy buffalo sauce. If you prefer it milder, use less buffalo sauce and mix in a bit of honey or maple syrup. This balances the heat with sweetness. Adjust to your taste for the perfect bite! Buffalo Cauliflower Bites are simple to make and tasty. We covered the key ingredients, from the batter to the sauce. I shared steps for preparation, coating, and baking. You learned tips for crispiness and how to serve them well. We also explored fun variations and how to store leftovers. Experiment with flavors or try new sauces to keep it exciting. Enjoy creating this dish and impress your friends!

Buffalo Cauliflower Bites Flavorful and Fun Snack

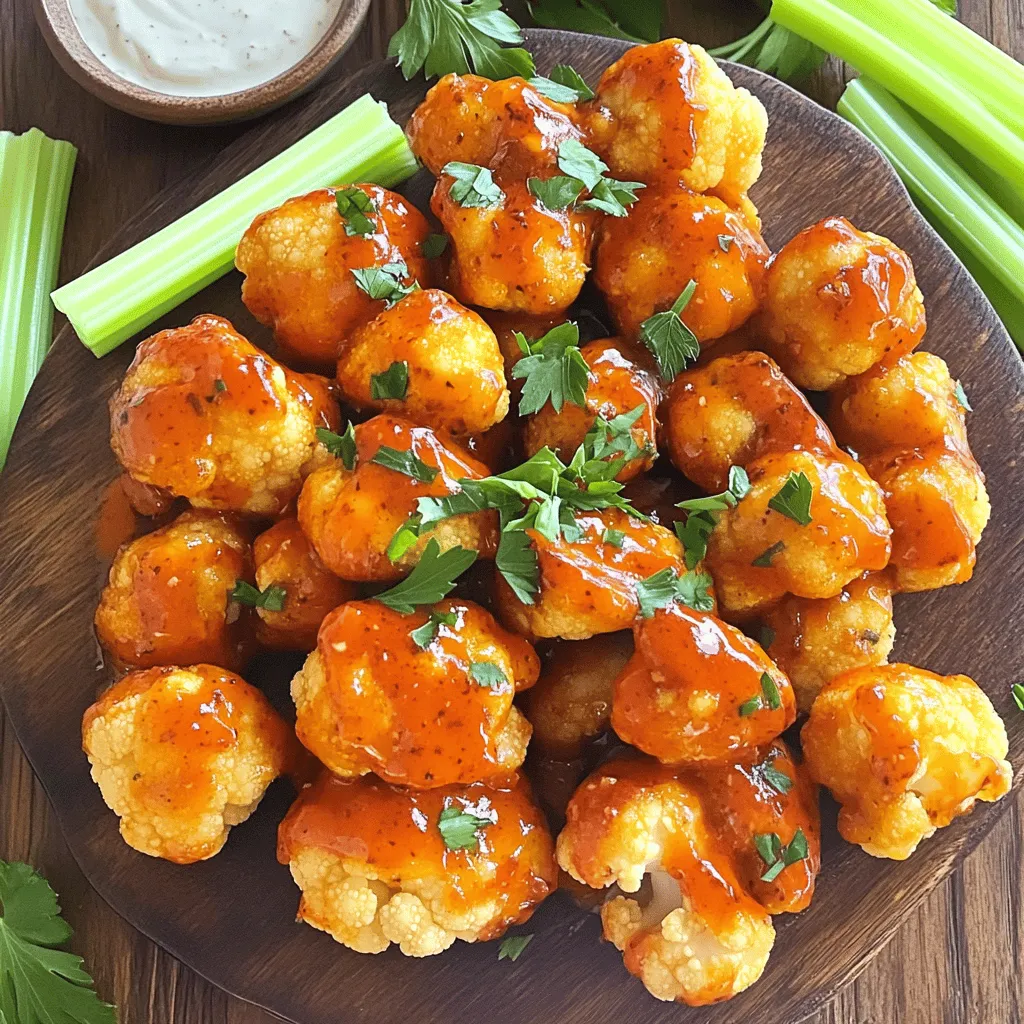
Looking for a fun snack that packs a punch? You’re in the right place! Buffalo Cauliflower Bites are the perfect

- 1 sheet of puff pastry, thawed Puff pastry serves as the flaky base. It puffs up beautifully when baked. This creates a nice texture that contrasts with the soft filling. - 4 large onions, thinly sliced Onions are the star here. Caramelizing them brings out their natural sweetness. They add depth and richness to the tart. - 2 tablespoons olive oil Olive oil helps cook the onions slowly. It adds flavor and prevents sticking while caramelizing. - 1 tablespoon balsamic vinegar Balsamic vinegar adds tanginess and complexity. It balances the sweetness of the onions perfectly. - 1 teaspoon granulated sugar Sugar accelerates the caramelization process. It enhances the natural sweetness of the onions. - 6 oz goat cheese, crumbled Goat cheese provides a creamy and tangy contrast. Its unique flavor complements the sweet onions well. - 1 teaspoon fresh thyme leaves Thyme brings an earthy flavor. It enhances the overall taste and aroma of the tart. - Sea salt and freshly cracked black pepper to taste These seasonings boost all the flavors. They are essential for a well-balanced dish. - 1 egg, beaten (for an egg wash) The egg wash gives the pastry a beautiful golden color. It adds an appealing shine to the finished tart. - Fresh arugula for garnish (optional) Arugula adds a peppery note and vibrant color. It makes the dish more visually appealing and fresh. Using these ingredients, you will create a delicious Caramelized Onion and Goat Cheese Tart that is sure to impress. For the full recipe, refer to the earlier section. Preheating the oven is key to a great tart. Set your oven to 400°F (200°C). This heat helps the pastry rise and turn golden. When you caramelize onions, patience is important. Start with a large skillet and add 2 tablespoons of olive oil. Heat it over medium heat. Add 4 sliced onions and cook them slowly. Stir occasionally for 15-20 minutes. The onions should soften and turn a rich, brown color. After they caramelize, add 1 tablespoon of balsamic vinegar and 1 teaspoon of sugar. Mix them in well and season with sea salt and black pepper. Cook for another 5 minutes, then remove from heat. Let the mixture cool slightly. Now, let’s work with the puff pastry. Take 1 sheet of thawed puff pastry and roll it out on a floured surface. Make it large enough for a 12-inch tart pan. Press the pastry gently into the pan and trim off any extra edges. Use a fork to poke holes in the bottom. This step stops it from bubbling up. Next, layer your filling. Spread the caramelized onion mix evenly over the pastry. Crumble 6 oz of goat cheese on top. Add 1 teaspoon of fresh thyme leaves for extra flavor. It’s time to bake! Brush the edges of the pastry with a beaten egg. This makes the crust shiny and golden. Place the tart in the oven and bake for 25-30 minutes. You want the pastry to puff up and look brown. Once done, take it out and let it cool for a few minutes. Cooling helps keep the texture just right. After a short wait, slice the tart into wedges. Enjoy this dish warm or at room temperature. For a pop of color, add fresh arugula on top if you’d like. Check the Full Recipe for more details. To get sweet, rich onions, heat your skillet over medium heat. Add the olive oil first, then the sliced onions. Stir them often. This helps them cook evenly. Sprinkle in a little sugar for extra sweetness. Cook for 15 to 20 minutes. Watch them closely to avoid burning. If they start to darken too quickly, lower the heat. You want a deep golden color, not black. Using an egg wash gives your tart a shiny finish. It helps the crust become golden and crisp. To apply it, beat one egg in a bowl. Use a pastry brush to coat the edges of the pastry. This method creates a professional look. Make sure to brush gently to avoid tearing the dough. When serving your tart, think about what goes well with it. Fresh arugula adds a nice peppery crunch. You can drizzle some olive oil and lemon juice on the arugula for more flavor. A light salad pairs well too. For drinks, try a crisp white wine or a fruity rosé. These wines balance the richness of the goat cheese. Enjoy exploring these flavor combinations with your tart. For the complete recipe, check out the Full Recipe. {{image_4}} You can switch up the cheese in your tart. Feta adds a nice tang. Cream cheese gives a rich, smooth texture. For a bold flavor, try blue cheese. If you want a vegan option, use almond or cashew cheese. These alternatives still provide creaminess without dairy. They also fit well with the tart's sweet onions. Make the tart shine with seasonal veggies. In spring, add asparagus or peas for a fresh taste. Summer tomatoes can bring brightness, while roasted butternut squash is great in the fall. You can also play with herbs and spices. A bit of rosemary or sage can add depth. Try mixing in some chili flakes for a kick. This tart works well as both an appetizer and a main dish. Slice it smaller for a party, serving it with a dip. A light yogurt sauce or balsamic glaze can enhance the flavor. For a heartier meal, pair it with a salad or soup. This way, you enjoy a complete dining experience. Explore the [Full Recipe] for more ideas on ways to enjoy your tart! To keep your tart fresh, store leftovers in the fridge. Place the tart in an airtight container or cover it tightly with plastic wrap. This helps prevent the crust from drying out. Consume the leftovers within three days for the best taste. When reheating, avoid the microwave if possible. Instead, use an oven or toaster oven. Preheat your oven to 350°F (175°C). Place the tart on a baking sheet and cover it loosely with foil. Heat for about 10-15 minutes. This method keeps the pastry crisp and warm without becoming soggy. For freezing, you can freeze both uncooked and cooked tarts. If freezing uncooked, wrap the tart in plastic wrap and then in foil. For cooked tarts, let them cool first, then wrap them tightly. To thaw, move the tart to the fridge overnight. Bake it straight from the fridge to maintain a nice texture. Caramelizing onions takes about 20 to 30 minutes. Start with medium heat and stir often. If you cook them too fast, they may burn. The goal is to get them soft and golden brown. Factors like onion type and pan size can affect timing. Yellow onions work best due to their natural sweetness. Yes, you can prepare the tart ahead of time. Make the caramelized onions and pastry in advance. Store them separately in the fridge. Assemble the tart right before baking. This keeps the pastry fresh. You can also bake the tart ahead. Just be sure to reheat it gently to keep it crisp. Yes, there are gluten-free options for pastry. You can use a gluten-free pie crust or a store-bought gluten-free puff pastry. Ensure it’s thawed and ready to roll out. For a homemade version, try almond flour or rice flour dough. Just remember, the texture may differ from classic puff pastry. If you need a goat cheese substitute, try feta or ricotta. Feta has a similar tangy flavor and crumbly texture. Ricotta is softer but offers a creamy base. You can also use cream cheese with herbs for a rich taste. Adjust the amount to match your flavor preference. You can use frozen onions, but there are pros and cons. Frozen onions save time and are convenient. They are already diced and ready to cook. However, they may not caramelize as well as fresh ones. Fresh onions offer a sweeter taste and better texture. If using frozen, sauté them until any excess moisture is gone. For more details, check the Full Recipe. This article covered how to make a delicious tart with puff pastry, onions, and goat cheese. We discussed preparing, assembling, baking, and storing this dish for great taste. You learned tips for caramelizing onions and how to achieve a golden pastry finish. Remember, you can play with different cheeses and seasonal veggies for fun twists. Enjoy your cooking and try new flavors! Your tart will impress everyone around the table. Keep exploring and perfecting your skills in the kitchen!

Caramelized Onion and Goat Cheese Tart Delight

Welcome to the delicious world of the Caramelized Onion and Goat Cheese Tart Delight! This tart is bursting with flavor

- Greek yogurt options: You can choose plain or flavored Greek yogurt. Plain yogurt has a tangy taste. Flavored yogurt adds sweetness and fun flavors. Both work well, so pick what you like best. - Sweetener alternatives: You can add honey or maple syrup to your yogurt. Honey gives a rich taste, while maple syrup offers a unique flavor. If your yogurt is sweet enough, you might skip the sweetener. - Topping options: The toppings make your yogurt bark exciting. You can use mixed berries like strawberries, blueberries, and raspberries for a fruity burst. Sliced banana adds creaminess. Granola gives crunch, while shredded coconut adds a tropical twist. Mini chocolate chips are fun for a little sweetness. All these choices let you create a treat that fits your taste. Enjoy making your own combination of flavors! For the full recipe, check out the details above. Start with 2 cups of Greek yogurt. You can use plain or flavored yogurt. In a medium bowl, whisk the yogurt and sweetener together. If you want extra sweetness, add 1 tablespoon of honey or maple syrup. Mix until the yogurt is smooth and creamy. This step is key for a tasty bark. A smooth consistency helps all the flavors blend well. Grab a baking sheet and line it with parchment paper. This makes it easy to remove the bark later. If you skip this step, the bark may stick. Make sure to cover the sheet well. This small detail saves time when serving. Pour the yogurt mixture onto the lined baking sheet. Use a spatula to spread it out evenly. Aim for a layer about 1/4-inch thick. Next, add your toppings. Scatter the mixed berries and banana slices over the yogurt. Sprinkle granola, shredded coconut, and mini chocolate chips on top. Press down gently on the toppings. This helps them stick to the yogurt. Now it’s time to freeze the bark. Place the baking sheet in the freezer for 2-3 hours. You want the bark to be firm to the touch. After freezing, take it out and lift the bark from the parchment paper. Break it into bite-sized pieces. You can use your hands or a knife. Enjoy your fruity frozen yogurt bark right away. If you want, store the pieces in an airtight container in the freezer for up to 2 weeks. You can make frozen yogurt bark your own. Here are a few ideas: - Adding Different Fruits or Toppings: Try using your favorite fruits. You can add mango, kiwi, or even peaches. Nuts or seeds can give a nice crunch. Just remember to chop them small for easy bites. - Experimenting with Yogurt Flavors: You can use different yogurt flavors. Vanilla, strawberry, or coconut yogurt all work great. Each variation adds a fun twist to your bark. Getting the right texture is key to the best bark. - Importance of Freeze Time: Be patient when freezing. You need to freeze the bark for at least 2-3 hours. If you rush this step, your bark may not hold together well. - Maintaining the Right Thickness for Easy Breakage: Aim for about 1/4-inch thickness when spreading the yogurt. This thickness helps it break easily into pieces. If it’s too thick, it might be hard to snap apart. {{image_4}} You can get creative with frozen yogurt bark! Here are two fun ideas: - Tropical Fruit Version: Use ripe mango and fresh pineapple. These fruits add a sweet, tangy flavor that feels like a mini-vacation. Just chop them up and sprinkle them on top of your yogurt base. - Chocolate Lover's Version: Mix in cocoa powder and sprinkle dark chocolate on top. This creates a rich and indulgent treat. You can even add mini chocolate chips for extra fun. If you want a nut-free option, don't worry! Here are some ideas: - Using Seeds: Instead of nuts, use sunflower seeds or pumpkin seeds. They give a nice crunch and are safe for nut-free diets. - Yogurt Substitutes: If you need a dairy-free option, try almond or coconut yogurt. These alternatives work well and keep your bark creamy. Feel free to explore these ideas. Each variation brings its own twist to the classic frozen yogurt bark. To keep your frozen yogurt bark fresh, use an airtight container. This helps block out moisture and air. I recommend using a container that fits the bark’s size well. If it's too big, the bark can get freezer burn. Before storing, make sure the bark is fully frozen. This will help it keep its shape. Place parchment paper between layers of bark if you stack them. This way, they won’t stick together. You can store your frozen yogurt bark for up to two weeks. After that, it may lose flavor and texture. Always check the bark before eating. Look for signs of freezer burn, like white or gray patches. If you see these, it’s best to toss the bark. Enjoy your fruity frozen yogurt bark as soon as you can for the best taste! Frozen yogurt bark is a simple treat made from yogurt. You spread yogurt on a baking sheet and add toppings. After freezing, you break it into pieces. It’s a fun and healthy snack! Yes, you can use non-dairy yogurt! Look for options like almond, coconut, or soy yogurt. These work well and taste great. Just check the label for added sugars. To make your frozen yogurt bark healthier: - Use low-fat yogurt or Greek yogurt. - Skip the sweetener if your yogurt is sweet enough. - Add more fruits and cut back on granola or chocolate. These small changes help lower calories. You can get creative with toppings! Here are some great options: - Mixed berries (strawberries, blueberries, raspberries) - Sliced bananas - Granola for crunch - Shredded coconut for flavor - Mini chocolate chips for a sweet touch Mix and match your favorites for a unique bark! For the full recipe, check out the details provided earlier. Frozen yogurt bark is simple and fun to make. You learned about the key ingredients, step-by-step instructions, and tips for customizing your own version. Remember to choose your yogurt and sweeteners wisely. The right toppings add flavor and texture. Store it properly to keep it fresh for longer. Try new flavors like tropical or chocolate! Feel free to enjoy this treat as a light snack or dessert. With a little creativity, you can make frozen yogurt bark your way. Happy making and enjoying!

Frozen Yogurt Bark Delightful and Easy Treat Recipe

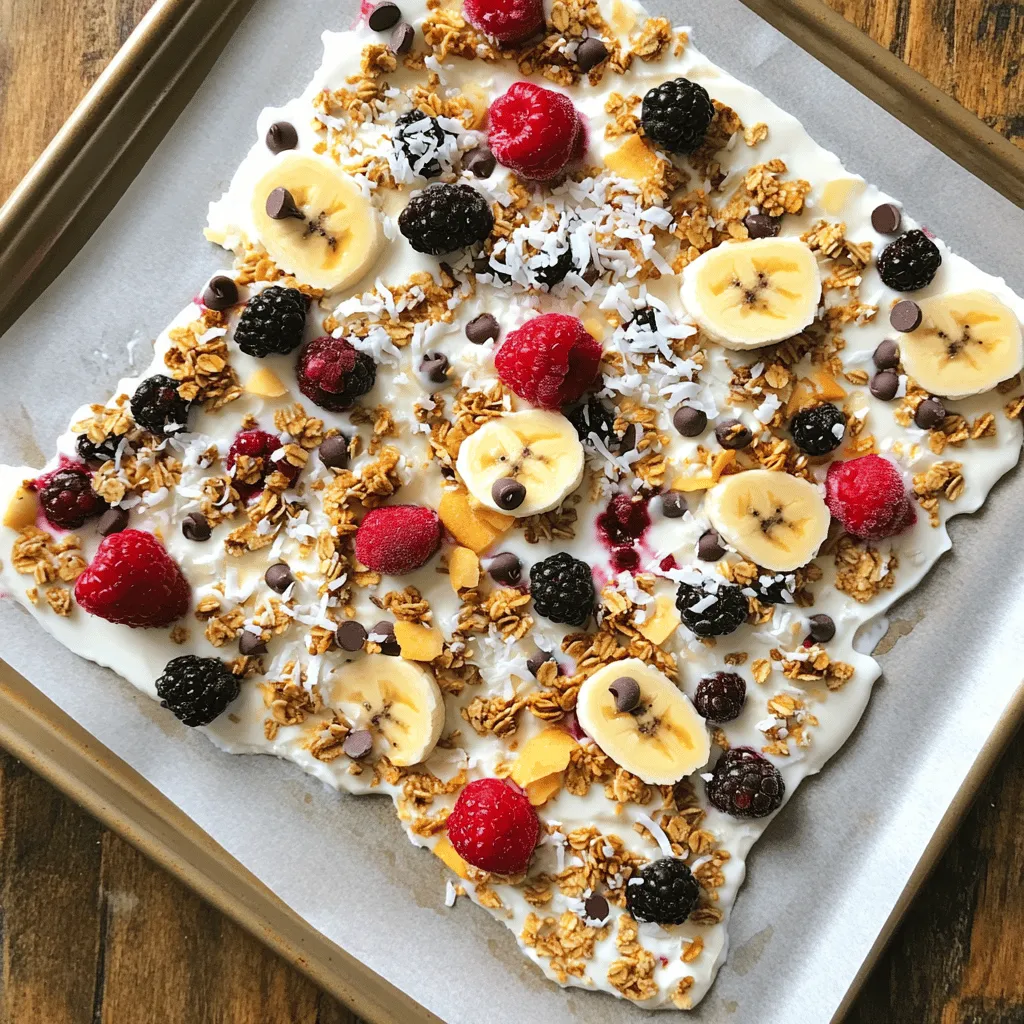
Looking for a delightful and easy treat? Let me introduce you to Frozen Yogurt Bark! This fun and simple recipe

To create a mouthwatering chocolate lava cake, gather these ingredients: - ½ cup unsalted butter (plus extra for greasing) - 1 cup semi-sweet chocolate chips - 2 large eggs - 2 large egg yolks - ½ cup granulated sugar - ¼ cup all-purpose flour - ¼ teaspoon salt - 1 teaspoon vanilla extract - Powdered sugar (for dusting) - Optional: Fresh berries and whipped cream for serving The butter and chocolate play a key role in the molten center. They melt together, creating a rich, gooey filling. The heat of the oven cooks the outer layer, while the inside stays soft and liquid. Eggs are crucial for texture and structure. They help the cake rise and hold its shape. The whites add lift, while the yolks keep it moist. This combination gives the cake its special softness. If you need gluten-free or dairy-free options, you can make simple swaps. Use gluten-free flour instead of all-purpose flour. For a dairy-free version, swap butter with coconut oil and use dairy-free chocolate. Choosing high-quality chocolate is vital. Look for chocolate with at least 60% cocoa solids for rich flavor. Higher quality chocolate makes a noticeable difference in taste. Start by greasing your ramekins with unsalted butter. Use a paper towel to spread it evenly. This step helps the cakes slide out easily after baking. After greasing, dust a little flour inside each ramekin. Shake out the excess flour. This extra step prevents sticking and ensures a clean release. Next, preheat your oven to 425°F (220°C). Preheating is very important. It helps the cakes bake evenly. If your oven is not hot enough, the cakes may not rise correctly. For the batter, melt the butter and semi-sweet chocolate chips together. Place them in a microwave-safe bowl. Heat this mixture in the microwave for 30 seconds at a time. Stir well after each interval. This method helps avoid burning. Once melted, let it cool for a few minutes. While the chocolate cools, whisk the eggs, egg yolks, and granulated sugar in a mixing bowl. Use a hand whisk or electric mixer. Whisk for 2-3 minutes. You want the mixture to turn pale and frothy. This step adds air and helps your cakes rise. Now, pour the cooled chocolate into the egg mixture. Stir gently until combined. Next, fold in the flour, salt, and vanilla extract. Mix just until combined. Avoid overmixing to keep the texture light. Now it’s time to bake! Spoon the batter into the prepared ramekins. Fill each one about three-quarters full. This gives them room to rise without spilling over. Place the ramekins on a baking sheet for easy handling. Bake in your preheated oven for 12-14 minutes. The edges should be firm, while the center remains soft. To check for doneness, look for a slight jiggle in the center. Once baked, take them out and let them sit for 1 minute. To loosen the cakes, run a butter knife around the edges. Then, invert each ramekin onto a plate. Tap gently to release the cakes. Your chocolate lava cakes are now ready to enjoy! For the full recipe, check the earlier section. To get that perfect gooey center, follow these simple tips. First, avoid overbaking your cakes. Bake them for 12 to 14 minutes. The edges should be firm, and the center must jiggle slightly. If you bake too long, the center will cook through. Timing is key. Set a timer and check your cakes a minute or two before the end. This way, you can catch them at just the right moment. Remember, every oven is different, so adjust as needed. Making your lava cakes look great is easy and fun. After you bake and invert them, dust the tops with powdered sugar. This gives a lovely finish. You can also add fresh berries on the side for color. Try serving with a dollop of whipped cream. It adds a creamy touch. For an extra special treat, drizzle chocolate sauce around the plate. This makes your dessert look even more inviting. Sometimes, things don’t go as planned. If your cakes are overbaked, they won't have the gooey center. If they are underbaked, they may collapse. For overbaked cakes, consider serving them with ice cream to add moisture. For underbaked cakes, you can pop them back in the oven for a minute. If you spill batter when filling ramekins, don’t worry! Just wipe the edges with a paper towel before baking. This helps them look neat when served. For the full recipe, check the earlier section. Happy baking! {{image_4}} You can play with chocolate types in your lava cake. Use dark chocolate for a rich taste. White chocolate gives a creamy twist. You might also try flavored chocolates like raspberry or orange. To add depth, mix in spices like cinnamon or a dash of espresso. Vanilla extract enhances sweetness, while peppermint extract adds a festive touch. Vegan options are easy with a few swaps. Use applesauce or a flaxseed mix instead of eggs. For keto diets, substitute regular sugar with a keto-friendly sweetener. Almond flour works well in place of all-purpose flour, but check for nut allergies. Always read labels when choosing ingredients to keep everyone safe. Mini lava cakes are fun and cute. Use muffin tins for smaller portions. They bake faster, so keep an eye on them! You can also serve lava cakes as sundaes. Top with ice cream, chocolate sauce, and fresh fruit for a tasty treat. For a fancy touch, add whipped cream and sprinkle with nuts or sprigs of mint. Store leftover lava cakes in an airtight container. This keeps them fresh. For short-term storage, put them in the fridge. They last about two days. For long-term storage, wrap them tightly and freeze. To reheat, use the oven. Set it to 350°F (175°C) and heat for about 10 minutes. This method warms them without overcooking. You can freeze both unbaked and baked lava cakes. For unbaked cakes, fill the ramekins and cover them tightly with plastic wrap. Freeze until solid. For baked cakes, let them cool completely before wrapping. To defrost, move them to the fridge overnight. Then, bake frozen unbaked cakes directly from the freezer. Bake them for an extra minute or two to ensure the center is molten. In the fridge, lava cakes stay fresh for about two days. If they smell off or have a dry texture, they may be spoiled. Look for any signs of mold or odd colors. If you see any of these, it’s best to toss them. Enjoy the deliciousness while it lasts! For the full recipe, refer to the beginning of the article. To prevent sticking, start by generously greasing each ramekin with unsalted butter. Use a pastry brush or paper towel to cover every surface. This gives your cake a smooth release. Next, dust the greased ramekins with flour. Tilt each ramekin to coat the sides evenly, then tap out the excess flour. This method creates a non-stick barrier, ensuring your lava cake comes out perfectly every time. Serve chocolate lava cake warm for the best experience. The center should be gooey and rich, while the outer layer is firm. The perfect serving temperature is around 120°F (49°C). This warmth enhances the chocolate flavor. You can use a food thermometer to check. If you don't have one, let the cakes cool for about one minute after baking, then serve right away. Yes, you can prepare the batter ahead of time. Make the batter and store it in the fridge for up to 24 hours. When ready to bake, just pour the chilled batter into the greased ramekins. You may need to add an extra minute or two to the baking time if the batter is cold. This method saves time and lets you enjoy a fresh dessert with minimal effort. For the full recipe, check the recipe section. In summary, we explored the key ingredients and steps to create delicious lava cakes. You learned about the roles of butter, chocolate, and eggs, along with alternatives for dietary needs. We broke down the process for prepping ramekins and baking times to ensure a perfect molten center. Plus, we shared tips for storage and creative serving ideas. Remember, practice makes perfect, and experimenting can lead to exciting variations. Enjoy your baking journey!

Chocolate Lava Cake Irresistible Dessert Recipe

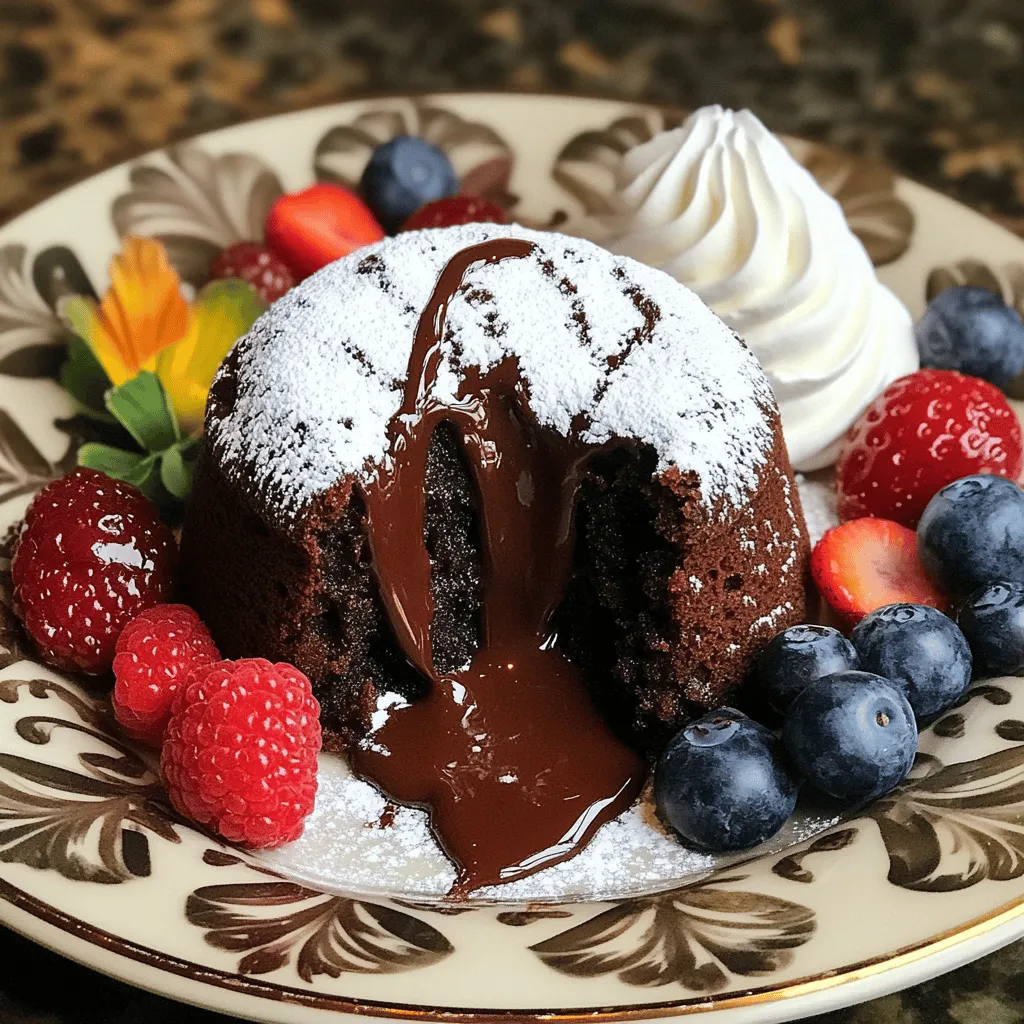
Indulge your sweet tooth with this easy Chocolate Lava Cake recipe! I’ll show you how to create a rich, gooey

- 1 can (15 oz) chickpeas, drained and thoroughly rinsed - 2 tablespoons extra virgin olive oil - 1 teaspoon smoked paprika - 1/2 teaspoon garlic powder - Sea salt and freshly cracked black pepper, to taste - 4 cups mixed salad greens (lettuce, spinach, arugula) - 1 cup cherry tomatoes, halved - 1 cucumber, diced - 1/4 red onion, thinly sliced - 1 ripe avocado, sliced - 1/4 cup feta cheese, crumbled (optional) - 2 tablespoons fresh lemon juice - 1 tablespoon balsamic vinegar - Fresh parsley, chopped, for garnish Gathering fresh ingredients makes a huge difference. I love using canned chickpeas for ease, but you can cook dried ones if you prefer. The olive oil adds a rich flavor and helps with roasting. Smoked paprika and garlic powder give the chickpeas a tasty kick. Choosing greens is key for this salad. I like a mix of lettuce, spinach, and arugula. The cherry tomatoes add sweetness, while the cucumber brings a nice crunch. Red onion provides a little bite, and the avocado adds creaminess. If you want to, sprinkle some feta cheese for extra flavor. For the dressing, fresh lemon juice and balsamic vinegar create a bright taste. Use sea salt and pepper to season everything just right. Once you have all the ingredients ready, you can create a fresh, vibrant salad. If you want the full recipe, check out the Crispy Chickpea Salad section. - Preheat the oven to 400°F (200°C): This step is key. A hot oven helps chickpeas crisp up nicely. - Prepare the chickpeas for roasting: Take a clean baking sheet. Add the drained and rinsed chickpeas. Drizzle in the olive oil, smoked paprika, garlic powder, sea salt, and pepper. Toss well to coat. Spread them out in a single layer. - Roast the chickpeas until crispy: Place the baking sheet in the oven. Roast the chickpeas for 20-25 minutes. Halfway through, shake the pan gently to help them crisp evenly. They are done when golden brown and crunchy. - Mix the salad base ingredients: In a large bowl, toss together the mixed salad greens, halved cherry tomatoes, diced cucumber, and sliced red onion. Mix well so every bite has flavor. - Whisk together the dressing: In a small bowl, combine fresh lemon juice, balsamic vinegar, and a pinch of salt and pepper. Whisk until smooth. Taste and adjust for your liking. - Combine roasted chickpeas with salad ingredients: Once your chickpeas are cool, add them to the salad. Drizzle the dressing over the top. Toss gently to combine without bruising the greens. Follow these steps for a crispy chickpea salad that bursts with flavor and is a delight to eat. For the full recipe, check the details above. To make crispy chickpeas, start by rinsing them well. Rinsing removes excess starch. This helps the chickpeas get extra crunchy. After rinsing, pat them dry with a clean towel. This step is key for crispiness. Next, set your oven to 400°F (200°C). This temperature is perfect for roasting. It allows the chickpeas to cook evenly and become golden. Roast them for 20 to 25 minutes. Keep an eye on them to avoid burning. Don't forget to shake the pan halfway through cooking. This ensures all sides get crispy. When they are done, they should look golden brown. Let them cool a bit, and they will get even crunchier. For plating, use a large, shallow bowl. This lets the colors shine. You can also place some crispy chickpeas on top. This adds a nice texture and visual appeal. To enhance flavor, consider adding toppings. Sliced radishes, nuts, or seeds work well. You can also sprinkle fresh herbs, like cilantro or dill. Pair this salad with grilled chicken or fish for a complete meal. A light soup or a crusty bread also complements it nicely. Enjoy your flavorful crispy chickpea salad! For the complete recipe, check out the Full Recipe. {{image_4}} You can easily change the greens in your salad. Try kale, spinach, or even romaine. Each green brings a unique taste and texture. If you want protein, swap chickpeas for black beans or lentils. These options add a different flair while keeping the dish hearty. For a cheesy touch, look for non-dairy cheese like cashew cheese. It melts well and adds creaminess without dairy. If you want a creamy dressing, try yogurt or tahini. These options add richness that pairs well with the crispy chickpeas. You can also use flavored vinegars or fresh lemon juice for a tangy kick. Think about adding herbs like dill or basil to the dressing. Fresh herbs can boost flavor and make the salad more vibrant. Check out the Full Recipe to see how to mix and match these ideas. To keep your salad fresh, store it in the fridge. Place the salad in a container with a tight lid. This helps keep it crisp. For best results, eat the salad within two days. If you have leftover chickpeas, store them separately. Use an airtight container for the chickpeas to prevent sogginess. They can last up to four days when stored properly. To re-crisp your chickpeas, preheat your oven to 375°F (190°C). Spread the chickpeas on a baking sheet in a single layer. Bake them for about 10 minutes. This will help restore their crunch. Avoid using a microwave as it can make them soft. Instead, keep them crispy by reheating in the oven. Enjoy your salad with fresh, crunchy chickpeas! Can I make this salad ahead of time? Yes, you can make this salad ahead of time. Prepare the chickpeas and salad base separately. Store them in airtight containers in the fridge. When you are ready to serve, mix them together with the dressing. This keeps everything fresh and tasty. How can I make the salad vegan-friendly? To make this salad vegan-friendly, skip the feta cheese. You can use a dairy-free cheese or leave it out. The chickpeas and greens will still offer great flavor. What can I serve with crispy chickpea salad? You can serve this salad with many dishes. It pairs well with grilled chicken or fish. Try it alongside a warm quinoa bowl or a hearty soup. This salad stands alone or complements any meal. Health benefits of chickpeas Chickpeas are high in protein and fiber. They help keep you full and support digestion. They also provide essential vitamins and minerals like iron and folate. Caloric breakdown of the salad components The salad is light yet filling. One serving has around 300 calories. This includes healthy fats from the olive oil and avocado, plus nutrients from the greens and veggies. Dietary considerations (gluten-free, low-carb, etc.) This salad is naturally gluten-free. It can fit into many diets, including vegetarian and low-carb. The chickpeas add carbs, but they are healthy and nutritious. Adjust the ingredients to meet your dietary needs. For a low-carb option, use fewer chickpeas or add more greens. For the full recipe, check out the detailed instructions above. This blog post showed you how to make a tasty crispy chickpea salad. We covered the ingredients, preparation steps, and fun variations you can try. Remember to rinse your chickpeas well for the best crunch. Don’t be afraid to experiment with different greens or dressings. You can store leftovers in the fridge and reheat chickpeas easily. With this tasty salad, you can enjoy healthy eating without any fuss. Give it a try, and enjoy every bite!

Crispy Chickpea Salad Packed with Flavorful Greens

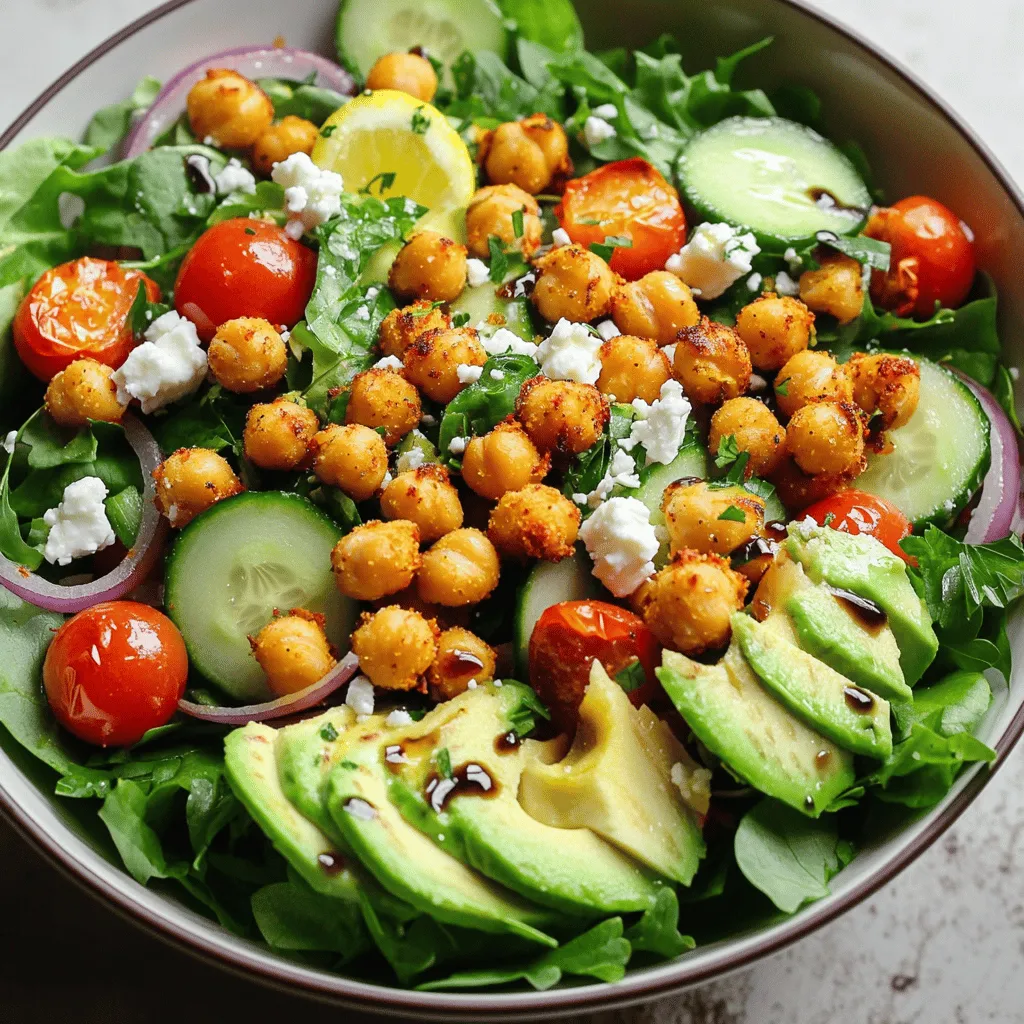
Are you ready to elevate your salad game? This Crispy Chickpea Salad, packed with vibrant greens, is not only delicious

To make a savory breakfast hash, you need fresh, simple ingredients. Here’s what you will gather for this delicious dish: - 3 medium potatoes, diced - 1 cup mixed bell peppers, diced - 1 small red onion, finely chopped - 1 cup cooked sausage or plant-based sausage - 2 cloves garlic, minced - 4 large eggs - 2 tablespoons olive oil - 1 teaspoon smoked paprika - Salt and pepper to taste - Fresh parsley, chopped Each ingredient adds its own unique flavor and texture. The potatoes give a hearty base. The bell peppers and onions add color and sweetness. Sausage brings a savory touch, while garlic adds depth. Smoked paprika gives a warm, smoky flavor. Fresh parsley brightens the dish and makes it look beautiful. You can find the full recipe for this savory breakfast hash above. Enjoy cooking and tasting each layer of flavor in this hearty meal! Start by dicing three medium potatoes. I prefer Yukon gold or red potatoes for creaminess. Place the diced potatoes in a pot and cover them with water. Bring the water to a boil, then reduce heat to simmer. Cook for about five minutes, just until tender but not fully cooked. Drain the potatoes and set them aside. The right texture is key; you want them to hold their shape while becoming crispy later. In a large skillet, heat two tablespoons of olive oil over medium heat. Add your drained potatoes to the skillet. Cook for eight to ten minutes, stirring occasionally. The oil should be hot enough for crispiness. Look for a golden crust on the potatoes. This adds flavor and a nice texture to your dish. Once your potatoes are crispy, it’s time to add flavor. Toss in one cup of mixed bell peppers and one small chopped red onion. Sauté the mixture for about five minutes. The veggies should soften and release their sweet aroma. Follow this by adding minced garlic, crumbled sausage, and a teaspoon of smoked paprika. Stir well and season with salt and pepper. This step is crucial for building flavor. Now for the eggs! Create four small wells in the hash using a spoon. Crack one egg into each well. Cover the skillet with a lid. Cook for about four to five minutes, or until the eggs reach your desired doneness. Creating wells helps the eggs cook evenly. I love when the yolk is runny, but you can cook them longer if you prefer firmer eggs. Follow these steps, and you'll have a delicious Savory Breakfast Hash ready to enjoy. For the full recipe, check the earlier ingredients list. To avoid sogginess, cook the potatoes first. Boil them for just five minutes. They should be slightly tender but not fully cooked. Drain and then fry them until crispy. This method keeps the hash crunchy and delicious. When choosing sausage, pick one with bold flavors. A spicy sausage can add a nice kick. If you prefer plant-based options, look for ones that mimic the taste of meat. This choice keeps your hash full of flavor. For a beautiful dish, serve the hash in colorful bowls. You can create a nice contrast with the golden potatoes and bright peppers. Top each egg with a sprinkle of smoked paprika. This adds a pop of color and flavor. Consider adding fresh herbs or avocado slices for extra flair. Chopped green onions or a dollop of salsa can also enhance the taste. These extras make your breakfast hash look inviting and appetizing. Prepare your ingredients ahead of time. Dice the potatoes and chop the veggies the night before. Store them in airtight containers to keep them fresh. This makes cooking easier on busy mornings. For leftovers, let the hash cool before storing. Place it in a sealed container in the fridge. It will stay fresh for up to three days. You can also freeze portions for later use. Reheating is simple; just warm it in a skillet until hot. Try the Full Recipe for a step-by-step guide to making this delightful dish! {{image_4}} For a meat-free option, swap sausage for plant-based alternatives. You can use tempeh, tofu, or even mushrooms. These options add texture and flavor. Adding smoked paprika boosts the taste and richness. Incorporate extra veggies like spinach or kale for added nutrients. They cook quickly and pair well with potatoes. Want more protein? Add black beans or chickpeas to your hash. They mix well with the potatoes and spices. Cheese like feta or cheddar adds creaminess and flavor. Sprinkle cheese on top before cooking the eggs. This melts the cheese beautifully and creates a rich taste that everyone will love. If you enjoy spice, add diced jalapeños or serrano peppers. These peppers bring heat and a fresh taste to your dish. You can also use spices like cayenne or red pepper flakes for a kick. Experiment with smoked paprika and cumin for extra depth. These spices can elevate your breakfast hash to new heights. To store your leftover breakfast hash, let it cool first. Place it in an airtight container. This helps keep it fresh. Use glass or plastic containers with tight lids. They work best for this purpose. Store it in the fridge for up to four days. When ready to eat, just reheat it. You’ll enjoy the same yummy flavors again. If you want to freeze your hash, follow these easy steps. First, cool the hash completely. Then, scoop it into freezer-safe bags. Remove as much air as possible before sealing. You can also freeze the eggs separately. When ready to eat, thaw overnight in the fridge. Reheat it in a skillet over low heat. This keeps it tasty and warm. In the fridge, the breakfast hash lasts about four days. In the freezer, it stays good for up to three months. Always check for signs of spoilage. Look for a strange smell or color changes. If it looks odd, don’t eat it. When in doubt, throw it out. Enjoy your Savory Breakfast Hash fresh and safe! Yes, you can make Savory Breakfast Hash ahead of time. To store it, let it cool completely. Place it in an airtight container. You can keep it in the fridge for up to three days. When you're ready to eat, reheat it in a skillet over medium heat. Stir occasionally until it’s warm. You can also microwave it, but the skillet keeps it crispy. For the best breakfast hash, Yukon gold or red potatoes work well. These types have a creamy texture that adds richness. They hold their shape while cooking, giving you that nice crispy bite. If you want a firmer texture, try using russet potatoes. Just remember to adjust the cooking time for different potato types. To spice up your breakfast hash, consider adding different seasonings. Smoked paprika gives a nice smoky flavor. For heat, try cayenne pepper or crushed red pepper flakes. Fresh herbs like thyme or rosemary can brighten the dish. You can also mix in ingredients like jalapeños or even a splash of hot sauce for an extra kick. Yes, Savory Breakfast Hash can be gluten-free. Just ensure that your sausage is gluten-free. Most fresh vegetables and potatoes are naturally gluten-free too. Always check labels if you use packaged items. This way, you can enjoy a tasty breakfast without any worries about gluten. Breakfast hash pairs well with many sides. Try serving it with fresh fruit for a sweet balance. A simple green salad can add crunch and freshness. For drinks, coffee or fresh juice complements the meal nicely. You might even top the hash with avocado or salsa for an exciting twist. This blog post covered how to make a savory breakfast hash using simple ingredients. We talked about how to prepare potatoes, sauté vegetables, and cook eggs to the perfect doneness. I shared tips to prevent sogginess and suggested variations to fit different tastes. In the end, this dish is easy to customize. Whether you prefer meat or want a vegetarian option, you can make it your own. Enjoy this hash for breakfast or any meal. You now have the tools to create a tasty dish that everyone will love!

Savory Breakfast Hash Flavorful Morning Delight

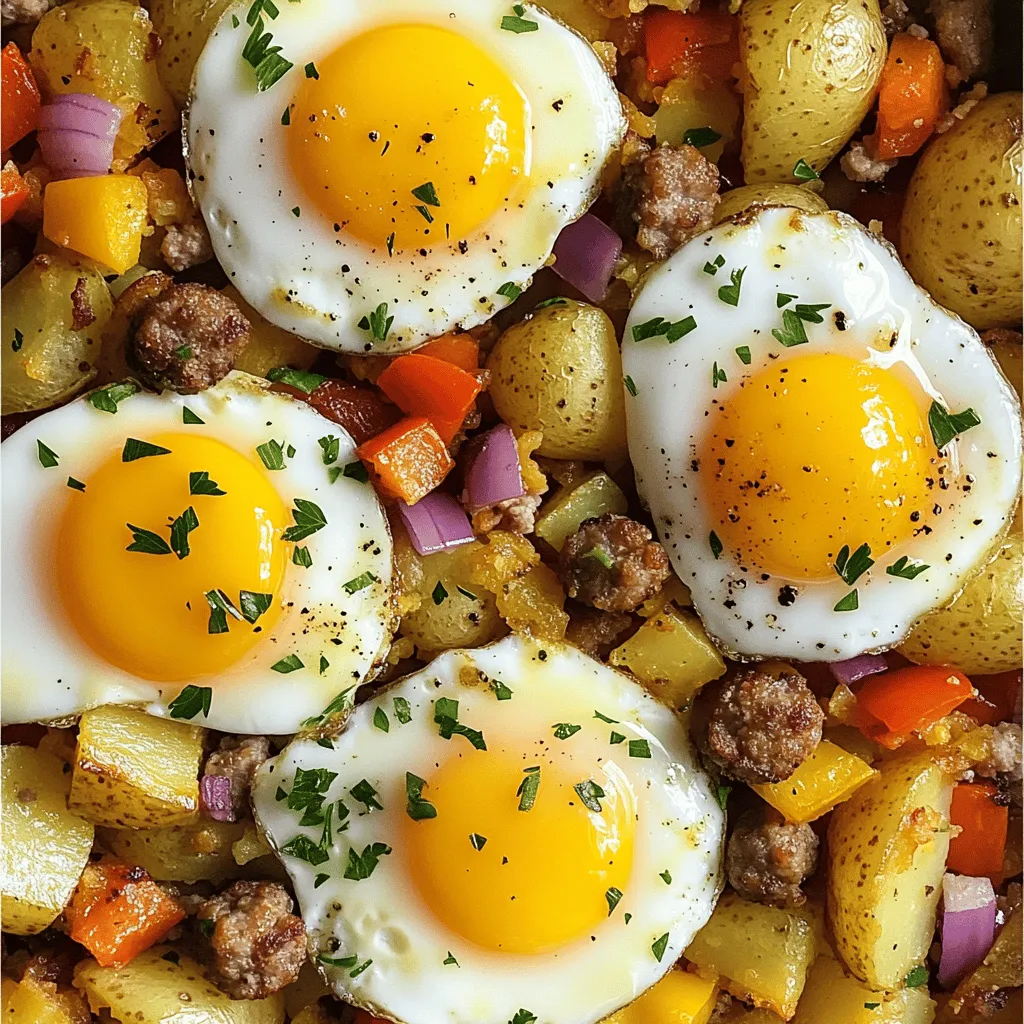
Wake up your taste buds with a Savory Breakfast Hash that packs a punch! This dish combines crispy potatoes, colorful

Each ingredient in this creamy tomato basil soup plays a key role. Fresh tomatoes give the soup its rich, vibrant flavor. Onions and garlic add depth. Heavy cream makes it indulgent and smooth. Fresh basil brings a bright, herbal note. - 4 cups fresh ripe tomatoes, chopped - 1 medium onion, diced - 3 cloves garlic, minced - 1/4 cup fresh basil leaves, chopped Fresh produce enhances the taste. Use ripe tomatoes for the best flavor. The onion and garlic create a solid base. Fresh basil adds a lovely aroma and freshness. - 2 cups vegetable broth - 2 tablespoons olive oil - 1 teaspoon sugar - Salt and pepper to taste - Crusty bread or croutons for serving Pantry staples round out the dish. Vegetable broth adds body and flavor. Olive oil helps sauté the aromatics. Sugar balances the acidity of the tomatoes. Salt and pepper enhance all the flavors, while bread or croutons provide a nice crunch. For the complete recipe with instructions, check out the Full Recipe. Start by warming the olive oil in a large pot over medium heat. Once the oil is hot, add the diced onion. Sauté the onion for about 5 minutes. Stir it occasionally until it turns soft and clear. This step builds a solid flavor base for the soup. Next, toss in the minced garlic. Stir it for about a minute until you smell its nice aroma. Be careful not to burn the garlic, as it can turn bitter quickly. Now, add the chopped tomatoes and a teaspoon of sugar to the pot. Stir everything together well. Let this cook for about 10 minutes. You want the tomatoes to soften and release their juices. This creates a flavorful tomato base. After that, pour in the vegetable broth. Increase the heat to bring it all to a gentle boil. Once it boils, reduce the heat and let it simmer for about 15 minutes. This helps all the flavors blend nicely. Using an immersion blender, carefully puree the soup until it is smooth. If you’re using a regular blender, let the soup cool slightly before blending in batches. This keeps you safe from hot splashes. Once blended, return the soup to low heat. Stir in the heavy cream gently, warming it up without boiling. Finally, add the chopped basil and season with salt and pepper to your taste. Mix everything well. Serve the soup hot, garnished with extra basil and enjoy it with crusty bread or croutons on the side. For the full experience, check out the Full Recipe! To get a creamy texture, use heavy cream. This adds richness. Stir it in slowly after blending. Make sure the soup is hot but not boiling. You can also use an immersion blender. This tool helps blend the soup smoothly without splashes. To balance flavors, taste as you cook. Add salt and pepper in small amounts. A pinch of sugar helps cut acidity from the tomatoes. Fresh basil adds sweetness and a fragrant touch. If the soup tastes flat, a splash of lemon juice can brighten it up. Serve the soup hot in deep bowls. Garnish with fresh basil leaves on top. A swirl of cream makes it look fancy. Pair it with crusty bread or crunchy croutons for texture. This makes each bite exciting. For a fun twist, try adding shredded cheese before serving. For a full recipe, check out the Creamy Tomato Basil Bliss section! {{image_4}} If you want a dairy-free version, you can swap the heavy cream. Use coconut milk or cashew cream instead. Both options give a creamy texture without dairy. Coconut milk adds a hint of sweetness and a tropical twist. Cashew cream has a rich, nutty flavor that works well. Just blend soaked cashews with water until smooth. This will keep your soup lush and creamy. You can enhance your soup with various add-ins. Try adding cooked lentils or chickpeas for protein. They also make the soup heartier. If you enjoy a cheesy flavor, sprinkle in some nutritional yeast. For a burst of color, toss in some diced bell peppers or carrots. These veggies add sweetness and crunch. You can also blend in a handful of spinach or kale for extra nutrients. If you like heat, add some red pepper flakes or hot sauce. Start with a small amount and taste as you go. You can also use diced jalapeños for a fresh kick. If you want deep flavor, try a dash of smoked paprika. It gives a warm, smoky taste. Just remember to adjust the other seasonings to balance the heat. Enjoy making this soup your own! Once you make your creamy tomato basil soup, let it cool. Pour the soup into an airtight container. Store it in the fridge for up to four days. Always check for any signs of spoilage before eating. If you want to save some for later, freezing works well. Let the soup cool completely. Pour it into freezer-safe bags or containers. Make sure to leave some space at the top for expansion. It can last up to three months in the freezer. When you're ready to eat, thaw it in the fridge overnight. To enjoy your soup again, reheat it gently. You can use a pot on the stove or a microwave. If using a pot, heat it on low, stirring often. If using a microwave, heat in short intervals, stirring in between. This keeps the soup creamy and smooth. For the best flavor, taste and adjust the seasoning as needed. For the complete cooking process, check the Full Recipe. You can use whole milk or half-and-half if you want a lighter soup. Coconut milk offers a dairy-free option, adding a subtle sweetness. Silken tofu blended until smooth works great too. Each choice will change the flavor slightly, but all keep the creamy texture. Yes, canned tomatoes are a great option. They save time and still taste good. Look for whole or diced tomatoes, preferably in juice or puree. You might want to adjust the sugar since canned tomatoes can be sweeter. Just taste as you cook! To make this soup vegan, skip the heavy cream and use coconut milk or cashew cream. You can also use vegetable broth to keep it flavorful. Fresh basil and garlic add a lot of taste, so load up on those. For the full recipe, check out the details on how to prepare this delicious vegan dish! In this blog post, we explored the key ingredients for Creamy Tomato Basil Soup and how to prepare it step-by-step. We also shared useful tips for texture and flavor, plus variations to suit your taste. Remember, you can customize this soup easily. Don't forget about storage tips to enjoy it later. With these insights, you can make a delicious soup that's sure to please anyone. Enjoy your cooking journey!

Creamy Tomato Basil Soup Rich Flavor and Comfort Food

Warm up with a bowl of Creamy Tomato Basil Soup that’s rich in flavor and comfort! This simple recipe uses

- 1 cup quinoa, thoroughly rinsed - 2 cups vegetable broth or water - 1 cup cherry tomatoes, halved - 1 medium cucumber, diced into small cubes - 1 red or yellow bell pepper, diced - 1/2 small red onion, finely chopped - 1/2 cup Kalamata olives, pitted and sliced - 1/2 cup feta cheese, crumbled (optional for a vegan alternative) - 1/4 cup fresh parsley, chopped finely - 1/4 cup high-quality olive oil - 2 tablespoons freshly squeezed lemon juice - 1 teaspoon dried oregano - Salt and freshly cracked black pepper to taste You can add or swap some ingredients if you want. Here are some ideas: - Use black olives if you prefer. - Try adding chickpeas for extra protein. - Add avocado for creaminess. - Substitute lime juice for lemon juice. - Use quinoa blends for variety in texture. A serving of Mediterranean quinoa salad has about: - 200 calories - 7g protein - 10g fat - 24g carbohydrates - 5g fiber - 200mg sodium This salad is not just tasty; it is also packed with nutrients. Quinoa is a complete protein. The veggies add vitamins and minerals. Enjoy this fresh and healthy option that suits various diets. For the full recipe, check out the details above. To start, take your rinsed quinoa and put it in a medium saucepan. Add 2 cups of vegetable broth or water. Turn the heat to high until it boils. Once it boils, lower the heat to a gentle simmer. Cover the saucepan and let it cook for about 15 minutes. The quinoa will fluff up and soak up all the liquid. After cooking, remove it from the heat and let it sit for a few minutes. Fluff it with a fork and let it cool to room temperature. While the quinoa cools, grab a large mixing bowl. Add 1 cup of halved cherry tomatoes. Next, toss in 1 diced medium cucumber, 1 diced bell pepper, and 1/2 small finely chopped red onion. Don't forget about 1/2 cup of sliced Kalamata olives and 1/4 cup of finely chopped fresh parsley. Mix everything gently to combine. This colorful mix brings fresh flavors to the salad. In a separate small bowl, whisk together 1/4 cup of high-quality olive oil and 2 tablespoons of freshly squeezed lemon juice. Add 1 teaspoon of dried oregano, salt, and freshly cracked black pepper. Blend this well to create a zesty dressing. Once the quinoa has cooled, gently fold it into the vegetable mix. Drizzle the dressing over the top and toss everything carefully. If you like, sprinkle 1/2 cup of crumbled feta cheese over the salad. Taste and adjust with more salt, pepper, or lemon juice. For the best flavor, cover the salad and let it sit for at least 15 minutes before serving. This allows the flavors to blend. You can find the full recipe in the earlier sections. To boost the flavor of your Mediterranean quinoa salad, try adding fresh herbs. Chopped mint or basil brings a bright taste. You can also mix in some sun-dried tomatoes for a sweet, tangy kick. For spice lovers, add a pinch of red pepper flakes. This little touch gives your salad some heat. A splash of balsamic vinegar can deepen the flavor too. Experiment with different combinations to find what you love best. Serve your salad cold or at room temperature. This enhances the fresh flavors. If you make it ahead, keep it in the fridge for up to three days. Store it in an airtight container to keep it fresh. Before serving, taste and adjust the seasoning if needed. Sometimes flavors mellow in the fridge, so a bit more lemon or salt can brighten it up. A good presentation makes any dish more appealing. Serve your Mediterranean quinoa salad in a large, colorful bowl. Garnish with extra parsley or a drizzle of olive oil for shine. You can also create individual servings in mason jars. Layer the ingredients so each layer is visible. This looks fun and is perfect for picnics or gatherings. For a festive touch, add lemon wedges on the side. They make a great visual and add flavor when squeezed. For the full recipe, check out the [Full Recipe]. {{image_4}} You can change the protein in your Mediterranean Quinoa Salad easily. Chickpeas are a great choice. They add protein and fiber. Grilled chicken is another option. It adds a nice smoky flavor. Shrimp can also work well. Just grill or sauté them, then toss them in. You can even mix different proteins for variety. If you want a vegan version, skip the feta cheese. You can add avocado for creaminess instead. Nutritional yeast is a tasty substitute too. It gives a cheesy flavor without using dairy. You can also add more beans or legumes. This will boost protein and make the salad heartier without losing the fresh taste. You can change up the veggies based on the season. In winter, try roasted sweet potatoes or butternut squash. In spring, add peas or asparagus for a fresh crunch. Summer is perfect for zucchini or bell peppers. In fall, consider adding roasted beets or carrots. Each swap keeps the salad fresh and exciting. For the full recipe, check out Mediterranean Quinoa Salad Delight. You can store the Mediterranean quinoa salad in an airtight container. This keeps it fresh and safe. Place the salad in the fridge if you plan to eat it later. Make sure to keep it covered. This prevents the salad from drying out or absorbing other smells. The salad lasts about three to five days in the fridge. After that, the veggies may lose their crunch. If you see any signs of spoilage, it's best to toss it away. Always check the salad before eating. Freshness is key to enjoying this healthy dish. Freezing quinoa salad is not ideal, but you can do it. If you must freeze it, separate the salad and the dressing. Freeze the salad in a container and leave space for expansion. When you want to eat it, thaw it in the fridge overnight. After thawing, add the dressing and mix well. This way, you can still enjoy the flavors without losing quality. Check out the Full Recipe for more tips on making this dish. Yes, you can use other grains. Some great options are farro, bulgur, or barley. These grains add different textures and flavors. Just remember to adjust cooking times and liquid amounts based on the grain you choose. Quinoa cooks quickly and is gluten-free, which is a plus! To prepare this salad ahead of time, cook the quinoa and let it cool. You can chop the veggies and make the dressing in advance. Keep the quinoa, veggies, and dressing separate until you are ready to serve. This keeps everything fresh and crunchy. Mix it all together just before serving for the best taste. Quinoa is packed with nutrients. It is high in protein and is a complete protein, meaning it has all nine essential amino acids. Quinoa is also rich in fiber, which helps with digestion. It contains vitamins and minerals like magnesium and iron. Eating quinoa can help keep your heart healthy and support your energy levels. This blog post covers everything you need to make a delicious Mediterranean Quinoa Salad. We looked at the key ingredients and optional swaps. You learned step-by-step how to cook quinoa, prepare the veggies, and make the dressing. I shared some tips to enhance flavor and the best way to store your salad. We also explored protein options and variations based on the seasons. Now, with this knowledge, you can create a tasty and healthy dish that fits your needs. Enjoy your cooking!

Mediterranean Quinoa Salad Fresh and Healthy Option

Looking for a fresh and healthy dish? Try this Mediterranean Quinoa Salad! Packed with vibrant vegetables and protein-rich quinoa, it’s

Older posts
Newer posts
← Previous Page1 … Page14 Page15 Page16 … Page27 Next →

dsad

© 2025 mealinmoments • Built with GeneratePress

Our Policies

  • Copyright Policy
  • Cookie Policy
  • GDPR Policy
  • Privacy Policy
  • Disclaimer
  • Terms Of Use

More Information

  • Home
  • About
  • Contact
  • Appetizers
  • Dessert
  • Dinner
  • Drinks
©2025, mealinmoments About Back To Top