Skip to content
DisclaimerTerms Of UseGDPR PolicyCookie Policy

mealinmoments

  • Home
  • Drinks
  • Appetizers
  • Dinner
  • Dessert
  • About
  • Contact
  • Privacy Policy
DisclaimerTerms Of UseGDPR PolicyCookie Policy

Megan

- 1 cup rolled oats - 1/2 cup creamy or crunchy natural peanut butter - 1/3 cup honey or pure maple syrup - 1/2 cup chocolate chips - 1/4 cup ground flaxseed (optional) - 1/2 teaspoon pure vanilla extract - A pinch of sea salt These ingredients come together to create a delicious and nutritious snack. The oats provide fiber and bulk, while the peanut butter brings protein and healthy fats. Honey or maple syrup adds sweetness, and chocolate chips give a delightful treat in every bite. Ground flaxseed boosts the nutritional value, offering omega-3 fatty acids. Vanilla and sea salt enhance the flavor, making these energy bites a real pleasure to eat. Each serving of these energy bites contains about 100 calories. The macronutrient breakdown is roughly: - 3 grams of protein - 5 grams of fat - 12 grams of carbohydrates These stats show that energy bites are not just tasty; they also help fuel your day. They are perfect before workouts or as a quick snack. If you want a vegan option, you can replace honey with maple syrup. This keeps it sweet while staying plant-based. For gluten-free energy bites, use certified gluten-free oats. These swaps allow more people to enjoy this delightful snack without worry. Start by grabbing a medium bowl. In this bowl, combine: - 1 cup rolled oats - 1/2 cup creamy or crunchy natural peanut butter - 1/3 cup honey or pure maple syrup Stir these ingredients well. You want a smooth mix that blends nicely. This step sets the base for your energy bites. Now, it’s time for the fun part! Fold in: - 1/2 cup chocolate chips - 1/4 cup ground flaxseed (optional) - 1/2 teaspoon pure vanilla extract - A pinch of sea salt Make sure everything mixes evenly. Your dough should feel sticky and uniform. This will give your energy bites that rich flavor. With slightly damp hands, scoop portions of the mixture. Roll these into small balls, about 1 inch in size. If the mixture feels too sticky, chill it in the fridge for 15-20 minutes. This step makes it easier to handle. Once rolled, place the bites on a baking sheet lined with parchment paper. Make sure to leave some space between each ball. After shaping all the bites, refrigerate them for about 30 minutes. This will help them firm up nicely. You can find the full recipe for even more details! To keep your energy bites fresh, store them in airtight containers. This prevents moisture and air from spoiling them. I recommend using glass containers with tight lids. These work well in any fridge. You can also use plastic containers, but make sure they seal tightly. Energy bites stay fresh in the fridge for about one week. You can enhance the flavor by adding spices like cinnamon or nutmeg. A splash of vanilla extract boosts the taste too. If you like a richer flavor, choose dark chocolate chips. They add depth and a slight bitterness, which pairs well with the sweetness. Semi-sweet chocolate chips are a great choice if you prefer a milder taste. One common mistake is overmixing the dough. This can make your bites tough. Mix just until everything is combined. On the other hand, under-mixing can lead to uneven bites. Make sure all ingredients are well-blended. Also, don’t skip chilling the mixture. Chilling makes it easier to roll into balls. If the mix is too sticky, chill it for about 15-20 minutes before rolling. By following these tips, your energy bites will be perfect every time! {{image_4}} You can mix things up with different nut butters. Almond butter or cashew butter adds unique taste. Each nut butter brings its own flavor, making it fun to try. Adding dried fruits or seeds makes the bites even better. Try raisins, cranberries, or chopped dates for sweetness. You can also use pumpkin seeds or sunflower seeds for crunch. Each addition gives a new twist to the energy bites. Want to make these bites vegan? Use maple syrup instead of honey. Also, make sure your chocolate chips are dairy-free. This way, everyone can enjoy them. To make the bites gluten-free, choose certified gluten-free oats. You can still enjoy the great taste without the gluten. For a high-protein version, add protein powder to the mix. A scoop of your favorite powder boosts the protein without changing the flavor much. These energy bites pair well with yogurt. Dip them in Greek yogurt for a tasty snack. You can also add them to smoothies for extra texture and flavor. Another fun idea is to use them as a topping for healthy desserts. Sprinkle them over nice cream or oatmeal. They add a crunch and a sweet bite to your treats. For the full recipe, check out the details above! Peanut butter chocolate chip energy bites last about one week in the fridge. Keep them in an airtight container to keep them fresh. If you want to store them for longer, freeze them. They can last up to three months in the freezer. Just make sure to wrap them well to avoid freezer burn. If your energy bites are frozen, you can refresh them easily. Just take a few out and let them sit at room temperature for about 30 minutes. This brings back their soft texture. If you want them a bit warmer, put them in the microwave for a few seconds. Be careful not to overheat, as they can get too soft. For the best freshness, use airtight containers made of glass or BPA-free plastic. These containers keep air out and moisture in. Label your containers with the date they were made. This helps you track how long they have been stored. Organizing them in the fridge or freezer can make it easy to grab a healthy snack anytime. To make these tasty bites, follow these steps: 1. In a bowl, mix rolled oats, peanut butter, and honey or maple syrup. Stir until smooth. 2. Fold in chocolate chips, flaxseed (if using), vanilla extract, and a pinch of salt. Mix well. 3. Use damp hands to roll the mixture into small balls, about one inch wide. 4. Place the balls on a parchment-lined baking sheet. Chill for 30 minutes to firm up. 5. Store in an airtight container in the fridge for up to one week. You can find the full recipe above for all details. Yes, these energy bites are healthy! They offer a good mix of nutrients. - Rolled oats provide fiber, which helps with digestion. - Peanut butter is rich in protein and healthy fats. - Honey or maple syrup gives quick energy and some antioxidants. - Chocolate chips add a little sweetness but can be chosen for lower sugar options. Overall, these bites are a great snack that fuels your body. Yes, you can skip honey or maple syrup. However, this will affect the taste and texture. You can try these alternatives: - Mashed banana for natural sweetness. - Applesauce for a moist texture without added sugar. - Stevia or monk fruit for a low-calorie sweet option. Remember, using less sweetener may change how the bites hold together. You can find pre-made energy bites at many stores. Look for brands like: - RXBAR: Known for clean ingredients. - LÄRABAR: Offers a variety of flavors. - Bobo's: Great for oat-based snacks. These are often found in health food sections or online. In this post, we covered how to make delicious Peanut Butter Chocolate Chip Energy Bites. You learned about the key ingredients, like oats and peanut butter, and their healthy benefits. We discussed step-by-step instructions for mixing and forming the bites. Remember to store them properly to keep them fresh. These energy bites offer tasty ways to snack and keep your energy up. Enjoy trying variations and have fun with flavors. Make these bites today and savor their goodness!

Peanut Butter Chocolate Chip Energy Bites Easy Recipe

Looking for a quick and healthy snack? These Peanut Butter Chocolate Chip Energy Bites are perfect! In just a few

- 2 cups fresh strawberries, hulled and sliced - 3/4 cup granulated sugar, divided - 1 cup heavy cream - 1 cup whole milk - 1 teaspoon vanilla extract - 1 tablespoon fresh lemon juice Selecting fresh strawberries is key. Look for bright red berries with no soft spots. The best strawberries smell sweet and feel firm. If you can find local strawberries, they will taste even better. When it comes to cream and milk, choose high-quality options. Heavy cream adds richness, while whole milk keeps the texture smooth. If you can, opt for organic dairy. This choice can enhance flavor and support better farming practices. If you want alternatives for granulated sugar, try using honey or agave syrup. Both can add a nice sweetness. For dairy-free options, use coconut cream and almond milk. These swaps keep the ice cream rich and creamy. They also cater to various dietary needs while still tasting great. Macerating strawberries makes them taste even better. Start with fresh, ripe strawberries. Hull and slice them into a bowl. Add 1/4 cup of sugar to the strawberries. This sugar helps draw out their juices. Let the mixture sit for about 30 minutes. You will notice the strawberries get juicy and sweet. Next, blend the strawberries to get your desired texture. Pour the macerated strawberries into a blender or food processor. Blend until smooth for a creamy texture. If you like chunks, leave some pieces intact. You can also save a bit of the mashed strawberries to mix in later for extra texture. Now it’s time to mix the ice cream base. In a separate bowl, combine 1 cup of heavy cream, 1 cup of whole milk, and 1/2 cup of sugar. Whisk until the sugar is fully dissolved. This step is key for a smooth ice cream. No one wants crunchy sugar bits in their treat! Add 1 teaspoon of vanilla extract and 1 tablespoon of fresh lemon juice. The lemon juice brightens the flavor. Carefully fold in your strawberry puree. Use a spatula to mix it gently. Make sure everything blends well but don’t over-mix. If you want a sweeter ice cream, add more sugar now. Next, pour the mixture into your ice cream maker. Follow the manufacturer's guidelines for churning, usually between 20 to 25 minutes. You want it to reach a soft-serve consistency. If you don’t have an ice cream maker, you can freeze it in a container and stir every 30 minutes for a few hours. Once churned, transfer the ice cream to an airtight container. Place it in the freezer for at least 4 hours. This helps it firm up nicely. When it’s ready, scoop the ice cream into bowls. You can add fresh strawberry slices or chocolate sauce for a fun touch. Enjoy your homemade strawberry ice cream! For the complete recipe, check out the Full Recipe. To get that perfect creamy texture in your homemade strawberry ice cream, focus on two key techniques. First, prevent ice crystals by chilling your mixing bowl and the cream before you start. The colder the ingredients, the smoother the ice cream will turn out. Second, adjust your ingredients for a smoother finish. Using a higher fat cream helps achieve that rich, creamy texture. You can also add a bit more sugar to help with the creaminess. Want to give your ice cream a fun twist? Try adding fresh herbs like basil or mint. Just a small amount can transform the flavor. You can also mix in other fruits like blueberries or raspberries for a fruity combo. To balance sweetness, add a splash of fresh lemon juice. This touch brings out the strawberry flavor even more. Be careful not to over-mix or under-mix your ingredients. Mixing too much can make the ice cream too airy, while not mixing enough can lead to a grainy texture. Also, proper freezing is crucial. If your ice cream isn't frozen long enough, it won’t get firm. Make sure to chill it in the freezer for at least four hours after churning. Following these tips will help you create a smooth and rich strawberry ice cream. For the full recipe, check out [Full Recipe]. {{image_4}} You can play with flavors to make your ice cream unique. Try mixing in fresh herbs like basil for a refreshing twist. The strawberry-basil combo gives a sweet and savory taste. If you want something zesty, add lime juice. The strawberry-lime mix adds a bright flavor punch. You can also swap strawberries for other fruits. Blueberries, raspberries, or peaches work well. Each fruit brings a new taste to your ice cream. Add-ins make your ice cream more fun. Chocolate chips add sweetness and crunch. Nuts give a nice texture and flavor. You can use crushed cookies or brownie pieces too. These mix-ins bring a delightful surprise in every bite. For a creative touch, swirl in sauces like chocolate or caramel during churning. You can also use fruit purees for a fruity ribbon effect. You don’t need an ice cream maker to enjoy homemade strawberry ice cream. A no-churn method works great too. Mix the base ingredients and pour them into a freezer-safe container. Stir every 30 minutes for the first two hours. This helps break up ice crystals and makes it creamy. You can also use a large zip-top bag filled with ice and salt. Place your mixture in a smaller bag and shake it to freeze. Both methods give you a tasty treat without fancy equipment. For the full recipe, check the details above. To keep your homemade strawberry ice cream fresh, use airtight containers. These containers help seal in the flavor and prevent ice from forming. Glass or plastic containers work great. Make sure to fill them to the top. This limits air exposure and reduces freezer burn. To avoid freezer burn, place a piece of parchment paper directly on the ice cream before sealing the container. This extra layer helps keep moisture out. Be sure to store the ice cream in the coldest part of your freezer. Homemade strawberry ice cream lasts about two weeks in the freezer. After this time, it may lose flavor and texture. Look for signs of spoilage. If you see ice crystals forming or if the ice cream smells off, it’s time to let it go. Freshness matters, so enjoy it while it’s at its best! If you need to refreeze your ice cream, do it carefully. Allow it to thaw in the fridge for about 20 minutes. Then, put it back into the freezer. This method helps maintain the texture. Avoid repeated thawing and freezing. It can lead to ice crystals forming. Always try to serve and enjoy your strawberry ice cream right after churning for the best experience. For more details on making this delight, check the Full Recipe. To make homemade strawberry ice cream, you need just a few tools: - Mixing bowls - Fork or potato masher - Blender or food processor - Whisk - Ice cream maker - Airtight container These tools help you combine and blend the ingredients easily. The ice cream maker is key for churning. It gives the ice cream a creamy texture that you will love. Yes, you can make ice cream without an ice cream maker! Here are two simple methods: 1. No-Churn Method: After mixing everything, pour it into a freezer-safe container. Stir every 30 minutes for about 2-3 hours. This helps break up ice crystals. 2. Using a Bag: Pour your mixture into a small zip bag. Seal it tightly. Place this bag into a larger bag filled with ice and salt. Shake for about 10-15 minutes. You will have creamy ice cream! These methods are fun and can yield great results! To boost the flavor, try these tips: - Use ripe strawberries: They taste sweeter and more flavorful. - Add lemon juice: It brightens the flavor and balances sweetness. - Mix in herbs: A bit of fresh basil or mint can add an exciting twist. - Use high-quality vanilla extract: Real vanilla enhances the overall taste. These small changes can make your ice cream taste even better. Yes, you can lower the sugar. Here are some ideas: - Use less sugar: Start with half the amount and taste as you go. - Try sweeteners: Options like honey, agave, or stevia can work well. - Ripe fruit: Using very ripe strawberries means you can use less sugar. Adjusting sugar makes the ice cream healthier and still tasty. Yes, you can use frozen strawberries! Here’s how it affects your ice cream: - Flavor: Frozen strawberries might taste a bit less fresh. However, they still work well. - Texture: They can be softer when blended. This may make the ice cream smoother. If you use frozen strawberries, let them thaw slightly before blending. This helps with blending and flavor. For the full recipe, check out the section above! You now know how to make great homemade strawberry ice cream. Fresh strawberries, quality cream, and simple steps lead to a tasty treat. Remember to macerate the strawberries and mix your base well. Avoid common mistakes to keep your ice cream creamy. Don’t forget the fun variations you can try! As you make this ice cream, enjoy the process and explore your own flavors. Your homemade strawberry ice cream will impress everyone.

Homemade Strawberry Ice Cream Rich and Creamy Delight

Are you ready to whip up a sweet treat that brings summer to your kitchen? In this guide to homemade

To make the zesty spicy chickpea tacos, gather the following ingredients: - 1 can (15 oz) chickpeas, thoroughly rinsed and drained - 1 tablespoon extra virgin olive oil - 1 teaspoon ground cumin - 1 teaspoon smoked paprika - 1/2 teaspoon cayenne pepper (adjust according to spice preference) - 1/2 teaspoon garlic powder - 1/2 teaspoon onion powder - Sea salt and freshly cracked black pepper to taste - 8 small corn or flour tortillas - 1 cup finely shredded cabbage (choose either green or purple for a vibrant touch) - 1 ripe avocado, sliced into wedges - 1/4 cup fresh cilantro leaves, roughly chopped - 1 lime, cut into wedges - Optional: A dash of your favorite hot sauce for an extra kick These tacos are not only tasty but also packed with nutrients. Each serving provides: - Calories: Approximately 350 - Protein: 12 grams - Fiber: 10 grams - Fat: 15 grams - Carbohydrates: 45 grams Chickpeas bring protein and fiber, making the tacos filling and healthy. Chickpeas are a superfood for many reasons: - High in Protein: They provide a great source of plant-based protein. - Rich in Fiber: This helps keep your digestive system healthy. - Low Glycemic Index: Chickpeas can help regulate blood sugar levels. - Packed with Vitamins and Minerals: They offer iron, magnesium, and folate. Adding chickpeas to your meals can support overall health and wellness. Try these spicy chickpea tacos for a tasty and nutritious meal. For the full recipe, check out the section above. To start, grab a can of chickpeas. Rinse them well under cool water. Drain them and set them aside. Take a medium mixing bowl and mash half of the chickpeas with a fork or potato masher. You want them a bit chunky. The other half should remain whole. This gives the filling a nice texture. Now, heat a skillet over medium heat and add the olive oil. Wait until the oil shimmers. Add both the mashed and whole chickpeas to the skillet. Next, sprinkle in the ground cumin, smoked paprika, cayenne pepper, garlic powder, onion powder, sea salt, and black pepper. Mix everything well. Sauté the chickpeas for about 5 to 7 minutes. Stir often until they heat up and get slightly crispy on the edges. While your chickpeas are cooking, warm the tortillas. You can do this in a separate skillet or quickly microwave them for about 15-20 seconds. They should be soft and easy to fold. Now, it’s time to build your tacos. Take a warm tortilla and spoon a generous amount of the chickpea mixture onto it. Top it off with shredded cabbage, avocado slices, and chopped cilantro. For extra flavor, serve lime wedges on the side. Don’t forget the hot sauce if you love a good kick. Enjoy making your tacos! For the full recipe, check out the details above. To make great tacos, follow these simple tips: - Choose the right tortillas: Corn or flour tortillas work well. Corn adds flavor, while flour offers a soft bite. - Warm tortillas properly: Heat them in a skillet or microwave. This keeps them soft and pliable. - Don’t overcook the chickpeas: Sauté just until crispy. This adds a nice texture without losing moisture. These tacos shine with fresh toppings. Here are some ideas: - Add a crunch: Use finely shredded cabbage for texture. It also gives a nice color to the plate. - Creamy avocado: Slices of ripe avocado balance the spice well. They add richness to each bite. - Herbs for freshness: Chopped cilantro adds a burst of flavor. It brightens up the dish. Pair your tacos with tasty sides and drinks: - Sides: Try serving with a fresh salsa or guacamole. A simple side salad with lime dressing works well, too. - Drinks: A cold beer or sparkling water with lime complements the spice. For a non-alcoholic option, try a refreshing iced tea. For the full recipe, check out [Full Recipe]. {{image_4}} You can easily make these tacos vegan. The main ingredient, chickpeas, is already vegan. For the tortillas, choose corn or flour tortillas that do not contain lard. You can also add more vegan toppings. Try using guacamole or dairy-free yogurt instead of sour cream. These swaps keep the meal plant-based while still tasting great. If you want to change up the tortillas, you have options. You can use lettuce wraps for a low-carb option. They add crunch and freshness. You can also try whole wheat tortillas for a healthier choice. Another fun idea is using pita bread or even taco shells. Each option gives a different twist to your meal. Toppings can change the whole taco experience. Besides cabbage and avocado, consider adding diced tomatoes or sliced radishes for more crunch. You can also sprinkle some feta or goat cheese on top. For a spicy kick, add jalapeño slices or pickled onions. Each topping adds new flavors and textures to enjoy. For the full recipe, check out the complete guide to making these spicy chickpea tacos. To keep your tacos fresh, place the filling and tortillas in separate containers. This keeps the tortillas from getting soggy. Use airtight containers for best results. Store them in the fridge for up to three days. If you have extra toppings, store those in their own containers too. When reheating tacos, use a skillet for the best taste. Heat the skillet over medium heat. Add the chickpea filling and stir until warm. For tortillas, warm them in the skillet for about 30 seconds on each side. You can also microwave the filling or tortillas, but they may not taste as good. If using the microwave, cover them with a damp paper towel. This keeps them from drying out. You can freeze the chickpea filling for longer storage. Place the cooled filling in an airtight container or a freezer bag. Make sure to remove as much air as possible. Label the bag with the date. You can freeze it for up to three months. When ready to eat, thaw it in the fridge overnight. Reheat it in a skillet before serving it in your tacos. This makes meal prep easy and fun! For the full recipe, check out the details above. Yes, you can make Spicy Chickpea Tacos ahead of time. Prepare the chickpea filling and store it in the fridge. It stays fresh for three days. When ready to eat, just warm it up. You can also heat the tortillas separately. This saves time and helps with meal prep. If you want a swap for chickpeas, try black beans or lentils. Both options give a nice texture and taste. You can also use cooked quinoa for a lighter filling. Each alternative keeps the spirit of the taco while offering different flavors. To adjust the spiciness, change the cayenne pepper amount. Start with less if you prefer mild. You can always add more spice later. Adding hot sauce is another way to increase heat. Experiment until you find your perfect level of spice! For more details, refer to the Full Recipe. We explored how to make tasty spicy chickpea tacos. You learned the key ingredients and their health perks. I shared easy steps for preparation, cooking, and assembly. Cooking tips can help you create perfect tacos every time. We discussed tasty pairings and fun variations to try. Plus, I offered smart storage tips for any leftovers. Enjoy these flavors in your meals. Get creative, and find what you love!

Spicy Chickpea Tacos Flavorful and Easy Guide

Looking for a fun and tasty meal? These Spicy Chickpea Tacos are packed with flavor and easy to make! Chickpeas

To make the best chocolate chip cookie dough dip, gather these items: - 1 cup all-purpose flour - 1 cup brown sugar, tightly packed - 1/2 cup granulated sugar - 1/2 cup unsalted butter, softened - 1 teaspoon pure vanilla extract - 1/4 teaspoon salt - 1 cup cream cheese, softened - 1/2 cup mini chocolate chips Choosing the right ingredients makes a big difference. Here are my top tips: - Butter: Always use unsalted butter for better control of salt levels. - Sugar: Use packed brown sugar for that rich, caramel taste. - Cream Cheese: Make sure it’s softened for easy mixing. - Flour: Opt for all-purpose flour, as it gives the best texture. Want to make your dip even better? Try these optional ingredients: - 1/4 cup chopped nuts for a crunchy texture. - 1/4 cup powdered sugar to sweeten the dip further. - A pinch of cinnamon can add warmth to the flavor. For the full recipe, check out the [Full Recipe]. To make the best chocolate chip cookie dough dip, start by gathering your ingredients. You will need flour, brown sugar, granulated sugar, butter, vanilla extract, salt, cream cheese, mini chocolate chips, and optional nuts or powdered sugar. 1. In a large bowl, beat the softened butter with brown and granulated sugar. Mix until it’s creamy and light. This takes around 3-4 minutes. 2. Add the vanilla extract and salt to the bowl. Make sure to mix them in well. 3. Slowly sift in the all-purpose flour. Gently fold it into the mixture. Don't overmix; keep it soft and fluffy. 4. In another bowl, whip the softened cream cheese until it’s smooth. There should be no lumps. 5. Combine the smooth cream cheese with the cookie dough mix. Blend gently until it's creamy and uniform. 6. Now fold in the mini chocolate chips and optional nuts. Make sure they are spread evenly. 7. If you like it sweeter, sprinkle in some powdered sugar and mix well. 8. Transfer the dip to a nice bowl. Cover it and chill in the fridge for at least 30 minutes. This helps the flavors blend better. To get the right texture, avoid overmixing at every step. Mix until ingredients are just combined. This keeps your dip light and creamy. Use a spatula to fold in chocolate chips gently. This ensures they stay whole and delicious. When you’re ready to serve, choose colorful dippers. I love using graham crackers, apple slices, strawberries, or pretzels. They add a fun twist to every bite. For a pretty touch, sprinkle extra mini chocolate chips on top. You can even add fresh mint leaves for a pop of color. This makes your dip look as good as it tastes! When making chocolate chip cookie dough dip, a few mistakes can happen. First, do not skip softening the butter and cream cheese. This step helps blend ingredients smoothly. Second, avoid overmixing the flour. If you mix too much, the dip can become tough. Lastly, don’t forget to chill your dip. Chilling it enhances the flavors and improves the texture. To get the best flavor, use fresh ingredients. Fresh butter and cream cheese make a big difference. I love using high-quality vanilla extract for a richer taste. Remember to fold in the chocolate chips gently. This way, they stay whole and add a nice bite. If you want extra sweetness, add a bit of powdered sugar at the end. Choosing the right dippers can make your dip even better. I suggest using graham crackers for a crunchy contrast. Fresh fruit like apples and strawberries adds a juicy touch. Pretzels are great too; they give a salty flavor that balances the sweet dip. Feel free to experiment with your favorite snacks. You can even try cookies or marshmallows for a fun twist! {{image_4}} You can change up the flavor of your chocolate chip cookie dough dip easily. Try adding peanut butter for a nutty twist. Just mix in half a cup of creamy peanut butter with the butter. You can also use different types of chocolate chips, like white or dark chocolate. For a fun surprise, add sprinkles or crushed candy bars to the mix. These small changes can make your dip unique and tasty. If you're looking for a healthier option, swap out some ingredients. Use almond flour or oat flour instead of all-purpose flour. This makes it gluten-free and adds a nutty flavor. You can also use coconut sugar instead of brown sugar for a lower glycemic index. For a lighter dip, replace cream cheese with Greek yogurt. It adds protein and keeps the creamy texture. These swaps make the dip healthier without losing taste. You can also add seasonal flavors to your dip. For fall, mix in pumpkin spice and a little pure pumpkin puree. This gives a cozy autumn vibe. In summer, add crushed fresh berries for a fruity touch. For winter, sprinkle in some crushed peppermint candies for a festive look. These seasonal twists keep your chocolate chip cookie dough dip fresh and exciting for every occasion. To keep your chocolate chip cookie dough dip fresh, store it in an airtight container. Make sure the lid is tight to keep out air. You can use glass or plastic containers. Avoid storing it in a bowl without covering it. This dip tastes best when chilled. You can freeze this dip for later use. First, place it in a freezer-safe container. Leave some space at the top for expansion. Label the container with the date. When you're ready to enjoy it, thaw the dip in the fridge overnight. After thawing, stir it well before serving. In the fridge, this dip lasts about five days. It may lose some flavor after a few days, so enjoy it fresh. If you notice any changes in smell or texture, it's best to toss it out. Always check before you dip! Yes, it is not safe to eat raw cookie dough. The main concern is raw flour. It can carry germs like E. coli. Always bake your dough or use heat-treated flour for safety. Yes, you can make this dip ahead of time. Just store it in the fridge. It stays fresh for about two to three days. This helps the flavors blend nicely. Some great dippers are: - Graham crackers - Pretzels - Fresh fruit slices (like apples or strawberries) - Vanilla wafers - Cookies These dippers pair well with the sweet dip. To make this dip gluten-free, swap all-purpose flour for gluten-free flour. Use a mix designed for baking. This change keeps the taste and texture delicious. Yes, you can add protein powder. It boosts nutrition without changing the taste much. Start with one scoop and adjust to your liking. This blog post covered everything you need to make cookie dough dip. We discussed the key ingredients, tips for choosing them, and ways to enhance the flavor. I shared clear steps to prepare it perfectly and serve it well. You learned common mistakes to avoid and how to pick the best dippers. Lastly, I provided storage tips and answered common questions. Now you're ready to enjoy this treat. Have fun making it and trying different flavors! Your great tasting dip awaits!

Chocolate Chip Cookie Dough Dip Easy and Fun Recipe

Get ready to indulge in a treat that’s both easy to make and deliciously fun! My Chocolate Chip Cookie Dough

To make these tasty vegan quinoa stuffed peppers, you need: - 4 large bell peppers (any color you prefer) - 1 cup quinoa, thoroughly rinsed to remove bitterness - 2 cups vegetable broth for cooking the quinoa - 1 can (15 oz) black beans, rinsed and drained for added protein - 1 cup corn (choose frozen or canned for convenience) - 1 medium onion, finely diced to enhance flavor - 2 cloves garlic, minced for aromatic goodness - 1 teaspoon ground cumin for warmth - 1 teaspoon smoked paprika for a hint of smokiness - 1 teaspoon chili powder for a slight kick - 1 cup diced tomatoes (fresh or canned, based on availability) - Salt and pepper to taste, adjusting according to preference - Fresh cilantro, chopped, for a vibrant garnish - Avocado slices, for a creamy side addition You can enhance the flavor of your stuffed peppers with these optional items: - Diced jalapeños for extra heat - Chopped spinach or kale for added greens - Nutritional yeast for a cheesy flavor - Lemon or lime juice for brightness - Vegan cheese for a creamy topping Each serving of vegan quinoa stuffed peppers packs a nutritious punch. You get roughly: - 300 calories - 12 grams of protein - 8 grams of fiber - 50% of daily vitamin C needs - Good amounts of iron and magnesium These peppers are not only filling but also full of vitamins and minerals. They are perfect for anyone looking to eat healthy! For the full recipe, visit the recipe section above. Start by preheating your oven to 375°F (190°C). This sets the stage for baking. Next, take your bell peppers and slice off the tops. Remove all seeds and membranes. Stand the peppers upright in a baking dish. This keeps them stable as you fill them. In a medium saucepan, mix the rinsed quinoa with vegetable broth. Bring the mixture to a quick boil. Then, lower the heat and cover the pot. Let it simmer for about 15 minutes. The quinoa will become fluffy and absorb all the broth. You want it light and airy for the best texture. While the quinoa cooks, grab a large skillet. Add a splash of water or some vegetable broth over medium heat. Sauté the diced onion until it turns translucent, which takes about 5 minutes. Then, add minced garlic and cook for another minute. This step releases a lovely aroma that adds depth to your dish. Now, stir in the black beans, corn, cumin, smoked paprika, chili powder, and diced tomatoes. Mix well and season with salt and pepper. Cook the mixture for about 5 minutes. This allows the flavors to blend nicely and create a robust filling. Once your quinoa is ready, fluff it with a fork. Add it to the skillet mixture and stir until everything combines well. Now, it's time to stuff the peppers! Spoon the quinoa mixture into each hollowed pepper. Pack it gently but firmly to keep their shape. Cover the baking dish with aluminum foil and place it in the oven. Bake for 25-30 minutes. After that, remove the foil and bake for another 10 minutes. This gives the tops a nice, slightly charred finish. When finished, let the peppers cool for a few minutes. Garnish with fresh cilantro and serve with avocado slices for extra creaminess. Enjoy your tasty dish! When picking bell peppers, look for bright colors. The skin should be smooth and firm. Avoid any peppers with soft spots or wrinkles. Choose peppers that feel heavy for their size. This means they are fresh and juicy. Different colors offer unique flavors. Green peppers taste slightly bitter, while red, yellow, and orange ones are sweeter. To cook quinoa perfectly, rinse it well before cooking. This removes the bitter saponins. Use a 2:1 ratio of liquid to quinoa. I recommend vegetable broth for added flavor. Bring the broth to a boil, then lower the heat. Cover and let it simmer for about 15 minutes. Once the water absorbs, fluff it with a fork to separate the grains. This keeps it light and fluffy. Ovens can vary in temperature accuracy. If your oven runs hot, reduce the baking time slightly. For a cooler oven, increase the time by a few minutes. Always check the peppers around the 25-minute mark. They should be tender but still hold their shape. Adjust your cooking time based on how your oven performs for best results. {{image_4}} You can switch up the filling in your stuffed peppers. Try cooked brown rice or lentils instead of quinoa. Both options add great texture and protein. For a twist, use sautéed mushrooms or spinach. They bring extra flavor and nutrients. You can also add chopped nuts for crunch. Each filling gives a unique taste and makes your dish fun. Want a lighter meal? Use less quinoa and add more veggies. Zucchini, mushrooms, or diced eggplant work well. You can also replace black beans with chickpeas for a different taste. If you skip the oil in cooking, the dish stays light. Consider using a sugar-free vegetable broth, too. These small changes keep your meal healthy without losing flavor. Serve your stuffed peppers with a side salad. A simple green salad with lemon dressing fits well. Add whole grain bread for a hearty meal. If you want a dip, try a light salsa or guacamole. These pairings keep the meal fresh and vibrant. For a cozy touch, serve with warm vegetable soup. Enjoy the colorful presentation and delicious flavors of your meal. For more details, check out the Full Recipe. To store leftover stuffed peppers, let them cool first. Place them in an airtight container. You can keep them in the fridge for up to four days. This keeps the flavor fresh. If you want to save space, you can separate the peppers with parchment paper. This reduces moisture and helps them stay firm. Freezing stuffed peppers is easy and great for meal prep! After they cool, wrap each pepper tightly in plastic wrap. Then place them in a freezer-safe bag. Make sure to squeeze out all the air. You can freeze them for up to three months. When you are ready to eat, just thaw them in the fridge overnight before reheating. To reheat, preheat your oven to 350°F (175°C). Place the stuffed peppers in a baking dish. Cover them with foil to keep them moist. Heat for about 20-25 minutes. You can microwave them too! Just place the pepper on a plate, cover it, and heat for 3-4 minutes. Be careful; they can get hot! Enjoy your meal with fresh toppings. For more details, check out the Full Recipe. Yes, you can use other grains. Brown rice, farro, or even barley work well. They each add their own taste and texture. Just adjust the cooking time based on the grain you choose. For example, brown rice takes longer to cook than quinoa. Yes, these stuffed peppers are gluten-free. Quinoa is a naturally gluten-free grain. All other ingredients, like beans and veggies, are also gluten-free. This makes this dish great for anyone with gluten intolerance. Stuffed peppers can last about 4 to 5 days in the fridge. Make sure to store them in an airtight container. This keeps them fresh. If you notice any odd smells or changes, it's best to discard them. Absolutely! You can prepare the filling in advance. Just stuff the peppers when you’re ready to bake them. You can also bake them ahead and reheat later. This makes it a great option for meal prep. For the full recipe, check the detailed instructions above. Vegan quinoa stuffed peppers make a healthy and tasty dish. We covered key ingredients, cooking steps, and helpful tips. You learned about variations and how to store leftovers too. Feel free to experiment with flavors and ingredients to match your taste. This dish is nutritious and great for meal prep. Now, you can enjoy making these stuffed peppers for yourself or loved ones. Get cooking and savor every bite!

Vegan Quinoa Stuffed Peppers Tasty and Nutritious Dish

Are you looking for a tasty and nutritious meal? Vegan quinoa stuffed peppers tick all the boxes. They are not

- 1 pound large shrimp, peeled and deveined - 4 tablespoons extra-virgin olive oil - 4 cloves fresh garlic, finely minced - Zest of 1 unwaxed lemon - 1/4 cup freshly squeezed lemon juice - 1/2 teaspoon red pepper flakes (adjust to taste) - Sea salt and freshly cracked black pepper, to taste - 2 tablespoons fresh parsley, finely chopped - Lemon wedges, for serving When I make Zesty Lemon Garlic Shrimp, I focus on fresh, high-quality ingredients. The shrimp should be large and firm. Choose shrimp that are peeled and deveined for ease. The garlic must be fresh, as it gives a bold flavor. Using unwaxed lemons is key; the zest adds a bright note without bitterness. Fresh lemon juice enhances the dish's zestiness. For seasoning, I use red pepper flakes for a bit of heat. Adjust the amount based on your taste. A sprinkle of sea salt and cracked black pepper rounds out the flavors nicely. Fresh parsley adds color and a fresh taste. Lastly, serve with lemon wedges to boost the dish's tang. For the full recipe, check out the Full Recipe section! First, grab a spacious bowl. In it, combine the shrimp with: - 1 pound large shrimp, peeled and deveined - 4 tablespoons extra-virgin olive oil - 4 cloves fresh garlic, finely minced - Zest of 1 unwaxed lemon - 1/4 cup freshly squeezed lemon juice - 1/2 teaspoon red pepper flakes (adjust to taste) - Sea salt and freshly cracked black pepper, to taste Gently toss all the ingredients until the shrimp are coated. This marinade is key for great flavor. Let the shrimp marinate at room temperature for 15 to 30 minutes. This time helps the flavors mix well and soak into the shrimp. You’ll notice that the shrimp will start to absorb the zesty taste. Next, preheat a large skillet over medium-high heat. The skillet needs to be hot before you add the shrimp. Once ready, carefully place the marinated shrimp in the skillet. Cook them for about 2-3 minutes on each side. They are done when they turn pink and opaque. This is when they are at their best! After cooking, take the skillet off the heat. Sprinkle chopped fresh parsley over the shrimp for a burst of color. You can serve the zesty shrimp right away. Pair it with lemon wedges for an extra zing. Squeezing fresh lemon juice on top adds a delightful touch! For the complete details, check the Full Recipe. To cook shrimp perfectly, watch for their color change. They will turn pink and opaque when done. This usually takes 2-3 minutes per side. Avoid overcooking by keeping an eye on them. Shrimp can become rubbery if cooked too long. For a zesty kick, add more lemon juice. It brightens the dish and makes it tangy. You can also play with spices. Try adding paprika for smokiness or thyme for an herbal note. These small changes can make a big difference in taste. Serve your shrimp in a vibrant bowl. This adds a pop of color to your table. Garnish with fresh parsley and lemon wedges. It makes the dish look inviting and fresh. A good presentation enhances the dining experience. {{image_4}} You can easily add vegetables to your zesty lemon garlic shrimp. Bell peppers, zucchini, and snap peas work well. Just chop them into bite-sized pieces. Toss them in the marinade with the shrimp. Cook them together for a colorful and tasty dish. You can also use asparagus or broccoli for added crunch. They will soak up the flavor and make the meal more filling. If you want to switch things up, try chicken or scallops. For chicken, cut it into small pieces. Use the same marinade and cook until it’s no longer pink. For scallops, follow the same steps as the shrimp. They cook quickly and have a nice, sweet flavor. Both options bring a new twist to the dish while keeping it delicious. Do you like heat? You can make this recipe spicier! Use fresh chili peppers like jalapeños or serranos. Chop them finely and add them to the marinade. You can also add more red pepper flakes if you want a little kick. Another option is to use hot sauce for a different flavor. Adjust the spice level to suit your taste for a thrilling meal experience. For the full recipe, check the detailed instructions above. You can keep Zesty Lemon Garlic Shrimp in the fridge for up to three days. Make sure to store it in an airtight container. This helps keep the shrimp fresh and tasty. After cooking, let it cool to room temperature before sealing it. This way, it won’t steam and get soggy. If you want to store leftovers longer, freezing is a great option. Place the shrimp in a freezer-safe bag. Remove as much air as possible to prevent freezer burn. You can freeze it for up to three months. When you’re ready to eat, thaw it in the fridge overnight. Never refreeze shrimp after it has been cooked. To reheat your shrimp, avoid using the microwave. This method can make shrimp rubbery. Instead, you can warm it gently in a skillet over low heat. Add a splash of olive oil or lemon juice to keep it moist. Cook for just a few minutes until heated through. This way, your shrimp stays delicious and tender. You can tell shrimp are cooked by looking at their color. They turn pink and opaque when done. The texture will also change; they become firmer. Cook shrimp for about 2-3 minutes on each side. If you see them curling tightly, that’s a sign they are ready. Overcooked shrimp can become rubbery, so watch them closely. Yes, you can use frozen shrimp! Just make sure to thaw them first. Place shrimp in the fridge overnight or run them under cold water for a quick thaw. Pat them dry before marinating. This helps the marinade stick better. Frozen shrimp can be just as tasty as fresh when cooked right. Zesty Lemon Garlic Shrimp pairs great with many sides. Here are some popular choices: - Steamed rice or quinoa - Garlic bread for a crunchy bite - Fresh salad with greens and vinaigrette - Roasted vegetables for added flavor - Pasta with olive oil and herbs These sides will make your meal tasty and complete. For the full recipe, check out the Zesty Lemon Garlic Shrimp Delight. Zesty Lemon Garlic Shrimp is a fresh and flavorful dish made with simple ingredients. You learned how to prepare and cook shrimp to keep it tender and juicy. There are tips for enhancing flavor, adding veggies, and even using different proteins. Always store leftovers safely to enjoy later. With these techniques, you can serve a tasty meal that impresses everyone. Now, it’s time to get cooking and enjoy your delicious shrimp!

Zesty Lemon Garlic Shrimp Simple and Tasty Recipe

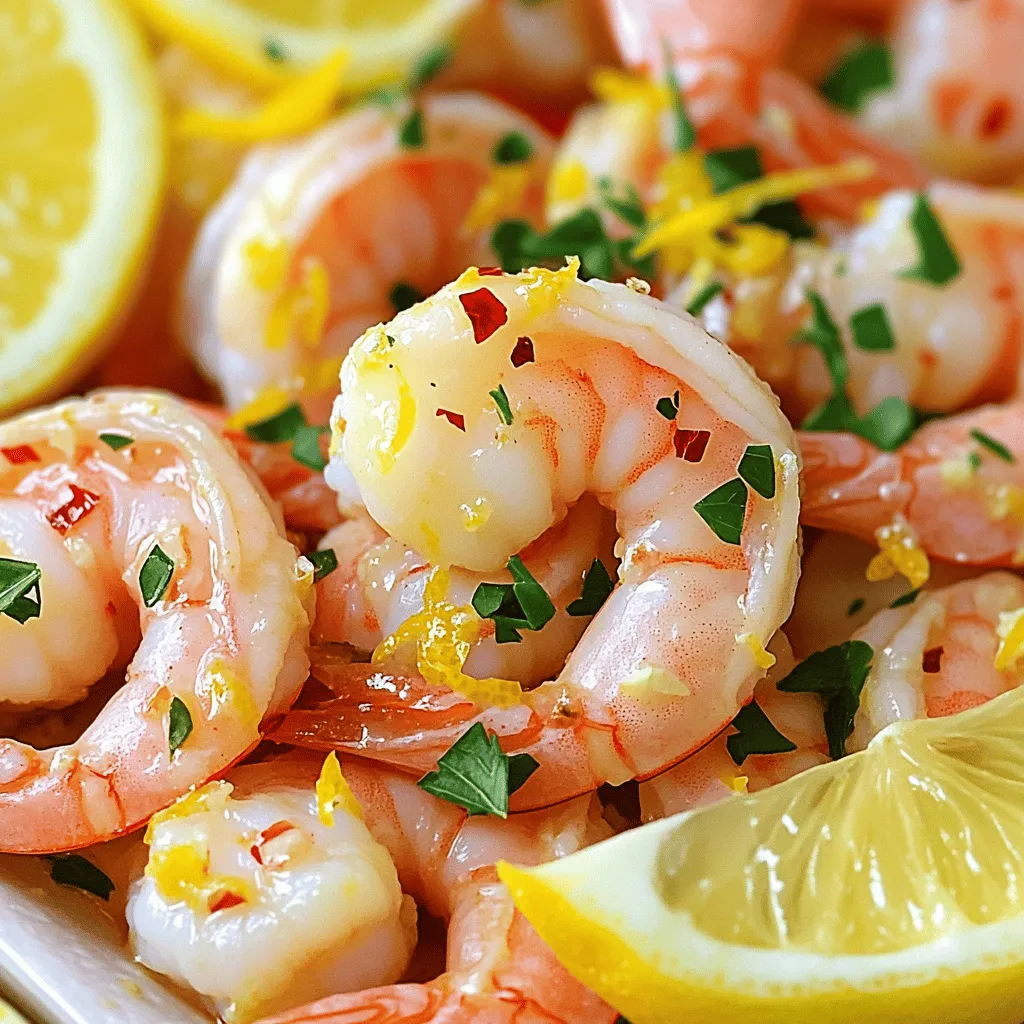
Want a dish that bursts with flavor and is quick to make? My Zesty Lemon Garlic Shrimp recipe delivers just

To make Heavenly Banana Walnut Cream Cake, you will need: - 3 ripe bananas, thoroughly mashed - 1 cup granulated sugar - 1/2 cup unsalted butter, softened - 2 large eggs - 1 teaspoon vanilla extract - 1 1/2 cups all-purpose flour - 1 teaspoon baking powder - 1/2 teaspoon baking soda - 1/4 teaspoon salt - 1 cup walnut halves or pieces, chopped - 1/2 cup sour cream - 1 cup heavy whipping cream - 2 tablespoons powdered sugar - 1/2 teaspoon vanilla extract (for the cream layer) When measuring ingredients, be precise. Use a kitchen scale for accuracy. For butter, you can use coconut oil for a dairy-free option. If you want a lighter cake, replace some sugar with applesauce or honey. You can also use Greek yogurt instead of sour cream for added protein. Always choose ripe bananas. They should have brown spots for the best flavor. Fresh walnuts add a nice crunch. Toast them lightly in a dry pan to enhance their taste. Use pure vanilla extract, as it provides a richer flavor than imitation vanilla. For the best cream topping, use heavy whipping cream with at least 36% fat content; this ensures it whips up beautifully. This recipe is simple and full of flavor. For the full recipe, please refer to the instructions above. To start, gather your ingredients. You need ripe bananas, sugar, butter, eggs, and vanilla extract. First, preheat your oven to 350°F (175°C). Grease a 9x13-inch pan with butter or cooking spray. Dust it lightly with flour to stop the cake from sticking. Next, in a large bowl, cream together the softened butter and sugar. Use an electric mixer for about 3-5 minutes until it looks light and fluffy. Then, add the eggs one at a time. Make sure to mix well after each egg. Now, add the mashed bananas and the vanilla extract. Mix until everything is combined. In another bowl, whisk the flour, baking powder, baking soda, and salt. Slowly add this dry mix to your wet mix. Alternate adding this with the sour cream. Start and finish with the flour mix. Stir gently to avoid overmixing. Finally, fold in the chopped walnuts. Once your batter is ready, pour it into the prepared pan. Spread it evenly with a spatula. Bake for 25-30 minutes. To check if it is done, insert a toothpick in the center. It should come out clean or with a few moist crumbs. When baked, let the cake cool completely on a wire rack. While the cake cools, prepare the cream topping. In a mixing bowl, beat the heavy whipping cream, powdered sugar, and vanilla extract together. Use an electric mixer until stiff peaks form, which takes several minutes. Once the cake is cool, spread the whipped cream topping evenly on it. For a nice touch, sprinkle more chopped walnuts and add fresh banana slices on top. This makes your cake look beautiful and tasty. For the full recipe, you can refer to the earlier sections. Enjoy this delightful cake at your next gathering! To make your batter smooth, start with soft butter. Beat it with sugar until fluffy. Add eggs one at a time; mix well after each. This ensures a light cake. Use ripe bananas; they're sweeter and easier to mash. When mixing dry and wet ingredients, alternate them. This keeps the batter from getting too tough. Baking is a science. Follow your oven temperature closely. If it runs hot, your cake may burn. If it’s cool, the cake may not rise. Use a toothpick to check doneness. It should come out clean or with a few crumbs. Let the cake cool fully before adding the cream layer. This keeps the cream from melting and sliding off. Serve the cake chilled for the best taste. Cut it into squares for easy serving. Add fresh banana slices on top for a nice look. You can drizzle caramel sauce over each piece. This adds extra flavor and makes it look fancy. For a twist, pair it with vanilla ice cream. It’s a sweet treat for any occasion. For the full recipe, you can refer back to the earlier section. {{image_4}} You can make a fun twist on the classic cake by adding chocolate chips. Simply mix in one cup of semi-sweet chocolate chips when you fold in the walnuts. The chocolate adds a rich taste and pairs well with the bananas. It turns this cake into a delightful treat for chocolate lovers. Imagine each bite filled with sweet banana, crunchy walnuts, and creamy chocolate. It’s a perfect dessert for any occasion. If you need a gluten-free cake, swap the all-purpose flour for a gluten-free flour blend. Make sure that your blend has xanthan gum; this helps the cake rise and gives it a nice texture. You can use the same amount as the recipe calls for. This way, you can enjoy the same moist and flavorful cake without gluten. The taste and texture will still amaze you and your guests. Feel free to get creative with your cake! You can use other nuts like pecans or almonds. Chop them up and mix them in just like the walnuts. You can also add fruits like blueberries or strawberries. These fruits add a fresh burst of flavor. Just make sure to adjust the amount of bananas if you add more fruit. Each variation gives you a new taste adventure while keeping the essence of the Heavenly Banana Walnut Cream Cake. For the full recipe, check out the complete guide to this delicious cake! Store your Heavenly Banana Walnut Cream Cake in an airtight container. This keeps the cake fresh and moist. If you plan to eat it within a few days, leave it at room temperature. For longer storage, refrigerate it. Always place a sheet of wax paper between the cake and the lid to avoid sticking. This helps maintain the lovely cream topping. You can freeze the cake for later enjoyment. First, let the cake cool completely. Then, cut it into pieces. Wrap each piece tightly in plastic wrap. After that, place the wrapped pieces in a freezer bag. This way, you can enjoy a slice whenever you want. The cake stays good in the freezer for up to three months. When you’re ready to eat, thaw it in the fridge overnight. To reheat your cake, remove it from the fridge or freezer. If it's frozen, let it thaw. You can warm it up in the microwave for about 15-20 seconds. This makes it soft and cozy. Just be careful not to overheat it, or the cream may melt too much. Enjoy your slice warm or at room temperature! To check if the cake is done, insert a toothpick into the center. If it comes out clean or with a few moist crumbs, the cake is ready. You’ll want to bake it for about 25 to 30 minutes. Keep an eye on it as ovens can vary. Yes, you can use frozen bananas! Just thaw them first and drain any extra liquid. Frozen bananas often become very soft, which is great for mixing into the batter. They add natural sweetness and moisture to your cake. If you don't have walnuts, you can use pecans or almonds. You could also try sunflower seeds or even chocolate chips for a fun twist. Just remember to chop them into smaller pieces for even mixing. The cake can last about 3 to 5 days when stored in the fridge. Keep it covered to maintain freshness. If you want to keep it longer, you can freeze it for up to three months. Just wrap it well to avoid freezer burn. For the best taste, enjoy it fresh! For the full recipe, check out the instructions above. In this post, we covered the key steps to make a delicious cake. You learned about important ingredients and how to measure them correctly for the best taste. I shared tips for making the batter and baking it just right, along with ideas for tasty toppings. Remember, you can customize this cake with different flavors or nuts. Lastly, proper storage will keep your cake fresh longer. Enjoy baking and experimenting with your favorite recipes!

Heavenly Banana Walnut Cream Cake for Sweet Moments

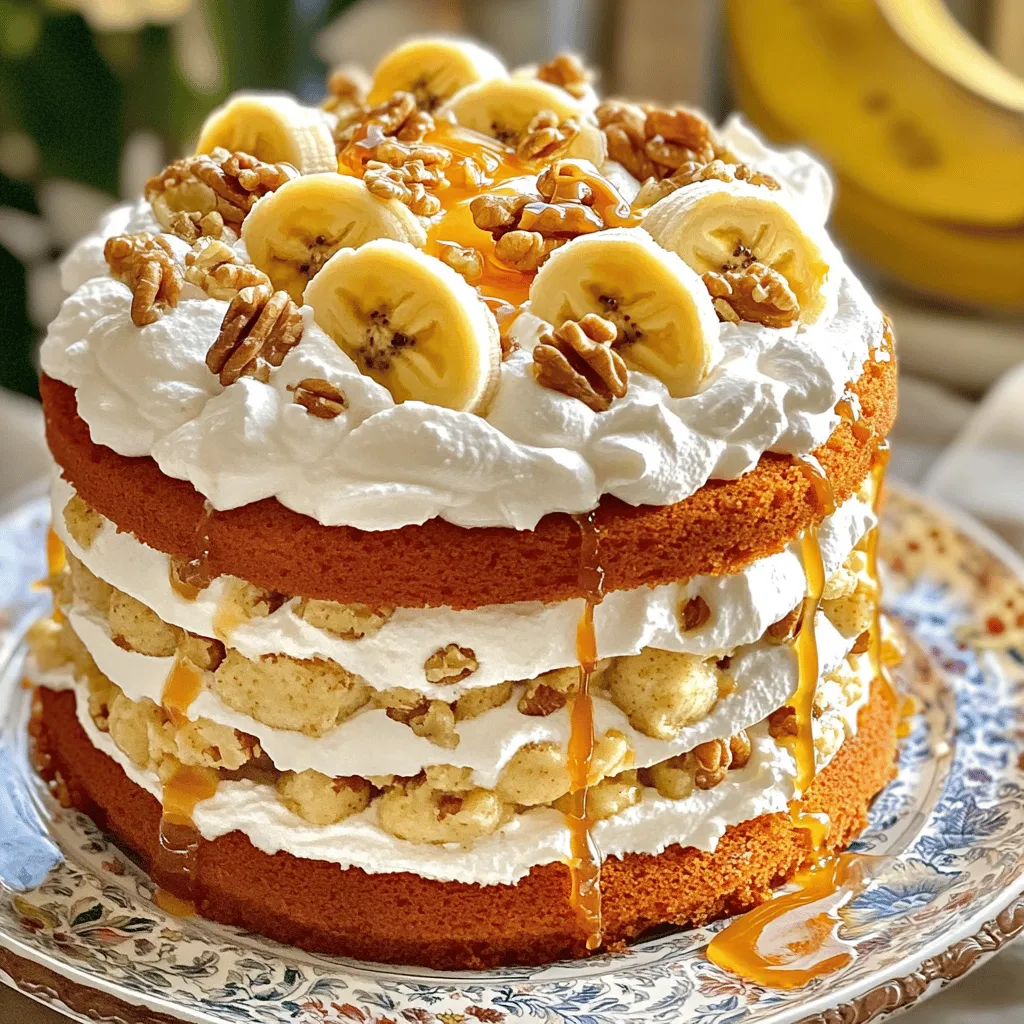
Are you ready to impress with a delightful treat? This Heavenly Banana Walnut Cream Cake makes sweet moments even sweeter.

- 8 oz penne pasta - 2 cups fresh broccoli florets - 2 boneless, skinless chicken breasts, diced into bite-sized pieces - 1 cup heavy cream - 1 cup low-sodium chicken broth - 1 cup freshly grated Parmesan cheese - 3 cloves garlic, minced - 2 tablespoons extra virgin olive oil - 1 teaspoon Italian seasoning blend - Salt and freshly ground black pepper to taste - Fresh basil leaves for garnish (optional) - Use 8 oz of penne pasta for four servings. Cook until al dente for the best texture. - For broccoli, choose vibrant green florets. Fresh is best, but frozen works too. - The chicken should be boneless and skinless. It cooks faster and has less fat. - Heavy cream makes the sauce rich and smooth, but you can use half-and-half for a lighter version. - Freshly grated Parmesan gives the best taste. Pre-grated cheese may not melt well. - Seasoning is key. Adjust salt and pepper based on your taste. - For garnish, fresh basil adds flavor and color. It's optional but highly recommended. Start by boiling a large pot of salted water. Add the penne pasta and cook it until al dente, as per the package directions. With about three minutes left for the pasta, add the fresh broccoli florets to the water. This method is called blanching. It keeps the broccoli bright and crisp. Once done, drain both the pasta and broccoli together. Set them aside for later use. In a deep skillet, heat two tablespoons of extra virgin olive oil over medium heat. Once the oil shimmers, add your diced chicken. Season it well with salt, pepper, and Italian seasoning. Cook the chicken for about five to seven minutes. You want it golden-brown and cooked all the way through. To check doneness, ensure the chicken is no longer pink in the center. After the chicken is cooked, add three minced garlic cloves to the skillet. Sauté for one minute until the garlic smells amazing. Next, pour in one cup of low-sodium chicken broth. Let it simmer for two to three minutes. This step melds the flavors together. Then, reduce the heat to low and stir in one cup of heavy cream. Gradually add one cup of freshly grated Parmesan cheese. Keep stirring until the sauce is smooth and creamy. If it’s too thick, you can add a bit of reserved pasta water to reach your desired consistency. This process creates a rich and flavorful sauce that coats the pasta and broccoli beautifully. You can find the full recipe to guide you through every step. To make Creamy Broccoli and Chicken Penne, prep is key. Start by gathering all your ingredients. This keeps you organized and saves time. Chop the chicken and broccoli first. Mince the garlic while the water boils. - Efficient prep strategies: Always read the recipe before starting. This helps you understand the steps. Prepare your workspace by clearing the counter and having bowls ready. - Tips for multitasking in the kitchen: While the pasta cooks, sauté the chicken. This saves time. Keep an eye on both pots. If you need to, set a timer for each task. - How to ensure everything is ready simultaneously: Aim to finish the sauce just as the pasta and broccoli are done. When the pasta is almost ready, start making the sauce. This way, you combine everything at its freshest. Adding flavors can make your dish pop. Use fresh herbs and spices to boost taste. - Recommended herbs and spices: Italian seasoning brings warmth. You can also try garlic powder or crushed red pepper for a kick. Fresh basil adds a nice touch at the end. - Adjusting creaminess levels: If you want a richer sauce, add more heavy cream. For a lighter version, use less cream or substitute with chicken broth. - Adding protein alternatives: If you want to switch things up, consider shrimp or tofu. Both options work well with the sauce. Presentation matters when serving your dish. It makes your meal feel special. - Ideal plating techniques: Serve the pasta in a shallow bowl. This allows the sauce to shine. Garnish with fresh basil for color and aroma. - Complementary side dishes: A crisp salad pairs nicely with this dish. Garlic bread also makes a great side. - Best beverages to pair: A light white wine like Pinot Grigio enhances the flavors. For a non-alcoholic choice, try sparkling water with lemon. These tips will help you create a creamy, flavorful delight that impresses family and friends. For the full recipe, check out the details above. {{image_4}} You can customize Creamy Broccoli and Chicken Penne to fit your diet. Here are some great swaps: - Gluten-free pasta options: Use rice or quinoa pasta. They work well in this dish. - Alternative proteins: Try shrimp or tofu instead of chicken. Both add unique flavors. - Dairy-free cream substitutes: Use coconut cream or almond milk. These keep it rich and tasty. You can prepare this dish in various ways. Here are a few methods to consider: - Oven-baked version: Combine all ingredients in a baking dish. Bake at 350°F until bubbly. - Stovetop versus Instant Pot: The stovetop gives you control, while the Instant Pot cooks faster. Choose based on your time. - Skillet methods: If you need a quicker option, sauté everything in a large skillet. This saves time and keeps flavors fresh. Adding regional flavors can make this dish exciting. Here are some ideas: - Italian-inspired variations: Add sun-dried tomatoes or olives for a Mediterranean twist. - Adding seasonal vegetables: Incorporate zucchini or asparagus for extra color and taste. - Incorporating different cheeses: Try mozzarella or goat cheese. They add creaminess and a unique flavor. For the full recipe, check out the complete details and instructions. To keep your Creamy Broccoli and Chicken Penne fresh, store leftovers in the fridge. Use airtight containers to prevent moisture loss. This dish stays good for about 3 to 4 days. Always let it cool before sealing it. This step helps avoid condensation, which can make the dish soggy. If you want to freeze your pasta, it’s best to do it right away. Portion out the pasta in freezer-safe bags or containers. Remove as much air as you can for better preservation. Your dish can last in the freezer for up to 2 months. To reheat, allow it to thaw in the fridge overnight. This keeps the texture nice. For reheating, the stove is your best friend. It warms the dish evenly and keeps the creaminess. If you're using a microwave, do it in short bursts. Stir in between to avoid hot spots. You may need to add a splash of cream or a bit of pasta water to regain the sauce's smoothness. On the stove, aim for low heat, stirring gently. This should take about 5 to 10 minutes. Enjoy your meal just like it was fresh! You can make this dish ahead in a few easy steps. First, cook the penne pasta and broccoli. Drain them, then set them aside. Next, prepare the chicken and sauce, but do not mix in the pasta yet. Store the chicken and sauce in a separate container. Keep the pasta and broccoli in another. For best flavor, assemble the dish within two days. Yes, you can swap out broccoli for other veggies. Try using spinach, peas, or bell peppers. Each vegetable brings its own flavor. For example, spinach adds a mild taste, while bell peppers can add a sweet crunch. Make sure your choices balance well with the creamy sauce. For a healthier version, reduce the heavy cream. You can use low-fat milk instead. Add more veggies like zucchini or carrots to boost nutrition. Consider using whole grain penne for added fiber. These changes keep your meal tasty while cutting calories. To make the sauce richer, boost the umami flavor. You can add a splash of white wine or a squeeze of lemon juice. Both will enhance the taste and add brightness. Try using a pinch of grated nutmeg for extra depth, too. This dish goes well with a fresh side salad. A simple mix of greens and a light vinaigrette works great. You can also serve crusty bread for dipping. If you enjoy wine, a glass of Chardonnay will complement the meal nicely. This blog post shared a delicious recipe for Creamy Broccoli and Chicken Penne. We covered key ingredients, precise measurements, and clear cooking steps. I offered tips for timing, flavor enhancements, and serving ideas. You learned about ingredient variations and smart storage methods too. To wrap up, this dish is flexible and can fit different diets. With a little creativity, you can make it your own. Enjoy cooking and sharing this meal with others!

Creamy Broccoli and Chicken Penne Flavorful Delight

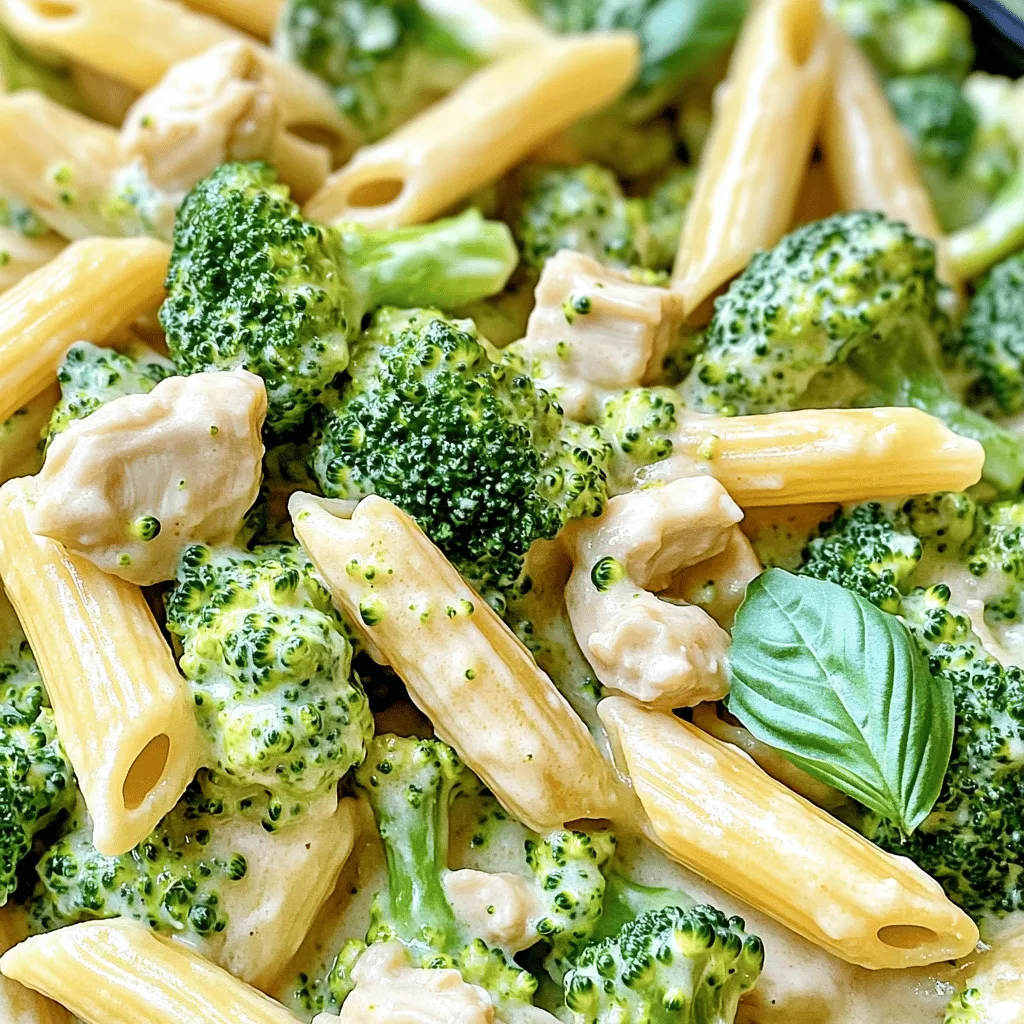
Are you ready to indulge in a creamy delight that combines tender chicken, fresh broccoli, and perfectly cooked penne? In

Here’s what you need for savory stuffed zucchini boats: - 4 medium zucchini - 1 cup cooked quinoa - 1 cup cherry tomatoes, halved - 1 cup cooked black beans, drained and rinsed - 1/2 cup corn kernels (fresh or frozen) - 1 teaspoon ground cumin - 1 teaspoon smoked paprika - 1/2 teaspoon garlic powder - 1/2 teaspoon onion powder - Salt and freshly ground black pepper to taste - 1 cup shredded cheese (cheddar or a blend of your choice) - 2 tablespoons fresh cilantro, finely chopped (for garnish) - 1 tablespoon olive oil Each ingredient plays an important role in flavor and texture. The zucchini serves as a tasty shell. Quinoa adds protein and bulk, while black beans bring fiber. Corn provides sweetness, and spices create depth. Cheese gives a rich finish, and fresh cilantro brightens the dish. For the full recipe, visit the section that covers step-by-step instructions. - Preheat oven to 375°F (190°C). - Take each zucchini and slice it in half. - Scoop out the flesh, leaving a shell. Set the flesh aside. - In a bowl, mix cooked quinoa, halved tomatoes, black beans, and corn. - Add ground cumin, smoked paprika, garlic powder, and onion powder. - Chop the reserved zucchini flesh and add it to the mixture. - Season with salt and black pepper. Mix in half of the cheese. - Brush the inside of the zucchini halves with olive oil. - Place them cut side up in a baking dish. - Fill each half with the quinoa mixture, pressing down gently. - Top with the remaining cheese. - Cover with foil and bake for 25 minutes. - Remove the foil and bake for 10-12 more minutes. - Let them cool a few minutes, then garnish with cilantro. For the full recipe, refer to the provided details. Enjoy your healthy and tasty meal! Select medium-sized zucchinis for the best taste and texture. They are easier to fill and cook evenly. Look for firm zucchinis with a bright color. Avoid those that feel soft or have blemishes. Fresh zucchinis will enhance your dish's flavor and presentation. To avoid mushy zucchini, do not overcook them. Bake them just right to keep a slight crunch. This will make your meal more enjoyable. You also want to ensure the filling is well-seasoned. Mix your spices well to flavor every bite. Taste the filling before you stuff the zucchini. Adjust the seasonings as needed for the best results. Arrange your stuffed zucchini boats on a large platter. This makes for an appealing presentation. Drizzle a little olive oil over them for shine. Garnish with fresh cilantro to add color. A bright plate will invite everyone to dig in. For extra flair, sprinkle some cilantro around the platter. It creates a vibrant and inviting dish that looks as good as it tastes. Enjoy the full recipe for more details on preparation! {{image_4}} You can easily make your stuffed zucchini boats vegan. To do this, just swap out the cheese for a dairy-free option. Nutritional yeast works great for a cheesy flavor. Also, you can try vegan cream cheese for creaminess. For plant-based protein, use lentils or chickpeas. These options add texture and flavor to your dish. If you want a gluten-free meal, you can use different grains. Instead of quinoa, try brown rice or millet. Both are tasty and safe for gluten-free diets. Always check ingredient labels to make sure everything is gluten-free. This helps you avoid any hidden gluten in sauces or spices. Spice up your stuffed zucchini with different flavors. You can add chili powder for heat or Italian herbs for a classic taste. Don’t forget to try adding chopped bell peppers or mushrooms to the filling. These vegetables give a nice crunch and enhance the overall flavor. Explore your favorite spices to create your own unique twist. For the full recipe, check out Savory Stuffed Zucchini Boats. To keep your stuffed zucchini boats fresh, store them in the fridge. Place them in airtight containers to prevent drying out. They will last for about 3 to 5 days. Always allow them to cool completely before sealing. When reheating, use the oven if you can. Preheat it to 350°F (175°C). Place the zucchini boats on a baking sheet. Cover them with foil to keep them moist. Heat for about 15 minutes or until warmed through. If you prefer using a microwave, heat them in short bursts. This helps keep the texture right. You can freeze stuffed zucchini boats for later meals. First, let them cool completely. Wrap each boat tightly in plastic wrap, then place them in freezer bags. They can last for up to 3 months. To thaw, move them to the fridge overnight. Reheat in the oven for the best taste and texture. Yes, you can prepare stuffed zucchini boats in advance. Here’s how: - Prep the Filling: Make the filling a day before. Store it in an airtight container in the fridge. - Stuff the Zucchini: You can stuff the zucchini halves and keep them in the fridge. - Reheat: When ready, bake them straight from the fridge. Just add a few extra minutes to the cooking time. If you don’t have quinoa, try these grains: - Rice: Use cooked white or brown rice. Cooking time is about 20-30 minutes. - Couscous: This cooks quickly, in about 5 minutes. - Farro: Cook for about 30-40 minutes. It adds a nice nutty flavor. To keep your zucchini firm, use these tips: - Salt the Zucchini: After scooping, sprinkle salt inside. Let it sit for 15 minutes, then rinse and dry. - Bake at a High Temp: Bake at 375°F (190°C) to help evaporate excess moisture. - Avoid Overcooking: Keep an eye on the baking time to prevent sogginess. Yes, grilling adds a great flavor! Here’s how: - Preheat the Grill: Heat to medium-high. - Stuff the Zucchini: Prepare the filling as usual. - Grill: Place zucchini boats cut side up on the grill. Cook for 10-15 minutes. Check for tenderness and a nice char. - Cheese: Add cheese in the last few minutes of grilling to melt it perfectly. For the complete recipe, refer to the [Full Recipe]. Stuffed zucchini boats offer a tasty and healthy meal option. We explored ingredients, from zucchini to cheeses, and discussed how to prepare and bake them. Tips for choosing good zucchini and ways to prevent mushiness were shared. I also provided ideas for vegan substitutions and storing leftovers. Try these stuffed zucchini boats on your own. They're simple, fun, and full of flavor. You’ll enjoy the process and the results!

Savory Stuffed Zucchini Boats Simple and Healthy Meal

Looking for a simple and healthy meal that bursts with flavor? Savory Stuffed Zucchini Boats are the perfect solution! With

To make a great Spaghetti Aglio e Olio, you need a few key ingredients. Choosing the right ones makes a big difference. - High-quality spaghetti: Pick a good brand for the best texture. Look for durum wheat spaghetti. It holds sauce well and cooks evenly. - Essential garlic and olive oil: Use fresh garlic for the best taste. Extra virgin olive oil adds rich flavor. Look for a fruity, robust oil to enhance the dish. - Optional toppings and garnishes: Fresh parsley brightens the dish. Lemon zest adds a zesty twist. For cheese lovers, grated Parmesan or nutritional yeast gives a nice finish. With these ingredients, you can create a simple yet flavorful meal. Follow the [Full Recipe], and enjoy the process! To make great spaghetti, start with a large pot of water. Add a generous pinch of salt. This step is key. It helps flavor the pasta. When the water boils, add the spaghetti. Cook it until it is al dente. This means it should be firm but not hard. Check the package for the right cooking time. Before you drain the pasta, save one cup of the pasta water. This water has starch, which helps the sauce stick. Use a colander to drain the spaghetti. While the pasta cooks, you can make the garlic sauce. Take a large skillet and pour in the extra virgin olive oil. Heat it over medium. Once hot, add the sliced garlic and red pepper flakes. Stir gently for about 2-3 minutes. You want the garlic to turn golden brown. Keep a close eye on it. If it burns, it will taste bitter. Once the garlic is golden, reduce the heat to low. Add the drained spaghetti to the skillet. Toss the pasta well in the garlic oil. This ensures every strand is coated. Now, slowly pour in the reserved pasta water. Do this a little at a time while stirring. This technique helps create a creamy sauce. When everything is mixed well, take the skillet off the heat. Stir in fresh lemon zest, lemon juice, and chopped parsley. Taste and add sea salt as needed. Serve the pasta right away. For added flavor, sprinkle some grated Parmesan cheese on top. Enjoy your Spaghetti Aglio e Olio! For full details, check the Full Recipe. To make your Spaghetti Aglio e Olio even better, consider these tips: - Adjusting Spice Levels: If you like spice, add more red pepper flakes. For milder flavor, use less. Start small, then taste as you go. - Richer Sauce: Want a deeper flavor? Add anchovies, capers, or sun-dried tomatoes. These ingredients bring umami and complexity to the dish. - Fresh Herbs and Citrus: Always use fresh parsley. It brightens the dish. Lemon zest and juice add a zesty kick. They balance the rich garlic oil beautifully. How you serve your pasta matters, too. Here are some ideas: - Plating Spaghetti Aglio e Olio: Twirl the spaghetti on a plate for a fancy look. A fork or tongs works well. - Impressing Guests: Garnish with extra parsley and lemon zest. A lemon wedge on the side makes it pop. - Complete Meal Pairing: Serve with a light salad or garlic bread. These sides complement the pasta without overpowering it. For more detailed instructions, check the Full Recipe. {{image_4}} Spaghetti Aglio e Olio shines in its simplicity. The classic version uses just garlic, olive oil, and pepper flakes. This dish is pure Italian comfort food. You can get creative by adding seasonal vegetables. Think about using zucchini, bell peppers, or cherry tomatoes. These add color and nutrition. Toss them in with the garlic for a delightful mix. If you want protein, shrimp or chicken works great. Sauté the shrimp in garlic oil until pink, or add cooked chicken for extra heartiness. This adds a new layer of flavor and makes the dish more filling. For those needing gluten-free options, there are many alternatives. Look for gluten-free spaghetti made from rice or corn. These options keep the dish tasty without gluten. Vegans can still enjoy this dish. Skip cheese or use nutritional yeast for a plant-based twist. It gives a cheesy flavor without dairy. Low-carb eaters can use spiralized vegetables like zucchini. This creates a fun, light version of the dish. You can sauté the spirals in garlic oil just like pasta. Overall, Spaghetti Aglio e Olio offers endless ways to fit your diet. You can explore these variations while keeping the essence of the dish intact. For the full recipe, check the details provided earlier. To store your Spaghetti Aglio e Olio, let it cool first. Place it in an airtight container. Refrigerate it for up to three days. This keeps the flavors fresh. When reheating, use low heat on the stovetop. Add a splash of olive oil or water. This helps to keep it moist. Stir gently until warmed through. Avoid the microwave if you can; it can dry out the pasta. If you notice any leftovers, check for off smells or strange textures. Discard anything that doesn't seem right. Safety first! You can freeze Spaghetti Aglio e Olio for longer storage. Start by letting it cool completely. Place it in a freezer-safe container or bag. Be sure to remove as much air as possible. Label the container with the date. It can last for up to three months in the freezer. For defrosting, move it to the fridge overnight. This keeps it from getting soggy. When ready to eat, reheat it on the stovetop. Add a bit of water or olive oil while stirring. This will help restore the flavor and texture. To keep the taste fresh after freezing, avoid adding lemon juice or herbs before freezing. Add them when you reheat the dish. This keeps the brightness and flavor intact. Enjoy your delicious Spaghetti Aglio e Olio anytime! Spaghetti Aglio e Olio stands out for its simple ingredients. You only need garlic, olive oil, and red pepper flakes. This dish highlights the flavors of each ingredient without heavy sauces. Its cultural roots trace back to Naples, Italy. This dish is a staple for many Italians. It shows how simple can be delicious and satisfying. Yes, you can prepare Spaghetti Aglio e Olio ahead of time. Cook the pasta and sauce, then mix them right before serving. This keeps the dish fresh. To reheat, warm it gently in a skillet. Add a bit of olive oil and pasta water to keep it moist. This way, it tastes almost as good as fresh. One common mistake is burning the garlic. Keep an eye on it while sautéing. Burnt garlic can ruin the dish’s flavor. Another pitfall is not saving enough pasta water. This water helps create a smooth sauce. Always reserve a cup before draining your spaghetti. Finally, make sure to mix the pasta and sauce off the heat. This helps maintain the sauce's creaminess and the pasta's texture. For the best results, follow the Full Recipe. Spaghetti Aglio e Olio is a simple yet flavorful dish. We explored key ingredients and step-by-step instructions to make it perfect. I shared tips for enhancing flavors and variations for every diet. Storing and reheating methods help you enjoy leftovers later. This dish stands out for its rich taste and cultural roots. Master these techniques, and impress your guests or family with your cooking skill. Enjoy your kitchen adventure, and savor every bite!

Spaghetti Aglio e Olio Flavorful Italian Delight

If you’re craving a quick, delicious meal, Spaghetti Aglio e Olio is your answer. This simple Italian dish bursts with

Older posts
Newer posts
← Previous Page1 … Page12 Page13 Page14 … Page27 Next →

dsad

© 2025 mealinmoments • Built with GeneratePress

Our Policies

  • Copyright Policy
  • Cookie Policy
  • GDPR Policy
  • Privacy Policy
  • Disclaimer
  • Terms Of Use

More Information

  • Home
  • About
  • Contact
  • Appetizers
  • Dessert
  • Dinner
  • Drinks
©2025, mealinmoments About Back To Top