Skip to content
DisclaimerTerms Of UseGDPR PolicyCookie Policy

mealinmoments

  • Home
  • Drinks
  • Appetizers
  • Dinner
  • Dessert
  • About
  • Contact
  • Privacy Policy
DisclaimerTerms Of UseGDPR PolicyCookie Policy

Megan

To make Marry Me Chicken Pasta, gather these key ingredients: - 2 boneless, skinless chicken breasts - 8 oz fettuccine pasta - 1 cup cherry tomatoes, halved - 1 cup heavy cream - ½ cup grated Parmesan cheese - 2 cloves garlic, minced - 1 teaspoon Italian seasoning - 2 tablespoons olive oil - Fresh basil leaves, for garnish - Salt and pepper, to taste These ingredients combine to create a rich, creamy dish that will impress anyone at your table. Using quality ingredients makes a big difference in your dish. Here are my favorite brands: - Chicken: Look for organic or free-range chicken for the best flavor. - Pasta: Barilla or De Cecco fettuccine are great choices for texture. - Cream: Land O’Lakes heavy cream gives a rich, smooth texture. - Parmesan: Grana Padano is a nice alternative for authentic flavor. These brands ensure you get the best taste and quality in your meal. You can easily adjust ingredients if you need to. Here are some smart swaps: - Chicken: Use turkey breast or even shrimp for a seafood twist. - Pasta: Gluten-free pasta works well for those with dietary needs. - Cream: Coconut cream or cashew cream can replace heavy cream for a dairy-free version. - Tomatoes: Canned diced tomatoes can be used if fresh ones aren’t available. These substitutions let you customize the dish while keeping it delicious. For the complete recipe, check the Full Recipe. Start by boiling a large pot of water. Add a generous amount of salt to the water. This helps flavor the pasta. Once the water is boiling, add 8 oz of fettuccine. Cook it according to the package instructions, usually about 8 to 10 minutes. You want it to be al dente, which means it should still have a bit of bite. Once done, drain the pasta. Set it aside and keep a little pasta water if you need to adjust the sauce later. While your pasta cooks, you can focus on the chicken. Take 2 boneless, skinless chicken breasts. Season both sides with salt, pepper, and 1 teaspoon of Italian seasoning. Heat 2 tablespoons of olive oil in a large skillet over medium-high heat. Once the oil is hot, carefully add the chicken breasts. Cook them for about 5 to 7 minutes on each side. They should turn a nice golden brown and reach an internal temperature of 165°F. After cooking, remove the chicken and let it rest for a few minutes. Slice it into strips to add later. In the same skillet, you will create a delicious sauce. Keep the residual oil in the pan. Add 2 cloves of minced garlic and sauté for about 30 seconds. Stir it continuously to avoid burning. Next, add 1 cup of halved cherry tomatoes. Cook them for about 2 to 3 minutes, until they soften and burst. This adds a great flavor to your sauce. Now, reduce the heat to medium and pour in 1 cup of heavy cream. Stir gently and let it simmer. Gradually add ½ cup of grated Parmesan cheese, mixing until the cheese melts. If the sauce is too thick, add a tablespoon of reserved pasta water. Then, add the drained fettuccine to the skillet. Toss everything together, making sure the pasta is well coated with the creamy sauce. Time to make it look good! Take the rested chicken breasts and slice them if you haven't yet. Arrange the chicken strips on top of the pasta. To finish, sprinkle some fresh basil leaves on top. You can also add a bit more grated Parmesan for extra flavor. This dish not only looks great, but it also tastes amazing. Enjoy your Marry Me Chicken Pasta! For the full recipe, check the earlier section. To make a great cream sauce, start with good ingredients. Use fresh heavy cream and quality Parmesan cheese. Heat the skillet over medium heat. Add minced garlic first, stirring for 30 seconds. This brings out its flavor. Then, add your cherry tomatoes. Cook until they soften. Pour in the heavy cream, stirring slowly. Let it simmer lightly. Gradually stir in the Parmesan. This makes the sauce creamy and rich. Adjust salt and pepper to taste. If the sauce feels too thick, add a little pasta water to loosen it. Cooking chicken well is crucial for safety and flavor. Season the chicken breasts with salt, pepper, and Italian seasoning. Heat olive oil in a large skillet. Cook the chicken for about 5-7 minutes on each side. You want a golden crust. Use a meat thermometer to check the temperature. It should reach 165°F (75°C). This ensures it's safe and juicy. Let the chicken rest for a few minutes before slicing. This step keeps the juices inside. Marry Me Chicken Pasta pairs well with many sides. A fresh green salad adds a nice crunch. You can also serve it with garlic bread for a hearty meal. For drinks, a chilled white wine works well. If you want something non-alcoholic, try sparkling water with lemon. Don't forget to top your pasta with fresh basil and extra Parmesan for a beautiful finish. For more ideas, check out the Full Recipe. {{image_4}} You can easily make a vegetarian version of Marry Me Chicken Pasta. Instead of chicken, use mushrooms or eggplant. These veggies add great flavor and texture. You can keep the creamy sauce just the same. Use vegetable broth instead of chicken broth for added depth. You can also add spinach for some extra color and nutrients. If you love seafood, shrimp works well in this dish. Cook the shrimp until they turn pink and add them to the pasta. Tofu is another great option. Press out the water and cut it into cubes. Sauté it until golden brown. Both choices add a nice twist while keeping the meal satisfying. Want to spice things up? Add crushed red pepper flakes to the sauce. It gives a nice heat without overpowering the dish. You could also toss in jalapeños or a dash of hot sauce. These spicy additions can make your meal exciting and full of flavor. To keep your Marry Me Chicken Pasta fresh, store leftovers in an airtight container. Place the pasta and chicken together, or keep them separate if you prefer. Make sure the dish cools to room temperature before sealing. This way, your meal stays tasty for up to three days. When you’re ready to eat your leftovers, reheat them gently. You can use a microwave or a skillet. If using a microwave, cover the dish with a damp paper towel to keep moisture in. Heat in short intervals, stirring in between. If using a skillet, add a splash of cream or reserved pasta water to restore the sauce's creaminess. Heat over low to medium heat until warmed through. Freezing Marry Me Chicken Pasta is a great option for long-term storage. Place the cooled dish in a freezer-safe container. Ensure it’s tightly sealed to avoid freezer burn. For best quality, eat within three months. When you’re ready to enjoy, thaw it overnight in the fridge. Reheat as mentioned above for the best taste. Feel free to explore more tips or recipes that can help you in your cooking journey! Check out the Full Recipe for Marry Me Chicken Pasta. Marry Me Chicken Pasta is a creamy, rich dish. It features chicken, pasta, and a delicious sauce. The sauce is made with heavy cream, Parmesan cheese, and cherry tomatoes. The dish is named for its ability to impress anyone who eats it. It’s a perfect meal for special occasions or cozy dinners at home. To make Marry Me Chicken Pasta gluten-free, choose gluten-free pasta. There are many options like rice, quinoa, or chickpea pasta. These alternatives cook similarly to regular pasta. Just check the cooking time on the package. The rest of the recipe remains the same. Yes, you can prepare this dish ahead of time. Cook the chicken and pasta, then store them separately. Keep the creamy sauce in an airtight container. When ready to serve, reheat everything together. Just make sure to not overcook the pasta when reheating. Several sides pair well with Marry Me Chicken Pasta. Here are some great options: - Garlic bread - A fresh garden salad - Steamed vegetables like broccoli or asparagus - Roasted Brussels sprouts These sides add color and nutrition to your meal. Marry Me Chicken Pasta delivers rich flavors and a satisfying meal. We explored vital ingredients, step-by-step cooking methods, and clever tips. You can swap items or try tasty variations for a personal touch. Remember to store and reheat leftovers properly. With these insights, you can enjoy this dish any time. Cooking doesn't need to be hard. Dive in and impress your loved ones with this simple, delicious recipe. Enjoy your culinary journey!

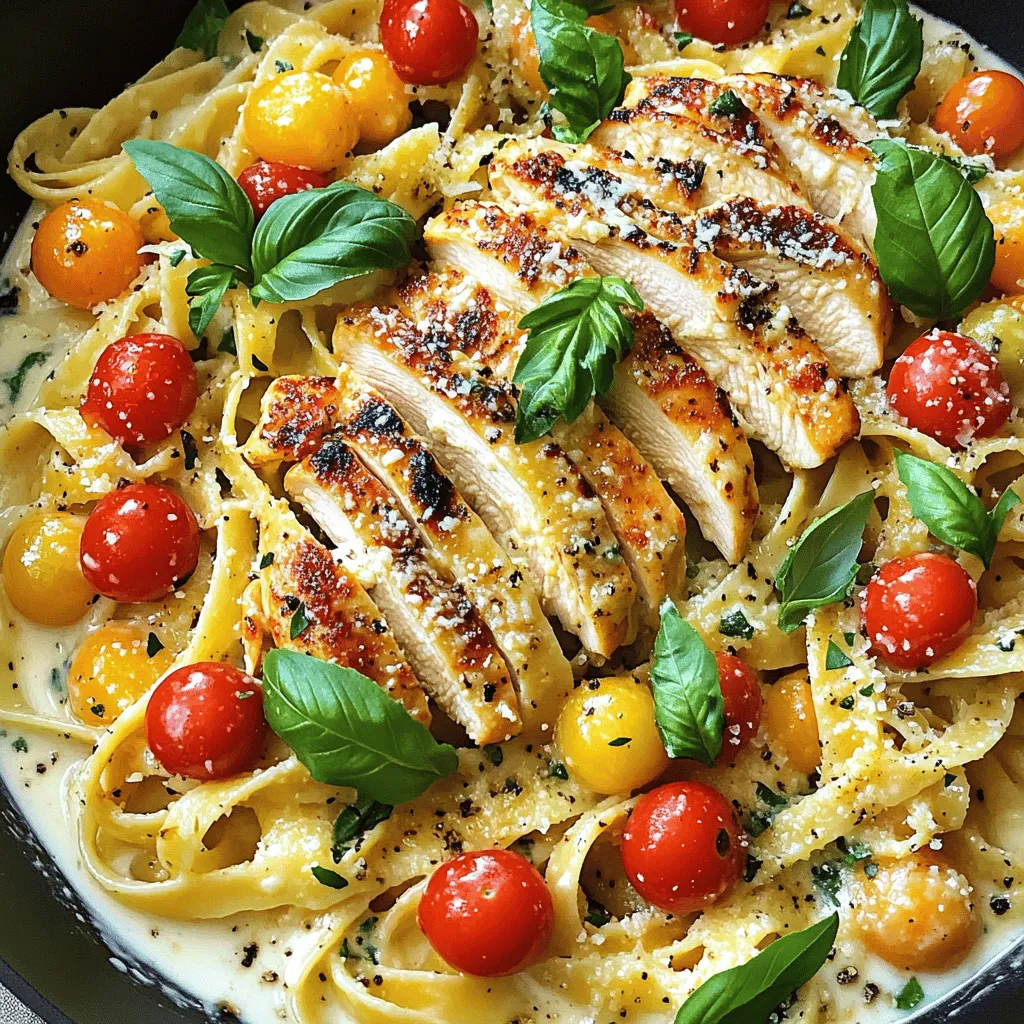
Marry Me Chicken Pasta Delightful and Simple Meal

Looking for a meal that wows? Marry Me Chicken Pasta is just the dish you need! With creamy sauce and

- 1 lb large shrimp, peeled and deveined - 1 bell pepper, sliced into thin strips - 1 cup snap peas, trimmed and washed - 1 can (13.5 oz) coconut milk - 2 tablespoons red curry paste - 1 tablespoon fish sauce - 1 tablespoon fresh ginger, minced - 2 garlic cloves, minced - 1 tablespoon freshly squeezed lime juice - 1 tablespoon coconut oil - Sea salt, to taste Gathering these ingredients is key. The shrimp bring a sweet, tender bite. The bell pepper adds crunch and color. Snap peas offer a fresh, crisp taste. Coconut milk serves as the base. It gives a creamy, rich texture. Red curry paste provides depth with its spicy, aromatic flavor. Fish sauce adds umami and saltiness for balance. Fresh ginger and garlic enhance the dish with warmth and zest. Lime juice brightens the flavors and adds acidity. Coconut oil contributes a subtle sweetness and richness. Don't forget sea salt to taste; it ties everything together. This dish uses simple ingredients to create bold flavors. For the full recipe, check out the [Full Recipe]. Enjoy making this delightful meal! - First, heat 1 tablespoon of coconut oil in a large skillet over medium heat. - Once the oil is warm, add the minced ginger and garlic. Sauté for about 1 minute until fragrant. Stir often to avoid burning. - Next, add 2 tablespoons of red curry paste to the skillet. Cook it for another minute to bring out the flavor. - Carefully pour in the 13.5 oz can of coconut milk. Stir well to mix the curry paste into the milk. - Now, add 1 pound of large shrimp to the curry. Cook for 3 to 4 minutes, until the shrimp turn pink and opaque. - Mix in 2 tablespoons of fish sauce and 1 tablespoon of lime juice. Season with sea salt to taste. Stir gently to blend all the flavors. You can find the full recipe above. Enjoy this rich and bold dish! To make your coconut curry shrimp shine, focus on salt and acidity. Salt boosts flavor, so add it little by little. You can also use lime juice for a fresh twist. The right curry paste is key. I love using red curry paste for its bold taste. Experiment with different brands to find your favorite. Managing the heat is crucial for shrimp. Cook them on medium to avoid rubbery shrimp. They only take a few minutes to turn from gray to pink. For a thicker sauce, let it simmer longer. Stir often to prevent burning, but don't rush. You want a creamy, delicious sauce. Serve your coconut curry shrimp over fluffy jasmine rice. It soaks up the sauce well and adds a nice texture. Don't forget to garnish with fresh cilantro. It brightens the dish and adds a pop of color. A lime wedge on the side adds a nice touch too. For the full recipe, check out the section above. {{image_4}} You can switch the shrimp for other proteins. Chicken works well and gives a different texture. Use boneless chicken thighs for a juicy bite. Tofu is another great choice for a plant-based dish. Firm tofu absorbs flavors and adds protein. If you want to explore seafood, consider scallops or fish. Both cook quickly and pair nicely with the curry. Just like shrimp, they will turn tender and soak up the sauce. Feel free to change up the veggies in the dish. Zucchini adds a lovely crunch and cooks fast. Slice it into half-moons for even cooking. Broccoli is another great option. Steam it lightly before adding to keep its bright color. If snap peas are not your favorite, you can leave them out. The dish will still taste amazing. You could add carrots or baby corn for extra color and nutrition. You can control the spice in this dish. For a mild flavor, add less red curry paste. You can start with one tablespoon and taste before adding more. If you prefer medium heat, stick to the recipe. For those who love spice, add chili flakes or fresh chili. You can also mix in some cayenne pepper for an extra kick. For an exciting twist, try adding different spices like coriander or cumin. This will enhance the curry’s depth and make it truly unique. For the full recipe, check out the Coconut Curry Shrimp Delight! To keep your coconut curry shrimp fresh, follow these simple steps: - Refrigeration guidelines: Store the shrimp in an airtight container. Place it in the fridge within two hours of cooking. This helps maintain flavor and safety. The dish stays fresh for up to three days when properly stored. - Freezing instructions: If you want to save some for later, you can freeze it. Place the shrimp in a freezer-safe container. Make sure to remove as much air as possible. You can freeze it for up to three months. Just remember to label the container with the date. When you’re ready to eat your coconut curry shrimp again, reheating is key: - Best practices for reheating: Use a stovetop to reheat for the best results. Place the shrimp in a skillet over medium heat. Stir gently until heated through. - Maintaining flavor and texture: Add a splash of coconut milk or a bit of water to keep the sauce creamy. This prevents it from drying out. Avoid using the microwave, as it can change the texture of the shrimp. Knowing how long your dish lasts is important: - Duration for refrigerated storage: As mentioned, coconut curry shrimp lasts about three days in the fridge. Always check for freshness before serving. - Signs of spoilage: Look for off smells or a change in color. If the shrimp looks slimy or the sauce separates, it's time to toss it. Always trust your senses! For more details, check out the Full Recipe for Coconut Curry Shrimp. Coconut curry shrimp is a bright, flavorful dish. It combines sweet coconut milk with spicy red curry paste. You get a rich, creamy sauce that pairs well with shrimp. The ginger and garlic add a fragrant touch. Fresh vegetables like bell pepper and snap peas give crunch and color. This dish is not just tasty; it’s a feast for the eyes too! Yes, you can easily make this dish dairy-free! Use coconut milk as your main liquid. It adds creaminess without dairy. Make sure your red curry paste does not contain dairy. Check labels or make your own. You can also use vegetable broth for a lighter version. This way, you keep all the flavor while staying dairy-free. Shrimp cook quickly. You know they are done when they turn pink and opaque. Use a light touch; overcooking makes them tough. Another tip is to check the shape; cooked shrimp curl into a C shape. If they stay straight, they need more time. This dish cooks shrimp in just a few minutes, so keep an eye on them! Serve coconut curry shrimp over fluffy jasmine rice. The rice soaks up the tasty sauce. You could also pair it with a fresh green salad. A side of steamed broccoli or sautéed spinach works well too. These sides balance the meal and add nutrition. For a fun twist, serve with naan bread to scoop up the curry. Absolutely, you can customize the spice level! For mild curry, use less red curry paste. You can also add sugar to balance the heat. If you want it spicier, add more paste or a fresh chili. Experiment with flavors until it fits your taste. Adjusting spice makes this dish perfect for everyone at the table. For the complete recipe, check out the [Full Recipe]. Coconut curry shrimp is a tasty dish with fresh shrimp, colorful veggies, and a creamy sauce. You learned how to prepare the base, make the curry, and cook the shrimp. We discussed tips for perfecting the flavor and variations to suit your taste. Remember, you can adjust spice levels and substitute ingredients. Enjoy making this meal for family and friends. With the right steps, your curry will be a hit every time. Happy cooking!

Coconut Curry Shrimp Flavorful and Bold Dish

Are you ready to dive into a bowl of bold and flavorful Coconut Curry Shrimp? This dish combines fresh shrimp,

- 4 thick slices of brioche bread - 2 large eggs - 1 cup whole milk - 1 teaspoon pure vanilla extract - 1 teaspoon ground cinnamon - 2 tablespoons granulated sugar - 1 tablespoon unsalted butter - Pinch of salt - Maple syrup (for serving) - Fresh berries (strawberries, blueberries, or raspberries for garnish) - Powdered sugar (for dusting) Gathering the right ingredients makes a big difference. Brioche bread adds a rich flavor and soft texture. Eggs and milk create a creamy mixture that binds everything together. Vanilla and cinnamon give your French toast a warm, inviting aroma. Toppings like maple syrup and fresh berries add sweetness and color. Powdered sugar adds a lovely finish. - Non-stick skillet or griddle - Mixing bowl and whisk - Serving plate Using the right tools helps you cook with ease. A non-stick skillet or griddle ensures your French toast cooks evenly. A mixing bowl and whisk let you combine your ingredients smoothly. A nice serving plate can make your dish look even more appealing. By preparing with these ingredients and tools, you set yourself up for breakfast success. The full recipe will guide you step by step to create a delightful meal. First, grab a medium mixing bowl. You will whisk the eggs, milk, vanilla, cinnamon, sugar, and salt together. Whisking well helps make a smooth batter. It also mixes all the flavors nicely. Be sure to measure your ingredients carefully. This makes a big difference in taste and texture. If your measurements are off, the French toast may not turn out as you hoped. Now, let’s move to the skillet. Preheat it over medium heat. This helps get that perfect crisp on the French toast. Add butter and let it melt, swirling it around the pan. Next, take a slice of bread and dip it in your egg mixture. Make sure it soaks up enough batter but doesn’t fall apart. Coat both sides well. Carefully place the soaked bread in the skillet. Cook each slice for about 3-4 minutes until it turns golden brown. Flip it over and cook the other side for another 3-4 minutes. It should be crispy and golden. Once cooked, put the slices on a warm plate. Cover them with a clean kitchen towel to keep them warm while you finish the rest. When it’s time to serve, do it hot! Drizzle rich maple syrup over the top. For a pop of color, add fresh berries like strawberries or blueberries. A light dusting of powdered sugar makes it look extra special. Stack the French toast on a nice plate, and you have a beautiful meal. It’s perfect for family-style dining. The Full Recipe includes everything you need to create this tasty breakfast treat. To make the best French toast, start with thick slices of brioche bread. Brioche holds the egg mixture well and gives a soft, rich flavor. You can also use challah or Texas toast for similar results. Prevent sogginess by not soaking the bread too long. Dip each slice quickly in the egg mixture. Let the excess drip off before cooking. This helps keep the bread from becoming too wet. Spices can really elevate your French toast. Try adding a dash of nutmeg or a pinch of cardamom to the egg mix. These add warmth and depth to the flavor. For a fresh twist, infuse some orange zest into the batter. This brightens the taste and adds a fun citrus note. You can also use vanilla extract for extra sweetness. If you are making a lot of French toast, use a griddle. It allows you to cook multiple slices at once. Preheat it well to ensure even cooking. Keep the heat steady while cooking. Too high of a heat will burn the bread. Aim for medium heat for perfect golden-brown slices every time. For the full recipe, check the Heavenly Cinnamon Vanilla French Toast recipe above! {{image_4}} You can make French toast in many fun ways. Let’s explore some tasty options. - Cream cheese and fruit fillings: Spread cream cheese on one slice of bread. Add fresh fruit like strawberries or bananas. Top with another slice and dip in the egg mixture. Cook as usual. This makes a sweet, creamy treat. - Savory options like ham and cheese: Place sliced ham and cheese between two slices of bread. Dip in the egg mix and cook. This gives you a warm, gooey meal that is great for lunch or breakfast. - Pumpkin spice variation for fall: Add pumpkin puree and pumpkin spice to the egg mixture. This gives your toast a cozy, seasonal flavor. Perfect for chilly mornings! - Chocolate chip or nut variations: Mix in chocolate chips or chopped nuts into the batter. This adds sweetness and a nice crunch. You can also sprinkle some on top after cooking for extra flavor. - Using whole grain or gluten-free bread: Swap white bread for whole grain or gluten-free bread. This makes your dish healthier while still tasting great. - Dairy-free substitutions for a vegan option: Use almond milk or coconut milk instead of whole milk. You can also replace eggs with flaxseed meal mixed with water. This keeps it tasty and suitable for all diets. With these variations, you can enjoy French toast in many delicious ways! For the full recipe, check out the Heavenly Cinnamon Vanilla French Toast. To keep your French toast fresh, store it in the fridge. Place the slices in an airtight container. If you have more than one layer, separate them with parchment paper to avoid sticking. French toast can last up to three days in the fridge. For longer storage, freeze it! Wrap each slice in plastic wrap, then place them in a freezer bag. This can keep your French toast safe for up to three months. To reheat your French toast, you can use an oven or a microwave. For the oven, preheat it to 350°F (175°C) and place the slices on a baking sheet. Heat for about 10 minutes or until warm. For the microwave, place a slice on a plate and heat for about 30 seconds. Check to see if it is warm enough; if not, heat in 10-second bursts until hot. You can prepare the egg mixture ahead of time. Just whisk together the eggs, milk, vanilla, cinnamon, and sugar. Store this mixture in the fridge for up to 24 hours. When you're ready, dip the bread and cook as normal. Batch cooking is a great way to enjoy French toast all week. Make a large batch and follow the storage tips above. You can reheat slices as needed. This way, you can enjoy a tasty breakfast treat without the fuss each day. For a fun twist, try adding different spices or toppings when you reheat. For French toast, I love using brioche. Its rich texture makes each bite soft and fluffy. Challah is another great choice. It has a slight sweetness and holds up well. You can also try sourdough for a tangy flavor. If you're looking for a hearty option, whole grain bread works too. Each type gives a unique taste and texture. To avoid sogginess, don’t soak the bread too long. Quickly dip each slice in the egg mixture. Ensure the skillet is hot enough before adding the bread. This helps seal the outside and keeps the inside fluffy. Also, using thicker slices of bread helps maintain a good texture. Yes, you can make French toast ahead of time! Cook it fully, then let it cool. Store the slices in an airtight container in the fridge. When you’re ready to eat, just reheat in a skillet or toaster oven. This keeps it warm and tasty. Toppings can really make your French toast special! Here are some favorites: - Maple syrup for sweetness - Fresh berries like strawberries or blueberries - Whipped cream for a light touch - Nuts for crunch - Powdered sugar for a sweet finish Mix and match these toppings for fun flavor combos! If you want a twist, try adding yogurt or nut butter. You can find more ideas in the Full Recipe section. In this post, we explored how to make the perfect French toast. We covered essential ingredients, tools, and step-by-step instructions. I shared tips for texture and flavor, plus fun variations to try. French toast is versatile and can please everyone. Whether you want sweet or savory, there’s a recipe for you. Enjoy making this classic dish with family and friends for memorable meals. Happy cooking!

Best French Toast Recipe for a Tasty Breakfast Treat

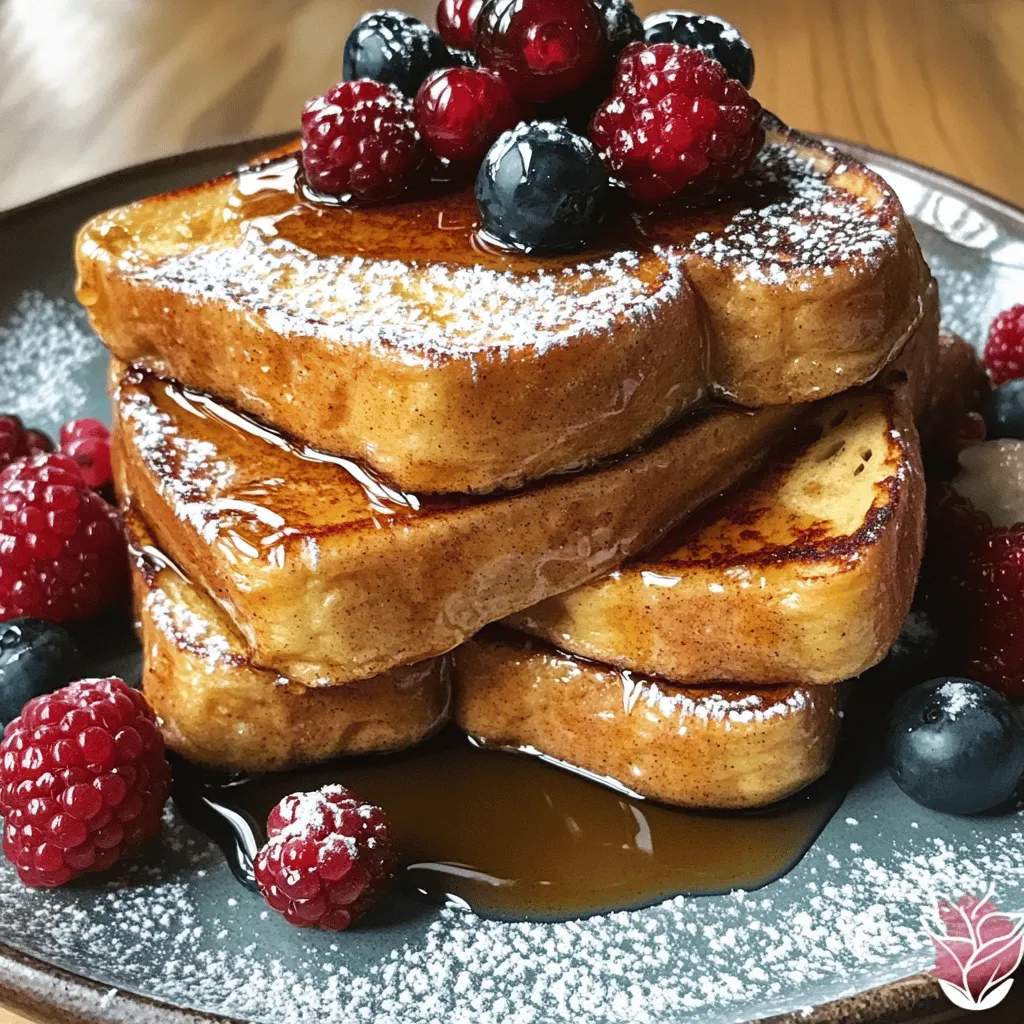
If you crave a delightful breakfast, this Best French Toast Recipe is a must-try. With just a few simple ingredients,

For this tasty dish, you need simple, fresh ingredients. Here’s what you will use: - 1 cup cornmeal - 4 cups water, divided - 1 cup coconut milk - 1/4 cup sugar (adjust to taste) - 1/2 teaspoon salt - 1 teaspoon vanilla extract - 1/2 teaspoon ground cinnamon - 1/2 teaspoon ground nutmeg These ingredients form the base of the porridge. The cornmeal gives it a lovely texture. Coconut milk adds a rich, creamy taste. The spices make it fragrant and inviting. You can add some fun extras to enhance the porridge. Consider using: - 1/4 cup raisins (for sweetness) Raisins soften as they cook, adding a pleasant burst of flavor. Feel free to skip them if you prefer a plain porridge. Toppings make your dish even better! Here are some ideas for delicious garnishes: - Fresh fruits, like bananas or mangoes - Nuts, such as almonds or walnuts Adding toppings not only makes it look beautiful but also gives extra crunch and flavor. Each bite can be a new surprise! For the full recipe, check the instructions to create this delightful breakfast. Start by boiling 3 cups of water in a medium saucepan. Use medium heat. While waiting for the water to boil, take another bowl. Combine 1 cup of cornmeal with 1 cup of water in that bowl. Stir until the mixture is smooth and lump-free. This is your cornmeal slurry. Getting it smooth is key for a creamy porridge. Once the water reaches a boil, slowly whisk in the cornmeal slurry. Keep whisking to avoid lumps. After you add the slurry, mix in coconut milk, sugar, salt, cinnamon, and nutmeg. Stir everything well. Let it come to a gentle boil again. Lower the heat and let it simmer for 15 to 20 minutes. Stir it often to stop it from sticking. This will help thicken it to your desired creaminess. If you like raisins, add them during the last few minutes. This makes them soft and sweet. After cooking, turn off the heat and stir in vanilla extract. This adds a lovely aroma. Let the porridge cool for a few minutes. When serving, ladle the creamy porridge into bowls. You can add fresh fruit or crunchy nuts on top. For an extra treat, drizzle a bit more coconut milk before serving. Enjoy your creamy Jamaican cornmeal porridge! For the full recipe, check out [Full Recipe]. To get that perfect creaminess in your cornmeal porridge, start with the right ratio of water to cornmeal. Use 4 cups of water for 1 cup of cornmeal. Mix your cornmeal with water before adding it to boiling water. This step helps prevent lumps. Stir continuously as the porridge cooks. This will keep it smooth and creamy. Let it simmer on low heat. This allows all the flavors to blend well. One common mistake is not whisking enough. If you stop whisking while adding the cornmeal, lumps can form. Another mistake is cooking on high heat. High heat can cause the porridge to stick and burn. Also, avoid skipping the salt. It enhances the flavor of your dish. Finally, don’t rush the cooking time. Let it simmer to reach the perfect thickness and creaminess. Spices can take your porridge to the next level. Ground cinnamon and nutmeg add warmth and depth. Use half a teaspoon of each for the best flavor. You can also experiment with vanilla extract. It adds a lovely aroma and sweetness. If you want extra sweetness, toss in some raisins. They will plump up and add a nice bite. For those who enjoy more flavor, consider adding a pinch of ginger or cardamom. These spices can give your dish a unique twist. {{image_4}} You can switch up the milk in your cornmeal porridge. Almond milk adds a nutty flavor. Oat milk makes it creamy and smooth. You can even try soy milk for a hearty taste. Each type of milk will give a unique twist to the dish. Feel free to mix and match based on what you have at home. Adding fruits or nuts can make your porridge even better. Sliced bananas or berries add sweetness and color. Chopped nuts, like almonds or walnuts, provide crunch and protein. You can also add dried fruits like raisins or cranberries. These extras make the dish more filling and fun to eat. This recipe is easy to make vegetarian or vegan. Use plant-based milk, like almond or oat milk. For sweetness, try maple syrup instead of sugar. If you want a richer taste, use coconut cream instead of coconut milk. These simple swaps keep the flavor while meeting your dietary needs. You can enjoy a tasty, creamy bowl no matter your preferences. For the full recipe, check out the provided link. To store your creamy Jamaican cornmeal porridge, let it cool first. Transfer it to an airtight container. This keeps the porridge fresh. Store it in the fridge for up to three days. If you want to enjoy it later, be sure to mark the date on the container. When you’re ready to enjoy the leftovers, you can easily reheat them. Place the porridge in a saucepan over low heat. Add a splash of water or coconut milk to help with the texture. Stir often to warm it evenly. You can also use a microwave. Heat in short bursts, stirring in between, until hot. If you want to freeze your porridge, it’s simple. Pour the cooled porridge into freezer-safe containers. Leave some space at the top for expansion. It can stay in the freezer for up to two months. To thaw, move it to the fridge overnight before reheating. This way, your creamy Jamaican cornmeal porridge stays tasty and ready to enjoy later. For the full recipe, check out the section above! Creamy Jamaican cornmeal porridge is rich in carbs, fiber, and healthy fats. It gives you energy to start your day. One serving typically has: - Calories: 250 - Protein: 4 grams - Fat: 5 grams - Carbs: 50 grams - Fiber: 4 grams The coconut milk adds healthy fats, while the cornmeal gives you fiber. This dish is filling and nutritious, perfect for breakfast. Yes, you can make this dish in advance. Cook the porridge and let it cool. Store it in an airtight container in the fridge. It will last for up to three days. When ready to eat, just reheat it with a splash of coconut milk or water. This way, it stays creamy and delicious. Absolutely! You can change a few ingredients to fit your taste or needs. Here are some ideas: - Use almond milk or oat milk instead of coconut milk. - Swap sugar for honey or maple syrup. - Add different spices like ginger or cardamom. Feel free to adjust the recipe based on what you have at home. Traditionally, serve creamy Jamaican cornmeal porridge with fresh fruits or nuts. Some popular choices include: - Slices of banana - Chopped mango - Toasted almonds You can also drizzle a little extra coconut milk on top. This adds creaminess and makes the dish even more tasty. If you want more sweetness, add a few raisins or a sprinkle of cinnamon. Enjoy your homemade delight! For the complete recipe, check the Full Recipe section above. Creamy Jamaican cornmeal porridge is easy and tasty. You learned about key ingredients, step-by-step cooking, and helpful tips. Variations allow for fun twists, while storage info keeps leftovers fresh. This dish fits many diets and preferences. I hope you feel ready to try this recipe. Enjoy making this warm, flavorful treat for yourself and others!

Creamy Jamaican Cornmeal Porridge Tasty Breakfast Dish

If you’re searching for a warm, filling breakfast, look no further! Creamy Jamaican Cornmeal Porridge is a hearty dish that

- 2 cups heavy whipping cream - 1 cup whole milk - 1/2 cup granulated sugar - 2 tablespoons pure vanilla extract - 3 large egg yolks - 1 tablespoon unflavored gelatin powder - 3 tablespoons cold water - Pinch of salt To create this smooth vanilla mousse, you need specific ingredients. Each one plays a key role. Heavy whipping cream gives it a rich and fluffy texture. Whole milk adds creaminess without being too heavy. Granulated sugar sweetens the mousse just right. Pure vanilla extract brings that classic flavor everyone loves. Egg yolks help with the mousse's body and richness. Unflavored gelatin powder is what helps it set perfectly. Cold water activates the gelatin, making it ready to use. Finally, a pinch of salt balances the sweetness and enhances the flavors. - Mixing bowls - Whisk - Saucepan - Spatula - Measuring cups and spoons Using the right tools makes this recipe easier. Mixing bowls help you combine ingredients smoothly. A whisk is key for beating the cream and egg yolks. A saucepan is essential for heating the milk mixture. A spatula helps you fold in ingredients without losing air. Measuring cups and spoons ensure you get the amounts just right. With these ingredients and tools, you're set up for success. This vanilla mousse will be a delight for anyone who tries it! If you want to see the complete steps, check the Full Recipe. - Bloom the gelatin: In a small bowl, sprinkle the gelatin over cold water. Let it sit for 5 to 10 minutes. This softens the gelatin, making it ready to mix. - Heat the milk mixture: In a medium saucepan, combine whole milk, granulated sugar, and a pinch of salt. Heat this over medium heat. Stir until the sugar dissolves and the mixture is hot but not boiling, about 5 minutes. - Temper the eggs: In a separate bowl, whisk the egg yolks until smooth. Gradually whisk in half of the hot milk mixture. This gently warms the yolks without scrambling them. - Thickening the mixture: Pour the egg and milk mix back into the saucepan. Cook over low heat, stirring constantly, for about 5 minutes. The mixture should thicken enough to coat the back of a spoon. - Incorporate gelatin and vanilla: Remove the pan from heat. Add the bloomed gelatin and pure vanilla extract. Stir until both dissolve completely. Let this cool to room temperature. - Whip the cream: In a large bowl, whisk the heavy whipping cream until soft peaks form. The cream should hold its shape but still be smooth. - Combine mixtures: Once the milk-gelatin mix cools, gently fold it into the whipped cream with a spatula. Fold carefully to keep the airiness of the mousse. - Chill the mousse: Spoon the mousse into serving dishes. Cover with plastic wrap and refrigerate for at least 4 hours. This helps it set and firm up. For the complete recipe, check the Full Recipe section. To create smooth vanilla mousse, whip the cream to soft peaks. This means the cream holds a shape but is still soft. If you whip it too long, it can turn grainy. When you mix the mousse, fold gently. Use a spatula to lift the cream without losing air. This keeps your mousse light and fluffy. You can change the flavor of your mousse easily. Try using different extracts. Almond or coconut extract can give a new twist. Adding zest from lemon or orange brings a bright note. A pinch of cinnamon or nutmeg can warm up the taste. Mix and match to find your favorite flavor! For a beautiful dessert, garnishing is key. Scatter fresh berries on top for color and taste. Chocolate shavings add a rich look and flavor. You can serve your mousse in cups, bowls, or even glasses. Each style gives a unique touch to your dessert. Remember, we eat with our eyes first! {{image_4}} To create a chocolate vanilla mousse, you need to adjust the base recipe. Start by adding melted dark chocolate to the mix. You can replace 1/2 cup of the milk with 4 ounces of good-quality chocolate. Melt the chocolate gently in a bowl over hot water. Once melted, let it cool slightly before mixing it into the egg and milk blend. This gives your mousse a rich, deep flavor that pairs perfectly with vanilla. Adding pureed fruits can give your vanilla mousse a fresh twist. You can use any fruit you like, such as strawberries, raspberries, or mangoes. Simply puree about 1 cup of your chosen fruit. Fold the fruit puree into the cooled mousse mixture after combining the gel and vanilla. This adds both color and a burst of flavor, making it unique and delightful. To make a vegan vanilla mousse, you can replace the dairy and eggs with plant-based options. Use coconut cream instead of heavy cream and almond milk instead of whole milk. For the thickening agent, substitute gelatin with agar-agar. Just mix the agar-agar with water in a pot, boil it, and then let it cool slightly before folding it into the creamy mixture. This way, you can enjoy a rich and creamy mousse without any animal products. For the full recipe, see the Heavenly Vanilla Mousse section above. To keep your vanilla mousse fresh, store it in the fridge. Use airtight containers. Make sure to cover the mousse with plastic wrap to avoid drying out. This helps keep the mousse soft and creamy. The mousse stays good in the fridge for up to three days. After that, the texture may change. Can you freeze vanilla mousse? Yes, you can freeze it! However, the texture may change after thawing. To freeze, place the mousse in a freezer-safe container. Leave some space at the top, as it may expand. You can freeze it for up to a month. To thaw and serve after freezing, move the mousse to the fridge for a few hours. Avoid using a microwave, as this can ruin the texture. Once thawed, stir gently to bring back some creaminess. Enjoy your mousse, even after freezing! For the full recipe, check out the complete guide above. Vanilla mousse is a light and airy dessert. It is made with whipped cream, milk, and eggs. The mousse has a creamy texture and a sweet vanilla taste. You can serve it in cups or bowls. This dessert is perfect for any occasion. Vanilla mousse can last up to four days in the fridge. Store it in a covered container. Make sure it is sealed well to keep it fresh. If you notice any changes in smell or texture, it’s best to throw it away. You can use other types of milk, but it will change the flavor. Almond milk or coconut milk can work well. Soy milk is another option for a different taste. Just know that these milks might not be as rich as whole milk. To make vanilla mousse lighter, use less cream. You can swap some cream for more milk. Whipping the cream to soft peaks helps too. Another tip is to fold in some whipped egg whites. This will give the mousse a fluffier texture. This guide shows you how to make delicious vanilla mousse. We covered ingredients, equipment, and step-by-step instructions. You learned essential tips for texture, flavor, and presentation. Variations let you explore chocolate or fruit flavors, or try a vegan option. Proper storage is key to keeping your mousse fresh. Enjoy experimenting with this light dessert. With practice, you'll create perfect mousse every time. Happy cooking!

Vanilla Mousse Delightful and Easy Dessert Recipe

Looking for a dessert that impresses without the fuss? Vanilla mousse is your answer! This light and creamy treat is

- 12 oz linguine pasta - 1 lb chicken breast, diced into bite-sized pieces - 1/2 cup unsalted butter, divided - 4 cloves garlic, minced - 1 teaspoon smoked paprika - 1 teaspoon dried oregano - 1/2 teaspoon cayenne pepper (adjust according to your spice preference) - 1/4 cup fresh parsley, finely chopped - 1/2 cup cherry tomatoes, halved - Salt and pepper to taste - Zest of 1 lemon - 2 tablespoons fresh lemon juice - Grated Parmesan cheese, for serving I love using fresh ingredients for this dish. The chicken is tender and juicy. The butter sauce is rich and creamy. It brings all the flavors together. The cherry tomatoes add a nice burst of sweetness. The lemon juice and zest brighten the dish. You can taste the layers of flavor in every bite. - Crushed red pepper flakes for heat - Fresh basil or thyme for herbal notes - A splash of white wine for depth - Spinach or arugula for extra greens Adding these optional ingredients can change the dish. Crushed red pepper adds heat. Fresh herbs give a nice aroma. A splash of wine deepens the flavor. Greens like spinach make it healthier. Feel free to experiment! - Large pot for boiling pasta - Large skillet for cooking chicken and sauce - Wooden spoon for stirring - Measuring cups and spoons for accuracy - Pasta strainer for draining Having the right tools makes cooking easier. A large pot helps cook pasta evenly. A sturdy skillet is key for sautéing. A wooden spoon mixes ingredients well. Measuring cups ensure you use the right amounts. These tools make your cooking experience smooth and fun! For the full recipe, follow the steps and enjoy your Cowboy Butter Chicken Linguine! How to Cook Pasta Al Dente To cook pasta al dente, bring about 4 quarts of salted water to a boil. Add 12 oz of linguine and cook for about 8-10 minutes. Check the pasta a minute before the time is up. It should be firm to the bite. Tips for Reserving Pasta Water Before draining the pasta, scoop out 1 cup of the starchy water. This water helps create a nice sauce later. Set the reserved water aside before draining the rest of the pasta. Sautéing Chicken to Perfection In a large skillet, melt 1/4 cup of unsalted butter over medium-high heat. Season 1 lb of diced chicken breast with salt and pepper. Add the chicken to the skillet and sauté for 6-8 minutes. Make sure it is golden brown and reaches 165°F inside. Cooking Tips for Juicy Chicken To keep chicken juicy, avoid overcooking. Stir occasionally for even cooking. Once done, take the chicken out and set it aside while you prepare the sauce. Key Ingredients for Flavor Mastery The cowboy butter sauce needs 1/4 cup of butter, 4 minced garlic cloves, and spices like smoked paprika and oregano. These ingredients bring a lot of flavor. Don’t forget the cayenne pepper for a kick! Avoiding Common Garlic Mistakes When adding garlic, stir often but don’t let it brown. Cooking it too long can make it bitter. You want it fragrant and golden, not dark brown. Proper Mixing Techniques for Creamy Dish After making the sauce, return the chicken to the skillet. Add halved cherry tomatoes and a bit of reserved pasta water if needed. Mix well to coat everything in the sauce. Presentation Tips for Serving To serve, plate the pasta and sauce generously. Sprinkle with fresh parsley and grated Parmesan. This adds color and flavor, making your dish look as good as it tastes. Enjoy your cowboy butter chicken linguine! For the complete recipe, check out the Full Recipe. To make the best Cowboy Butter Chicken Linguine, follow these simple tips. First, cook your linguine until it is al dente. This means it should still have a slight bite. Second, remember to reserve some pasta water before draining. This starchy water helps the sauce stick to the pasta. Lastly, don't rush cooking the chicken. Sauté it until it is golden brown and reaches 165°F. Avoid these common mistakes when making your dish. Do not skip seasoning the chicken. A little salt and pepper make a big difference in taste. Another mistake is not cooking the garlic properly. Overcooked garlic can taste bitter. Make sure to stir it often and remove it from heat when fragrant. Lastly, don’t forget to mix everything well. This ensures every bite is full of flavor. You can easily boost the flavors in your Cowboy Butter Chicken Linguine. Try adding a splash of white wine after cooking the garlic. It adds depth to the sauce. Fresh herbs like basil or thyme can also elevate the dish. If you want more spice, add extra cayenne pepper or chili flakes. For a zesty kick, consider more lemon zest or juice. These small changes make a big impact. For the complete recipe, check out the Full Recipe. {{image_4}} You can easily swap chicken for other proteins. Shrimp works well and cooks fast. Just sauté it for 3-4 minutes. You can also use diced turkey for a leaner option. If you're feeling adventurous, try using pork tenderloin. It adds a nice twist. For a vegetarian dish, replace chicken with mushrooms or zucchini. These veggies soak up the flavors nicely. If you want a vegan option, use firm tofu. Sauté it until golden brown, just like the chicken. Instead of butter, use olive oil or a vegan butter substitute. While linguine is great, you can use any pasta you like. Spaghetti or fettuccine are good choices. For a gluten-free meal, try chickpea or lentil pasta. These options add protein and fiber. You can even use zucchini noodles for a low-carb twist. Remember, you can find the full recipe to help you explore these variations. After enjoying Cowboy Butter Chicken Linguine, store any leftovers in an airtight container. This keeps the dish fresh. Make sure it cools down before sealing it. Store in the fridge for up to three days. Keeping it in smaller portions can help when reheating. To reheat, you can use either the microwave or the stovetop. If using the microwave, place the linguine in a bowl. Cover it with a damp paper towel to keep moisture in. Heat in 30-second bursts until hot. For stovetop reheating, add a splash of water to a pan. Heat over medium until warm, stirring often. You can freeze this dish for later. Place cooled portions in freezer-safe bags. Remove as much air as possible before sealing. It can stay in the freezer for up to three months. When ready to eat, thaw in the fridge overnight. Reheat as mentioned above, adding a little extra water if needed. Enjoy your delicious meal any time! Cowboy butter is a rich and flavorful sauce. It blends butter, garlic, and spices. This sauce adds a savory kick to many dishes, like our Cowboy Butter Chicken Linguine. The smoked paprika and cayenne pepper give it a warm, smoky taste. This sauce is perfect for enhancing meats, seafood, and pasta. Yes, you can use other pasta types. Options like fettuccine, penne, or spaghetti work great. Each will change the dish’s texture slightly. Choose a pasta that you enjoy. Just be sure to cook it al dente for the best results. To spice up your dish, add more cayenne pepper. You can also include red pepper flakes for an extra kick. If you like heat, try adding chopped jalapeños or hot sauce. Adjust the spice level to your taste. This way, you create a Cowboy Butter Chicken Linguine that suits your flavor preferences. You can prepare some parts ahead of time. Cook the chicken and make the Cowboy butter sauce in advance. Store them separately in the fridge for up to three days. When you're ready to eat, just cook the pasta and combine everything together. This makes for a quick and easy meal on busy days. For the full recipe, check out the detailed instructions above. Cowboy Butter Chicken Linguine is a fun and tasty dish. We covered the key ingredients, including main and optional choices that add flavor. The step-by-step guide helps you cook the pasta and chicken just right. You learned how to make a rich sauce and mix it all for a creamy finish. Remember our tips to avoid common mistakes and tweak the flavors as you like. Don’t forget, this dish stores well for later meals. Enjoy making and sharing this dish as much as I do!

Cowboy Butter Chicken Linguine Flavor-Packed Recipe

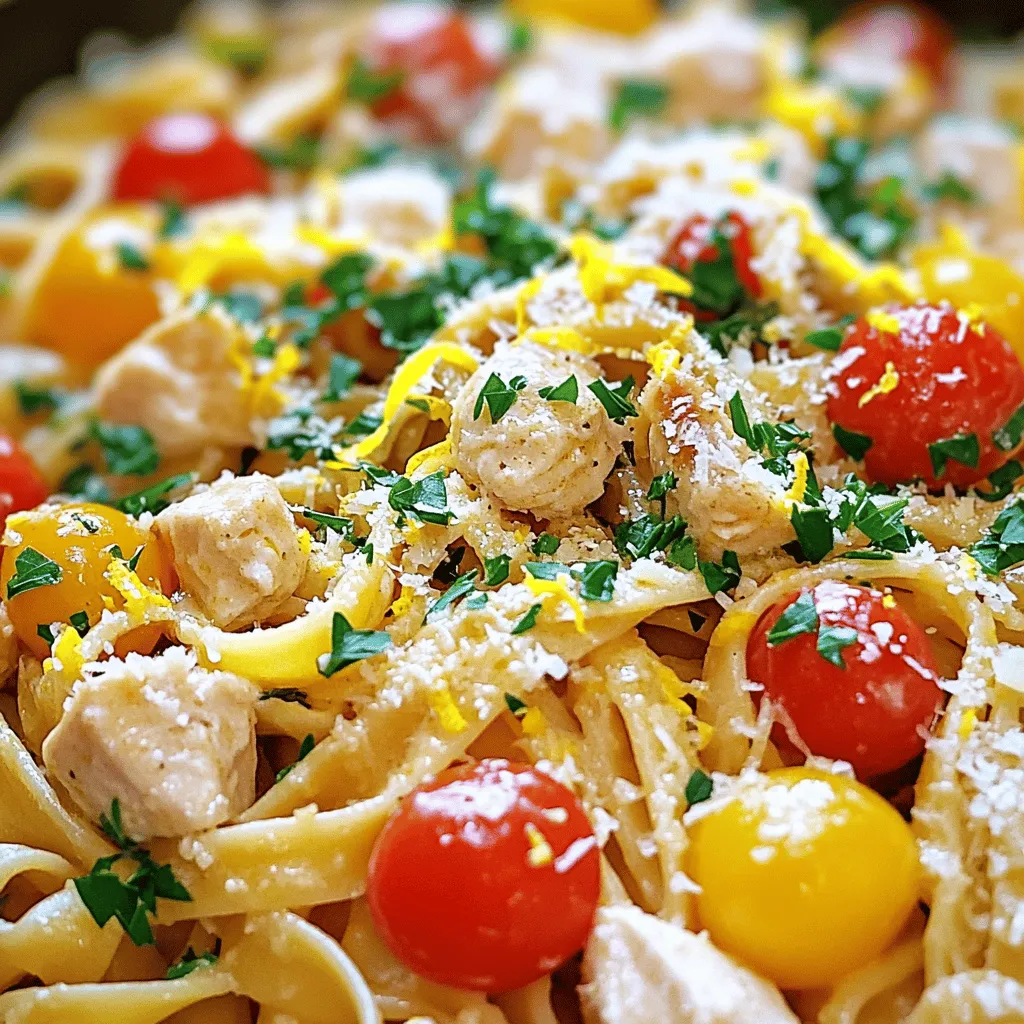
Looking for a dish that’s as flavorful as it is simple to make? Cowboy Butter Chicken Linguine packs a punch

This dish shines with its simple yet rich ingredients. Here’s what you need: - 1 cup red lentils, thoroughly rinsed - 2 cups pumpkin, peeled and cut into 1-inch cubes - 1 medium onion, finely chopped - 2 cloves garlic, minced - 1 inch piece of fresh ginger, grated - 1 can (14 oz) coconut milk - 2 cups vegetable broth, low-sodium preferred - 2 tablespoons curry powder - 1 teaspoon ground turmeric - 1 teaspoon ground cumin - Salt and freshly cracked black pepper, to taste - 2 tablespoons extra virgin olive oil - Fresh cilantro, finely chopped, for garnish Each ingredient plays a role in flavor and texture. The lentils add protein and fiber, while pumpkin brings sweetness and a lovely color. You can enhance this curry with a few optional ingredients. Try adding: - 1-2 green chilies, minced for heat - 1 tablespoon lemon juice for brightness - 1/2 cup spinach or kale for extra greens - A pinch of cinnamon for warmth These additions can make your curry even more exciting, so feel free to experiment! Pumpkin and lentils pack a powerful punch. Pumpkin is low in calories and high in vitamins A and C. It supports eye health and boosts your immune system. Lentils are rich in protein and fiber. They help with digestion and keep you full longer. Together, they create a balanced meal that nourishes your body. For the full recipe, check out the detailed cooking instructions. Start by gathering all your ingredients. This makes cooking smooth and fun. For the best taste, always use fresh veggies. Chop the onion finely. Rinse the red lentils under cold water until the water runs clear. Peel and cube the pumpkin into 1-inch pieces. Mince the garlic and grate the ginger. Each step makes your curry tastier. 1. Heat 2 tablespoons of olive oil in a large pot over medium heat. 2. Add the chopped onion. Sauté it for about 5 minutes. Wait until the onion is soft and clear. 3. Stir in the minced garlic and grated ginger. Cook it for another minute. This makes your kitchen smell great! 4. Add curry powder, turmeric, and cumin to the pot. Stir well and cook for one more minute. This step brings out the spices’ full flavor. 5. Now, mix in the cubed pumpkin and rinsed lentils. Stir until they are coated with spices. 6. Pour in 2 cups of vegetable broth and a can of coconut milk. Stir to combine everything. 7. Increase the heat until it gently boils. Then, reduce the heat to low. Let it simmer uncovered for about 20 minutes. The lentils and pumpkin should be soft by now. 8. If you want a creamier curry, use an immersion blender. Blend to your desired texture, whether smooth or a bit chunky. 9. Taste your curry and add salt and pepper if needed. Serve the hot curry in bowls. Garnish it generously with fresh chopped cilantro. This adds color and a burst of flavor. You can serve it with warm naan or steamed rice. Each bite of this pumpkin lentil curry is a warm hug for your taste buds. For the full recipe, check the details above. Enjoy your cooking adventure! When making pumpkin lentil curry, avoid some common pitfalls. First, do not skip rinsing the lentils. This step removes dirt and helps them cook evenly. Second, watch the heat when cooking the spices. Too high can burn the spices and ruin the flavor. Lastly, do not forget to taste as you cook. Adjusting salt and pepper at the right time makes a big difference. To boost the taste of your curry, try adding a squeeze of fresh lime juice before serving. This brightens the dish and adds a tangy kick. You can also mix in a spoonful of maple syrup or brown sugar for a hint of sweetness. For a deeper flavor, consider adding a bay leaf while cooking. Just remember to remove it before serving! Using the right tools can make cooking easier. A large pot is essential for making this curry. An immersion blender helps achieve the perfect texture. If you don’t have one, a regular blender works too. A good cutting board and sharp knife make prep work faster and safer. Lastly, measuring cups and spoons help ensure you get the right amounts of each ingredient from the full recipe. {{image_4}} You can make this pumpkin lentil curry even better by adding more veggies. Try spinach, bell peppers, or sweet potatoes. Each veggie brings its own taste and nutrition. For instance, spinach adds iron and color. Sweet potatoes add a natural sweetness that pairs well with spices. Just chop the veggies and add them when you put in the pumpkin and lentils. They will cook together, making the curry full of flavor. Adjusting spices can change the heat level of your curry. If you want it spicy, add cayenne pepper or red chili flakes. Start with a small amount, like 1/4 teaspoon, and taste as you go. If you prefer less heat, skip those spices entirely. You can also add a touch of honey to balance the spice. Just remember, it’s easier to add more spice than to take it out. To make your curry more filling, add protein. Chickpeas or tofu work great. If you use canned chickpeas, add them during the last 10 minutes of cooking. For tofu, cube it and sauté it before adding it to the curry. This will give it a nice texture. You can also use cooked chicken for a non-vegetarian option. These additions will make your dish hearty and satisfying. For the full recipe, check out the detailed instructions above. After enjoying your pumpkin lentil curry, store any leftovers in an airtight container. This keeps the flavors fresh. Place the container in the fridge right away. It’s best to eat the leftovers within three to four days. Before storing, let the curry cool down to room temperature. Avoid putting hot food directly in the fridge, as it can raise the temperature inside. You can freeze pumpkin lentil curry for longer storage. Use a freezer-safe container or bag. Make sure to leave space at the top for expansion. Label the container with the date and name. The curry can stay frozen for up to three months. When you’re ready to eat it, thaw it overnight in the fridge. To reheat, you can use a pot on the stove or the microwave. If using a pot, heat it over low heat. Stir the curry often to warm it evenly. If using the microwave, place it in a microwave-safe bowl. Heat it in short bursts, stirring in between. Add a splash of vegetable broth or coconut milk if it looks too thick. This keeps the curry creamy and delicious. Yes, you can use other lentils. Green or brown lentils work well. They take longer to cook. You should check them for doneness. Red lentils are quick and break down, making the curry creamy. Each type brings a different texture. Experiment with what you have on hand. This recipe is naturally gluten-free. Just use gluten-free vegetable broth. Check all spice mixes for hidden gluten. The coconut milk also adds creaminess without gluten. Enjoy the hearty meal without worry. You can serve this curry with many sides. Steamed rice is a great choice. Warm naan bread complements it well. Quinoa also makes a tasty pairing. For a light option, serve with a green salad. Each side enhances the flavors of the curry. You can find the full recipe linked above for more ideas. You now have a complete guide to making Pumpkin Lentil Curry. We've explored key ingredients and their benefits. I shared step-by-step instructions for cooking, along with useful tips to enhance flavor. You learned about variations and how to store leftovers properly. My final thoughts: this dish is nutritious, delicious, and adaptable. Whether you stick to the basics or experiment, enjoy every bite. Happy cooking!

Pumpkin Lentil Curry Flavorful and Nutritious Dish

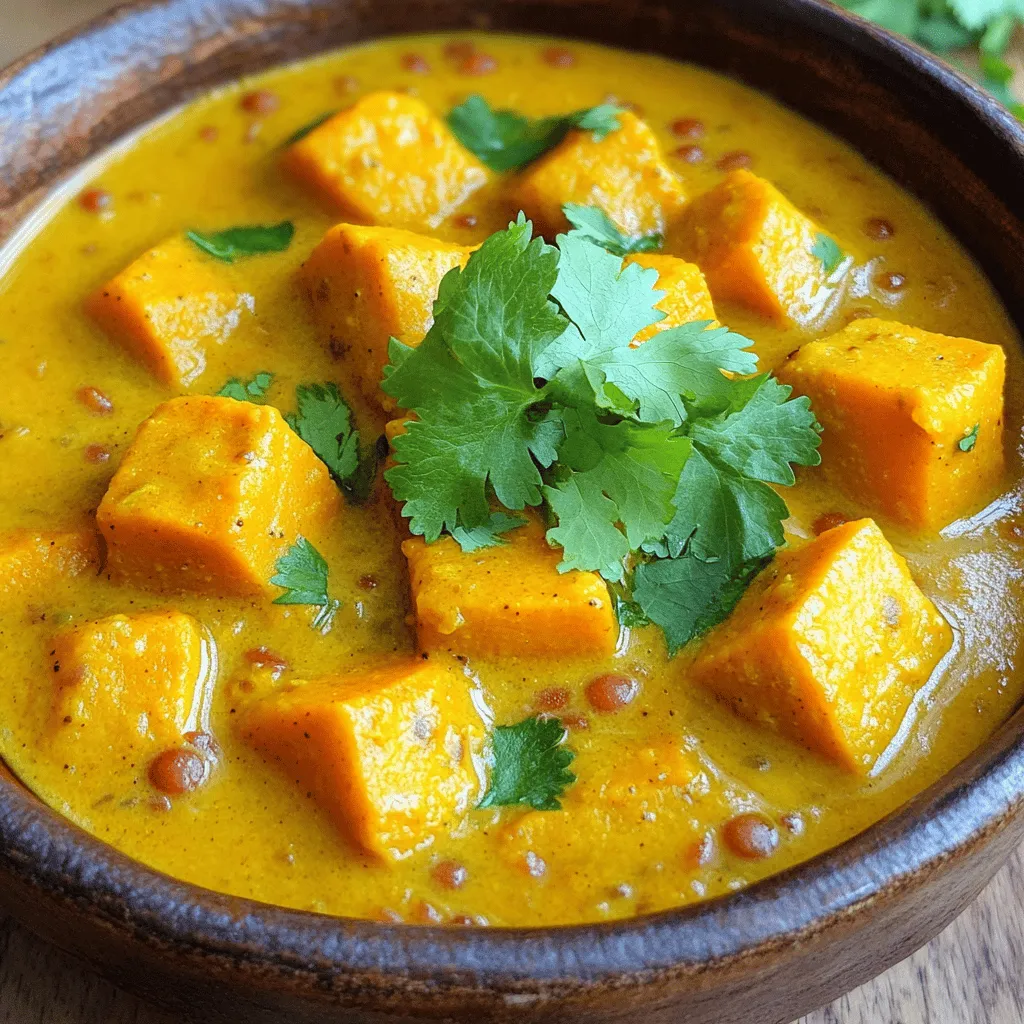
Are you ready to dive into a warm bowl of comfort? My Pumpkin Lentil Curry recipe packs bold flavors and

- 1 cup cream cheese, softened - 1/2 cup powdered sugar - 1/4 cup creamy peanut butter - 1 teaspoon pure vanilla extract - 1/2 teaspoon sea salt - 1 cup chocolate chips, melted - 1/2 cup mini Twix bars, finely chopped - Fresh apple slices or crunchy pretzel sticks - Additional Twix bars for garnish - Other dip dippers like graham crackers or fruit When making Twix Dip, you need a few key ingredients. Start with cream cheese, which gives the dip its rich texture. The powdered sugar adds sweetness, while creamy peanut butter gives a nutty twist. Vanilla extract brings in a warm flavor, and sea salt balances everything out. For toppings, melted chocolate chips make the dip extra special. Mini Twix bars add a fun crunch and flavor. Fresh apple slices or pretzel sticks work well as dippers. You can also add more Twix bars for a garnish. Other options like graham crackers or fruit make great dippers, too. Check the [Full Recipe] for more details on how to bring this sweet treat to life! 1. In a medium bowl, beat the cream cheese and powdered sugar together until smooth. 2. This should take about 2 to 3 minutes with a hand mixer. 3. Next, add in the creamy peanut butter, vanilla extract, and sea salt. 4. Beat the mixture again for another 2 minutes until it’s light and fluffy. 1. Carefully pour in the melted chocolate chips. 2. Use a spatula to gently fold them into the mixture. 3. Ensure it is smooth and glossy. 4. Now, gently mix in the finely chopped Twix bars. 5. Fold them in to distribute evenly throughout the dip. 1. Spoon the dip into a decorative bowl. 2. Place it in the refrigerator for at least 30 minutes. 3. This helps the flavors meld and firms up the dip. 4. When ready to serve, offer it with fresh apple slices or crunchy pretzel sticks. 5. This gives a fun sweet and salty contrast. Make sure to check out the Full Recipe for extra details! To get a creamy Twix dip, use room temperature cream cheese. Cold cream cheese makes mixing hard. It can lead to lumps in your dip. Let the cream cheese sit out for about 30 minutes. This simple step makes a big difference. When you mix, use a hand mixer or a stand mixer. Beat the cream cheese and powdered sugar well. Aim for a smooth, fluffy texture. Make your dip look as good as it tastes. Garnish with chopped Twix bars on top. This adds a nice crunch and color. You can also drizzle melted chocolate over the dip. Use colorful serving bowls to catch the eye. Bright bowls make the dip pop. A fun presentation makes everyone want to dive in! Want to add a twist to your dip? Try different types of chocolate. Milk chocolate gives a sweet taste, while dark chocolate adds richness. You can also add a pinch of cinnamon. This small touch brings warmth and depth. Experiment with flavors to find your favorite mix. Your Twix dip can be as unique as you! For the full recipe, check out the recipe section above. {{image_4}} You can make Twix dip even more fun. Try a peanut butter cookie dip. Just swap the chocolate chips for crushed peanut butter cookies. It adds a nutty taste. Another option is Nutella Twix dip. Mix in some Nutella with the chocolate. This gives a rich, creamy twist. Both variations bring new life to your dip. If you want a vegan option, use vegan cream cheese. It works just as well and keeps the flavor. You can also make it sugar-free. Just use sugar-free powdered sugar. This way, everyone can enjoy the dip without worry. Think outside the box for dipping. Fresh fruits like strawberries, bananas, and pears work great. They add a juicy bite. You can also serve the dip with graham crackers or cookies. These crunchy options make each bite exciting. Feel free to mix and match your dippers. Everyone will find something they love! For the full recipe, check the earlier section that lists all the ingredients and steps. After making Twix dip, store it in the refrigerator. Use an airtight container to keep it fresh. You can use glass or plastic containers with snug lids. This helps prevent the dip from absorbing other fridge smells. Yes, you can freeze Twix dip! To freeze, transfer the dip to a freezer-safe container. Leave some space at the top, as it will expand when frozen. To thaw, place it in the fridge overnight. Stir gently after thawing to restore its creamy texture. In the fridge, Twix dip lasts about 3 to 5 days. Always check for signs that it has gone bad. If the dip smells off or has an unusual texture, it's best to throw it away. To make Twix Dip vegan, you can use simple substitutes. Replace cream cheese with vegan cream cheese. Instead of powdered sugar, use a vegan alternative like coconut sugar. For peanut butter, ensure it’s free from added sugars. Use dairy-free chocolate chips for the melted chocolate. Yes, you can use other candy bars! Snickers or Milky Way work great in this dip. You can also try crushed Reese's or M&M's for a fun twist. Mix and match to find your favorite flavor combo! You can serve Twix Dip with various tasty dippers. Fresh apple slices add a nice crunch. Crunchy pretzel sticks provide a sweet and salty mix. Graham crackers or vanilla wafers are great, too. Get creative with your dippers for more fun! This Twix dip is easy and fun to make. You start with a creamy base of cream cheese, peanut butter, and sugar. Then, you mix in chocolate and Twix for extra flavor. Don't forget to chill it before serving with fruits or snacks. Try new flavors and creative dippers to keep it exciting. With simple tips and variations, you can make this dip your own. This dessert is sure to please everyone. Enjoy making and sharing it!

Twix Dip Delightful Dessert for Any Occasion

Are you ready to impress at your next gathering? This Twix Dip is a sweet delight that combines creamy flavors

- Fresh crab meat - Creamy Greek yogurt - Mayonnaise - Dijon mustard - Fresh lemon juice - Celery - Red bell pepper - Fresh dill - Salt and black pepper - Avocado - Microgreens or parsley To make my crab salad delight, I start with fresh crab meat. It is the star here, giving the dish its sweet and delicate flavor. I prefer using high-quality crab. Always check for shell fragments. Next, I mix creamy Greek yogurt and mayonnaise. This combination adds richness while keeping the salad light. For a zesty kick, I use Dijon mustard. A squeeze of fresh lemon juice brightens the taste. Then, I chop up some celery and red bell pepper. The celery adds a nice crunch while the bell pepper brings sweetness. I like to add fresh dill for an herbal note. Salt and black pepper balance all the flavors perfectly. I also include a ripe avocado, which acts as a delicious vessel for the salad. Finally, I garnish with microgreens or parsley for color and freshness. This crab salad is a feast for the eyes and the taste buds! Check the Full Recipe for exact amounts and step-by-step instructions. - Whisk together creamy dressing base In a medium bowl, combine the Greek yogurt, mayonnaise, Dijon mustard, and lemon juice. Add a pinch of salt and pepper. Whisk until everything blends into a smooth and creamy dressing. - Fold in fresh crab meat and vegetables Gently fold in the fresh crab meat. Make sure to break apart any lumps. Next, add the minced celery, diced red bell pepper, and chopped dill. Mix slowly to keep the crab’s soft texture. - Taste and adjust seasoning Now, it’s time to taste your salad. Adjust the seasoning as needed. You can add more salt, pepper, or a squeeze of lemon juice to fit your taste. - Fill avocado halves Take a ripe avocado and cut it in half. Scoop out some flesh to make space. Then, use a spoon to fill each avocado half with the crab salad. Let it overflow a bit for a nice look. - Arrange on serving platter Place the filled avocado halves on a serving platter. Arrange them in a way that makes the dish look inviting. - Garnish with fresh herbs To finish, sprinkle fresh microgreens or parsley on top. This adds a bright and fresh touch to your dish. For the full recipe, refer to the Crab Salad Delight section. When choosing fresh crab meat, you want quality. - Look for a sweet aroma: Fresh crab should smell like the ocean. - Check for firmness and texture: The meat should feel firm and not mushy. - Avoid any discolored or mushy pieces: Discoloration means it may not be fresh. To make your crab salad shine, focus on flavors. - Use fresh herbs for a vibrant taste: Dill and parsley brighten the dish. - Experiment with spices for added depth: A pinch of Old Bay or paprika can elevate flavors. How you present your crab salad matters. - Serve on a bed of greens: This adds color and freshness to the dish. - Use colorful plates for visual appeal: Bright plates make the dish pop. For more details, check the Full Recipe. {{image_4}} You can easily make this crab salad fit a keto diet. To do this, swap high-carb ingredients for low-carb ones. For example, use a low-carb mayonnaise or Greek yogurt. These swaps keep the flavor but lower the carbs. You can also add avocado for healthy fats. It adds a creamy texture and pairs well with crab. For dressing alternatives, try using olive oil and lemon juice. This keeps it fresh and light. If you want a vegan crab salad, you can use plant-based crab alternatives. Look for products made from jackfruit or tofu to mimic crab meat. They have a similar texture and soak up flavors well. For the dressing, replace creamy options with cashew cream or blended silken tofu. This gives you that rich, creamy feel without any dairy. Adding a bit of seaweed can give a hint of ocean flavor, too. You can customize your crab salad with fun ingredients. Adding fruits like mango or pineapple brings a sweet twist. This makes it bright and refreshing. For a crunchy texture, try incorporating nuts like almonds or walnuts. They add a satisfying bite and a nutty flavor. You can mix and match these extras based on what you like. Each addition makes it your own! To keep your crab salad fresh, store it in the fridge. Use an airtight container. This prevents moisture loss and keeps the flavors intact. Make sure the container is clean and dry before adding the salad. If you have leftover crab salad, place it in a smaller container to reduce air exposure. Crab salad tastes best within 1 to 2 days. It can last up to 3 days if stored well. However, always check before eating. Signs that it’s time to discard include a sour smell or a change in color. If you see any mold, throw it away. Freshness is key to enjoying your crab salad delight. Yes, you can use canned crab meat. It works well in this recipe. Canned crab is often convenient and saves time. However, fresh crab meat gives better flavor and texture. If you choose canned, pick a quality brand for the best taste. The best crabs for salad are lump crab and backfin crab. Lump crab has large pieces, which look great and taste sweet. Backfin crab is smaller and adds a nice texture. Both types will make your salad delicious and appealing. To make the crab salad ahead, prepare it a few hours before serving. Store it in the fridge in a sealed container. Keep the avocado separate until just before serving. This helps prevent browning and keeps the salad fresh. Crab meat is low in calories and high in protein. It offers important nutrients like vitamin B12, zinc, and omega-3 fatty acids. These nutrients support brain health, boost the immune system, and help heart health. Adding crab to your diet can be tasty and nutritious. You now have all the steps and tips to make a tasty crab salad. You learned about using fresh crab, creating a creamy dressing, and adding crunch with veggies. Personalize your salad with fruits or nuts, and enjoy the vibrant flavors. Remember, presentation plays a big role too. Store it properly and enjoy it while it's fresh for the best taste. I hope you try this crab salad delight and make it your own!

Crab Salad Delight Fresh and Flavorful Recipe

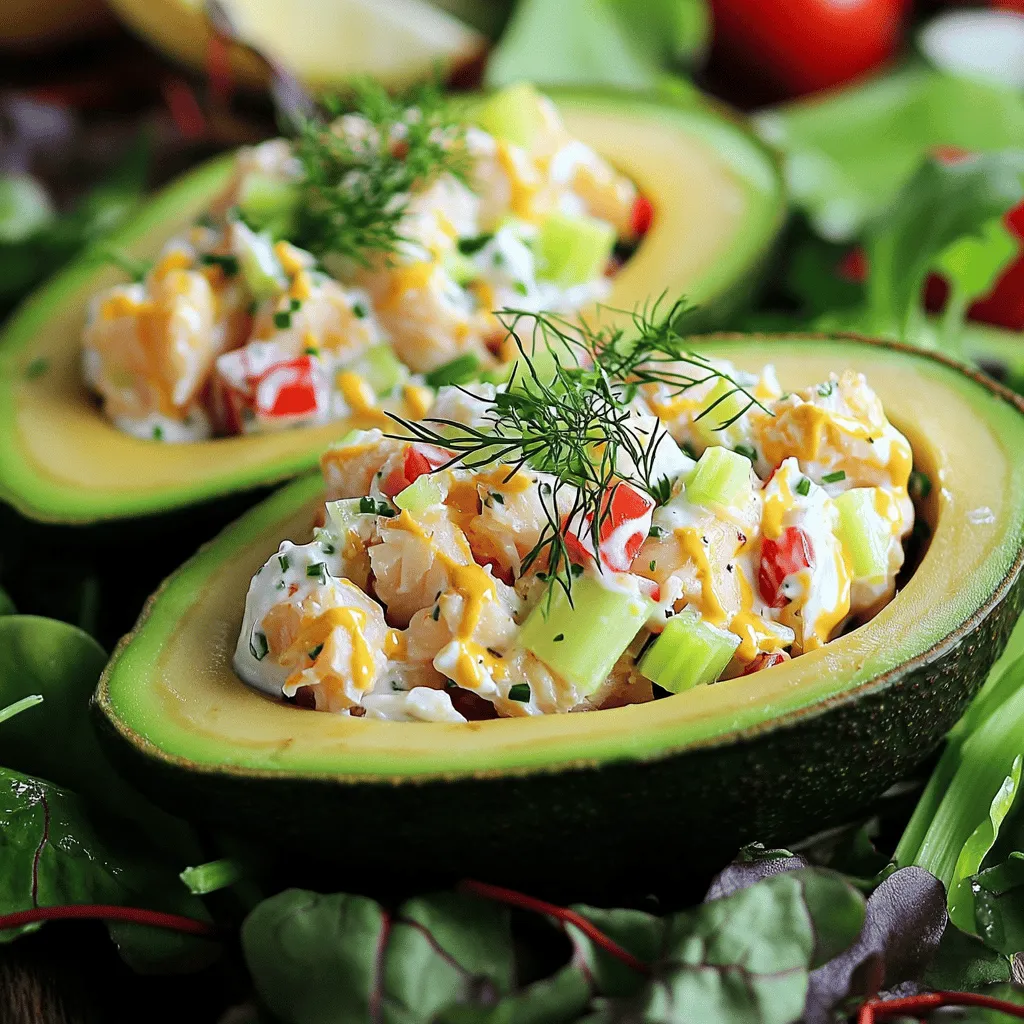
Welcome to my Crab Salad Delight recipe! If you crave something fresh and flavorful, you’re in the right place. This

- 1 cup green or brown lentils - 1 medium onion, finely diced - 2 garlic cloves, minced - 1 bell pepper (red or green), chopped - 2 medium carrots, peeled and sliced - 2 medium potatoes, peeled and cubed - 1 can (14 oz) diced tomatoes - 4 cups vegetable broth, low-sodium recommended - 2 tablespoons Hungarian paprika, preferably sweet - 1 teaspoon dried thyme - 1 teaspoon caraway seeds - 2 tablespoons extra virgin olive oil - Salt and freshly cracked black pepper to taste - Fresh parsley, chopped, for garnish - Additional vegetables such as zucchini or green beans - A splash of balsamic vinegar for acidity - A pinch of cayenne pepper for heat To make this Hungarian lentil vegetable stew truly special, gather these ingredients. The lentils serve as the stew's heart, bringing protein and fiber. I love using green or brown lentils for their robust flavor. Next, the onion and garlic create a fragrant base. Add in a bell pepper for sweetness and vibrant color. Carrots and potatoes contribute texture and heartiness. A can of diced tomatoes adds richness and acidity. Using vegetable broth enhances the flavor without added sodium. The spices are key. Sweet Hungarian paprika provides warmth, while thyme and caraway seeds offer depth. Olive oil adds a smooth finish. If you want to tweak the flavor, feel free to add extra vegetables. Zucchini or green beans work well. For a tangy kick, try balsamic vinegar. If you like heat, a pinch of cayenne pepper can spice things up. Once you have your ingredients ready, you're set to create a comforting dish that's full of flavor. Don't forget to check the Full Recipe for detailed cooking steps! To start, you need to sauté the onion and garlic. Heat olive oil in a large pot over medium heat. Once the oil is hot, add the finely diced onion. Cook for about five minutes until it is soft and clear. Next, add the minced garlic. Cook for one to two minutes more, stirring to keep it from burning. Now, it's time to add the vegetables and seasoning. Toss in the chopped bell pepper, sliced carrots, and cubed potatoes. Let this mix cook for another five minutes. Stir often to ensure even cooking. Then, sprinkle in the Hungarian paprika, dried thyme, and caraway seeds. Mix well to coat the veggies with the spices. Next, you will introduce the lentils and liquids. Pour the can of diced tomatoes into the pot with their juices. After that, add the vegetable broth. Stir everything together and let it come to a boil over high heat. Once boiling, it’s time to add the rinsed lentils to the pot. Reduce the heat to low and cover the pot with a lid. Let it simmer for about 30 to 35 minutes. Stir occasionally. Check the stew's thickness and add more broth or water if needed. Before serving, taste the stew and adjust the seasoning. Add salt and freshly cracked black pepper based on your taste. Lastly, garnish the stew with a sprinkle of freshly chopped parsley. This adds a lovely pop of color and flavor. Enjoy the warmth and richness of Hungarian Lentil Vegetable Stew. You can find the Full Recipe above to guide you through this delicious process. Rinsing lentils is key. It removes dust and small stones. This step also helps reduce any foam during cooking. When you rinse them, they cook more evenly. Garlic adds great flavor, but it can burn fast. To prevent this, add garlic after the onion softens. Stir it often, and watch closely. Pair your stew with rustic bread. It’s perfect for dipping and adds a nice contrast. You can also serve it with a fresh salad for balance. Serve the stew hot. This dish is best enjoyed warm. If you like, add a sprinkle of fresh parsley on top for color and taste. For the full recipe, check the previous section. {{image_4}} You can switch up the lentils in this stew for fun. Red or yellow lentils work well. They cook faster and give a different taste. Mixing different lentils adds texture and flavor. Green lentils hold their shape better, while brown lentils are soft and creamy. Try a blend to see what you like best. This stew can easily be vegetarian or vegan. You can add plant-based proteins like tofu or tempeh. They boost the protein level and make it heartier. If you want it gluten-free, ensure your broth is safe. You can use any broth that meets your needs. These tweaks make the dish fit many diets. Using seasonal vegetables can enhance your stew. Spring might call for fresh peas, while winter is great for root veggies. You can also adjust spices based on the season. For a warmer feel, add a bit of extra paprika or a dash of cumin. Each season brings new flavors, so get creative! Try different combinations to keep it exciting. For the full recipe, check out the section above. To store leftover Hungarian lentil vegetable stew, let it cool first. Place it in an airtight container. You can use glass or plastic containers. Make sure to seal it well. The stew can last in the fridge for about three to five days. When you're ready to eat, just reheat it on the stove or in the microwave. You can freeze this stew for later use. Portion the stew into freezer-safe containers or bags. Leave some space at the top, as liquids expand when frozen. Label each container with the date. It’s best to use the stew within three months for the best taste. To thaw, move it to the fridge overnight. Reheat on the stove or microwave until hot. Stir well to ensure even heating. Enjoy this warm comfort dish anytime! Can I make this stew in a slow cooker? Yes, you can use a slow cooker. Just sauté the onion and garlic first. Then, add all the ingredients into the slow cooker. Cook on low for 6-8 hours or high for about 3-4 hours. This method brings out the flavors nicely. How do I make this recipe spicier? To spice up your stew, add some red pepper flakes or a pinch of cayenne pepper. You can also try a spicier paprika, like hot Hungarian paprika, for a flavorful kick. Start with a small amount and taste as you go. Can I substitute an ingredient if I don’t have it on hand? Absolutely! If you lack lentils, try beans or chickpeas. You can also swap vegetables based on what you have, like using zucchini instead of carrots. Be creative and make it your own. Is this stew healthy? Yes, this stew is very healthy. Lentils are full of protein and fiber. It also has lots of vegetables, which are good for you. Plus, it's low in fat, making it a great choice for a balanced meal. How can I lower the sodium content? To lower sodium, use low-sodium vegetable broth. You can also skip adding extra salt and let the natural flavors shine through. Fresh herbs can add flavor without the salt. What are the health benefits of lentils? Lentils are packed with nutrients. They help with digestion due to their fiber. They also provide protein, which is great for muscle health. Lentils can help keep your blood sugar stable and support heart health. What makes this stew a traditional Hungarian dish? Hungarian lentil stew is traditional because of its use of paprika, a staple in Hungarian cooking. This dish reflects the country's love for hearty, wholesome meals. It is often made in homes across Hungary, especially in colder months. Are there specific occasions to serve Hungarian lentil stew? You can serve this stew on many occasions. It's perfect for family dinners, cozy gatherings, or even casual parties. Many enjoy it during winter holidays, as it warms the soul and brings comfort to the table. For the complete recipe, check out the Full Recipe section above. This article covered the key ingredients and steps to make a hearty Hungarian lentil vegetable stew. We discussed optional ingredients to enhance flavor, tips for perfecting texture, and variations for different diets. Don't forget to store leftovers properly to enjoy later. Cooking can be fun and rewarding, especially with a dish like this. Explore the different ways to make this stew your own, and savor the warm, rich flavors with each bite. Enjoy your journey in creating this comforting meal!

Hungarian Lentil Vegetable Stew Flavorful Comfort Dish

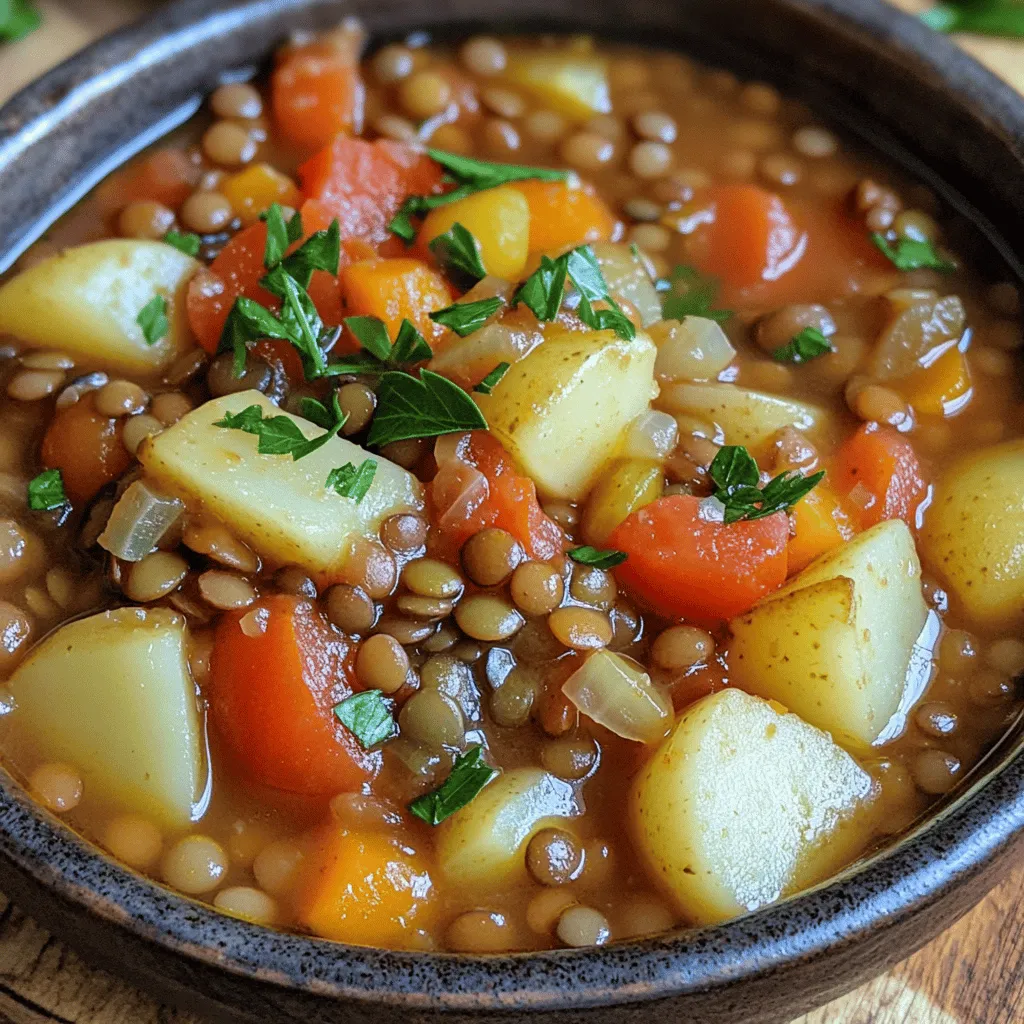
Warm, hearty, and packed with flavor, Hungarian Lentil Vegetable Stew is the perfect comfort dish. With simple ingredients like lentils,

Older posts
Newer posts
← Previous Page1 … Page9 Page10 Page11 … Page27 Next →

dsad

© 2025 mealinmoments • Built with GeneratePress

Our Policies

  • Copyright Policy
  • Cookie Policy
  • GDPR Policy
  • Privacy Policy
  • Disclaimer
  • Terms Of Use

More Information

  • Home
  • About
  • Contact
  • Appetizers
  • Dessert
  • Dinner
  • Drinks
©2025, mealinmoments About Back To Top