Skip to content
DisclaimerTerms Of UseGDPR PolicyCookie Policy

mealinmoments

  • Home
  • Drinks
  • Appetizers
  • Dinner
  • Dessert
  • About
  • Contact
  • Privacy Policy
DisclaimerTerms Of UseGDPR PolicyCookie Policy

Megan

- 4 large flour tortillas - 1 cup mini marshmallows - 1 cup chocolate chips - 1/2 cup crushed graham crackers - 2 tablespoons unsalted butter - 1 teaspoon vanilla extract (optional) - Fresh strawberries (thinly sliced) - Banana slices (thinly sliced) - Grill or skillet - Spatula - Mixing bowl Gathering the right ingredients is key to making delicious grilled s'mores quesadillas. You need large flour tortillas to hold everything together, and mini marshmallows for that classic s'mores taste. Chocolate chips add the rich, melty flavor we all love. The crushed graham crackers give that crunchy texture. Butter helps achieve a golden, crispy outside. If you want to make these quesadillas even more special, consider adding fresh strawberries or banana slices. These fruits can bring a new layer of flavor and fun to your dish. For cooking, a grill or skillet works best to get that perfect crisp. A spatula helps flip the quesadilla easily. Lastly, a mixing bowl is essential for combining the filling ingredients. Having everything ready makes cooking smooth and enjoyable. The full recipe will guide you through the steps to create this tasty treat. - Preheat your grill or skillet over medium heat. This step helps make the quesadilla crispy. - While it heats, gather your ingredients. In a medium bowl, mix chocolate chips, mini marshmallows, and crushed graham crackers. If you want more flavor, add vanilla extract. - Take a flour tortilla and spread softened butter on one side. This will be the bottom side when cooking. - Place the buttered tortilla, butter side down, on the grill or skillet. Sprinkle a generous amount of your chocolate and marshmallow mix over the tortilla. Leave a small edge around the sides to help during grilling. - Grill the quesadilla for about 2-3 minutes. Look for a golden brown color on the bottom. - Carefully flip the quesadilla using a spatula. Grill the other side for another 2-3 minutes. You want it crispy and melted inside. - After grilling, take it off the heat and let it rest for a minute. Slice it into wedges and enjoy! - Serve warm, and you can drizzle extra melted chocolate on top for fun. For the full recipe, refer to the provided details! To get the best crispiness, set your grill to medium heat. This helps cook the tortillas evenly. If it’s too hot, the outside may burn before the inside melts. Grill each quesadilla for about 2-3 minutes on one side. Look for a nice golden brown color before flipping. After flipping, grill for another 2-3 minutes. Keep an eye on it to avoid burning. Try using flavored chocolate chips for a twist. Options like mint or orange chocolate can add fun new tastes. You can also mix in spices like cinnamon for warmth or a dash of sea salt for contrast. These small changes can make your quesadillas stand out. When serving, cut the quesadillas into wedges. Arrange them on a colorful plate for an appealing look. Sprinkle extra crushed graham crackers on top for texture. A light dusting of powdered sugar also adds a nice touch. You can serve mini marshmallows on the side for extra fun. They make a great dipping option too. {{image_4}} You can switch up the classic flavors of grilled s'mores quesadillas. Try a peanut butter and chocolate twist. Just spread peanut butter on one tortilla before adding chocolate and marshmallows. The creamy peanut butter pairs well with sweet chocolate and fluffy marshmallows. Another fun option is using Nutella and fruit combinations. Spread Nutella on your tortilla, then add slices of fresh bananas or strawberries. This adds a fruity taste that really shines. For those needing gluten-free options, use gluten-free tortillas. These work just as well and let everyone enjoy the treat. Check the label to ensure they fit your dietary needs. If you're looking for dairy-free chocolate options, many brands offer great alternatives. You can find dairy-free chocolate chips at most stores. These substitutes help you enjoy grilled s'mores quesadillas without the dairy. Grilled s'mores quesadillas taste wonderful when paired with ice cream. Vanilla or chocolate ice cream complements the sweet flavors perfectly. You can also drizzle some warm chocolate sauce over the top for an extra touch. When it comes to drinks, consider serving with milk or a sweet iced tea. Both pair well with the rich taste of the quesadillas. You can even add a splash of vanilla to the tea for a fun twist. For the full recipe, check out the section above. To keep your grilled s'mores quesadillas fresh, wrap them in plastic wrap or foil. Place them in an airtight container. This helps prevent them from drying out in the fridge. For freezing, wrap each quesadilla snugly in foil, then place them in a freezer bag. This method protects them from freezer burn. To reheat and keep them crispy, use an oven or skillet. Preheat your oven to 350°F (175°C). Place the quesadillas on a baking sheet and heat for about 10 minutes. If using a skillet, warm it over medium heat. Cook the quesadillas for about 2-3 minutes on each side. This way, they stay crunchy and delicious. Leftovers will last about 3-4 days in the fridge. After that, they may start to lose flavor and texture. Look for signs like an off smell, mold, or a change in color. If you see any of these, it's best to toss them. Enjoy your delicious treats while they are fresh! Yes, you can prepare these delicious treats ahead of time. To do this, assemble the quesadillas but do not grill them. - Stack the prepared quesadillas between parchment paper. - Place them in an airtight container. - Store them in the fridge for up to one day. When ready to enjoy, simply grill them as you normally would. This way, you save time and still get that warm, gooey goodness. If you want to switch things up, several tasty options work well. - Use peanut butter chips for a nutty twist. - Try white chocolate chips for a milder sweetness. - Consider using Nutella spread if you want a creamy texture. Each option brings its own flavor, enhancing the quesadilla experience. Keeping the filling in place is key for a perfect quesadilla. Here are a few tips: - Leave a small border of tortilla without filling. This helps seal it better. - Press the quesadilla down gently while grilling. This helps the edges stick. - Grill on low to medium heat. This allows the inside to melt without burning the outside. These steps will help keep your filling intact and your grilling mess-free. Serving grilled s'mores quesadillas can be fun and creative. Here are some ideas: - Serve warm, cut into wedges on a colorful plate. - Drizzle extra melted chocolate on top for a sweet touch. - Pair with fresh strawberries or banana slices for a fruity side. You can also add a scoop of vanilla ice cream for a delicious dessert experience. In this post, we covered how to make grilled s'mores quesadillas. You learned about the key ingredients, including tortillas, marshmallows, and chocolate chips. We went step-by-step on preparation, cooking, and tips for the perfect dish. Remember to try the suggested add-ins and enjoy the flavor variations! These tasty treats are easy to make and fun to share. So grab your grill, gather your ingredients, and get ready for a delicious dessert adventure. Enjoy every crispy, gooey bite!

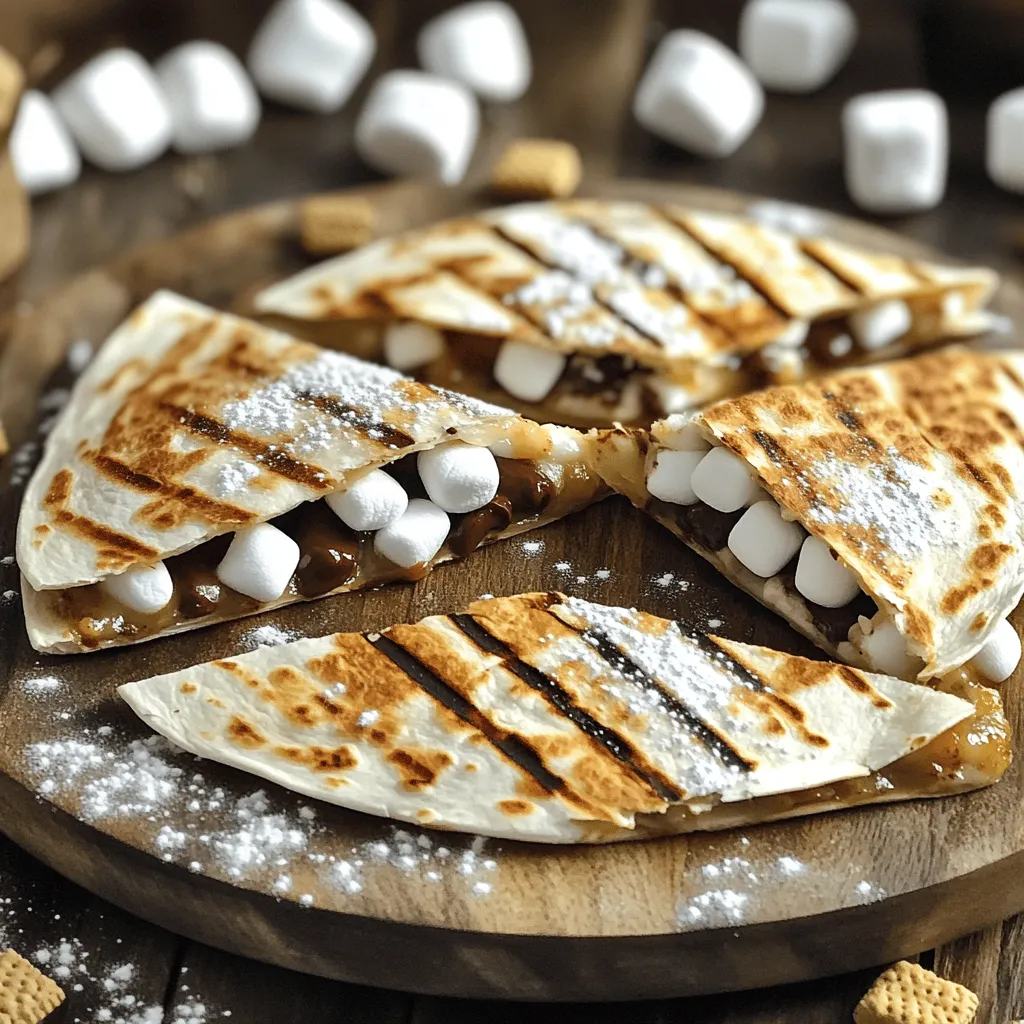
Grilled S’mores Quesadillas Tasty and Fun Treat

Are you ready to elevate your campfire treats? Grilled S’mores Quesadillas combine gooey marshmallows, melty chocolate, and crunchy graham crackers

To create a savory surf and turf steak with creamy sauce, gather the following ingredients: - 2 ribeye steaks (1-inch thick) - 8 oz shrimp, peeled and deveined - 2 tablespoons unsalted butter - 2 cloves garlic, finely minced - 1 tablespoon fresh parsley, finely chopped - 1 tablespoon Worcestershire sauce - 1/2 cup heavy cream - 1/4 cup grated Parmesan cheese - Salt and freshly ground black pepper, to taste - Lemon wedges, for serving These ingredients combine to make a dish that delights the senses. The ribeye steaks provide rich flavor, while the shrimp add a touch of the sea. Garlic and butter create a savory base for the creamy sauce. Heavy cream and Parmesan cheese give the sauce a smooth texture. Fresh parsley adds color and freshness. Don't forget the lemon wedges; they enhance the dish with a burst of brightness. For the full recipe, check the details. To start, you want to season the ribeye steaks well. Generously sprinkle salt and black pepper on both sides. This adds flavor and helps form a nice crust. After seasoning, let the steaks rest at room temperature for about 30 minutes. Resting helps them cook evenly and stay juicy. Next, heat a large skillet over medium-high heat. Add 1 tablespoon of unsalted butter. When the butter is melted and sizzling, carefully add the seasoned steaks. Cook each steak for about 4-5 minutes for medium-rare. If you want it more done, adjust the time slightly. Once cooked to your liking, move the steaks to a plate. Cover them loosely with aluminum foil to keep warm. In that same skillet, add the remaining tablespoon of butter. Let it melt. Then, stir in 2 cloves of minced garlic. Sauté for about 30 seconds until the garlic smells great. After that, add the peeled and deveined shrimp. Cook for about 3-4 minutes, stirring often. The shrimp should turn pink and opaque when they are done. Now, reduce the heat to low. Pour in the Worcestershire sauce and heavy cream. Add 1/4 cup of grated Parmesan cheese and stir well. Let the sauce simmer for 2-3 minutes. Stir it occasionally until it thickens slightly. Finally, add 1 tablespoon of chopped parsley and season with salt and pepper to taste. When serving, slice the ribeye steaks against the grain. Place the slices on warm plates and spoon the creamy shrimp sauce generously over the top. For a nice touch, garnish with more chopped parsley. Serve with lemon wedges on the side for a zesty flavor boost. For the full recipe, check out the details above. To get the best steak, start by resting your ribeye. Letting it rest for 30 minutes helps it cook evenly. After cooking, slice against the grain. This keeps the steak tender and easy to chew. You can swap heavy cream with half-and-half for a lighter sauce. Adding a splash of lemon juice can brighten the flavor. For extra kick, try adding a pinch of cayenne pepper or smoked paprika. These spices will give depth to the sauce. For a twist, consider using fresh herbs like thyme or basil in place of parsley. They can change the whole taste while still keeping it creamy and rich. For the full recipe, check out the Surf and Turf Delight 🥩. {{image_4}} You can switch up the shrimp for other seafood. Try scallops or lobster for a luxe touch. Each option brings a unique flavor. You can also add crab meat for a sweet twist. Mix and match different seafood for a fun surprise in every bite. While ribeye is great, you can use other cuts too. Sirloin or filet mignon work well. Each cut offers its own taste and texture. You can also change how you cook the steak. Try grilling for a smoky flavor or broiling for a quick sear. The creamy sauce can have many styles. Swap heavy cream for sour cream for a tangy taste. Use different cheeses, like goat cheese, for unique flavors. You can also add herbs, like thyme or rosemary, to change the profile. Adjust the sauce to your liking; it should match your taste. For the full recipe, check out the Surf and Turf Delight. After enjoying your surf and turf, store any leftovers right away. Place the steak and shrimp in an airtight container. Make sure to cool them down first. Refrigerate them within two hours of cooking. This keeps the food safe and fresh. You can keep it in the fridge for up to 3 days. For longer storage, you can freeze the leftovers. Wrap the steak and shrimp tightly in plastic wrap. Then, place them in a freezer bag. Squeeze out all the air to avoid freezer burn. You can freeze them for up to 3 months. When you are ready to eat the leftovers, reheating is key. Use a skillet for the best result. Heat on medium-low, adding a little butter or oil. This helps keep the food moist. Stir gently to ensure even heating. If you prefer the microwave, use it with care. Place the food in a microwave-safe dish. Add a splash of water to keep it from drying out. Heat on medium power and check every minute. This way, you avoid overcooking the shrimp or steak. Overcooking can make them tough and less tasty. Enjoy your meal again with ease! For more tips and the full recipe, check out the Surf and Turf Delight 🥩! The best way to cook ribeye steak is in a skillet. You can also grill it. Start by seasoning the steak well with salt and pepper. Let it rest for 30 minutes before cooking. Heat your skillet over medium-high heat and add butter. Cook the steak for about 4-5 minutes on each side for medium-rare. Adjust the time if you like it more or less cooked. This method gives a nice crust and keeps the meat juicy. Yes, you can use frozen shrimp. Just make sure to thaw them first. The best way to thaw shrimp is to place them in a bowl of cold water. Change the water every 15 minutes until they are thawed. You can also leave them in the fridge overnight. This keeps them safe and fresh. Avoid using hot water, as it can cook the shrimp unevenly. You can tell shrimp are cooked when they turn pink and opaque. This usually takes about 3-4 minutes in the skillet. The shrimp should also curl slightly. If they are still gray or translucent, they need more time. Overcooked shrimp can become tough, so watch them closely. Yes, you can make the creamy sauce ahead of time. Cook the sauce as described, then let it cool. Store it in an airtight container in the fridge for up to three days. When you are ready to serve, reheat it slowly on low heat. Add a splash of cream if it thickens too much. This way, you save time and can enjoy your meal stress-free. For the full recipe, check the details above. This blog post covered how to create a delicious dish with ribeye steak and shrimp. We explored ingredient lists, step-by-step instructions, and tips for perfecting texture and flavor. With variations and storage tips, you can easily customize this meal. Cooking can be simple and fun. Use these instructions to impress yourself and others. Enjoy every bite and feel free to experiment with flavors. Your culinary skills will grow with each dish you make.

Savory Surf and Turf Steak with Creamy Sauce Recipe

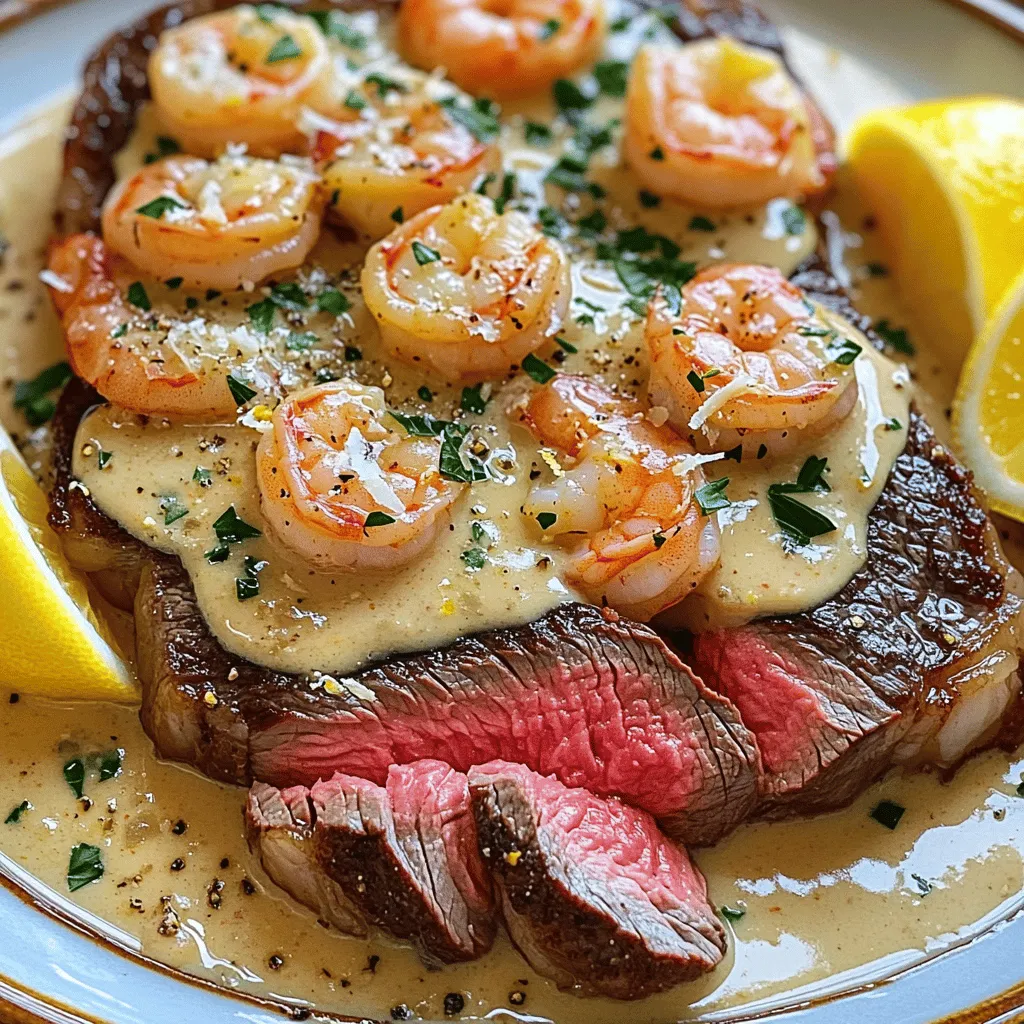
Welcome to the delicious world of Surf and Turf! In this post, I’ll guide you through making a savory Surf

- 2 cups of cooked chicken, shredded - 1 cup of shredded sharp cheddar cheese - 1/2 cup of cream cheese, softened - 1/2 cup of corn (canned or frozen) - 1/4 cup of red bell pepper, diced finely - 1/4 cup of green onions, chopped - 1 teaspoon of garlic powder - 1 teaspoon of chili powder - Salt and pepper to taste - 4 large flour tortillas When I make cheesy chicken wraps, I love to use fresh ingredients. The base starts with cooked chicken. Shredded chicken mixes well with the cheese. I prefer sharp cheddar for that rich flavor. Cream cheese adds creaminess and helps bind the mixture. Next, I like to add corn. It gives a sweet crunch. Diced red bell pepper brings color and a bit of sweetness. Green onions add a fresh bite. For seasoning, I use garlic powder and chili powder. They add depth and warmth to every bite. I always check the salt and pepper too. These small touches make a big difference. Finally, I choose large flour tortillas. They wrap well around the filling. Each bite should be full and satisfying. You can find the full recipe to guide you through the steps. Enjoy your cooking! - In a large bowl, combine cooked chicken, cheddar cheese, cream cheese, corn, and diced bell pepper. - Add chopped green onions, garlic powder, chili powder, and a pinch of salt and pepper. - Stir everything together thoroughly until it is well mixed. - Take a large tortilla and lay it flat on your clean surface. - Spoon a generous amount of the cheesy chicken mixture into the center. - Top the mixture with crisp lettuce for added crunch. - Fold the sides of the tortilla inward and tightly roll it from the bottom to the top. - Repeat this with the remaining tortillas and filling until all wraps are made. - Preheat a non-stick skillet over medium heat to ensure even cooking. - Place each wrap seam side down in the hot skillet. - Cook for about 2 to 3 minutes until the bottom is golden brown. - Flip the wraps carefully and cook the other side for another 2 to 3 minutes. - When both sides are crispy and heated through, remove them from the skillet. - Let the wraps cool slightly, then slice each wrap in half to show the cheesy filling inside. - Serve warm with salsa on the side for dipping. For the complete details, you can check out the Full Recipe. To get a nice crisp on your wraps, use a non-stick skillet. This helps cook the outside evenly and keeps the wraps from sticking. Always preheat your skillet to medium heat before adding the wraps. Avoid overcrowding the skillet. If you put in too many wraps at once, they might not cook well. Cook them in batches if needed. You can prepare the filling ahead of time. This saves you time on busy nights. Just mix the chicken, cheeses, and veggies, then store it in the fridge. You can also store un-cooked wraps wrapped in plastic wrap in the refrigerator. This helps keep them fresh until you are ready to cook. Garnishes can really make your dish pop. Sprinkle some extra chopped green onions on top for color. Serve the wraps on a vibrant plate. A small bowl of salsa in the center adds flair. Fresh toppings like chopped tomatoes or cilantro can enhance the look and taste. Enjoy making your wraps not just tasty but also beautiful! {{image_4}} You can easily swap chicken for other proteins. Turkey works well and tastes great. If you prefer a plant-based option, use tofu. Ground beef also adds a nice flavor. Don't forget to experiment with cheeses! Mix sharp cheddar with mozzarella or feta for a unique taste. Adding veggies can boost flavor and nutrition. Diced jalapeños give a spicy kick. Spinach adds color and is packed with nutrients. Black beans are another great choice. They add fiber and protein, making your wrap even heartier. Want to spice things up? Hot sauce or extra chili powder can do the trick. If you love cheese, try using white cheddar or pepper jack. These cheeses bring a fun twist to the flavor. Adjust the heat and cheese to your liking. Enjoy making your wraps unique! After making your cheesy chicken wraps, store any leftovers in the fridge. Place them in an airtight container. This keeps the wraps fresh and tasty. You can safely store them for about 3 days. To freeze your wraps, first let them cool completely. Then, wrap each one tightly in plastic wrap. After that, place them in a freezer bag. This helps to keep out air and moisture. You can freeze them for up to 2 months. When ready to eat, thaw them overnight in the fridge. Reheat them in a skillet over medium heat for the best results. Always make sure the chicken is fully cooked before storing. This helps prevent foodborne illness. Use airtight containers to keep the wraps fresh and avoid drying out. This way, your cheesy chicken wraps will stay delicious for your next meal. To make Cheesy Chicken Wraps healthier, you can swap some ingredients. Here are some ideas: - Use low-fat cream cheese instead of regular cream cheese. - Choose whole wheat tortillas for added fiber. - Replace sharp cheddar with a reduced-fat cheese. - Add more veggies like spinach or zucchini for extra nutrients. - Reduce the amount of cheese to cut calories. These changes help keep the wraps tasty while lowering fat and calories. Yes, you can easily make these wraps vegetarian! Instead of chicken, try these options: - Use black beans or chickpeas for protein. - Add grilled vegetables like bell peppers and zucchini. - Substitute cream cheese with a plant-based alternative. - Use a mix of your favorite cheeses to keep it cheesy. These swaps let everyone enjoy the wraps, no matter their diet. Pairing sides with Cheesy Chicken Wraps can enhance your meal. Here are some tasty options: - Serve with a fresh garden salad for crunch. - Add some tortilla chips and guacamole for a fun twist. - A bowl of salsa or pico de gallo works great too. - Try some roasted veggies for a healthy option. These sides complement the wraps and make your meal more filling. If you want to spice up your Cheesy Chicken Wraps, consider these tips: - Add diced jalapeños to the filling for heat. - Mix in some hot sauce with the cream cheese. - Use pepper jack cheese instead of cheddar for a kick. - Sprinkle extra chili powder into the mixture. These options let you control the spice level and suit your taste. For the full recipe, check out the details above. Cheesy chicken wraps are easy and fun to make. We covered the main ingredients and flavors. You learned step-by-step instructions for preparation, assembly, and cooking. I shared tips for crispy wraps and meal prep. You can even try different proteins and veggies to mix it up. Remember to store your leftovers safely, ensuring they stay fresh. Enjoy your cheesy chicken wraps, and feel free to experiment with flavors. Your kitchen is the best place for creativity!

Cheesy Chicken Wraps Flavorful and Easy Recipe

Looking for a quick dinner idea that packs a punch of flavor? Try my Cheesy Chicken Wraps! This easy recipe

To make this dish, you need the following ingredients: - 1 lb (450g) boneless, skinless chicken thighs - 1/4 cup honey - 2 tablespoons soy sauce - 1 tablespoon Sriracha (adjust to your heat preference) - 2 cloves garlic, minced - 1 teaspoon freshly grated ginger - 1 tablespoon vegetable oil - 1 teaspoon sesame oil - Salt and pepper, to taste When choosing chicken, look for fresh, high-quality meat. If you prefer chicken breasts, you can use those instead. They will work just fine. For the honey, choose a pure variety for the best flavor. If you want a different heat, replace Sriracha with another hot sauce. You can also mix in some chili flakes for extra spice. Fresh ginger gives a bright taste, but you can use ground ginger if you need to. Just be sure to adjust the amounts. Garnishes can elevate your dish. Here are some great ideas: - Chopped green onions - Sesame seeds These toppings add color and crunch. They also bring fresh flavors to the meal. The green onions give a mild onion taste, while sesame seeds add a nutty note. Drizzling some extra sauce over the chicken before serving makes the dish shine. Garnishes not only enhance flavor but also make your plate look beautiful. So, don’t skip them! You can find the full recipe for Delicious Spicy Honey Chicken in the earlier section. To start, you need to marinate the chicken. In a big bowl, mix honey, soy sauce, Sriracha, garlic, and ginger. Whisk these together until smooth. This mix makes a tasty marinade. Next, add the chicken thighs to the bowl. Make sure every piece gets coated well. Use a spatula or your hands to turn the chicken in the marinade. Cover the bowl with plastic wrap. Put it in the fridge for at least 30 minutes. For even better flavor, let it sit overnight. Now it's time to cook the chicken. Heat a large skillet over medium-high heat. Add both vegetable oil and sesame oil. Wait until the oil shimmers. Take the marinated chicken out of the bowl. Let any extra marinade drip off. Season both sides with salt and pepper. Then, place the chicken in the hot skillet. Cook for about 6 to 7 minutes on each side. You want a golden, caramelized crust. If you like, baste with some leftover marinade in the last few minutes. Once the chicken is cooked, move it to a cutting board. Let it rest for a few minutes. This helps keep the juices inside. Slice the chicken into strips for serving. For the final touch, drizzle any sauce left in the skillet over the chicken. This adds extra flavor. You can also sprinkle chopped green onions and sesame seeds on top for a nice look. Enjoy your meal! For the full recipe, check the previous section. To keep your chicken juicy, use boneless, skinless thighs. They stay tender and moist. Cook them over medium-high heat. This gives a nice sear and keeps the juices in. Avoid overcrowding the pan. If you add too much chicken, it will steam instead of sear. When it comes to Sriracha, start with one tablespoon. This gives a nice kick without overwhelming the dish. Taste the marinade before you add the chicken. You can always add more heat later if you like. Marinate the chicken for at least 30 minutes. This allows the flavors to soak in. For a richer taste, let it sit overnight in the fridge. The longer it marinates, the more flavor it will have. Make sure to coat the chicken well. Use your hands to rub the marinade into each piece. This ensures every bite is full of flavor. If you're short on time, even 15 minutes can add some taste. Just remember, more time means better flavor. {{image_4}} You can change the meat in this recipe easily. Chicken thighs give great flavor, but you can use chicken breasts too. If you want a plant-based option, use tofu or tempeh. They soak up the marinade well and taste amazing. Adjusting spice levels is simple. If you like it hotter, add more Sriracha or use fresh peppers. For a milder taste, reduce the Sriracha or use sweet chili sauce. You can also try different hot sauces for unique flavors. Pair your spicy honey chicken with simple sides. Steamed rice or roasted vegetables work well. You can also serve it with a fresh salad to balance the heat. For a fun twist, try serving it in lettuce wraps. This adds crunch and freshness. You can also create a rice bowl with toppings like avocado, cilantro, or lime. Check out the Full Recipe for more tips and tricks to make your meal shine. To keep your Delicious Spicy Honey Chicken fresh, cool it first. Let it sit at room temperature for no more than two hours. Then, place it in an airtight container. You can use glass or plastic containers that seal tightly. This helps keep the chicken moist and full of flavor. Leftovers can stay fresh in the fridge for up to four days. If you want to keep it longer, freeze it. Make sure to wrap it well in plastic wrap before placing it in a freezer bag. This prevents freezer burn. When it's time to eat your leftovers, reheat them carefully. The best way is to use the oven or a skillet. Preheat the oven to 350°F (175°C). Place the chicken in an oven-safe dish and cover it with foil. Heat for about 15-20 minutes. If you use a skillet, add a splash of water or broth. This keeps the chicken juicy. Heat it on medium until warmed through. You can also get creative with your leftovers. Chop the chicken and add it to salads, wraps, or stir-fries. This makes a quick and tasty meal with a spicy kick. For an easy lunch, add it to rice or quinoa bowls. With these tips, you’ll enjoy your spicy honey chicken well beyond dinner night! To keep the chicken juicy, you need a good marinade. A mix of honey, soy sauce, and Sriracha works great. This blend adds flavor and moisture. Marinate the chicken for at least 30 minutes. If you have time, let it sit overnight. This extra time lets the flavors soak in. When cooking, avoid high heat. Cook over medium-high, and don't rush it. Flip the chicken only once to get a nice crust. Yes, you can prep this dish in advance. Marinate the chicken earlier in the day or the night before. When it's time to cook, just take it out of the fridge. This makes weeknight dinners easy. You can also cook the chicken ahead of time and store it. Just let it cool completely, then keep it in the fridge. Reheat it when you're ready to eat. If you run out of Sriracha, don't worry. You can use other hot sauces or chili paste. Look for something with a similar heat level. For a milder option, use sweet chili sauce. If you want more heat, try a dash of cayenne pepper or red pepper flakes. Adjust the amount based on your taste. This way, you can still enjoy that spicy kick without Sriracha. For the full recipe, check the earlier section. This recipe for Delicious Spicy Honey Chicken combines great ingredients and helpful tips. You learned how to marinate and cook the chicken for perfect flavor. The optional garnishes add taste and beauty to your dish. Adjust spice levels to suit your taste and try variations with meats or plants. Store and reheat carefully to keep it tasty. I hope you feel inspired to create this dish and enjoy every bite!

Delicious Spicy Honey Chicken Flavorful Weeknight Meal

Looking for a quick and tasty weeknight meal? Try my Delicious Spicy Honey Chicken! With a perfect balance of heat

- 8 oz penne pasta - 1 lb boneless, skinless chicken breasts, diced - 3 cloves garlic, finely minced - 1 cup heavy cream - 1/2 cup chicken broth - 1 teaspoon dried Italian seasoning - Salt and freshly ground black pepper to taste - Fresh basil leaves, torn, for garnish - Large pot for boiling pasta - Large skillet for cooking chicken and sauce - Colander for draining pasta For this creamy chicken penne, the ingredients play a key role in its rich taste. The penne pasta gives a hearty base. The chicken adds protein and flavor. Garlic brings a punch of aroma. Heavy cream makes it velvety and rich. Chicken broth enhances the flavor depth. The seasoning is simple yet effective. Italian seasoning ties everything together. Salt and pepper help bring out the best in each ingredient. Fresh basil leaves add color and a bright taste. You will need a large pot to boil the pasta. A large skillet is essential for cooking the chicken and sauce. Lastly, have a colander ready to drain the pasta after cooking. These tools make your cooking process smooth and easy. For the full recipe, check the detailed steps in the [Full Recipe]. - Bring salted water to a rolling boil. - Cook penne according to package instructions. Cooking pasta is simple and fun. Use a large pot and let the water boil first. Add salt for flavor. Cooking penne usually takes about 11 to 13 minutes. You want it to be al dente, which means firm but not hard. Drain the pasta in a colander and set it aside. - Heat olive oil in skillet over medium heat. - Season and cook diced chicken until golden brown. For the chicken, start with a large skillet. Add olive oil and let it heat up. It should shimmer but not smoke. Add the diced chicken and season it well with salt and pepper. Cook for about 6 to 8 minutes. Stir it often, so it cooks evenly. The chicken should be golden brown and cooked through. Once done, take it out and place it on a plate. - Sauté minced garlic in skillet. - Combine chicken broth and heavy cream, then add cheese. In the same skillet, add minced garlic. Sauté it for about one minute. The smell will be amazing! Next, pour in chicken broth and heavy cream. Stir it well and let it simmer for a few minutes. Then, add freshly grated Parmesan cheese and mix until it melts into a creamy sauce. This will take about 3 to 4 minutes. - Return chicken to skillet and add drained pasta. - Toss together until pasta is coated. Now comes the best part! Return the cooked chicken to the skillet. Add the drained penne pasta. Toss everything together gently. Make sure the pasta is fully coated in that creamy sauce. If things seem a bit dry, you can add a splash of the reserved pasta water. Taste it and adjust the seasoning if needed. For the full recipe, refer to the detailed instructions above. Enjoy your creamy chicken penne! To make the sauce just right, you can adjust the thickness. Add more cheese or cream if you want it richer. This will give your dish a nice, creamy feel. Always check the seasoning as you mix. Taste it as you go to ensure every bite is flavorful. When cooking, keep the stove on medium heat. This helps to prevent burning. If the heat is too high, you risk ruining the sauce. Use a wooden spoon for gentle mixing. It won’t scratch your skillet and helps keep things smooth. For a touch of class, garnish with extra Parmesan and a drizzle of olive oil. This makes your dish look great and adds flavor. Serve in wide, shallow bowls. This way, every bite gets noticed, and it looks nice on the table. {{image_4}} You can switch the chicken for shrimp or tofu. Shrimp cooks fast and adds a nice taste. Tofu is great for a plant-based option. If you want a quick meal, use rotisserie chicken. Just shred it and add it to the sauce. This saves time and still gives you a tasty dish. Veggies can boost the flavor and nutrition of your meal. Try adding spinach for a fresh crunch. Sun-dried tomatoes give a sweet and tangy taste. You can also toss in mushrooms. They bring an earthy flavor that makes the dish richer. These add-ins make your creamy chicken penne even better. If you need a gluten-free option, use gluten-free penne. It's easy to find and cooks well. You can also try whole wheat or spinach pasta for a healthier choice. These alternatives add different textures and flavors while keeping the dish enjoyable. Experiment with these options to find your favorite! After you enjoy your creamy chicken penne, store any leftovers in an airtight container. This keeps the dish fresh and tasty. You should eat the leftovers within 3-4 days for the best flavor and quality. If you want to save some for later, you can freeze it. Creamy chicken penne can stay good in the freezer for up to 2 months. When you're ready to eat, thaw it in the fridge overnight. Gently reheat it before serving to keep it creamy and delicious. To reheat your dish, use low heat. This helps avoid drying it out. If the sauce thickens too much, add a splash of cream or broth. This will bring back its smooth texture. Enjoy your meal without worry! You can prepare the sauce and chicken in advance. Store them separately. When it’s time to eat, just combine them with the pasta. This way, you can enjoy a fresh meal without much hassle. You can use half-and-half if you want a lighter option. For a dairy-free choice, coconut cream works well too. Both will give you a nice creamy texture. You can make it healthier by adding veggies. Spinach or broccoli would be great. Also, using lean chicken helps boost its nutritional value. Balance is key to a healthy meal. Yes, you can easily make this dish gluten-free. Just swap the penne with gluten-free pasta. There are many tasty options on the market today. It takes about 30 minutes to make this dish. This includes prep time and cooking time. You can have a delicious meal ready in no time! Yes, it reheats nicely. Just remember to heat it gently. This will help keep the sauce smooth and creamy. If it gets too thick, add a splash of cream or broth. This blog post shows how to make a tasty Creamy Chicken Penne. We covered all the ingredients needed, from pasta and chicken to spices. I shared step-by-step instructions for cooking. You'll also find tips for perfecting your dish and fun variations. Lastly, I discussed storage options and answered common questions. Cooking this dish can be simple and rewarding. With a few extra touches, you can enjoy a rich, creamy meal. So grab your ingredients and get started! Enjoy your cooking journey!

Creamy Chicken Penne Flavorful Dinner Delight

If you’re looking for a quick and tasty dinner, Creamy Chicken Penne is the answer! This dish pairs tender chicken

- 1 cup graham cracker crumbs - 1/2 cup unsalted butter, melted - 1/3 cup packed brown sugar - 1/4 cup granulated sugar - 1 cup all-purpose flour - 1 teaspoon baking powder - 1/4 teaspoon salt - 1 cup mini marshmallows - 1 cup milk chocolate chips - 1/2 cup crushed graham crackers (for topping) To create these oven-baked s'mores bars, you need a few simple ingredients. The base starts with graham cracker crumbs. These give the bars that classic s'mores taste. Next, melted butter helps bind everything together and adds richness. Brown sugar and granulated sugar provide sweetness and a slight caramel flavor. The all-purpose flour gives structure to the bars. Baking powder helps them rise just a bit. A touch of salt balances the sweetness. Mini marshmallows melt beautifully and create that gooey texture we all love. Milk chocolate chips add a creamy, rich taste. Finally, crushed graham crackers on top give a little crunch. - Different types of chocolate - Nut butters for additional flavor - Add-ins like walnuts or peanuts For those who want to switch things up, consider using dark chocolate or white chocolate. Nut butters like peanut or almond can add a unique twist. You can also mix in nuts for some crunch. Each of these options can enhance the bars and make them your own. For the full recipe and instructions, check out the [Full Recipe]. First, gather your tools. You will need an 8x8-inch baking dish, mixing bowls, and a spatula. Grease the baking dish with cooking spray. You can also line it with parchment paper. Lining helps you remove the bars easily later. In a large bowl, mix the graham cracker crumbs and melted butter. Add brown and granulated sugar. Stir until it feels like coarse wet sand. Next, sift in flour, baking powder, and salt. Mix until you have a soft, slightly sticky dough. This texture is key for great bars. Take half of the dough and press it into the bottom of the dish. This forms a solid crust. Sprinkle mini marshmallows evenly over the crust. Then, add a layer of milk chocolate chips on top. Use the remaining dough to crumble over the chocolate and marshmallows. This adds texture and balance. Finally, sprinkle crushed graham crackers on top for crunch. Set your oven to 350°F (175°C). Place the dish inside and bake for 20-25 minutes. Keep an eye on it. The top should turn golden brown. Marshmallows will look puffy and bubbly. When done, take it out and let it cool for 15 minutes. This helps the bars set and makes cutting easier. For the full recipe, check the details above. To bake perfect s'mores bars, focus on even baking. Spread the dough evenly in the dish. This helps the bars cook uniformly. Keep an eye on the baking time. The bars should turn golden brown. You can check for doneness by looking for puffy marshmallows. They should be bubbly too. After baking, let the bars cool for about 15 minutes. This cooling time helps them set and makes cutting easier. If you have leftover s'mores bars, store them in an airtight container. This keeps them fresh for up to five days. You can also freeze them for later. Cut the bars into pieces first. Wrap each piece in plastic wrap, then place them in a freezer-safe bag. They will stay good for about two months. To enjoy them later, thaw them in the fridge or at room temperature. Serving s'mores bars can be fun. For special occasions, warm them up and drizzle with chocolate sauce. You can also add extra mini marshmallows on top for a tasty look. Pair the bars with vanilla ice cream for a great contrast. You can even sprinkle some crushed graham crackers on the plate for extra flair. Get creative and let your guests enjoy the deliciousness! {{image_4}} You can easily change the flavor of your s'mores bars. Try using flavored chocolate like mint or orange. You can also use colored marshmallows for a fun look. Adding spices can make a big difference too. A dash of cinnamon gives warmth and depth. You can also add a splash of vanilla for extra sweetness. If you're looking for gluten-free options, swap the graham crackers for gluten-free ones. You can use almond flour or gluten-free flour blends for the crust. For a vegan version, replace the butter with coconut oil or vegan butter. Use dairy-free chocolate and skip the eggs entirely. These swaps keep your s'mores bars just as tasty while meeting dietary needs. Add fruits like bananas or strawberries for a fresh twist. You can slice them thin and layer them with the chocolate and marshmallows. Another fun idea is to turn these into s'mores cookies. Just scoop the dough onto a baking sheet and bake as cookies instead. Both options give your s'mores bars a delightful new spin. To keep your s'mores bars fresh in the fridge, let them cool completely first. After cooling, cut them into squares. Place them in an airtight container. This helps keep them moist. You can enjoy them for up to five days. For freezing, wrap each bar in plastic wrap. Then, place them in a freezer bag. This method prevents freezer burn. You can store them for up to three months. When you are ready to eat, let them thaw in the fridge. Reheat them in the oven at 350°F for about 10 minutes. They will taste fresh and warm again. Check for any changes in color or texture. If the bars feel dry or hard, they may be bad. A weird smell is another sign of spoilage. If you notice any mold, throw them away immediately. Always trust your senses to guide you. Yes, you can make these s'mores bars ahead of time. To do this, bake them as the recipe states. Let them cool completely. Then, cover the dish tightly with plastic wrap. Store it in the fridge for up to three days. When you want to serve, you can warm them in the oven for a few minutes. This will bring back that warm, gooey texture. If you don’t have graham crackers, don’t worry! You can use digestive biscuits or vanilla wafers. Both options work well for the crust. You can also try crushed cookies like Oreos for a fun twist. Just make sure to adjust the sugar if your substitute is sweet. To make gluten-free s'mores bars, swap out the all-purpose flour for a gluten-free blend. Look for blends that include starches and flours like rice or almond. For the graham crackers, use gluten-free versions available at most stores. This way, you can enjoy the treat without gluten. To cut the bars cleanly, use a sharp knife. First, let the bars cool for about 15 minutes. This will help them set. Then, dip your knife in warm water before cutting. Wipe it dry between cuts to avoid crumbling. This method gives you neat slices. Yes, you can customize the chocolate! Use dark chocolate or even white chocolate for a different taste. If you want a richer flavor, try using chocolate bars instead of chips. Just keep in mind that different chocolates melt at different rates. Adjust your baking time if needed. For best results, use chocolate that is 60% cocoa or less for a smooth melt. For the full recipe, check the detailed instructions above. Enjoy your baking! These s'mores bars combine basic ingredients like graham crackers and chocolate. You learned step-by-step how to prep, mix, and bake them. I shared tips for the best results and ways to store them. Customizing the flavors can turn your bars into something really special. Try different chocolates or even fruits to explore new tastes. Enjoy making these easy treats for fun gatherings or cozy nights at home. Simple recipes like this bring joy to every kitchen. Happy baking!

Oven-Baked S’mores Bars Delightful and Easy Recipe

If you’re craving a sweet treat that’s both fun and easy, I have just the thing! My Oven-Baked S’mores Bars

- 1 cup all-purpose flour - 1/2 cup unsweetened cocoa powder - 1 teaspoon baking powder - 1/2 teaspoon baking soda - 1/4 teaspoon salt - 1 cup granulated sugar - 1/2 cup unsalted butter, softened to room temperature - 2 large eggs - 1 teaspoon vanilla extract - 1/2 cup buttermilk - 6 ounces dark chocolate (70% cacao), finely chopped - 1 tablespoon granulated sugar - 3 large egg whites, at room temperature - 1 cup heavy cream, chilled - 6 ounces milk chocolate, finely chopped - 1 tablespoon granulated sugar - 3 large egg whites, at room temperature - 1 cup heavy cream, chilled - 6 ounces white chocolate, finely chopped - 1 tablespoon granulated sugar - 3 large egg whites, at room temperature - 1 cup heavy cream, chilled - Shaved chocolate or a dusting of cocoa powder - Fresh berries (like raspberries or strawberries) - Whipped cream This Triple Chocolate Mousse Cake is a celebration of flavors and textures. Each layer adds its own charm. The cake layer is rich and soft, while the mousses offer a delightful contrast. You can choose to decorate it simply or with a flourish. I love adding fresh berries for a pop of color and flavor. If you want the full recipe, I encourage you to explore the complete guide. Enjoy the process! First, preheat your oven to 350°F (175°C). Grease an 8-inch round cake pan with butter and dust it with flour. This step helps the cake not stick. In a medium bowl, mix 1 cup of flour, 1/2 cup of cocoa powder, 1 teaspoon of baking powder, 1/2 teaspoon of baking soda, and 1/4 teaspoon of salt. In a large bowl, beat 1 cup of granulated sugar with 1/2 cup of softened butter until light and fluffy. This should take about 3-5 minutes. Add 2 large eggs one at a time. Mix in 1 teaspoon of vanilla extract. Now, alternate adding the dry mix and 1/2 cup of buttermilk to the sugar and butter mix. Start and end with the dry mix. Mix just until combined. Pour the batter into your prepared pan and bake for 25-30 minutes. To check if it’s done, insert a toothpick in the center. It should come out clean. Let the cake cool completely on a wire rack. For the dark chocolate mousse, melt 6 ounces of finely chopped dark chocolate over simmering water in a heatproof bowl. Stir until smooth, then remove from heat and let it cool slightly. In another bowl, whip 1 cup of chilled heavy cream until soft peaks form. In a separate bowl, beat 3 large egg whites until soft peaks form. Gradually add 1 tablespoon of sugar, beating until stiff peaks appear. Carefully fold some whipped cream into the melted chocolate to lighten it. Then, gently fold in the rest of the whipped cream and the whipped egg whites until no streaks remain. Repeat the process for the dark chocolate mousse, using 6 ounces of finely chopped milk chocolate instead. This mousse will be sweeter and creamier. For the white chocolate mousse, melt 6 ounces of finely chopped white chocolate in the same way. Then, whip 1 cup of heavy cream and 3 large egg whites separately, adding sugar to the egg whites until you get stiff peaks. Fold the whipped cream and egg whites into the melted white chocolate until you see no streaks. Place the cooled chocolate cake on a serving plate. Spread the dark chocolate mousse over the top, smoothing it evenly. Chill for about 30 minutes to set. Next, layer the milk chocolate mousse over the dark chocolate layer and chill for another 30 minutes. Finally, spoon the white chocolate mousse on top and smooth it out. Cover the cake and refrigerate for at least 2 hours or preferably overnight. Once the cake has set, decorate the top with shaved chocolate, a dusting of cocoa powder, fresh berries, and whipped cream if you like. Slice into wedges and serve chilled. Each bite offers a rich and decadent delight that melts in your mouth! For the complete recipe, check out the [Full Recipe]. To get the best chocolate mousse texture, focus on two key steps: folding and temperature. First, let your chocolate cool a bit before mixing. If it's too hot, it can melt your whipped cream and egg whites. When you fold these ingredients together, do so gently. Use a spatula and cut through the mixture, then lift it from the bottom. This helps keep air in and maintains that light, fluffy texture. Many people make a few common mistakes. One big mistake is overmixing the mousse. This can lead to a dense texture. Another issue is not letting the cake cool completely before adding the mousse. If the cake is warm, the mousse may melt and not set right. Lastly, always check that your egg whites are at room temperature. This helps them whip up better and adds volume. For a stunning presentation, serve your cake with fresh berries or a dusting of cocoa powder. You can also add whipped cream on the side. Each slice reveals the beautiful mousse layers. If you want to impress your guests, try pairing your cake with a scoop of vanilla ice cream. This adds a nice contrast to the rich chocolate flavor. For the full recipe, you can check the section above. Enjoy your baking! {{image_4}} You can make this cake gluten-free. Use a gluten-free flour blend instead of regular flour. Look for blends that include xanthan gum to help with texture. Your cake will still taste rich and delicious. To make a dairy-free version, swap out butter for coconut oil or dairy-free butter. For the mousse, use coconut cream instead of heavy cream. Choose dairy-free chocolates for each layer. This keeps the cake creamy without any dairy. Add a splash of coffee or espresso to the chocolate cake mix. It enhances the chocolate flavor. You can also mix in a teaspoon of almond extract for an extra layer of taste. For a fruity twist, add a layer of raspberry or cherry puree between the mousse layers. These small changes can make your cake unique and exciting. For the full recipe, check out the Full Recipe section. Chilling is key for this cake. It helps the mousse layers set properly. After making the cake, cover it well with plastic wrap. Keep it in the fridge for at least two hours. If you have time, let it chill overnight. This waiting time makes the flavors blend better. Leftover cake can stay fresh in the fridge. Use an airtight container to keep it from drying out. If you don’t have a container, cover it tightly with plastic wrap. Enjoy the leftover cake within three days for the best taste. You can freeze Triple Chocolate Mousse Cake for longer storage. Wrap it tightly in plastic wrap, then place it in a freezer bag. This method prevents freezer burn. The cake can last up to a month in the freezer. To eat, thaw it in the fridge overnight before serving. You can use plain yogurt or milk with vinegar. Mix one tablespoon of vinegar or lemon juice into one cup of milk. Let it sit for about five minutes. This will mimic buttermilk's tangy taste and thick texture. Yes, you can make it a day in advance. Just store it in the fridge. The layers will set well, and the flavors will blend. It makes for a perfect dessert for parties. To check if the cake is done, insert a toothpick into the center. If it comes out clean or with a few moist crumbs, the cake is ready. Avoid overbaking to keep it moist. You can get creative with decorations. Try fresh berries, mint leaves, or chocolate shavings. A drizzle of caramel or chocolate sauce also adds a nice touch. The goal is to make it look as good as it tastes. Look for local bakeries that specialize in gourmet cakes. Online options also exist, so check delivery services. You can find many great options if you search for "Triple Chocolate Mousse Cake" nearby. In this post, I shared how to make a delicious Triple Chocolate Mousse Cake. We covered ingredients for the cake and mousse. I provided clear steps for preparing and assembling the dessert. Tips help you avoid common mistakes, and I offered storage info for leftovers. As you create your cake, remember to enjoy the rich flavors. Experiment with variations to suit your taste. You’ll impress anyone who tries it!

Triple Chocolate Mousse Cake Rich and Decadent Delight

Indulging in a rich Triple Chocolate Mousse Cake is one of life’s greatest joys. This dessert combines layers of chocolate

To make creamy Cajun shrimp pasta, gather these key ingredients: - 8 oz fettuccine or linguine pasta - 1 lb large shrimp, peeled and deveined - 2 tablespoons Cajun seasoning - 2 tablespoons olive oil - 1 medium onion, finely chopped - 3 cloves garlic, minced - 1 cup heavy cream - 1 cup chicken broth - 1 cup cherry tomatoes, halved - 1 cup grated parmesan cheese - Salt and pepper to taste - Fresh parsley, chopped for garnish You can easily swap some ingredients based on what you have: - Use any pasta type like penne or spaghetti instead of fettuccine. - For a lighter option, try using half-and-half instead of heavy cream. - If you don’t have shrimp, chicken or tofu works well too. - Instead of fresh parsley, you can use basil for a different taste. Using high-quality ingredients can boost the taste of your dish: - Fresh shrimp gives the best flavor. Look for firm, pink shrimp. - Use real Parmesan cheese, not pre-grated, for a richer taste. - Choose high-grade olive oil for cooking and drizzling. - Fresh garlic and onions add great depth to the sauce. For the full recipe, check out the details above. To start, bring a large pot of water to a boil. Add a generous amount of salt to the water. This will help flavor the pasta. I recommend using fettuccine or linguine here. Cook the pasta according to the package instructions until it’s al dente. This usually takes about 8-10 minutes. Once cooked, drain the pasta in a colander. Don’t forget to save 1 cup of that pasta water. This water is starchy and will help bind your sauce later. Set the pasta aside while you prepare the shrimp. Next, grab a mixing bowl and add your peeled and deveined shrimp. Sprinkle about 2 tablespoons of Cajun seasoning over the shrimp. Toss them well to coat every piece evenly with the spice mix. This adds a bold flavor. In a large skillet, heat 2 tablespoons of olive oil over medium-high heat. Once it’s hot, add the shrimp in a single layer. Sauté them for 2-3 minutes on each side. You want them to turn pink and opaque. Once done, transfer the shrimp to a plate, keeping them warm. In the same skillet, you’ll use the leftover oil and flavors. Add a finely chopped onion and 3 minced garlic cloves. Sauté these for about 2-3 minutes until the onion is soft and the garlic is fragrant. This step builds a great base for your sauce. Reduce the heat to medium-low. Carefully pour in 1 cup of chicken broth and 1 cup of heavy cream. Stir well to combine. Let the mixture simmer gently for about 5 minutes. This will thicken the sauce. Next, add 1 cup of halved cherry tomatoes and 1 cup of grated parmesan cheese. Stir until the cheese melts into the sauce. If it gets too thick, add a splash of the reserved pasta water. Finally, mix in your cooked pasta and sautéed shrimp. Toss gently to coat everything in the creamy sauce. Season with salt and pepper to taste. For the full recipe, check out the detailed instructions provided. Enjoy your cooking! To get that perfect creamy texture, start with heavy cream. It adds richness and smoothness. When you mix in the cheese, do it slowly. Stir until it melts completely. If your sauce is too thick, add a bit of the reserved pasta water. This will help loosen the sauce and keep it creamy. Cajun seasoning can be strong. Use just enough to coat the shrimp well but not too much. Taste is key! Start with two tablespoons, then adjust based on your liking. You can also add more garlic or a pinch of cayenne for extra heat. Finding that right balance makes the dish shine. To save time, cook your pasta while you prepare the sauce. This way, both will be ready at the same time. You can also chop your onion and garlic ahead of time. Keeping your workspace organized helps you move fast. Prepping in advance makes cooking fun and less stressful. For the full recipe, check out the complete guide to this dish! {{image_4}} To spice things up, you can add more heat. Use extra Cajun seasoning or a pinch of cayenne pepper. This brings a bold kick to the dish. You can also toss in sliced jalapeños while cooking the shrimp. They add flavor and heat, perfect for spicy lovers. If you want a meatless dish, replace the shrimp with vegetables. Try bell peppers, zucchini, or mushrooms. These veggies add texture and taste. You can also use tofu or tempeh for protein. Season them just like the shrimp for a flavorful bite. This makes the dish light yet satisfying. Adding spinach is a great way to boost nutrition. Toss in fresh spinach leaves just before serving. The heat will wilt the spinach, keeping it bright and fresh. This not only adds color, but it also gives a nice flavor. You can mix it in with the pasta and sauce for a creamy, delicious finish. For more ideas and details, check out the Full Recipe. After you enjoy your creamy Cajun shrimp pasta, store any leftovers right away. Use an airtight container to keep the dish fresh. Let the pasta cool to room temperature before sealing. This helps avoid moisture buildup, which can lead to soggy pasta. The dish will stay good in the fridge for up to three days. To reheat your pasta, use the stovetop or microwave. If you choose the stovetop, add a splash of water or broth to keep it creamy. Heat on medium-low until warmed through. If using the microwave, place the pasta in a microwave-safe bowl. Cover it with a damp paper towel and heat in 30-second intervals. Stir between each interval until hot. You can freeze creamy Cajun shrimp pasta for easy meals later. First, let it cool completely. Then, pack it into freezer-safe bags or containers. Remove any excess air to prevent freezer burn. This dish can last in the freezer for up to three months. When you're ready to eat, thaw it overnight in the fridge and reheat using the methods above. For the best taste, enjoy it fresh! For the full recipe, check the full recipe section. If you lack Cajun seasoning, you can mix your own. Combine paprika, garlic powder, onion powder, thyme, oregano, and cayenne pepper. Aim for about 1 tablespoon of paprika, 1 teaspoon of garlic powder, and a pinch of cayenne for heat. Adjust to your taste. This mix gives a similar kick and flavor. To make this dish gluten-free, swap the fettuccine or linguine for gluten-free pasta. Many brands offer great options made from rice or corn. Cook it just like regular pasta. Check the cooking time on the package. The rest of the recipe stays the same, so you can enjoy the creamy goodness! Yes, you can make this recipe in advance. Cook the pasta and shrimp, then store them separately. For the best taste, keep the sauce in another container. When you're ready to eat, reheat the sauce and combine all the parts. This keeps everything fresh and tasty. Try to eat it within 2-3 days for the best flavor. For the full recipe, check the link above. This blog post covered everything you need to know about making creamy Cajun shrimp pasta. We explored the best ingredients, step-by-step cooking instructions, useful tips, and tasty variations. Remember, you can adjust flavors and make it your own. Proper storage and reheating help keep leftovers fresh and delicious. Don’t forget to try the different variations to suit your taste. With these insights, you can create a dish that impresses everyone. Happy cooking!

Creamy Cajun Shrimp Pasta Flavorful and Easy Recipe

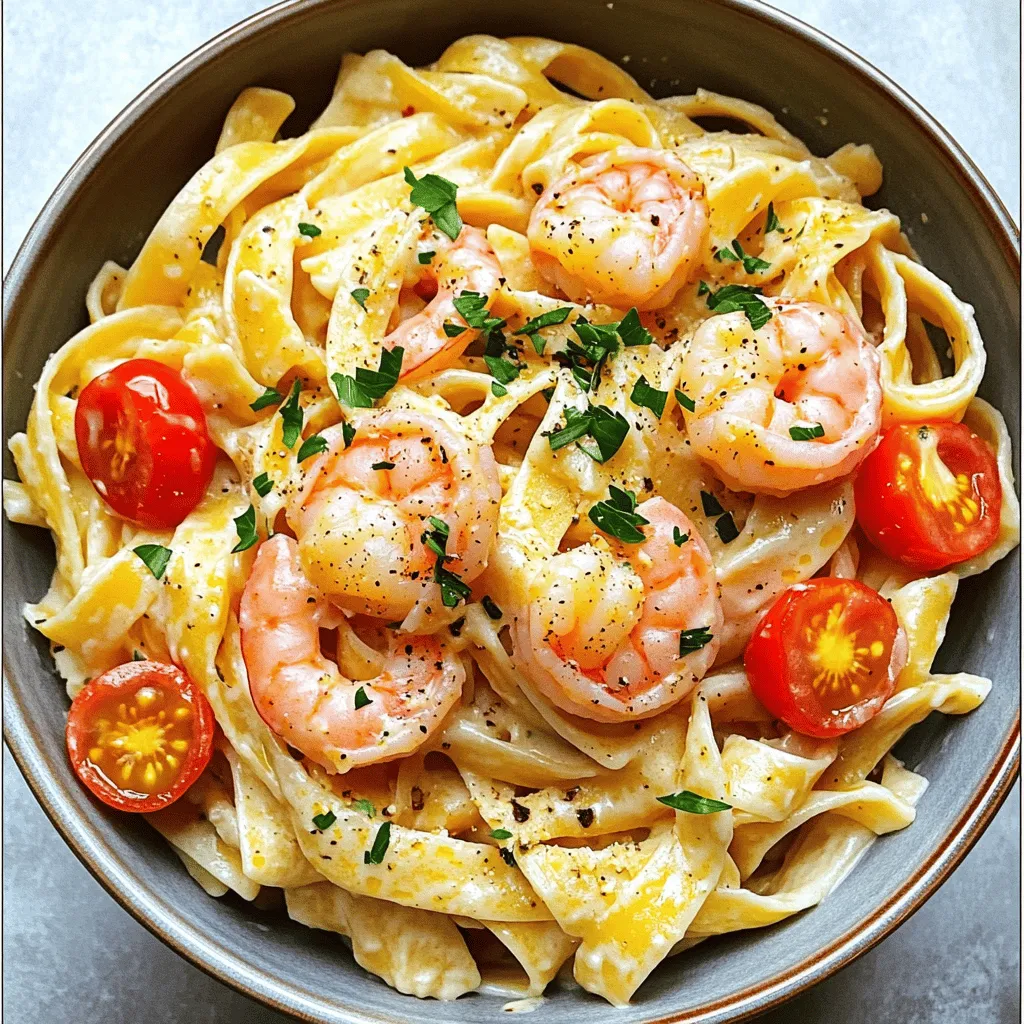
Craving a dish that’s both creamy and packed with flavor? Let me introduce you to my Creamy Cajun Shrimp Pasta!

To make Cheesy Garlic Butter Linguine, you need a few simple ingredients. Here’s what you will need: - 8 oz linguine pasta - 4 tablespoons unsalted butter - 4 cloves garlic, minced - 1 cup heavy cream - 1 cup grated Parmesan cheese - 1 cup shredded mozzarella cheese - 1 teaspoon red pepper flakes (optional) - Salt and freshly ground black pepper to taste - Fresh parsley, finely chopped (for garnish) These ingredients come together to create a rich and creamy dish. The linguine pasta serves as the perfect base, while the butter and garlic give it a lovely flavor. The heavy cream, Parmesan, and mozzarella melt into a smooth sauce that clings to the pasta. You can add red pepper flakes for a little kick, but it’s up to you. Finally, don’t forget the fresh parsley; it brightens the dish and adds color. You can find the full recipe for Cheesy Garlic Butter Linguine [here](#). To start, you need a big pot. Fill it with 4-5 quarts of water. Add salt to taste. Bring it to a rolling boil. This step is key for good pasta. Once the water is boiling, add 8 oz of linguine. Cook it for 8-10 minutes for al dente. Stir occasionally to avoid sticking. When it's done, drain it in a colander. Remember to save 1/2 cup of that starchy pasta water. This water helps the sauce later. Next, grab a large skillet. Place it on medium heat. Add 4 tablespoons of unsalted butter. Let it melt completely. The butter will start to foam, and that’s good. Now, add 4 cloves of minced garlic. Sauté it for about 1-2 minutes. Stir it often to keep it from burning. You want the garlic to smell amazing and turn slight golden. Once the garlic is ready, pour in 1 cup of heavy cream. Stir well to mix it with the butter and garlic. Let it simmer for 2-3 minutes. This step warms the cream nicely. Now, add in 1 cup of grated Parmesan cheese and 1 cup of shredded mozzarella cheese. Keep stirring until all the cheese melts. The sauce should become rich and creamy. Time to combine! Add the drained linguine to the skillet. Gently toss to coat every strand with sauce. If the sauce feels too thick, use that reserved pasta water. Add it a tablespoon at a time until you like the creaminess. For a little kick, stir in 1 teaspoon of red pepper flakes if you want. Season your dish with salt and freshly ground black pepper. Mix well to ensure every bite is tasty. To serve, place the cheesy garlic butter linguine on warm plates. Garnish with finely chopped fresh parsley. This adds color and freshness to your dish. Enjoy every delicious bite! For the full recipe, check out the details above. To melt cheese without clumping, keep the heat low. Add cheese slowly and stir constantly. This helps it blend smoothly into the sauce. If the sauce feels too thick, add a splash of reserved pasta water. You can adjust flavors by adding more salt or pepper to suit your taste. Look for signs of perfectly al dente linguine. The pasta should be firm but not hard. It should have a slight bite when you chew it. Timing is key; start checking a minute or two before the package time ends. This way, you get the perfect texture every time. For variety, consider adding extra ingredients. Cooked chicken or shrimp can make this dish heartier. You can also add seasonal veggies like spinach or cherry tomatoes for a fresh twist. Fresh herbs, like parsley or basil, make great garnishes. They add a pop of color and a burst of flavor, making your dish look and taste amazing. {{image_4}} You can easily boost the nutrition of cheesy garlic butter linguine by adding protein. Chicken or shrimp are great choices. - For Chicken: Cook bite-sized pieces in the skillet before adding garlic. This adds flavor and makes the dish heartier. - For Shrimp: Sauté shrimp in the garlic butter until they turn pink. This adds a fresh taste and pairs well with the creaminess. If you prefer plant-based options, try adding chickpeas or tofu. Both options soak up flavors well and add texture. Adding vegetables not only enhances the taste but also adds nutrition. You can use seasonal veggies to keep it fresh. - Spinach: Mix in fresh spinach toward the end of cooking. It wilts nicely and adds color. - Cherry Tomatoes: Toss in halved cherry tomatoes for a burst of sweetness. Pairing veggies with the dish provides vitamins and minerals. You can use broccoli or zucchini for extra crunch. While Parmesan and mozzarella are classic choices, you can experiment with different cheeses. - Cheddar: Try sharp cheddar for a bolder flavor. It melts well and adds a rich taste. - Goat Cheese: This cheese offers a tangy twist. It creates a creamy texture that complements the dish. If you're looking for dairy-free options, consider cashew cream or nutritional yeast. They give a creamy feel without the dairy. To store your cheesy garlic butter linguine, let it cool first. Place it in an airtight container. Try to use it within three days. It stays fresh in the fridge for up to three days. This way, you can enjoy the creamy goodness later! To reheat your pasta, use a skillet over low heat. Add a splash of water or cream to keep it moist. Stir gently until hot. This helps avoid dried out pasta. You want it creamy and delicious, just like when you first made it! If you want to freeze it, put the cooled linguine in a freezer-safe bag. Squeeze out air to prevent freezer burn. It keeps well for up to three months. When ready to eat, thaw it overnight in the fridge. Reheat as mentioned before for the best results! Yes, you can make this dish ahead of time. Cook the pasta and sauce separately. Store them in airtight containers. When you are ready to serve, simply reheat the sauce and add the pasta. If the sauce is too thick, add a bit of water or broth. This way, you keep the meal fresh and tasty. If you want a lighter option, use half-and-half or whole milk. For a dairy-free choice, try coconut milk or cashew cream. Each of these options will change the flavor slightly, but they keep the dish creamy. Yes, this recipe is suitable for vegetarians. It uses cheese and butter, which are vegetarian-friendly. Just be sure to check the labels on your cheeses to avoid any animal rennet. To add spice, include red pepper flakes or chopped fresh chili peppers. You can also use a dash of hot sauce while cooking. Adjust the amount based on your spice preference. Start small and taste as you go. You can use several pasta types instead of linguine. Good options include fettuccine, spaghetti, or even penne. Each pasta will give a different texture but will still taste great with the garlic butter sauce. This blog post covered a delicious creamy garlic butter linguine recipe. You learned the key ingredients, from linguine to fresh parsley. I shared step-by-step instructions to ensure perfect pasta and sauce. Tips for enhancing flavor and storage advice help you enjoy leftovers. Feel free to make variations with proteins, veggies, and cheeses. This dish is easy to adapt and customize. Enjoy your creamy linguine as a go-to meal for any occasion!

Cheesy Garlic Butter Linguine Flavorful and Simple Dish

Are you ready to elevate your dinner game? This Cheesy Garlic Butter Linguine is both flavorful and simple to make.

- Crusty Italian bread - 1 cup cream cheese, softened - 1 cup sour cream - 1 cup shredded mozzarella cheese - 1/2 cup grated Parmesan cheese - 4 cloves garlic, finely minced - 1 teaspoon dried oregano - 1 teaspoon dried basil - Salt and pepper, to taste - 2 tablespoons fresh parsley, finely chopped (for garnish) To make Baked Garlic Bread Dip, you need a few key ingredients. The crusty Italian bread serves as your base, creating a warm, inviting vessel for the dip. Cream cheese and sour cream form a creamy blend that holds the flavors together. Mozzarella and Parmesan add richness and a cheesy texture. Garlic, oregano, and basil bring in that classic Italian taste. Lastly, a sprinkle of parsley adds color and freshness. - Instead of cream cheese, you can use Greek yogurt for tang. - If you want a dairy-free option, try using cashew cream or tofu. - For gluten-free choices, look for gluten-free Italian bread or use vegetable slices. If you don’t have cream cheese, Greek yogurt works well. It gives a tangy taste and creamy texture. For a dairy-free dip, cashew cream is a great option. You can easily make cashew cream by blending soaked cashews with a bit of water. If you’re gluten-free, you can use gluten-free bread or even veggie slices, like zucchini or eggplant, as a fun twist. When you use these substitutions, you can still enjoy this delicious dip without missing out on flavor. Each option allows you to cater to different diets while keeping the essence of the recipe. Feel free to mix and match based on your needs! 1. Preheat the oven: Set your oven to 375°F (190°C). This gives the dip a nice golden color while baking. 2. Prepare the bread: Slice the crusty Italian bread in half lengthwise. Carefully scoop out some of the inside, making shallow wells. Place the bread halves on a baking sheet, cut side up. 3. Mix the dip ingredients: In a large bowl, combine 1 cup of softened cream cheese, 1 cup of sour cream, 1 cup of shredded mozzarella, and 1/2 cup of grated Parmesan cheese. Add 4 minced garlic cloves, 1 teaspoon of dried oregano, and 1 teaspoon of dried basil. Season with salt and pepper to your taste. Mix until creamy. 1. Fill the bread wells: Use a spoon to fill each bread well with the creamy dip mixture. Be generous so every bite is flavorful. 2. Baking time and temperature: Place the baking sheet in your preheated oven. Bake for 20-25 minutes, or until the dip is bubbly and golden brown on top. 1. How to serve the baked dip: Serve the dip right in the bread halves. This adds a rustic touch and makes it easy for guests to dip. 2. Tips for presentation and dipping accompaniments: Display the dip on a wooden board. Serve with the scooped-out bread pieces, cut into small chunks for easy dipping. For a special touch, add a small bowl of herb-infused olive oil on the side. For the full recipe, check out the details above. Enjoy this savory and comforting treat! To make your baked garlic bread dip even better, try adding spices. A pinch of red pepper flakes gives it a nice kick. You can also use smoked paprika for a smoky taste. For a touch of sweetness, consider adding a dash of garlic powder. Adding different cheeses can boost flavor too. Cream cheese makes it rich, while mozzarella adds stretch. Try using gouda or cheddar for a stronger flavor. Mixing cheeses creates a unique taste. Experiment and find what you love. One common mistake is burning the dip. To avoid this, keep an eye on it while baking. If the top browns too fast, cover it with foil. This protects it while it cooks through. Another tip is to ensure a creamy texture. If your dip is too thick, add a bit of milk. This helps it stay smooth. Mix well to combine all ingredients fully before baking. For baking, use a sturdy baking sheet. A shallow pan keeps the dip from spilling. You can also use an oven-safe dish for easier serving. When mixing, a sturdy spatula works well. If you want a smoother dip, an electric mixer can help. Make sure all ingredients blend together nicely. This makes the dip creamy and delicious. {{image_4}} You can easily switch up the flavors in your baked garlic bread dip. One tasty option is to add spinach or artichoke. These greens not only boost nutrition but also give a fresh taste. Simply chop a cup of fresh spinach or one can of artichokes and mix them into the creamy dip. You can even use both for extra flavor! Another fun way to change the dip is by adding different herbs. Fresh herbs like rosemary or thyme can bring a nice twist. You can also try using herbs like dill or chives for a unique taste. Just chop about one tablespoon and stir them into your mix for a hint of brightness. If you want a vegan baked garlic bread dip, you can make simple swaps. Use vegan cream cheese and dairy-free sour cream. These options still provide that creamy texture. For the cheese, try using a blend of nutritional yeast and vegan mozzarella. This keeps the taste rich and satisfying. For those following a low-carb or keto diet, you can also adapt this recipe. Instead of bread, use bell peppers or zucchini slices for dipping. You can also replace the cream cheese with a nut-based cream. This makes a delightful, keto-friendly option full of flavor without the carbs. To keep your baked garlic bread dip fresh, refrigeration is key. Allow the dip to cool before storing. Place any leftovers in an airtight container. This helps prevent moisture loss and keeps the dip tasty. Make sure to cover it well to avoid odors from the fridge. You can store it for up to three days. When it's time to enjoy leftovers, reheating is simple. The best method is using the oven. Preheat it to 350°F (175°C). Transfer the dip to an oven-safe dish. Cover it with foil to keep it moist. Bake for about 15 minutes or until warmed through. This method keeps the flavors and texture intact. You can also use the microwave, but be careful not to overheat it. Heat in short bursts and stir in between for even warming. Enjoy your creamy dip just like the first time! Yes, you can prepare this dip ahead. Mix all the ingredients and place them into the bread. Cover it well with plastic wrap and store it in the fridge. You can keep it for about 24 hours. When you are ready to bake, take it out and let it sit at room temperature for 15 minutes. This helps it bake evenly. For a party, serve this dip in the bread halves. Cut the bread into pieces for easy dipping. Aim for about 4 to 6 servings. You can also add a few small bowls of extra toppings, like olive oil or fresh herbs. These add a nice touch for your guests. Yes, you can freeze baked garlic bread dip. After baking, let it cool completely. Wrap the bread tightly in foil or plastic wrap. Store it in the freezer for up to three months. To thaw, move it to the fridge overnight. Reheat it in the oven at 350°F (175°C) until warm. The best bread for this recipe is a crusty Italian loaf. It holds the dip well. You can also use French bread or sourdough. These breads have a nice texture and flavor. Avoid soft breads, as they may not hold up. If you want a twist, try a garlic bread loaf for extra flavor. This blog post covered a great baked garlic bread dip recipe. You learned about the ingredients, including essential cheese and bread types. We explored substitutions for dietary needs and shared easy preparation and baking steps. I included helpful tips to enhance flavor while avoiding common mistakes. Lastly, we discussed storage and reheating methods. This dip can fit into any gathering with its delicious flavors. Feel free to get creative with variations and enjoy every bite!

Baked Garlic Bread Dip Savory and Comforting Treat

Looking for a warm, tasty dip that brings comfort to any gathering? Try my Baked Garlic Bread Dip! This creamy

Older posts
Page1 Page2 … Page26 Next →

dsad

© 2025 mealinmoments • Built with GeneratePress

Our Policies

  • Copyright Policy
  • Cookie Policy
  • GDPR Policy
  • Privacy Policy
  • Disclaimer
  • Terms Of Use

More Information

  • Home
  • About
  • Contact
  • Appetizers
  • Dessert
  • Dinner
  • Drinks
©2025, mealinmoments About Back To Top